Category: sql

  • Khóa học miễn phí SQL – Auto Increment nhận dự án làm có lương

    SQL – Auto Increment

    Table of content


    The SQL Auto Increment is used to automatically add unique sequential values into a column of a table.

    We usually define the Auto Increment on a column while creating a table. And when we insert new records into the table, the unique values are added to them.

    When we use Auto Increment on a table column, there is no need to insert NOT NULL values to that column. If we provide such values, they will overwrite the unique identities and the increment will be continued (only) on the NULL values (if any); causing ambiguity on the data.

    Different RDBMS support the Auto Increment feature in different ways.

    Auto Increment in MySQL

    In MySQL, you can add the auto-increment feature to a column of a table using the attribute named AUTO_INCREMENT.

    By default, when we define the AUTO_INCREMENT attribute on a column, the unique values are generated from “1”; and for each new record we enter into the table, the values in the column will increment by 1. Thus, the first record inserted will have a value of 1, the second record will have a value of 2, and so on.

    Syntax

    Following is the syntax to add AUTO_INCREMENT attribute to a column of a table in MySQL −

    CREATE TABLE table_name(
       column1 datatype AUTO_INCREMENT,
       column2 datatype,
       column3 datatype,
       .....
       columnN datatype
    );
    

    Example

    In the query to we are creating a table named CUSTOMERS and adding the AUTO_INCREMENT to the column named ID −

    CREATE TABLE CUSTOMERS(
       ID INT PRIMARY KEY AUTO_INCREMENT,
       NAME VARCHAR (20) NOT NULL,
       AGE INT NOT NULL,
       ADDRESS CHAR (25),
       SALARY DECIMAL (18, 2)
    );
    

    Now, let us insert values into the CUSTOMERS table using the INSERT statement −

    INSERT INTO CUSTOMERS (NAME, AGE, ADDRESS, SALARY) VALUES
    ("Ramesh", 32, "Ahmedabad", 2000.00),
    ("Khilan", 25, "Delhi", 1500.00),
    ("Kaushik", 23, "Kota", 2000.00),
    ("Chaitali", 25, "Mumbai", 6500.00);
    

    Verification

    To verify this, you need to retrieve the contents of the CUSTOMERS using the SELECT query as −

    SELECT * FROM CUSTOMERS;
    

    Output

    Following is the output of the above query, here you can observe that the ID values are generated automatically −

    ID NAME AGE ADDRESS SALARY
    1 Ramesh 32 Ahmedabad 2000.00
    2 Khilan 25 Delhi 1500.00
    3 Kaushik 23 Kota 2000.00
    4 Chaitali 25 Mumbai 6500.00

    AUTO_INCREMENT on Existing Columns

    MySQL also allows you to implement the AUTO_INCREMENT attribute on an existing table, using the ALTER TABLE statement.

    Following query starts incrementing the ID values from 5 in the CUSTOMERS table CUSTOMERS −

    ALTER TABLE CUSTOMERS AUTO_INCREMENT = 100;
    

    Now, let us insert more records to see if the ID values are auto incremented.

    INSERT INTO CUSTOMERS(NAME, AGE, ADDRESS, SALARY) VALUES
    ("Hardik", 27, "Bhopal", 8500.00),
    ("Komal", 22, "MP", 4500.00),
    ("Muffy", 24, "Indore", 10000.00);
    

    To view the above table data, we use the following SELECT query −

    SELECT * FROM CUSTOMERS;
    

    Output

    The output of the above query is shown below. It shows the auto increment in action. We are getting the ID values of the newly inserted records begins at 100.

    ID NAME AGE ADDRESS SALARY
    1 Ramesh 32 Ahmedabad 2000.00
    2 Khilan 25 Delhi 1500.00
    3 Kaushik 23 Kota 2000.00
    4 Chaitali 25 Mumbai 6500.00
    100 Hardik 27 Bhopal 8500.00
    101 Komal 22 Hyderabad 4500.00
    102 Muffy 24 Indore 10000.00

    Auto Increment in SQL Server

    In SQL Server, there is no direct command/query to perform Auto Increment. Instead, we use the IDENTITY() property. This property works similar to the AUTO_INCREMENT attribute in MySQL. It generates unique, sequential numbers automatically and it is mostly used on the PRIMARY KEY constraint.

    Syntax

    Following is the basic syntax of IDENTITY() property in SQL Server −

    CREATE TABLE table_name (
       column1 datatype IDENTITY [(seed, increment)],
       column2 datatype,
       column3 datatype,
       .....
       columnN datatype
    );
    

    This property accepts two parameters. The same are described below:

    • seed: It sets the starting value for the auto-incrementing column.
    • increment: It specifies how much the value increases by for each new row.

    Example

    In the following example, we are using the IDENTITY() property on the ID column of table named CUSTOMERS −

    CREATE TABLE CUSTOMERS(
       ID INT PRIMARY KEY IDENTITY(1,1),
       NAME VARCHAR (20) NOT NULL,
       AGE INT NOT NULL,
       ADDRESS CHAR (25),
       SALARY DECIMAL (18, 2)
    );
    

    After creating the table, we are inserting some records using the following query −

    INSERT INTO CUSTOMERS(NAME, AGE, ADDRESS, SALARY) VALUES
    (''Ramesh'', 32, ''Ahmedabad'', 2000.00),
    (''Khilan'', 25, ''Delhi'', 1500.00),
    (''Kaushik'', 23, ''Kota'', 2000.00),
    (''Chaitali'', 25, ''Mumbai'', 6500.00);
    

    To view the table data, we use the following SELECT query −

    SELECT * FROM CUSTOMERS;
    

    Output

    Following is an output of the above query, where ID values are generated automatically −

    ID NAME AGE ADDRESS SALARY
    1 Ramesh 32 Ahmedabad 2000.00
    2 Khilan 25 Delhi 1500.00
    3 Kaushik 23 Kota 2000.00
    4 Chaitali 25 Mumbai 6500.00

    Khóa học lập trình tại Toidayhoc vừa học vừa làm dự án vừa nhận lương: Khóa học lập trình nhận lương tại trung tâm Toidayhoc

  • Khóa học miễn phí SQL – Cursors nhận dự án làm có lương

    SQL – Cursors

    Table of content


    A database cursor solves the problem of impedance mismatch. It acts as a filter between the result of a SQL query and the statements that process this result.

    Cursors in SQL

    A Cursor is a temporary memory that is allocated by the database server at the time of performing the Data Manipulation Language operations on a table, such as INSERT, UPDATE and DELETE etc. It is used to retrieve and manipulate data stored in the SQL table.

    In MySQL, you cannot declare a cursor directly outside of a stored procedure or function. Cursors are generally declared within stored procedures, functions, or blocks of SQL code in MySQL database.

    Using cursors, we can perform multiple operations on each row of a result set, with or without returning the original data.

    Properties of Cursors

    Following are the properties of MySQL Cursors −

    • READ ONLY − We cannot update or modify any records in the table using the MySQL cursors. We can just fetch and process data from a table.

    • Non-Scrollable − We can retrieve records from a table in a single direction, i.e. from the first record or the last. We cannot move backward or jump to a specific position within the result set.

    • Asensitive Cursor − An asensitive cursor operates directly on the actual data in the database, it does not create a copy of the data. If any change is made to the data by other connections, it can affect the data that the cursor is working with.

    In addition to the Asensitive cursor there is another type known as Insensitive Cursor. An insensitive cursor uses a temporary copy of the data. Therefore, these cursors are insensitive (not affected) to the changes that are made in the table.

    Life Cycle of the Cursor

    There are four steps to manage these cursors. Following diagram illustrates the lifecycle of an SQL cursor −

    Cursor Lifecycle

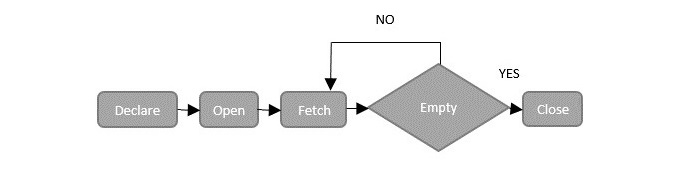
    Now, let us discuss the phases of life cycle of the cursor one-by-one.

    Declare Cursor Statement

    In MySQL we can declare a cursor using the DECLARE statement and associate it with a SELECT statement to retrieve records from a database table.

    However, this SELECT statement associated with a cursor does not use the INTO clause, as it”s purpose is to fetch and process rows rather than assigning values to variables.

    Syntax

    Following is the syntax to declare a cursor in MySQL database −

    DECLARE cursor_name CURSOR FOR select_statement;
    

    Open Cursor Statement

    After declaring a cursor in MySQL, the next step is to open the cursor using the OPEN statement. It initializes the result-set, allowing us to fetch and process rows from the associated SELECT statement in the cursor.

    Syntax

    Following is the syntax to open a cursor in MySQL database −

    OPEN cursor_name;
    

    Fetch Cursor Statement

    Then, we can use the FETCH statement to retrieve the current row pointed by the cursor, and with each FETCH, the cursor moves to the next row in the result set. This allows us to process each row one by one.

    Syntax

    Following is the syntax to fetch a cursor in MySQL database −

    FETCH cursor_name INTO variable_list;
    

    Close Cursor Statement

    Once all the rows are fetched, we must close the cursor to release the memory associated with it. We can do this using the CLOSE statement.

    Syntax

    Following is the syntax to close a cursor in MySQL database −

    CLOSE cursor_name;
    

    Example

    In this example, let us see how to manage a cursor in a stored procedure.

    Assume we have created a table with the name CUSTOMERS using the CREATE TABLE statement as follows −

    CREATE TABLE CUSTOMERS (
       ID INT NOT NULL,
       NAME VARCHAR (20) NOT NULL,
       AGE INT NOT NULL,
       ADDRESS CHAR (25),
       SALARY DECIMAL (18, 2),
       PRIMARY KEY (ID)
    );
    

    Now, let us insert some records into the CUSTOMERS table using the INSERT statement as follows −

    INSERT INTO CUSTOMERS VALUES
    (1, ''Ramesh'', 32, ''Ahmedabad'', 2000.00 ),
    (2, ''Khilan'', 25, ''Delhi'', 1500.00 ),
    (3, ''Kaushik'', 23, ''Kota'', 2000.00 ),
    (4, ''Chaitali'', 25, ''Mumbai'', 6500.00 );
    

    Now, we will create a backup table named ”CUSTOMERS_BACKUP” to store customer data −

    CREATE TABLE CUSTOMERS_BACKUP (
       ID INT NOT NULL,
       NAME VARCHAR (20) NOT NULL,
       PRIMARY KEY (ID)
    );
    

    Here, we are creating a stored procedure named FetchCustomers to fetch customer names from the CUSTOMERS table and inserting them one by one into the BACKUP table. We are using a cursor to iterate through the rows and a handler to detect the end of the result-set, ensuring all names are processed −

    DELIMITER //
    CREATE PROCEDURE FetchCustomers()
    BEGIN
       DECLARE done INT DEFAULT FALSE;
       DECLARE customer_id INT;
       DECLARE customer_name VARCHAR(255);
       DECLARE auto_id INT;
    
       -- Declare cursor
       DECLARE MY_CURSOR CURSOR FOR
       SELECT id, name FROM CUSTOMERS;
    
       -- Declare exit handler
       DECLARE CONTINUE HANDLER FOR NOT FOUND SET done = TRUE;
    
       -- Open cursor
       OPEN MY_CURSOR;
    
       -- Fetch and insert rows
       read_loop: LOOP
          FETCH MY_CURSOR INTO customer_id, customer_name;
          IF done = 1 THEN
             LEAVE read_loop;
          END IF;
    
          -- Insert the fetched data into the backup table
          INSERT INTO customers_backup VALUES (customer_id, customer_name);
    
          -- Get the last auto-generated ID used in the insertion
          SET auto_id = LAST_INSERT_ID();
    
       END LOOP;
    
        -- Close cursor
        CLOSE MY_CURSOR;
    END //
    DELIMITER ;
    

    Once we create the procedure successfully, we can execute it using the CALL statement as shown below −

    CALL FetchCustomers();
    

    Verification

    You can verify the contents of the CUSTOMERS_BACKUP table using the SELECT statement as shown below −

    SELECT * FROM CUSTOMERS_BACKUP;
    

    The contents of the table would be −

    ID NAME
    1 Ramesh
    2 Khilan
    3 Kaushik
    4 Chaitali

    Khóa học lập trình tại Toidayhoc vừa học vừa làm dự án vừa nhận lương: Khóa học lập trình nhận lương tại trung tâm Toidayhoc

  • Khóa học miễn phí SQL – Common Table Expression nhận dự án làm có lương

    SQL – Common Table Expression (CTE)

    Table of content


    A Common Table Expression (CTE) can make it easier to manage and write complex queries by making them more readable and simple, like database views and derived tables. We can reuse or rewrite the query by breaking down the complex queries into simple blocks.

    The SQL Common Table Expression

    The WITH clause in MySQL is used to specify a Common Table Expression.

    A Common Table Expression (CTE) in SQL is a one-time result set, i.e. it is a temporary table that exists only during the execution of a single query. It allows us to work with data specifically within that query, such as using it in SELECT, UPDATE, INSERT, DELETE, CREATE, VIEW, OR MERGE statements.

    CTE is temporary because it cannot be stored anywhere for later use; once the query is executed, it is lost.

    The MySQL WITH Clause

    To specify common table expressions, we use WITH clause that consists of one or more comma-separated subclauses. Within each subclause, we can present a subquery that produces a result set and assigns a name to this subquery.

    You cannot use the WITH clause in MySQL versions before 8.0.

    Syntax

    Following is the syntax to create a CTE using WITH clause −

    WITH CTE_NAME (column_name) AS (query)
    SELECT * FROM CTE_NAME;
    

    Where,

    • CTE_NAME − It is the name assigned to the CTE.
    • column_name − It is the column names for the CTE, which can be useful for improving query readability.
    • query − It defines the CTE and it can be any valid SQL query.
    • After defining the CTE, you can reference it in subsequent queries within the same session.

    Example

    Assume we have created a table named CUSTOMERS in MySQL database using CREATE TABLE statement as shown below −

    CREATE TABLE CUSTOMERS (
       ID INT NOT NULL,
       NAME VARCHAR (20) NOT NULL,
       AGE INT NOT NULL,
       ADDRESS CHAR (25),
       SALARY DECIMAL (18, 2),
       PRIMARY KEY (ID)
    );
    

    Now, we are inserting some records into the above created table −

    INSERT INTO CUSTOMERS VALUES
    (1, ''Ramesh'', 32, ''Ahmedabad'', 2000.00 ),
    (2, ''Khilan'', 25, ''Delhi'', 1500.00 ),
    (3, ''Kaushik'', 23, ''Kota'', 2000.00 ),
    (4, ''Chaitali'', 25, ''Mumbai'', 6500.00 ),
    (5, ''Hardik'', 27, ''Bhopal'', 8500.00 ),
    (6, ''Komal'', 22, ''Hyderabad'', 4500.00 ),
    (7, ''Muffy'', 24, ''Indore'', 10000.00 );
    

    The table created is as shown below −

    ID NAME AGE ADDRESS SALARY
    1 Ramesh 32 Ahmedabad 2000.00
    2 Khilan 25 Delhi 1500.00
    3 Kaushik 23 Kota 2000.00
    4 Chaitali 25 Mumbai 6500.00
    5 Hardik 27 Bhopal 8500.00
    6 Komal 22 Hyderabad 4500.00
    7 Muffy 24 Indore 10000.00

    Here, we are creating a Common Table Expression (CTE) named CUSTOMER_AGE that selects all customers with an age of 23. We are then retrieving the ID, NAME, and AGE of these customers from the CTE.

    WITH CUSTOMER_AGE AS (
    SELECT * FROM customers WHERE AGE = 23)
    SELECT ID, NAME, AGE FROM CUSTOMER_AGE;
    

    Output

    Following is the output of the above query −

    ID NAME AGE
    3 Kaushik 23

    CTE from Multiple Tables

    We can also create a Common Table Expression (CTE) that combines data from multiple tables by using JOIN operations within the CTE”s subquery. To do this, we need to use the comma operator to separate each CTE definition, effectively merging them into a single statement.

    Syntax

    Following is the basic syntax for multiple Common Table Expression (CTE) −

    WITH
       CTE_NAME1 (column_name) AS (query),
       CTE_NAME2 (column_name) AS (query)
    SELECT * FROM CTE_NAME1
    UNION ALL
    SELECT * FROM CTE_NAME2;
    

    We can use multiple Common Table Expressions (CTEs) with various SQL operations, such as UNION, UNION ALL, JOIN, INTERSECT, or EXCEPT.

    Example

    In here, we are defining two CTEs namely ”CUSTOMERS_IN_DELHI” and ”CUSTOMERS_IN_MUMBAI” to segregate customers based on their addresses in Delhi and Mumbai. Then, we are using the UNION ALL operator to combine the results from both CTEs into a single result set, retrieving customer information from both cities.

    WITH
    CUSTOMERS_IN_DELHI AS (
       SELECT * FROM CUSTOMERS WHERE ADDRESS = ''Delhi''),
    CUSTOMERS_IN_MUMBAI AS (
       SELECT * FROM CUSTOMERS WHERE ADDRESS = ''Mumbai'')
    SELECT ID, NAME, ADDRESS FROM CUSTOMERS_IN_DELHI
    UNION ALL
    SELECT ID, NAME, ADDRESS FROM CUSTOMERS_IN_MUMBAI;
    

    Output

    Output of the above query is as shown below −

    ID NAME ADDRESS
    2 Khilan Delhi
    4 Chaitali Mumbai

    Recursive CTE

    A common table expression is a query that keeps referring back to its own result in a loop repeatedly until it returns an empty result.

    A recursive query continually iterates across a subset of the data during its execution, and defines itself in a self-referencing manner. This self-referencing mechanism allows it to repeatedly process and expand its results until a stopping condition is met.

    To make a CTE recursive, it must include a UNION ALL statement and provide a second definition of the query that utilizes the CTE itself. This allows the CTE to repeatedly reference to its own results, creating a recursive behaviour in the query.

    Example

    Now, we are using a recursive CTE named recursive_cust to retrieve data from the ”CUSTOMERS” table created above. Initially, we are selecting customers with salaries above 3000 and then recursively appending customers older than 25 to the result set using the UNION ALL operator −

    WITH recursive_cust (ID, NAME, ADDRESS, AGE) AS (
       SELECT ID, NAME, ADDRESS, AGE
       FROM CUSTOMERS
       WHERE SALARY > 3000
       UNION ALL
       SELECT ID, NAME, ADDRESS, AGE
       FROM CUSTOMERS
       WHERE AGE > 25
    )
    SELECT * FROM recursive_cust;
    

    Output

    When the above query is executed, all data from the customers table whose age is greater than 25 or salary is greater than 3000 will be displayed recursively as shown below −

    ID NAME ADDRESS AGE
    4 Chaitali Mumbai 25
    5 Hardik Bhopal 27
    6 Komal Hyderabad 22
    7 Muffy Indore 24
    1 Ramesh Ahmedabad 32
    5 Hardik Bhopal 27

    Example

    In the following query, we are using a recursive CTE named Numbers to generate and display numbers from 1 to 5. The recursive part continually adds 1 to the previous value until it reaches 5, creating a sequence −

    WITH RECURSIVE Numbers AS (
      SELECT 1 AS N
      UNION ALL
      SELECT N + 1 FROM Numbers WHERE N < 5
    )
    SELECT n FROM Numbers;
    

    Output

    After executing the above query, we get the following output −

    N
    1
    2
    3
    4
    5

    Advantages of CTE

    Following are the advantages of the CTE −

    • CTE makes the code maintenance easier.

    • It increases the readability of the code.

    • It increases the performance of the query.

    • CTE allows for the simple implementation of recursive queries.

    Disadvantages of CTE

    Following are the disadvantages of the CTE −

    • CTE can only be referenced once by the recursive member.

    • We cannot use the table variables and CTEs as parameters in a stored procedure.

    • A CTE can be used in place of a view, but a CTE cannot be nested while views can.


    Khóa học lập trình tại Toidayhoc vừa học vừa làm dự án vừa nhận lương: Khóa học lập trình nhận lương tại trung tâm Toidayhoc

  • Khóa học miễn phí SQL – Wildcards nhận dự án làm có lương

    SQL – Wildcards


    SQL Wildcards

    SQL Wildcards are special characters used as substitutes for one or more characters in a string. They are used with the LIKE operator in SQL, to search for specific patterns in character strings or compare various strings.

    The LIKE operator in SQL is case-sensitive, so it will only match strings that have the exact same case as the specified pattern.

    Following are the most commonly used wildcards in SQL −

    S.No. Wildcard & Description
    1

    The percent sign (%)

    Matches one or more characters.

    Note − MS Access uses the asterisk (*) wildcard character instead of the percent sign (%) wildcard character.

    2

    The underscore (_)

    Matches one character.

    Note − MS Access uses a question mark (?) instead of the underscore (_) to match any one character.

    The percent sign (%) represents zero, one, or multiple characters within a string. The underscore (_) represents a single character or number. These symbols can also be used in combination to perform complex pattern searching and matching in SQL queries.

    Syntax

    Following is the basic syntax to use wildcard characters −

    SELECT * FROM table_name
    WHERE column_name LIKE [wildcard_pattern];
    

    We can combine N number of conditions using the AND or the OR operators. Here, the [wildcard_pattern] can represent any numeric or string value.

    The following table demonstrates various ways of using wildcards in conjunction with the LIKE operator within a WHERE clause:

    S.No. Statement & Description
    1

    WHERE SALARY LIKE ”200%”

    Finds any values that start with 200.

    2

    WHERE SALARY LIKE ”%200%”

    Finds any values that have 200 in any position.

    3

    WHERE SALARY LIKE ”_00%”

    Finds any values that have 00 in the second and third positions.

    4

    WHERE SALARY LIKE ”2_%_%”

    Finds any values that start with 2 and are at least 3 characters in length.

    5

    WHERE SALARY LIKE ”%2”

    Finds any values that end with 2.

    6

    WHERE SALARY LIKE ”_2%3”

    Finds any values that have a 2 in the second position and end with a 3.

    7

    WHERE SALARY LIKE ”2___3”

    Finds any values in a five-digit number that start with 2 and end with 3.

    Example

    Firstly, let us create a table named CUSTOMERS using the following query −

    CREATE TABLE CUSTOMERS (
       ID INT NOT NULL,
       NAME VARCHAR (20) NOT NULL,
       AGE INT NOT NULL,
       ADDRESS CHAR (25),
       SALARY DECIMAL (18, 2),
       PRIMARY KEY (ID)
    );
    

    The following INSERT query adds records into the CUSTOMERS table −

    INSERT INTO CUSTOMERS VALUES
    (1, ''Ramesh'', 32, ''Ahmedabad'', 2000.00),
    (2, ''Khilan'', 25, ''Delhi'', 1500.00),
    (3, ''Kaushik'', 23, ''Kota'', 2000.00),
    (4, ''Chaitali'', 25, ''Mumbai'', 6500.00),
    (5, ''Hardik'', 27, ''Bhopal'', 8500.00),
    (6, ''Komal'', 22, ''Hyderabad'', 4500.00),
    (7, ''Muffy'', 24, ''Indore'', 10000.00);
    

    The table will be created as −

    ID NAME AGE ADDRESS SALARY
    1 Ramesh 32 Ahmedabad 2000.00
    2 Khilan 25 Delhi 1500.00
    3 Kaushik 23 Kota 2000.00
    4 Chaitali 25 Mumbai 6500.00
    5 Hardik 27 Bhopal 8500.00
    6 Komal 22 Hyderabad 4500.00
    7 Muffy 24 Indore 10000.00

    Here, we are displaying all the records from the CUSTOMERS table where the SALARY starts with 200.

    SELECT * FROM CUSTOMERS WHERE SALARY LIKE ''200%
    

    Output

    This would produce the following result.

    ID NAME AGE ADDRESS SALARY
    1 Ramesh 32 Ahmedabad 2000.00
    3 Kaushik 23 Kota 2000.00

    Khóa học lập trình tại Toidayhoc vừa học vừa làm dự án vừa nhận lương: Khóa học lập trình nhận lương tại trung tâm Toidayhoc

  • Khóa học miễn phí SQL – Min & Max nhận dự án làm có lương

    SQL – MIN() – MAX() function

    Table of content


    The MIN() and MAX() functions in SQL are aggregate functions. They are used to compare values in a set and, retrieve the maximum and minimum values respectively.

    An aggregate function is a mathematical computation that takes a range of values as input and yields a single value expression, representing the significance of the provided data.

    MAX() and MIN() aggregate functions are generally used in two ways:

    • As functions, they are used with the GROUP BY clause of the SELECT statement.

    • As expressions, they are used with a subquery and HAVING clause of SELECT statement.

    The SQL MAX() Function

    The MAX() function compares the values in a column and returns the largest value among them.

    Syntax

    Following is the syntax of SQL MAX() function −

    MAX(column_name);
    

    Example

    In the following example, we are running a query for MAX() function on a table named CUSTOMERS. The objective is to retrieve the maximum salary value from this table. First of all, let us create the CUSTOMERS table using the following query −

    CREATE TABLE CUSTOMERS (
       ID INT NOT NULL,
       NAME VARCHAR (20) NOT NULL,
       AGE INT NOT NULL,
       ADDRESS CHAR (25),
       SALARY DECIMAL (18, 2),
       PRIMARY KEY (ID)
    );
    

    Now, insert values into this table using the INSERT statement as follows −

    INSERT INTO CUSTOMERS VALUES
    (1, ''Ramesh'', 32, ''Ahmedabad'', 2000.00),
    (2, ''Khilan'', 25, ''Delhi'', 1500.00),
    (3, ''Kaushik'', 23, ''Kota'', 2000.00),
    (4, ''Chaitali'', 25, ''Mumbai'', 6500.00),
    (5, ''Hardik'', 27, ''Bhopal'', 8500.00),
    (6, ''Komal'', 22, ''Hyderabad'', 4500.00),
    (7, ''Muffy'', 24, ''Indore'', 10000.00);
    

    The CUSTOMERS table will be created as −

    ID NAME AGE ADDRESS SALARY
    1 Ramesh 32 Ahmedabad 2000.00
    2 Khilan 25 Delhi 1500.00
    3 Kaushik 23 Kota 2000.00
    4 Chaitali 25 Mumbai 6500.00
    5 Hardik 27 Bhopal 8500.00
    6 Komal 22 Hyderabad 4500.00
    7 Muffy 24 Indore 10000.00

    Here, we are comparing the salaries of CUSTOMERS and retrieving the maximum salary using the following query −

    SELECT MAX(SALARY) FROM CUSTOMERS;
    

    When the above query is executed, the result is displayed as −

    MAX(SALARY)
    10000.0000

    HAVING with MAX() Function

    In the following query, we are fetching the ID, NAME, and SALARY of the CUSTOMERS using the MAX() function along with HAVING clause.

    SELECT ID, NAME, SALARY
    FROM CUSTOMERS
    GROUP BY NAME, ID
    HAVING MAX(SALARY) < 8000;
    

    When the above query is executed, we get the details of the employees whose maximum salary is less than 8000 −

    ID NAME SALARY
    1 Ramesh 2000.00
    2 Khilan 1500.00
    3 Kaushik 2000.00
    4 Chaitali 6500.00
    6 Komal 4500.00

    MAX() Function in Subqueries

    In the following example, we are using the MAX() function in a subquery to retrieve the record with maximum salary, from the CUSTOMERS table.

    SELECT * FROM CUSTOMERS
    WHERE SALARY = (SELECT MAX(SALARY) FROM CUSTOMERS);
    

    When we execute the above query, we will get the following result −

    ID NAME AGE ADDRESS SALARY
    7 Muffy 24 Indore 10000.00

    MAX() Function with Strings

    This query retrieves the maximum value (alphabetically) among the names of customers in the CUSTOMERS table using the MAX() function −

    SELECT MAX(NAME) AS max_name FROM CUSTOMERS;
    

    Following is the result of the above query −

    max_name
    Ramesh

    Aliases with MAX() Function

    In the following example, we use the MAX() function to retrieve the record containing maximum age from the CUSTOMERS table. We are displaying the results as a new column with the alias “max_age”.

    SELECT MAX(age) AS ''max_age'' FROM CUSTOMERS;
    

    Following is the output of the above query −

    max_age
    32

    The SQL MIN() Function

    The MIN() function compares values in a column and returns the smallest value among them.

    Syntax

    Following is the syntax of SQL MIN() function −

    MIN(column_name);
    

    Example

    In this example, we are comparing values in the SALARY column of CUSTOMERS table and displaying the minimum salary using the following query −

    SELECT MIN(SALARY) FROM CUSTOMERS;
    

    When the above query is executed, the result is displayed as −

    MIN(SALARY)
    1500.0000

    HAVING with MIN() Function

    In the following query, we are fetching the ID, NAME, and SALARY of the CUSTOMERS using the MIN() function along with HAVING clause.

    SELECT ID, NAME, SALARY
    FROM CUSTOMERS
    GROUP BY NAME, ID
    HAVING MIN(SALARY) > 5000;
    

    When the above query is executed, we get the details of the maximum salary for employees whose minimum salary is more than 5000, as we can see in the table that follows −

    ID NAME MAX_Salary
    4 Chaitali 6500.0000
    5 Hardik 8500.0000
    7 Muffy 10000.0000

    MIN() Function in Subqueries

    In the following example, we are using the MIN() function in a subquery to retrieve the record with minimum salary, from the CUSTOMERS table.

    SELECT * FROM CUSTOMERS
    WHERE SALARY = (SELECT MIN(SALARY) FROM CUSTOMERS);
    

    When we execute the above query, we will get the following result −

    ID NAME AGE ADDRESS SALARY
    2 Khilan 25 Delhi 1500.00

    MIN() Function with Strings

    Following is the query to retrieve the minimum value (alphabetically) among the names of customers in the CUSTOMERS table using the MIN() function −

    SELECT MIN(NAME) AS min_first_name FROM CUSTOMERS;
    

    Following is the result of the above query −

    min_first_name
    Chaitali

    Aliases with MIN() Function

    Following is the SQL query that will fetch the minimum age from the CUSTOMERS table using the MIN() function −

    SELECT MIN(age) AS ''min_age'' FROM CUSTOMERS;
    

    When we execute the above query, the minimum value in the age field is displayed as shown below.

    min_age
    22

    Khóa học lập trình tại Toidayhoc vừa học vừa làm dự án vừa nhận lương: Khóa học lập trình nhận lương tại trung tâm Toidayhoc

  • Khóa học miễn phí SQL – Left Join vs Right Join nhận dự án làm có lương

    Left Join vs Right Join

    Table of content


    The main difference between the Left Join and Right Join can be observed in the way tables are joined.

    They are both types of Outer Joins; that is, they retain unmatched rows in one table and discard the unmatched rows of another. Left Join preserves the unmatched rows of left table while Right join preserves the unmatched rows of right table.

    Working of Left Join

    Left Join or Left Outer Join in SQL combines two or more tables, where the first table is returned as it is; but, only the record(s) that have counterparts in first table are returned from consequent tables.

    If the ON clause matches zero records in consequent tables with the rows in first table, left join will still return these rows of first table in the result, but with NULL in each column from the right table.

    Syntax

    Following is the basic syntax of Left Join in SQL −

    SELECT table1.column1, table2.column2...
    FROM table1
    LEFT JOIN table2
    ON table1.column_name = table2.column_name;
    

    Example

    The example below demonstrates the Left Join operation on two relative tables. Here, the first table contains the salary information while the second table contains marital status information. Since Alex”s status is unknown, it is not recorded in the table.

    Left Join Vs Right Join

    When both tables are joined using the Left Join query, since there is no record matching Alex”s Status, the value is recorded as NULL in the final table.

    Working of Right Join

    Right Join or Right Outer Join query in SQL returns all rows from the right table, even if there are no matches in the left table. This means that if the ON clause matches 0 (zero) records in left table with the records in right table; right join will still return the rows of right table in the result, but with a NULL value in each column of the left table.

    Syntax

    Following is the basic syntax of a Right Join in SQL −

    SELECT table1.column1, table2.column2...
    FROM table1
    RIGHT JOIN table2
    ON table1.column_name = table2.column_name;
    

    Example

    Now in this example, the Right Join operation is performed on the same tables. Here, we are starting the join from the right table; since, the right table does not contain the record value matching Alex”s row, the row is discarded from the final table.

    Left Join Vs Right Join

    The final table only consists of two rows as the right table consists of two rows only.

    Left Join Vs Right Join

    Let us summarize all the differences between the Left Join and Right Join in the table below −

    Left Join Right Join
    Left Join matches the data of the first table or the left table with the data in second table. If the data is matched, the records are combined; otherwise, NULL is recorded. Right Join matches the data of the second table or right table with the data in first table. If the data is matched, the records are combined; otherwise, NULL is recorded.
    If the first table has less rows than the second table, extra unmatched rows from the second table are discarded. If the second table has less rows than the first table, extra unmatched rows from the first table are discarded.
    This Join is also known as Left Outer Join This Join is also known as Right Outer Join
    *= is used in Transact SQL, instead of using the LEFT JOIN or LEFT OUTER JOIN query. =* is used in Transact SQL, instead of using the RIGHT JOIN or RIGHT OUTER JOIN query.

    As we can observe from the summary, there aren”t wide range of differences between the Left and Right joins. Every difference between them zeroes down to the way the tables are joined and the join point of view.


    Khóa học lập trình tại Toidayhoc vừa học vừa làm dự án vừa nhận lương: Khóa học lập trình nhận lương tại trung tâm Toidayhoc

  • Khóa học miễn phí SQL – Hosting nhận dự án làm có lương

    SQL – Hosting

    Table of content


    SQL Hosting

    SQL Hosting is nothing but a means to manage any RDBMS linked to your website using SQL. If the website has an access to a RDBMS, any data from the website you created will be stored and retrieved from this database.

    There are various SQL hosting plans available if your web server is hosted by an Internet Service Provider (ISP).

    Following are the most common SQL hosting databases −

    • MS SQL Server
    • Oracle
    • MySQL
    • MS Access

    MS SQL Server

    MS SQL Server is created and developed by Microsoft. It is compatible with both virtual and cloud servers. It is very efficient to use with database-driven websites having high traffic.

    MS SQL Server”s features include −

    • Maximum scalability and security
    • Integrated reporting capabilities
    • Easy to use
    • Powerful
    • Robust
    • Offers more diverse features while hosting

    Oracle

    Oracle is a popular database which is suitable to use with high-traffic websites. This database offers various features like,

    • Cost-effective product
    • High-performance
    • Converged, multi-model database management system
    • In-memory MySQL databases

    Oracle is also a very powerful, robust and full featured SQL database system.

    MySQL

    MySQL is one of the most popular RDBMS in the world used to store and manage data. It is compatible with any type of server, say cloud, virtual or dedicated. Features of MySQL are as follows −

    • Easy to use
    • High performance
    • Excellent security
    • Improved speed
    • Cost effective

    MS Access

    Microsoft Access is a very simple database which can be used for simple websites. MS Access is neither as powerful as MySQL, MS SQL Server or Oracle. Thus, it is not effective for websites with higher traffic.


    Khóa học lập trình tại Toidayhoc vừa học vừa làm dự án vừa nhận lương: Khóa học lập trình nhận lương tại trung tâm Toidayhoc

  • Khóa học miễn phí SQL – Foreign Key nhận dự án làm có lương

    SQL – Foreign Key

    Table of content


    The SQL Foreign Key

    In SQL, a Foreign Key is a column in one table that matches a Primary Key in another table, allowing the two tables to be connected together.

    A foreign key also maintains referential integrity between two tables, making it impossible to drop the table containing the primary key (preserving the connection between the tables).

    The foreign key can reference the unique fields of any table in the database. The table that has the primary key is known as the parent table and the key with the foreign key is known as the child table.

    Let”s consider an example scenario, assume we have two tables namely CUSTOMERS (ID, NAME, AGE, ADDRES, SALARY) and ORDERS (ID, DATE, CUSTOMER_ID, AMOUNT). Here the id of the customer is primary key (ID) in the CUSTOMERS table and foreign key in the ORDERS (CUSTOMER_ID) table observe the following diagram −

    foreign key

    Features of Foreign Key

    Following is the of features of Foreign Key −

    • A Foreign Key is used to reduce the redundancy (or duplicates) in the table.

    • It helps to normalize (or organize the data in a database) the data in multiple tables.

    Syntax

    Following is the basic syntax to add Foreign Key constraints on a column of a table in MySQL database −

    CREATE TABLE table_name (
        column1 datatype,
        column2 datatype,
        ...
        CONSTRAINT fk_name
    	FOREIGN KEY (column_name)
    	REFERENCES referenced_table(referenced_column)
    );
    

    Example

    Let us create two tables with the names CUSTOMERS and ORDERS. The following query creates a table with the name CUSTOMERS −

    CREATE TABLE CUSTOMERS(
       ID INT NOT NULL,
       NAME VARCHAR (20) NOT NULL,
       AGE INT NOT NULL,
       ADDRESS CHAR (25) ,
       SALARY DECIMAL (18, 2),
       PRIMARY KEY (ID)
    );
    

    Output

    Following is the output of the above SQL statement −

    Query OK, 0 rows affected (0.02 sec)
    

    Now, let us create the ORDERS table. While doing so, we add the foreign key constraint on column CUSTOMER_ID reference on column ID of the CUSTOMERS table as shown in the statement below −

    CREATE TABLE ORDERS (
       ID INT NOT NULL,
       DATE DATETIME,
       CUSTOMER_ID INT,
       CONSTRAINT FK_CUSTOMER
       FOREIGN KEY(CUSTOMER_ID)
       REFERENCES CUSTOMERS(ID),
       AMOUNT DECIMAL,
       PRIMARY KEY (ID)
    );
    

    Output

    The above statement produces the following output −

    Query OK, 0 rows affected (0.04 sec)
    

    Verification

    We have created a Foreign Key Constraint on a column named CUSTOMER_ID in the ORDERS table that references the column named ID of the CUSTOMERS table; so you can”t drop table1 (CUSTOMERS) before dropping the table2 (ORDERS).

    First of all, let”s drop the CUSTOMERS table without dropping the ORDERS table using the DROP TABLE statement −

    DROP TABLE CUSTOMERS;
    

    If you verify the error message below, you will observe that it says that the table can not be dropped because it is referenced by a FOREIGN KEY constraint −

    ERROR 3730 (HY000): Cannot drop table ''customers'' referenced by a foreign key constraint ''FK_CUSTOMER'' on table ''orders''.
    

    Foreign Key Constraint on an Existing Column

    We can also create a Foreign key constraint on a column of an existing table. This is useful when you forget to add a Foreign Key constraint on a column while creating a table, or when you want to add this constraint on another column even if one Foreign Key column exists in a table.

    Syntax

    Using the ALTER TABLE statement we can add a Foreign Key constraint on an existing column in a table in MySQL database as shown below −

    ALTER TABLE TABLE2
    ADD CONSTRAINT[symbol]
    FOREIGN KEY(column_name)
    REFERENCES TABLE1(column_name);
    

    Here, FK_ORDERS is the name of the foreign key constraint. It is optional to specify the name of a constraint but it comes in handy while dropping the constraint.

    Example

    Assume the CUSTOMERS and ORDERS tables have already been created in the SQL database. Now, we will add a Foreign Key Constraint on the ID column of the ORDERS table.

    Following is the SQL query to add the foreign key constraint on an the column of an existing table −

    ALTER TABLE ORDERS
    ADD CONSTRAINT FK_ORDERS
    FOREIGN KEY(ID)
    REFERENCES CUSTOMERS(ID);
    

    Output

    Following is the output of the above program −

    Query OK, 0 rows affected (0.04 sec)
    Records: 0  Duplicates: 0  Warnings: 0
    

    Verification

    We have created a Foreign Key Constraint on a column named CUSTOMER_ID in the ORDERS table that references the column name ID of the CUSTOMERS table. So, you can”t drop table1 (CUSTOMERS) before dropping the table2 (ORDERS).

    First of all, let us drop the CUSTOMERS table without dropping the ORDERS table by executing the following statement −

    DROP TABLE CUSTOMERS;
    

    This generates an error message saying that the table can not be dropped because it is referenced by a FOREIGN KEY constraint −

    ERROR 3730 (HY000): Cannot drop table ''customers'' referenced by a foreign key constraint ''FK_CUSTOMER'' on table ''orders''.
    

    Dropping a FOREIGN KEY

    You can drop the foreign key from a table, without dropping that entire table, using the ALTER TABLE statement.

    Syntax

    Following is the syntax to drop the FOREIGN key constraint from the column of the table using the ALTER TABLE statement−

    ALTER TABLE table_name DROP FOREIGN KEY (constraint symbol);
    

    Where, FK_NAME is the name of the foreign key constraint you need to drop.

    Example

    The SQL query to drop the foreign key constraint from the column of a table is as follows −

    ALTER TABLE ORDERS DROP FOREIGN KEY FK_ORDERS;
    

    Output

    Following is the output of the above SQL query −

    Query OK, 0 rows affected (0.01 sec)
    Records: 0  Duplicates: 0  Warnings: 0
    

    Verification

    Since we have dropped the Foreign key constraint from the ORDERS table, you can now directly drop the CUSTOMERS table without dropping the ORDERS table, as shown below −

    DROP TABLE CUSTOMERS;
    

    If you verify the below status code thrown by the above SQL command, you observe that the CUSTOMERS table has dropped.

    Query OK, 0 rows affected (0.02 sec)
    

    Primary Key vs Foreign Key

    Even though both the primary key and foreign key refer to the same column, there are many differences to be observed in the way they work. They are listed below −

    Primary Key Foreign Key
    The primary key is always unique. The foreign key can be duplicated.
    The primary key can not be NULL. The Foreign can be NULL.
    A table can contain only one Primary Key. We can have more than one Foreign Key per table.

    Khóa học lập trình tại Toidayhoc vừa học vừa làm dự án vừa nhận lương: Khóa học lập trình nhận lương tại trung tâm Toidayhoc

  • Khóa học miễn phí SQL – Primary Key nhận dự án làm có lương

    SQL – Primary Key

    Table of content


    The SQL Primary Key

    The SQL Primary Key is a column (or combination of columns) that uniquely identifies each record in a database table. The Primary Key also speeds up data access and is used to establish a relationship between tables.

    Even though a table can only have one Primary Key, it can be defined on one or more fields. When a primary key is created on multiple fields of a table, it is called a .

    Let us say, you are developing an application called “Customer Management System” to handle all the customer data of a member-only resort. This data can include their personal details, assigned member IDs, other details of the membership they opted, etc. And in all the tables created within this database, the member ID is used to distinguish the customers from each other. So, this field will be the Primary Key.

    Following is the diagram of a CUSTOMERS table that holds the personal details of the customers. And as we can observe, the primary key is defined on the CUST_ID column. Using this primary key, we can retrieve a unique record of any customer.

    Primary Key

    Points to Remember

    Here are some key points of the PRIMARY KEY −

    • It contains only a unique value.

    • It can not be null.

    • One table can have only one Primary Key.

    • A primary key length cannot be more than 900 bytes.

    Creating an SQL Primary Key

    While creating a table using the CREATE TABLE statement, you can add the primary key constraint on a particular column of the table just by to specifying the name of the column along with the keyword “PRIMARY KEY”.

    Syntax

    Following is the syntax to define a column of a table as a primary key −

    CREATE TABLE table_name(
       column1 datatype,
       column2 datatype,
       column3 datatype,
       .....
       columnN datatype,
       PRIMARY KEY(column_name)
    );
    

    Example

    In the following example, we are trying to create a table with the name CUSTOMERS with various fields in an SQL database. While creating the table, we will add the constraint “PRIMARY KEY” on the column named ID.

    CREATE TABLE CUSTOMERS (
       ID INT NOT NULL,
       NAME VARCHAR (20) NOT NULL,
       AGE INT NOT NULL,
       ADDRESS CHAR (25),
       SALARY DECIMAL (18, 2),
       PRIMARY KEY (ID)
    );
    

    Output

    Following is the output of the above SQL statement −

    Query OK, 0 rows affected (0.03 sec)
    

    Verification

    As we know primary key value must be unique, so you can not insert the record with the same ID. Here, we will verify the constraint created on the ID column, by inserting records with duplicate ID values.

    First of all, let”s insert a record into the CUSTOMERS table −

    INSERT INTO CUSTOMERS VALUES
    (3, ''Kaushik'', 23, ''Kota'', 2000.00);
    

    Now, let”s insert one more record with same ID −

    INSERT INTO CUSTOMERS VALUES
    (3, ''Chaitali'', 25, ''Mumbai'', 6500.00);
    

    As we have mentioned above, if any field/column is defined as Primary Key in a database table, two records can not have the same value in that column/field. Therefore, the second insert statement generates the following error −

    ERROR 1062 (23000): Duplicate entry ''3'' for key ''customers.PRIMARY''
    

    Similarly, a primary key column cannot contain null values. Here, using the INSERT statement we are passing a NULL value to the primary key column (ID).

    INSERT INTO CUSTOMERS VALUES
    (NULL, ''Komal'', 22, ''Hyderabad'', 4500.00);
    

    This statement generates the following error −

    ERROR 1048 (23000): Column ''ID'' cannot be null
    

    Creating Primary Key on an Existing Column

    We can also add the PRIMARY KEY constraint on an existing column of a table using the ALTER TABLE statement.

    Syntax

    Following is the syntax to create a primary constraint on existing columns of a table −

    ALTER TABLE table_name ADD CONSTRAINT PRIMARY KEY (column_name);
    

    Example

    In this example, we are adding the PRIMARY KEY constraint on the NAME column of the existing CUSTOMERS table −

    ALTER TABLE CUSTOMERS ADD CONSTRAINT PRIMARY KEY(NAME);
    

    Output

    Following is the output of the above statement −

    Query OK, 0 rows affected (0.05 sec)
    Records: 0  Duplicates: 0  Warnings: 0
    

    Dropping an SQL Primary Key

    If you can add a Primary Key Constraint to a column in the table, you can drop it as well. This is done by using the ALTER TABLE… DROP statement.

    Syntax

    Following is the syntax of the ALTER TABLE statement to can drop the Primary key constraints from the column of a table −

    ALTER TABLE table_name DROP PRIMARY KEY;
    

    Example

    Let us consider the CUSTOMERS table where we have created a primary key constraint on a column named ID. You can drop this constraint from the column ID by executing the following statement −

    ALTER TABLE CUSTOMERS DROP PRIMARY KEY;
    

    Output

    The above SQL query produces the following output −

    Query OK, 1 row affected (0.03 sec)
    Records: 1  Duplicates: 0  Warnings: 0
    

    Verification

    As we have dropped the Primary key from the column named ID, we can insert multiple records with the same ID. Following statement inserts four records with the same ID −

    INSERT INTO CUSTOMERS VALUES
    (3, ''Chaitali'', 25, ''Mumbai'', 6500.00 ),
    (3, ''Hardik'', 27, ''Bhopal'', 8500.00 ),
    (3, ''Komal'', 22, ''Hyderabad'', 4500.00 ),
    (3, ''Muffy'', 24, ''Indore'', 10000.00 );
    

    If you verify the content of this table, you can find multiple records with same ID −

    SELECT * FROM CUSTOMERS;
    

    The table will be displayed as −

    ID NAME AGE ADDRESS SALARY
    3 Kaushik 23 Kota 2000.00
    3 Chaitali 25 Mumbai 6500.00
    3 Hardik 27 Bhopal 8500.00
    3 Komal 22 Hyderabad 4500.00
    3 Muffy 24 Indore 10000.00

    Khóa học lập trình tại Toidayhoc vừa học vừa làm dự án vừa nhận lương: Khóa học lập trình nhận lương tại trung tâm Toidayhoc

  • Khóa học miễn phí SQL – Composite Key nhận dự án làm có lương

    SQL – Composite Key

    Table of content


    The SQL Composite Key

    An SQL Composite Key is a key that can be defined on two or more columns in a table to uniquely identify any record. It can also be described as a Primary Key created on multiple columns.

    Composite Keys are necessary in scenarios where a database table does not have a single column that can uniquely identify each row from the table. In such cases, we might need to use the combination of columns to ensure that each record in the table is distinct and identifiable.

    Let us understand the composite keys with an example. Suppose if we have a table named CUSTOMERS with various fields like ID, NAME, AGE, AADHAAR_ID, MOBILE_NO and SALARY as shown below −

    Alternate

    We can select the two columns AADHAAR_ID and MOBILE_NO and define a Composite key on them, and it can be used to fetch the records of the CUSTOMERS table uniquely.

    Features of Composite Keys

    Following are some important features of the SQL Composite Key −

    • A Composite Key can be created by combining more than one Candidate Key.
    • Each Candidate Key (or column) that makes up a Composite Key may or may not be a Foreign Key. However, if all the columns of the Composite Key are Foreign Keys in their own right, then the Composite Key is known as a Compound Key.
    • A Composite Key cannot be NULL; i.e. any column of the Composite Key must not contain NULL values.
    • The individual columns making up the Composite Key can contain duplicate values, but, the combination of these columns must be unique across the database table.

    Syntax

    Following is the syntax to create an SQL Composite Key while creating a table −

    CREATE TABLE table_name(
       column1 datatype,
       column2 datatype,
       column3 datatype,
       .....
       columnN datatype,
       CONSTRAINT composite_key_name,
       PRIMARY KEY(column_name)
    );
    

    Here, the composite_key_name is the optional placeholder which holds the name of a Composite Key in a table. It is used while dropping the constraint from a table in some databases.

    Example

    In the following example, we are creating a table named CUSTOMERS with multiple columns. The Composite Key is created when a PRIMARY KEY is defined on ID and NAME columns together. Look at the query below −

    CREATE TABLE CUSTOMERS(
       ID INT NOT NULL,
       NAME VARCHAR (20) NOT NULL,
       AGE INT NOT NULL,
       ADDRESS CHAR (25),
       SALARY DECIMAL (18, 2),
       CONSTRAINT ck_customers
       PRIMARY KEY (ID, NAME)
    );
    

    Where, ck_customers is the name of a composite key of this table.

    Output

    Following is the output of the above statement −

    Query OK, 0 rows affected (0.02 sec)
    

    Verification

    As we have created a Composite Key on the columns ID and NAME of the CUSTOMERS table, the combination of values in these columns can not be duplicated. To verify it, let us insert two records with same values in these columns into the CUSTOMERS table −

    INSERT INTO CUSTOMERS VALUES
    (1, ''Ramesh'', 32, ''Ahmedabad'', 2000.00 ),
    (1, ''Ramesh'', 25, ''Delhi'', 1500.00 );
    

    You can observe that the second INSERT statement generates an error message saying “Duplicate entry” as shown below −

    ERROR 1062 (23000): Duplicate entry ''1-Ramesh'' for key ''customers.PRIMARY''
    

    Dropping a Composite Key in MySQL

    You can drop the composite key from a table in MySQL database using the ALTER TABLE… DROP statement.

    Syntax

    Following is the syntax to drop the Composite Key in MySQL −

    ALTER TABLE table_name DROP PRIMARY KEY;
    

    Example

    Using the following SQL statement, we can drop the Composite Key constraint from the CUSTOMERS table −

    ALTER TABLE CUSTOMERS DROP PRIMARY KEY;
    

    Output

    The above SQL statement produces the following output −

    Query OK, 1 row affected (0.02 sec)
    Records: 1  Duplicates: 0  Warnings: 0
    

    Verification

    Since, we have dropped the composite from the CUSTOMERS table, so now you can insert the duplicate values in the columns ID and NAME.

    Let us insert two records with the same ID and NAME into the CUSTOMERS table −

    INSERT INTO CUSTOMERS VALUES
    (1, ''Ramesh'', 25, ''Delhi'', 1500.00 ),
    (1, ''Ramesh'', 23, ''Kota'', 2000.00 );
    

    If you retrieve the contents the CUSTOMERS table you can find the records with same ID and NAME as −

    ID NAME AGE ADDRESS SALARY
    1 Ramesh 32 Ahmedabad 2000.00
    1 Ramesh 25 Delhi 1500.00
    1 Ramesh 23 Kota 2000.00

    Dropping a Composite Key in SQL Server

    In SQL Server, we have a different syntax to drop a composite key of a table. The syntax is almost similar, but we just need to specify the composite key name in order to drop it, rather than the keyword PRIMARY KEY.

    Syntax

    Following is the syntax to drop a composite key in SQL Server −

    ALTER TABLE table_name DROP composite_key_name;
    

    Example

    Assuming that a composite key “ck_customers” is created on ID and NAME columns of the CUSTOMERS table, we will use the following query to drop it −

    ALTER TABLE CUSTOMERS DROP ck_customers;
    

    Output

    When we execute the above query, the composite key will be dropped.

    Commands completed successfully.
    

    Verification

    To verify whether we have removed the composite key from the CUSTOMERS table or not, insert duplicate values into the ID and NAME columns using the following query −

    INSERT INTO CUSTOMERS VALUES
    (1, ''Ramesh'', 25, ''Delhi'', 1500.00 ),
    (1, ''Ramesh'', 23, ''Kota'', 2000.00 );
    

    As we can see in the table below, both the customers have the same ID and NAME −

    ID NAME AGE ADDRESS SALARY
    1 Ramesh 32 Ahmedabad 2000.00
    1 Ramesh 25 Delhi 1500.00
    1 Ramesh 23 Kota 2000.00

    Khóa học lập trình tại Toidayhoc vừa học vừa làm dự án vừa nhận lương: Khóa học lập trình nhận lương tại trung tâm Toidayhoc