PostgreSQL – Overview
PostgreSQL is a powerful, open source object-relational database system. It has more than 15 years of active development phase and a proven architecture that has earned it a strong reputation for reliability, data integrity, and correctness.
This tutorial will give you a quick start with PostgreSQL and make you comfortable with PostgreSQL programming.
What is PostgreSQL?
PostgreSQL (pronounced as post-gress-Q-L) is an open source relational database management system (DBMS) developed by a worldwide team of volunteers. PostgreSQL is not controlled by any corporation or other private entity and the source code is available free of charge.
A Brief History of PostgreSQL
PostgreSQL, originally called Postgres, was created at UCB by a computer science professor named Michael Stonebraker. Stonebraker started Postgres in 1986 as a follow-up project to its predecessor, Ingres, now owned by Computer Associates.
Key Features of PostgreSQL
PostgreSQL runs on all major operating systems, including Linux, UNIX (AIX, BSD, HP-UX, SGI IRIX, Mac OS X, Solaris, Tru64), and Windows. It supports text, images, sounds, and video, and includes programming interfaces for C / C++, Java, Perl, Python, Ruby, Tcl and Open Database Connectivity (ODBC).
PostgreSQL supports a large part of the SQL standard and offers many modern features including the following −
- Complex SQL queries
- SQL Sub-selects
- Foreign keys
- Trigger
- Views
- Transactions
- Multiversion concurrency control (MVCC)
- Streaming Replication (as of 9.0)
- Hot Standby (as of 9.0)
You can check official documentation of PostgreSQL to understand the above-mentioned features. PostgreSQL can be extended by the user in many ways. For example by adding new −
- Data types
- Functions
- Operators
- Aggregate functions
- Index methods
Procedural Languages Support
PostgreSQL supports four standard procedural languages, which allows the users to write their own code in any of the languages and it can be executed by PostgreSQL database server. These procedural languages are – PL/pgSQL, PL/Tcl, PL/Perl and PL/Python. Besides, other non-standard procedural languages like PL/PHP, PL/V8, PL/Ruby, PL/Java, etc., are also supported.
PostgreSQL – Environment Setup
To start understanding the PostgreSQL basics, first let us install the PostgreSQL. This chapter explains about installing the PostgreSQL on Linux, Windows and Mac OS platforms.
Installing PostgreSQL on Linux/Unix
Follow the given steps to install PostgreSQL on your Linux machine. Make sure you are logged in as root before you proceed for the installation.
-
Pick the version number of PostgreSQL you want and, as exactly as possible, the platform you want from
-
I downloaded postgresql-9.2.4-1-linux-x64.run for my 64 bit CentOS-6 machine. Now, let us execute it as follows −
[root@host]# chmod +x postgresql-9.2.4-1-linux-x64.run
[root@host]# ./postgresql-9.2.4-1-linux-x64.run
------------------------------------------------------------------------
Welcome to the PostgreSQL Setup Wizard.
------------------------------------------------------------------------
Please specify the directory where PostgreSQL will be installed.
Installation Directory [/opt/PostgreSQL/9.2]:
-
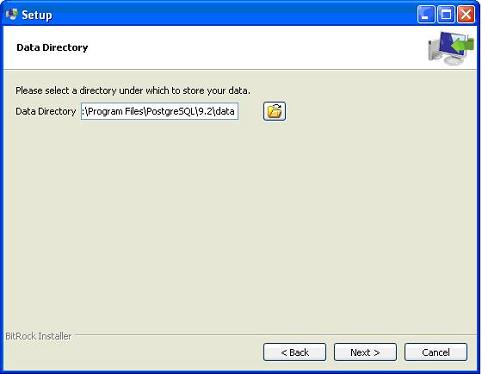
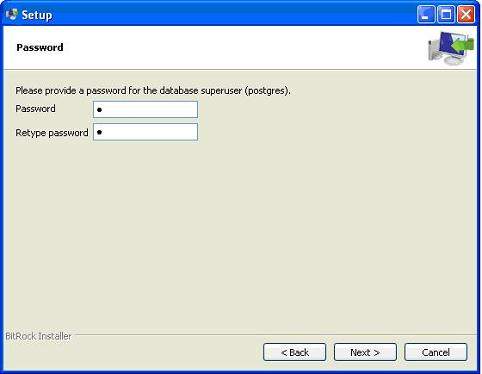
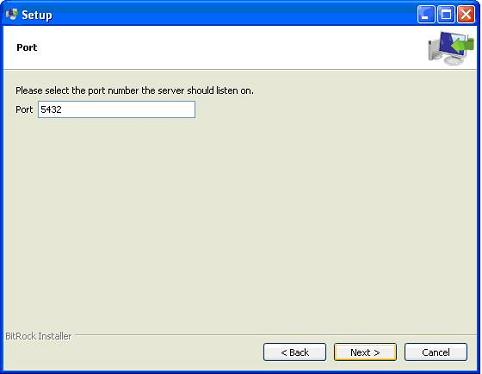
Once you launch the installer, it asks you a few basic questions like location of the installation, password of the user who will use database, port number, etc. So keep all of them at their default values except password, which you can provide password as per your choice. It will install PostgreSQL at your Linux machine and will display the following message −
Please wait while Setup installs PostgreSQL on your computer.
Installing
0% ______________ 50% ______________ 100%
#########################################
-----------------------------------------------------------------------
Setup has finished installing PostgreSQL on your computer.
[root@host]# su - postgres
Password:
bash-4.1$ createdb testdb
bash-4.1$ psql testdb
psql (8.4.13, server 9.2.4)
test=#
[root@host]# service postgresql restart
Stopping postgresql service: [ OK ]
Starting postgresql service: [ OK ]
Installing PostgreSQL on Windows
Follow the given steps to install PostgreSQL on your Windows machine. Make sure you have turned Third Party Antivirus off while installing.
-
Pick the version number of PostgreSQL you want and, as exactly as possible, the platform you want from
-
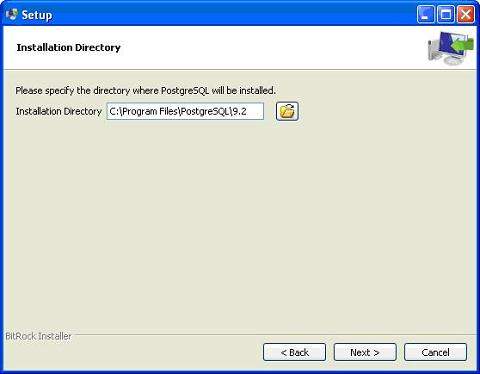
I downloaded postgresql-9.2.4-1-windows.exe for my Windows PC running in 32bit mode, so let us run postgresql-9.2.4-1-windows.exe as administrator to install PostgreSQL. Select the location where you want to install it. By default, it is installed within Program Files folder.
-
In the next step, when asked for “Locale”, I selected “English, United States”.
-
It takes a while to install PostgreSQL on your system. On completion of the installation process, you will get the following screen. Uncheck the checkbox and click the Finish button.
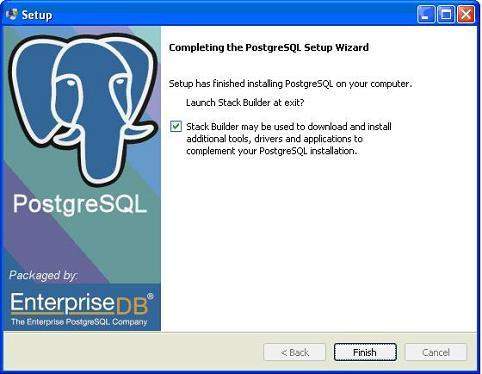
After the installation process is completed, you can access pgAdmin III, StackBuilder and PostgreSQL shell from your Program Menu under PostgreSQL 9.2.
Installing PostgreSQL on Mac
Follow the given steps to install PostgreSQL on your Mac machine. Make sure you are logged in as administrator before you proceed for the installation.
-
Pick the latest version number of PostgreSQL for Mac OS available at
-
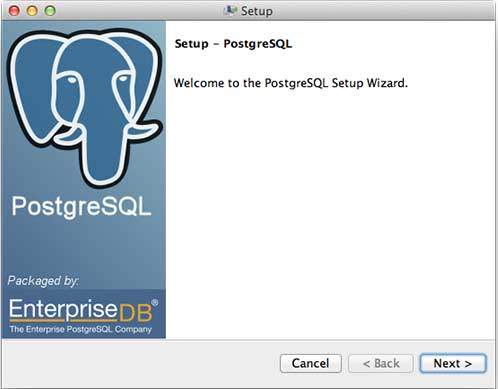
I downloaded postgresql-9.2.4-1-osx.dmg for my Mac OS running with OS X version 10.8.3. Now, let us open the dmg image in finder and just double click it which will give you PostgreSQL installer in the following window −

-
Next, click the postgres-9.2.4-1-osx icon, which will give a warning message. Accept the warning and proceed for further installation. It will ask for the administrator password as seen in the following window −
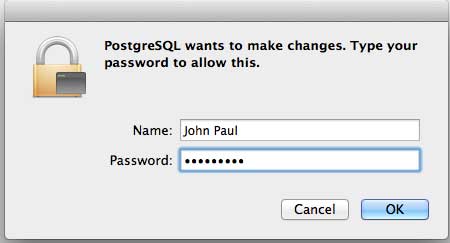
Enter the password, proceed for the installation, and after this step, restart your Mac machine. If you do not see the following window, start your installation once again.
-
Once you launch the installer, it asks you a few basic questions like location of the installation, password of the user who will use database, port number etc. Therefore, keep all of them at their default values except the password, which you can provide as per your choice. It will install PostgreSQL in your Mac machine in the Application folder which you can check −

-
Now, you can launch any of the program to start with. Let us start with SQL Shell. When you launch SQL Shell, just use all the default values it displays except, enter your password, which you had selected at the time of installation. If everything goes fine, then you will be inside postgres database and a postgress# prompt will be displayed as shown below −
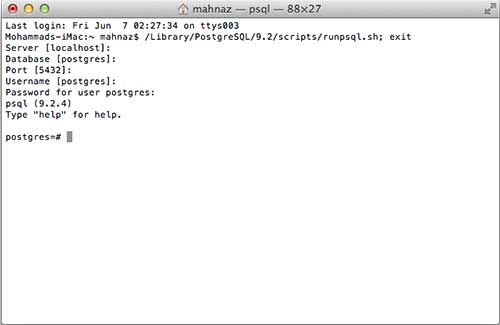
Congratulations!!! Now you have your environment ready to start with PostgreSQL database programming.
PostgreSQL – Syntax
This chapter provides a list of the PostgreSQL SQL commands, followed by the precise syntax rules for each of these commands. This set of commands is taken from the psql command-line tool. Now that you have Postgres installed, open the psql as −
Program Files → PostgreSQL 9.2 → SQL Shell(psql).
Using psql, you can generate a complete list of commands by using the help command. For the syntax of a specific command, use the following command −
postgres-# help <command_name>
The SQL Statement
An SQL statement is comprised of tokens where each token can represent either a keyword, identifier, quoted identifier, constant, or special character symbol. The table given below uses a simple SELECT statement to illustrate a basic, but complete, SQL statement and its components.
|
SELECT |
id, name |
FROM |
states |
| Token Type |
Keyword |
Identifiers |
Keyword |
Identifier |
| Description |
Command |
Id and name columns |
Clause |
Table name |
PostgreSQL SQL commands
ABORT
Abort the current transaction.
ABORT [ WORK | TRANSACTION ]
ALTER AGGREGATE
Change the definition of an aggregate function.
ALTER AGGREGATE name ( type ) RENAME TO new_name
ALTER AGGREGATE name ( type ) OWNER TO new_owner
ALTER CONVERSION
Change the definition of a conversion.
ALTER CONVERSION name RENAME TO new_name
ALTER CONVERSION name OWNER TO new_owner
ALTER DATABASE
Change a database specific parameter.
ALTER DATABASE name SET parameter { TO | = } { value | DEFAULT }
ALTER DATABASE name RESET parameter
ALTER DATABASE name RENAME TO new_name
ALTER DATABASE name OWNER TO new_owner
ALTER DOMAIN
Change the definition of a domain specific parameter.
ALTER DOMAIN name { SET DEFAULT expression | DROP DEFAULT }
ALTER DOMAIN name { SET | DROP } NOT NULL
ALTER DOMAIN name ADD domain_constraint
ALTER DOMAIN name DROP CONSTRAINT constraint_name [ RESTRICT | CASCADE ]
ALTER DOMAIN name OWNER TO new_owner
ALTER FUNCTION
Change the definition of a function.
ALTER FUNCTION name ( [ type [, ...] ] ) RENAME TO new_name
ALTER FUNCTION name ( [ type [, ...] ] ) OWNER TO new_owner
ALTER GROUP
Change a user group.
ALTER GROUP groupname ADD USER username [, ... ]
ALTER GROUP groupname DROP USER username [, ... ]
ALTER GROUP groupname RENAME TO new_name
ALTER INDEX
Change the definition of an index.
ALTER INDEX name OWNER TO new_owner
ALTER INDEX name SET TABLESPACE indexspace_name
ALTER INDEX name RENAME TO new_name
ALTER LANGUAGE
Change the definition of a procedural language.
ALTER LANGUAGE name RENAME TO new_name
ALTER OPERATOR
Change the definition of an operator.
ALTER OPERATOR name ( { lefttype | NONE }, { righttype | NONE } )
OWNER TO new_owner
ALTER OPERATOR CLASS
Change the definition of an operator class.
ALTER OPERATOR CLASS name USING index_method RENAME TO new_name
ALTER OPERATOR CLASS name USING index_method OWNER TO new_owner
ALTER SCHEMA
Change the definition of a schema.
ALTER SCHEMA name RENAME TO new_name
ALTER SCHEMA name OWNER TO new_owner
ALTER SEQUENCE
Change the definition of a sequence generator.
ALTER SEQUENCE name [ INCREMENT [ BY ] increment ]
[ MINVALUE minvalue | NO MINVALUE ]
[ MAXVALUE maxvalue | NO MAXVALUE ]
[ RESTART [ WITH ] start ] [ CACHE cache ] [ [ NO ] CYCLE ]
ALTER TABLE
Change the definition of a table.
ALTER TABLE [ ONLY ] name [ * ]
action [, ... ]
ALTER TABLE [ ONLY ] name [ * ]
RENAME [ COLUMN ] column TO new_column
ALTER TABLE name
RENAME TO new_name
Where action is one of the following lines −
ADD [ COLUMN ] column_type [ column_constraint [ ... ] ]
DROP [ COLUMN ] column [ RESTRICT | CASCADE ]
ALTER [ COLUMN ] column TYPE type [ USING expression ]
ALTER [ COLUMN ] column SET DEFAULT expression
ALTER [ COLUMN ] column DROP DEFAULT
ALTER [ COLUMN ] column { SET | DROP } NOT NULL
ALTER [ COLUMN ] column SET STATISTICS integer
ALTER [ COLUMN ] column SET STORAGE { PLAIN | EXTERNAL | EXTENDED | MAIN }
ADD table_constraint
DROP CONSTRAINT constraint_name [ RESTRICT | CASCADE ]
CLUSTER ON index_name
SET WITHOUT CLUSTER
SET WITHOUT OIDS
OWNER TO new_owner
SET TABLESPACE tablespace_name
ALTER TABLESPACE
Change the definition of a tablespace.
ALTER TABLESPACE name RENAME TO new_name
ALTER TABLESPACE name OWNER TO new_owner
ALTER TRIGGER
Change the definition of a trigger.
ALTER TRIGGER name ON table RENAME TO new_name
ALTER TYPE
Change the definition of a type.
ALTER TYPE name OWNER TO new_owner
ALTER USER
Change a database user account.
ALTER USER name [ [ WITH ] option [ ... ] ]
ALTER USER name RENAME TO new_name
ALTER USER name SET parameter { TO | = } { value | DEFAULT }
ALTER USER name RESET parameter
Where option can be −
[ ENCRYPTED | UNENCRYPTED ] PASSWORD ''password''
| CREATEDB | NOCREATEDB
| CREATEUSER | NOCREATEUSER
| VALID UNTIL ''abstime''
ANALYZE
Collect statistics about a database.
ANALYZE [ VERBOSE ] [ table [ (column [, ...] ) ] ]
BEGIN
Start a transaction block.
BEGIN [ WORK | TRANSACTION ] [ transaction_mode [, ...] ]
Where transaction_mode is one of −
ISOLATION LEVEL {
SERIALIZABLE | REPEATABLE READ | READ COMMITTED
| READ UNCOMMITTED
}
READ WRITE | READ ONLY
CHECKPOINT
Force a transaction log checkpoint.
CHECKPOINT
CLOSE
Close a cursor.
CLOSE name
CLUSTER
Cluster a table according to an index.
CLUSTER index_name ON table_name
CLUSTER table_name
CLUSTER
COMMENT
Define or change the comment of an object.
COMMENT ON {
TABLE object_name |
COLUMN table_name.column_name |
AGGREGATE agg_name (agg_type) |
CAST (source_type AS target_type) |
CONSTRAINT constraint_name ON table_name |
CONVERSION object_name |
DATABASE object_name |
DOMAIN object_name |
FUNCTION func_name (arg1_type, arg2_type, ...) |
INDEX object_name |
LARGE OBJECT large_object_oid |
OPERATOR op (left_operand_type, right_operand_type) |
OPERATOR CLASS object_name USING index_method |
[ PROCEDURAL ] LANGUAGE object_name |
RULE rule_name ON table_name |
SCHEMA object_name |
SEQUENCE object_name |
TRIGGER trigger_name ON table_name |
TYPE object_name |
VIEW object_name
}
IS ''text''
COMMIT
Commit the current transaction.
COMMIT [ WORK | TRANSACTION ]
COPY
Copy data between a file and a table.
COPY table_name [ ( column [, ...] ) ]
FROM { ''filename'' | STDIN }
[ WITH ]
[ BINARY ]
[ OIDS ]
[ DELIMITER [ AS ] ''delimiter'' ]
[ NULL [ AS ] ''null string'' ]
[ CSV [ QUOTE [ AS ] ''quote'' ]
[ ESCAPE [ AS ] ''escape'' ]
[ FORCE NOT NULL column [, ...] ]
COPY table_name [ ( column [, ...] ) ]
TO { ''filename'' | STDOUT }
[ [ WITH ]
[ BINARY ]
[ OIDS ]
[ DELIMITER [ AS ] ''delimiter'' ]
[ NULL [ AS ] ''null string'' ]
[ CSV [ QUOTE [ AS ] ''quote'' ]
[ ESCAPE [ AS ] ''escape'' ]
[ FORCE QUOTE column [, ...] ]
CREATE AGGREGATE
Define a new aggregate function.
CREATE AGGREGATE name (
BASETYPE = input_data_type,
SFUNC = sfunc,
STYPE = state_data_type
[, FINALFUNC = ffunc ]
[, INITCOND = initial_condition ]
)
CREATE CAST
Define a new cast.
CREATE CAST (source_type AS target_type)
WITH FUNCTION func_name (arg_types)
[ AS ASSIGNMENT | AS IMPLICIT ]
CREATE CAST (source_type AS target_type)
WITHOUT FUNCTION
[ AS ASSIGNMENT | AS IMPLICIT ]
CREATE CONSTRAINT TRIGGER
Define a new constraint trigger.
CREATE CONSTRAINT TRIGGER name
AFTER events ON
table_name constraint attributes
FOR EACH ROW EXECUTE PROCEDURE func_name ( args )
CREATE CONVERSION
Define a new conversion.
CREATE [DEFAULT] CONVERSION name
FOR source_encoding TO dest_encoding FROM func_name
CREATE DATABASE
Create a new database.
CREATE DATABASE name
[ [ WITH ] [ OWNER [=] db_owner ]
[ TEMPLATE [=] template ]
[ ENCODING [=] encoding ]
[ TABLESPACE [=] tablespace ]
]
CREATE DOMAIN
Define a new domain.
CREATE DOMAIN name [AS] data_type
[ DEFAULT expression ]
[ constraint [ ... ] ]
Where constraint is −
[ CONSTRAINT constraint_name ]
{ NOT NULL | NULL | CHECK (expression) }
CREATE FUNCTION
Define a new function.
CREATE [ OR REPLACE ] FUNCTION name ( [ [ arg_name ] arg_type [, ...] ] )
RETURNS ret_type
{ LANGUAGE lang_name
| IMMUTABLE | STABLE | VOLATILE
| CALLED ON NULL INPUT | RETURNS NULL ON NULL INPUT | STRICT
| [ EXTERNAL ] SECURITY INVOKER | [ EXTERNAL ] SECURITY DEFINER
| AS ''definition''
| AS ''obj_file'', ''link_symbol''
} ...
[ WITH ( attribute [, ...] ) ]
CREATE GROUP
Define a new user group.
CREATE GROUP name [ [ WITH ] option [ ... ] ]
Where option can be:
SYSID gid
| USER username [, ...]
CREATE INDEX
Define a new index.
CREATE [ UNIQUE ] INDEX name ON table [ USING method ]
( { column | ( expression ) } [ opclass ] [, ...] )
[ TABLESPACE tablespace ]
[ WHERE predicate ]
CREATE LANGUAGE
Define a new procedural language.
CREATE [ TRUSTED ] [ PROCEDURAL ] LANGUAGE name
HANDLER call_handler [ VALIDATOR val_function ]
CREATE OPERATOR
Define a new operator.
CREATE OPERATOR name (
PROCEDURE = func_name
[, LEFTARG = left_type ] [, RIGHTARG = right_type ]
[, COMMUTATOR = com_op ] [, NEGATOR = neg_op ]
[, RESTRICT = res_proc ] [, JOIN = join_proc ]
[, HASHES ] [, MERGES ]
[, SORT1 = left_sort_op ] [, SORT2 = right_sort_op ]
[, LTCMP = less_than_op ] [, GTCMP = greater_than_op ]
)
CREATE OPERATOR CLASS
Define a new operator class.
CREATE OPERATOR CLASS name [ DEFAULT ] FOR TYPE data_type
USING index_method AS
{ OPERATOR strategy_number operator_name [ ( op_type, op_type ) ] [ RECHECK ]
| FUNCTION support_number func_name ( argument_type [, ...] )
| STORAGE storage_type
} [, ... ]
CREATE RULE
Define a new rewrite rule.
CREATE [ OR REPLACE ] RULE name AS ON event
TO table [ WHERE condition ]
DO [ ALSO | INSTEAD ] { NOTHING | command | ( command ; command ... ) }
CREATE SCHEMA
Define a new schema.
CREATE SCHEMA schema_name
[ AUTHORIZATION username ] [ schema_element [ ... ] ]
CREATE SCHEMA AUTHORIZATION username
[ schema_element [ ... ] ]
CREATE SEQUENCE
Define a new sequence generator.
CREATE [ TEMPORARY | TEMP ] SEQUENCE name
[ INCREMENT [ BY ] increment ]
[ MINVALUE minvalue | NO MINVALUE ]
[ MAXVALUE maxvalue | NO MAXVALUE ]
[ START [ WITH ] start ] [ CACHE cache ] [ [ NO ] CYCLE ]
CREATE TABLE
Define a new table.
CREATE [ [ GLOBAL | LOCAL ] {
TEMPORARY | TEMP } ] TABLE table_name ( {
column_name data_type [ DEFAULT default_expr ] [ column_constraint [ ... ] ]
| table_constraint
| LIKE parent_table [ { INCLUDING | EXCLUDING } DEFAULTS ]
} [, ... ]
)
[ INHERITS ( parent_table [, ... ] ) ]
[ WITH OIDS | WITHOUT OIDS ]
[ ON COMMIT { PRESERVE ROWS | DELETE ROWS | DROP } ]
[ TABLESPACE tablespace ]
Where column_constraint is −
[ CONSTRAINT constraint_name ] {
NOT NULL |
NULL |
UNIQUE [ USING INDEX TABLESPACE tablespace ] |
PRIMARY KEY [ USING INDEX TABLESPACE tablespace ] |
CHECK (expression) |
REFERENCES ref_table [ ( ref_column ) ]
[ MATCH FULL | MATCH PARTIAL | MATCH SIMPLE ]
[ ON DELETE action ] [ ON UPDATE action ]
}
[ DEFERRABLE | NOT DEFERRABLE ] [ INITIALLY DEFERRED | INITIALLY IMMEDIATE ]
And table_constraint is −
[ CONSTRAINT constraint_name ]
{ UNIQUE ( column_name [, ... ] ) [ USING INDEX TABLESPACE tablespace ] |
PRIMARY KEY ( column_name [, ... ] ) [ USING INDEX TABLESPACE tablespace ] |
CHECK ( expression ) |
FOREIGN KEY ( column_name [, ... ] )
REFERENCES ref_table [ ( ref_column [, ... ] ) ]
[ MATCH FULL | MATCH PARTIAL | MATCH SIMPLE ]
[ ON DELETE action ] [ ON UPDATE action ] }
[ DEFERRABLE | NOT DEFERRABLE ] [ INITIALLY DEFERRED | INITIALLY IMMEDIATE ]
CREATE TABLE AS
Define a new table from the results of a query.
CREATE [ [ GLOBAL | LOCAL ] { TEMPORARY | TEMP } ] TABLE table_name
[ (column_name [, ...] ) ] [ [ WITH | WITHOUT ] OIDS ]
AS query
CREATE TABLESPACE
Define a new tablespace.
CREATE TABLESPACE tablespace_name [ OWNER username ] LOCATION ''directory''
CREATE TRIGGER
Define a new trigger.
CREATE TRIGGER name { BEFORE | AFTER } { event [ OR ... ] }
ON table [ FOR [ EACH ] { ROW | STATEMENT } ]
EXECUTE PROCEDURE func_name ( arguments )
CREATE TYPE
Define a new data type.
CREATE TYPE name AS
( attribute_name data_type [, ... ] )
CREATE TYPE name (
INPUT = input_function,
OUTPUT = output_function
[, RECEIVE = receive_function ]
[, SEND = send_function ]
[, ANALYZE = analyze_function ]
[, INTERNALLENGTH = { internal_length | VARIABLE } ]
[, PASSEDBYVALUE ]
[, ALIGNMENT = alignment ]
[, STORAGE = storage ]
[, DEFAULT = default ]
[, ELEMENT = element ]
[, DELIMITER = delimiter ]
)
CREATE USER
Define a new database user account.
CREATE USER name [ [ WITH ] option [ ... ] ]
Where option can be −
SYSID uid
| [ ENCRYPTED | UNENCRYPTED ] PASSWORD ''password''
| CREATEDB | NOCREATEDB
| CREATEUSER | NOCREATEUSER
| IN GROUP group_name [, ...]
| VALID UNTIL ''abs_time''
CREATE VIEW
Define a new view.
CREATE [ OR REPLACE ] VIEW name [ ( column_name [, ...] ) ] AS query
DEALLOCATE
Deallocate a prepared statement.
DEALLOCATE [ PREPARE ] plan_name
DECLARE
Define a cursor.
DECLARE name [ BINARY ] [ INSENSITIVE ] [ [ NO ] SCROLL ]
CURSOR [ { WITH | WITHOUT } HOLD ] FOR query
[ FOR { READ ONLY | UPDATE [ OF column [, ...] ] } ]
DELETE
Delete rows of a table.
DELETE FROM [ ONLY ] table [ WHERE condition ]
DROP AGGREGATE
Remove an aggregate function.
DROP AGGREGATE name ( type ) [ CASCADE | RESTRICT ]
DROP CAST
Remove a cast.
DROP CAST (source_type AS target_type) [ CASCADE | RESTRICT ]
DROP CONVERSION
Remove a conversion.
DROP CONVERSION name [ CASCADE | RESTRICT ]
DROP DATABASE
Remove a database.
DROP DATABASE name
DROP DOMAIN
Remove a domain.
DROP DOMAIN name [, ...] [ CASCADE | RESTRICT ]
DROP FUNCTION
Remove a function.
DROP FUNCTION name ( [ type [, ...] ] ) [ CASCADE | RESTRICT ]
DROP GROUP
Remove a user group.
DROP GROUP name
DROP INDEX
Remove an index.
DROP INDEX name [, ...] [ CASCADE | RESTRICT ]
DROP LANGUAGE
Remove a procedural language.
DROP [ PROCEDURAL ] LANGUAGE name [ CASCADE | RESTRICT ]
DROP OPERATOR
Remove an operator.
DROP OPERATOR name ( { left_type | NONE }, { right_type | NONE } )
[ CASCADE | RESTRICT ]
DROP OPERATOR CLASS
Remove an operator class.
DROP OPERATOR CLASS name USING index_method [ CASCADE | RESTRICT ]
DROP RULE
Remove a rewrite rule.
DROP RULE name ON relation [ CASCADE | RESTRICT ]
DROP SCHEMA
Remove a schema.
DROP SCHEMA name [, ...] [ CASCADE | RESTRICT ]
DROP SEQUENCE
Remove a sequence.
DROP SEQUENCE name [, ...] [ CASCADE | RESTRICT ]
DROP TABLE
Remove a table.
DROP TABLE name [, ...] [ CASCADE | RESTRICT ]
DROP TABLESPACE
Remove a tablespace.
DROP TABLESPACE tablespace_name
DROP TRIGGER
Remove a trigger.
DROP TRIGGER name ON table [ CASCADE | RESTRICT ]
DROP TYPE
Remove a data type.
DROP TYPE name [, ...] [ CASCADE | RESTRICT ]
DROP USER
Remove a database user account.
DROP USER name
DROP VIEW
Remove a view.
DROP VIEW name [, ...] [ CASCADE | RESTRICT ]
END
Commit the current transaction.
END [ WORK | TRANSACTION ]
EXECUTE
Execute a prepared statement.
EXECUTE plan_name [ (parameter [, ...] ) ]
EXPLAIN
Show the execution plan of a statement.
EXPLAIN [ ANALYZE ] [ VERBOSE ] statement
FETCH
Retrieve rows from a query using a cursor.
FETCH [ direction { FROM | IN } ] cursor_name
Where direction can be empty or one of −
NEXT
PRIOR
FIRST
LAST
ABSOLUTE count
RELATIVE count
count
ALL
FORWARD
FORWARD count
FORWARD ALL
BACKWARD
BACKWARD count
BACKWARD ALL
GRANT
Define access privileges.
GRANT { { SELECT | INSERT | UPDATE | DELETE | RULE | REFERENCES | TRIGGER }
[,...] | ALL [ PRIVILEGES ] }
ON [ TABLE ] table_name [, ...]
TO { username | GROUP group_name | PUBLIC } [, ...] [ WITH GRANT OPTION ]
GRANT { { CREATE | TEMPORARY | TEMP } [,...] | ALL [ PRIVILEGES ] }
ON DATABASE db_name [, ...]
TO { username | GROUP group_name | PUBLIC } [, ...] [ WITH GRANT OPTION ]
GRANT { CREATE | ALL [ PRIVILEGES ] }
ON TABLESPACE tablespace_name [, ...]
TO { username | GROUP group_name | PUBLIC } [, ...] [ WITH GRANT OPTION ]
GRANT { EXECUTE | ALL [ PRIVILEGES ] }
ON FUNCTION func_name ([type, ...]) [, ...]
TO { username | GROUP group_name | PUBLIC } [, ...] [ WITH GRANT OPTION ]
GRANT { USAGE | ALL [ PRIVILEGES ] }
ON LANGUAGE lang_name [, ...]
TO { username | GROUP group_name | PUBLIC } [, ...] [ WITH GRANT OPTION ]
GRANT { { CREATE | USAGE } [,...] | ALL [ PRIVILEGES ] }
ON SCHEMA schema_name [, ...]
TO { username | GROUP group_name | PUBLIC } [, ...] [ WITH GRANT OPTION ]
INSERT
Create new rows in a table.
INSERT INTO table [ ( column [, ...] ) ]
{ DEFAULT VALUES | VALUES ( { expression | DEFAULT } [, ...] ) | query }
LISTEN
Listen for a notification.
LISTEN name
LOAD
Load or reload a shared library file.
LOAD ''filename''
LOCK
Lock a table.
LOCK [ TABLE ] name [, ...] [ IN lock_mode MODE ] [ NOWAIT ]
Where lock_mode is one of −
ACCESS SHARE | ROW SHARE | ROW EXCLUSIVE | SHARE UPDATE EXCLUSIVE
| SHARE | SHARE ROW EXCLUSIVE | EXCLUSIVE | ACCESS EXCLUSIVE
MOVE
Position a cursor.
MOVE [ direction { FROM | IN } ] cursor_name
NOTIFY
Generate a notification.
NOTIFY name
PREPARE
Prepare a statement for execution.
PREPARE plan_name [ (data_type [, ...] ) ] AS statement
REINDEX
Rebuild indexes.
REINDEX { DATABASE | TABLE | INDEX } name [ FORCE ]
RELEASE SAVEPOINT
Destroy a previously defined savepoint.
RELEASE [ SAVEPOINT ] savepoint_name
RESET
Restore the value of a runtime parameter to the default value.
RESET name
RESET ALL
REVOKE
Remove access privileges.
REVOKE [ GRANT OPTION FOR ]
{ { SELECT | INSERT | UPDATE | DELETE | RULE | REFERENCES | TRIGGER }
[,...] | ALL [ PRIVILEGES ] }
ON [ TABLE ] table_name [, ...]
FROM { username | GROUP group_name | PUBLIC } [, ...]
[ CASCADE | RESTRICT ]
REVOKE [ GRANT OPTION FOR ]
{ { CREATE | TEMPORARY | TEMP } [,...] | ALL [ PRIVILEGES ] }
ON DATABASE db_name [, ...]
FROM { username | GROUP group_name | PUBLIC } [, ...]
[ CASCADE | RESTRICT ]
REVOKE [ GRANT OPTION FOR ]
{ CREATE | ALL [ PRIVILEGES ] }
ON TABLESPACE tablespace_name [, ...]
FROM { username | GROUP group_name | PUBLIC } [, ...]
[ CASCADE | RESTRICT ]
REVOKE [ GRANT OPTION FOR ]
{ EXECUTE | ALL [ PRIVILEGES ] }
ON FUNCTION func_name ([type, ...]) [, ...]
FROM { username | GROUP group_name | PUBLIC } [, ...]
[ CASCADE | RESTRICT ]
REVOKE [ GRANT OPTION FOR ]
{ USAGE | ALL [ PRIVILEGES ] }
ON LANGUAGE lang_name [, ...]
FROM { username | GROUP group_name | PUBLIC } [, ...]
[ CASCADE | RESTRICT ]
REVOKE [ GRANT OPTION FOR ]
{ { CREATE | USAGE } [,...] | ALL [ PRIVILEGES ] }
ON SCHEMA schema_name [, ...]
FROM { username | GROUP group_name | PUBLIC } [, ...]
[ CASCADE | RESTRICT ]
ROLLBACK
Abort the current transaction.
ROLLBACK [ WORK | TRANSACTION ]
ROLLBACK TO SAVEPOINT
Roll back to a savepoint.
ROLLBACK [ WORK | TRANSACTION ] TO [ SAVEPOINT ] savepoint_name
SAVEPOINT
Define a new savepoint within the current transaction.
SAVEPOINT savepoint_name
SELECT
Retrieve rows from a table or view.
SELECT [ ALL | DISTINCT [ ON ( expression [, ...] ) ] ]
* | expression [ AS output_name ] [, ...]
[ FROM from_item [, ...] ]
[ WHERE condition ]
[ GROUP BY expression [, ...] ]
[ HAVING condition [, ...] ]
[ { UNION | INTERSECT | EXCEPT } [ ALL ] select ]
[ ORDER BY expression [ ASC | DESC | USING operator ] [, ...] ]
[ LIMIT { count | ALL } ]
[ OFFSET start ]
[ FOR UPDATE [ OF table_name [, ...] ] ]
Where
from_item can be one of:
[ ONLY ] table_name [ * ] [ [ AS ] alias [ ( column_alias [, ...] ) ] ]
( select ) [ AS ] alias [ ( column_alias [, ...] ) ]
function_name ( [ argument [, ...] ] )
[ AS ] alias [ ( column_alias [, ...] | column_definition [, ...] ) ]
function_name ( [ argument [, ...] ] ) AS ( column_definition [, ...] )
from_item [ NATURAL ] join_type from_item
[ ON join_condition | USING ( join_column [, ...] ) ]
SELECT INTO
Define a new table from the results of a query.
SELECT [ ALL | DISTINCT [ ON ( expression [, ...] ) ] ]
* | expression [ AS output_name ] [, ...]
INTO [ TEMPORARY | TEMP ] [ TABLE ] new_table
[ FROM from_item [, ...] ]
[ WHERE condition ]
[ GROUP BY expression [, ...] ]
[ HAVING condition [, ...] ]
[ { UNION | INTERSECT | EXCEPT } [ ALL ] select ]
[ ORDER BY expression [ ASC | DESC | USING operator ] [, ...] ]
[ LIMIT { count | ALL } ]
[ OFFSET start ]
[ FOR UPDATE [ OF table_name [, ...] ] ]
SET
Change a runtime parameter.
SET [ SESSION | LOCAL ] name { TO | = } { value | ''value'' | DEFAULT }
SET [ SESSION | LOCAL ] TIME ZONE { time_zone | LOCAL | DEFAULT }
SET CONSTRAINTS
Set constraint checking modes for the current transaction.
SET CONSTRAINTS { ALL | name [, ...] } { DEFERRED | IMMEDIATE }
SET SESSION AUTHORIZATION
Set the session user identifier and the current user identifier of the current session.
SET [ SESSION | LOCAL ] SESSION AUTHORIZATION username
SET [ SESSION | LOCAL ] SESSION AUTHORIZATION DEFAULT
RESET SESSION AUTHORIZATION
SET TRANSACTION
Set the characteristics of the current transaction.
SET TRANSACTION transaction_mode [, ...]
SET SESSION CHARACTERISTICS AS TRANSACTION transaction_mode [, ...]
Where transaction_mode is one of −
ISOLATION LEVEL { SERIALIZABLE | REPEATABLE READ | READ COMMITTED
| READ UNCOMMITTED }
READ WRITE | READ ONLY
SHOW
Show the value of a runtime parameter.
SHOW name
SHOW ALL
START TRANSACTION
Start a transaction block.
START TRANSACTION [ transaction_mode [, ...] ]
Where transaction_mode is one of −
ISOLATION LEVEL { SERIALIZABLE | REPEATABLE READ | READ COMMITTED
| READ UNCOMMITTED }
READ WRITE | READ ONLY
TRUNCATE
Empty a table.
TRUNCATE [ TABLE ] name
UNLISTEN
Stop listening for a notification.
UNLISTEN { name | * }
UPDATE
Update rows of a table.
UPDATE [ ONLY ] table SET column = { expression | DEFAULT } [, ...]
[ FROM from_list ]
[ WHERE condition ]
VACUUM
Garbage-collect and optionally analyze a database.
VACUUM [ FULL ] [ FREEZE ] [ VERBOSE ] [ table ]
VACUUM [ FULL ] [ FREEZE ] [ VERBOSE ] ANALYZE [ table [ (column [, ...] ) ] ]
PostgreSQL – Data Type
In this chapter, we will discuss about the data types used in PostgreSQL. While creating table, for each column, you specify a data type, i.e., what kind of data you want to store in the table fields.
This enables several benefits −
-
Consistency − Operations against columns of same data type give consistent results and are usually the fastest.
-
Validation − Proper use of data types implies format validation of data and rejection of data outside the scope of data type.
-
Compactness − As a column can store a single type of value, it is stored in a compact way.
-
Performance − Proper use of data types gives the most efficient storage of data. The values stored can be processed quickly, which enhances the performance.
PostgreSQL supports a wide set of Data Types. Besides, users can create their own custom data type using CREATE TYPE SQL command. There are different categories of data types in PostgreSQL. They are discussed below.
Numeric Types
Numeric types consist of two-byte, four-byte, and eight-byte integers, four-byte and eight-byte floating-point numbers, and selectable-precision decimals. The following table lists the available types.
| Name |
Storage Size |
Description |
Range |
| smallint |
2 bytes |
small-range integer |
-32768 to +32767 |
| integer |
4 bytes |
typical choice for integer |
-2147483648 to +2147483647 |
| bigint |
8 bytes |
large-range integer |
-9223372036854775808 to 9223372036854775807 |
| decimal |
variable |
user-specified precision,exact |
up to 131072 digits before the decimal point; up to 16383 digits after the decimal point |
| numeric |
variable |
user-specified precision,exact |
up to 131072 digits before the decimal point; up to 16383 digits after the decimal point |
| real |
4 bytes |
variable-precision,inexact |
6 decimal digits precision |
| double precision |
8 bytes |
variable-precision,inexact |
15 decimal digits precision |
| smallserial |
2 bytes |
small autoincrementing integer |
1 to 32767 |
| serial |
4 bytes |
autoincrementing integer |
1 to 2147483647 |
| bigserial |
8 bytes |
large autoincrementing integer |
1 to 9223372036854775807 |
Monetary Types
The money type stores a currency amount with a fixed fractional precision. Values of the numeric, int, and bigint data types can be cast to money. Using Floating point numbers is not recommended to handle money due to the potential for rounding errors.
| Name |
Storage Size |
Description |
Range |
| money |
8 bytes |
currency amount |
-92233720368547758.08 to +92233720368547758.07 |
Character Types
The table given below lists the general-purpose character types available in PostgreSQL.
| S. No. |
Name & Description |
| 1 |
character varying(n), varchar(n)
variable-length with limit
|
| 2 |
character(n), char(n)
fixed-length, blank padded
|
| 3 |
text
variable unlimited length
|
Binary Data Types
The bytea data type allows storage of binary strings as in the table given below.
| Name |
Storage Size |
Description |
| bytea |
1 or 4 bytes plus the actual binary string |
variable-length binary string |
Date/Time Types
PostgreSQL supports a full set of SQL date and time types, as shown in table below. Dates are counted according to the Gregorian calendar. Here, all the types have resolution of 1 microsecond / 14 digits except date type, whose resolution is day.
| Name |
Storage Size |
Description |
Low Value |
High Value |
| timestamp [(p)] [without time zone ] |
8 bytes |
both date and time (no time zone) |
4713 BC |
294276 AD |
| TIMESTAMPTZ |
8 bytes |
both date and time, with time zone |
4713 BC |
294276 AD |
| date |
4 bytes |
date (no time of day) |
4713 BC |
5874897 AD |
| time [ (p)] [ without time zone ] |
8 bytes |
time of day (no date) |
00:00:00 |
24:00:00 |
| time [ (p)] with time zone |
12 bytes |
times of day only, with time zone |
00:00:00+1459 |
24:00:00-1459 |
| interval [fields ] [(p) ] |
12 bytes |
time interval |
-178000000 years |
178000000 years |
Boolean Type
PostgreSQL provides the standard SQL type Boolean. The Boolean data type can have the states true, false, and a third state, unknown, which is represented by the SQL null value.
| Name |
Storage Size |
Description |
| boolean |
1 byte |
state of true or false |
Enumerated Type
Enumerated (enum) types are data types that comprise a static, ordered set of values. They are equivalent to the enum types supported in a number of programming languages.
Unlike other types, Enumerated Types need to be created using CREATE TYPE command. This type is used to store a static, ordered set of values. For example compass directions, i.e., NORTH, SOUTH, EAST, and WEST or days of the week as shown below −
CREATE TYPE week AS ENUM (''Mon'', ''Tue'', ''Wed'', ''Thu'', ''Fri'', ''Sat'', ''Sun'');
Enumerated, once created, can be used like any other types.
Geometric Type
Geometric data types represent two-dimensional spatial objects. The most fundamental type, the point, forms the basis for all of the other types.
| Name |
Storage Size |
Representation |
Description |
| point |
16 bytes |
Point on a plane |
(x,y) |
| line |
32 bytes |
Infinite line (not fully implemented) |
((x1,y1),(x2,y2)) |
| lseg |
32 bytes |
Finite line segment |
((x1,y1),(x2,y2)) |
| box |
32 bytes |
Rectangular box |
((x1,y1),(x2,y2)) |
| path |
16+16n bytes |
Closed path (similar to polygon) |
((x1,y1),…) |
| path |
16+16n bytes |
Open path |
[(x1,y1),…] |
| polygon |
40+16n |
Polygon (similar to closed path) |
((x1,y1),…) |
| circle |
24 bytes |
Circle |
<(x,y),r> (center point and radius) |
Network Address Type
PostgreSQL offers data types to store IPv4, IPv6, and MAC addresses. It is better to use these types instead of plain text types to store network addresses, because these types offer input error checking and specialized operators and functions.
| Name |
Storage Size |
Description |
| cidr |
7 or 19 bytes |
IPv4 and IPv6 networks |
| inet |
7 or 19 bytes |
IPv4 and IPv6 hosts and networks |
| macaddr |
6 bytes |
MAC addresses |
Bit String Type
Bit String Types are used to store bit masks. They are either 0 or 1. There are two SQL bit types: bit(n) and bit varying(n), where n is a positive integer.
Text Search Type
This type supports full text search, which is the activity of searching through a collection of natural-language documents to locate those that best match a query. There are two Data Types for this −
| S. No. |
Name & Description |
| 1 |
tsvector
This is a sorted list of distinct words that have been normalized to merge different variants of the same word, called as “lexemes”.
|
| 2 |
tsquery
This stores lexemes that are to be searched for, and combines them honoring the Boolean operators & (AND), | (OR), and ! (NOT). Parentheses can be used to enforce grouping of the operators.
|
UUID Type
A UUID (Universally Unique Identifiers) is written as a sequence of lower-case hexadecimal digits, in several groups separated by hyphens, specifically a group of eight digits, followed by three groups of four digits, followed by a group of 12 digits, for a total of 32 digits representing the 128 bits.
An example of a UUID is − 550e8400-e29b-41d4-a716-446655440000
XML Type
The XML data type can be used to store XML data. For storing XML data, first you have to create XML values using the function xmlparse as follows −
XMLPARSE (DOCUMENT ''<?xml version="1.0"?>
<tutorial>
<title>PostgreSQL Tutorial </title>
<topics>...</topics>
</tutorial>'')
XMLPARSE (CONTENT ''xyz<foo>bar</foo><bar>foo</bar>'')
JSON Type
The json data type can be used to store JSON (JavaScript Object Notation) data. Such data can also be stored as text, but the json data type has the advantage of checking that each stored value is a valid JSON value. There are also related support functions available, which can be used directly to handle JSON data type as follows.
| Example |
Example Result |
| array_to_json(”{{1,5},{99,100}}”::int[]) |
[[1,5],[99,100]] |
| row_to_json(row(1,”foo”)) |
{“f1″:1,”f2″:”foo”} |
Array Type
PostgreSQL gives the opportunity to define a column of a table as a variable length multidimensional array. Arrays of any built-in or user-defined base type, enum type, or composite type can be created.
Declaration of Arrays
Array type can be declared as
CREATE TABLE monthly_savings (
name text,
saving_per_quarter integer[],
scheme text[][]
);
or by using the keyword “ARRAY” as
CREATE TABLE monthly_savings (
name text,
saving_per_quarter integer ARRAY[4],
scheme text[][]
);
Inserting values
Array values can be inserted as a literal constant, enclosing the element values within curly braces and separating them by commas. An example is shown below −
INSERT INTO monthly_savings
VALUES (‘Manisha’,
‘{20000, 14600, 23500, 13250}’,
‘{{“FD”, “MF”}, {“FD”, “Property”}}’);
Accessing Arrays
An example for accessing Arrays is shown below. The command given below will select the persons whose savings are more in second quarter than fourth quarter.
SELECT name FROM monhly_savings WHERE saving_per_quarter[2] > saving_per_quarter[4];
Modifying Arrays
An example of modifying arrays is as shown below.
UPDATE monthly_savings SET saving_per_quarter = ''{25000,25000,27000,27000}''
WHERE name = ''Manisha
or using the ARRAY expression syntax −
UPDATE monthly_savings SET saving_per_quarter = ARRAY[25000,25000,27000,27000]
WHERE name = ''Manisha
Searching Arrays
An example of searching arrays is as shown below.
SELECT * FROM monthly_savings WHERE saving_per_quarter[1] = 10000 OR
saving_per_quarter[2] = 10000 OR
saving_per_quarter[3] = 10000 OR
saving_per_quarter[4] = 10000;
If the size of array is known, the search method given above can be used. Else, the following example shows how to search when the size is not known.
SELECT * FROM monthly_savings WHERE 10000 = ANY (saving_per_quarter);
Composite Types
This type represents a list of field names and their data types, i.e., structure of a row or record of a table.
Declaration of Composite Types
The following example shows how to declare a composite type
CREATE TYPE inventory_item AS (
name text,
supplier_id integer,
price numeric
);
This data type can be used in the create tables as below −
CREATE TABLE on_hand (
item inventory_item,
count integer
);
Composite Value Input
Composite values can be inserted as a literal constant, enclosing the field values within parentheses and separating them by commas. An example is shown below −
INSERT INTO on_hand VALUES (ROW(''fuzzy dice'', 42, 1.99), 1000);
This is valid for the inventory_item defined above. The ROW keyword is actually optional as long as you have more than one field in the expression.
Accessing Composite Types
To access a field of a composite column, use a dot followed by the field name, much like selecting a field from a table name. For example, to select some subfields from our on_hand example table, the query would be as shown below −
SELECT (item).name FROM on_hand WHERE (item).price > 9.99;
You can even use the table name as well (for instance in a multitable query), like this −
SELECT (on_hand.item).name FROM on_hand WHERE (on_hand.item).price > 9.99;
Range Types
Range types represent data types that uses a range of data. Range type can be discrete ranges (e.g., all integer values 1 to 10) or continuous ranges (e.g., any point in time between 10:00am and 11:00am).
The built-in range types available include the following ranges −
-
int4range − Range of integer
-
int8range − Range of bigint
-
numrange − Range of numeric
-
tsrange − Range of timestamp without time zone
-
tstzrange − Range of timestamp with time zone
-
daterange − Range of date
Custom range types can be created to make new types of ranges available, such as IP address ranges using the inet type as a base, or float ranges using the float data type as a base.
Range types support inclusive and exclusive range boundaries using the [ ] and ( ) characters, respectively. For example ”[4,9)” represents all the integers starting from and including 4 up to but not including 9.
Object Identifier Types
Object identifiers (OIDs) are used internally by PostgreSQL as primary keys for various system tables. If WITH OIDS is specified or default_with_oids configuration variable is enabled, only then, in such cases OIDs are added to user-created tables. The following table lists several alias types. The OID alias types have no operations of their own except for specialized input and output routines.
| Name |
References |
Description |
Value Example |
| oid |
any |
numeric object identifier |
564182 |
| regproc |
pg_proc |
function name |
sum |
| regprocedure |
pg_proc |
function with argument types |
sum(int4) |
| regoper |
pg_operator |
operator name |
+ |
| regoperator |
pg_operator |
operator with argument types |
*(integer,integer) or -(NONE,integer) |
| regclass |
pg_class |
relation name |
pg_type |
| regtype |
pg_type |
data type name |
integer |
| regconfig |
pg_ts_config |
text search configuration |
English |
| regdictionary |
pg_ts_dict |
text search dictionary |
simple |
Pseudo Types
The PostgreSQL type system contains a number of special-purpose entries that are collectively called pseudo-types. A pseudo-type cannot be used as a column data type, but it can be used to declare a function”s argument or result type.
The table given below lists the existing pseudo-types.
| S. No. |
Name & Description |
| 1 |
any
Indicates that a function accepts any input data type.
|
| 2 |
anyelement
Indicates that a function accepts any data type.
|
| 3 |
anyarray
Indicates that a function accepts any array data type.
|
| 4 |
anynonarray
Indicates that a function accepts any non-array data type.
|
| 5 |
anyenum
Indicates that a function accepts any enum data type.
|
| 6 |
anyrange
Indicates that a function accepts any range data type.
|
| 7 |
cstring
Indicates that a function accepts or returns a null-terminated C string.
|
| 8 |
internal
Indicates that a function accepts or returns a server-internal data type.
|
| 9 |
language_handler
A procedural language call handler is declared to return language_handler.
|
| 10 |
fdw_handler
A foreign-data wrapper handler is declared to return fdw_handler.
|
| 11 |
record
Identifies a function returning an unspecified row type.
|
| 12 |
trigger
A trigger function is declared to return trigger.
|
| 13 |
void
Indicates that a function returns no value.
|
PostgreSQL – CREATE Database
This chapter discusses about how to create a new database in your PostgreSQL. PostgreSQL provides two ways of creating a new database −
- Using CREATE DATABASE, an SQL command.
- Using createdb a command-line executable.
Using CREATE DATABASE
This command will create a database from PostgreSQL shell prompt, but you should have appropriate privilege to create a database. By default, the new database will be created by cloning the standard system database template1.
Syntax
The basic syntax of CREATE DATABASE statement is as follows −
CREATE DATABASE dbname;
where dbname is the name of a database to create.
Example
The following is a simple example, which will create testdb in your PostgreSQL schema
postgres=# CREATE DATABASE testdb;
postgres-#
Using createdb Command
PostgreSQL command line executable createdb is a wrapper around the SQL command CREATE DATABASE. The only difference between this command and SQL command CREATE DATABASE is that the former can be directly run from the command line and it allows a comment to be added into the database, all in one command.
Syntax
The syntax for createdb is as shown below −
createdb [option...] [dbname [description]]
Parameters
The table given below lists the parameters with their descriptions.
| S. No. |
Parameter & Description |
| 1 |
dbname
The name of a database to create.
|
| 2 |
description
Specifies a comment to be associated with the newly created database.
|
| 3 |
options
command-line arguments, which createdb accepts.
|
Options
The following table lists the command line arguments createdb accepts −
| S. No. |
Option & Description |
| 1 |
-D tablespace
Specifies the default tablespace for the database.
|
| 2 |
-e
Echo the commands that createdb generates and sends to the server.
|
| 3 |
-E encoding
Specifies the character encoding scheme to be used in this database.
|
| 4 |
-l locale
Specifies the locale to be used in this database.
|
| 5 |
-T template
Specifies the template database from which to build this database.
|
| 6 |
–help
Show help about createdb command line arguments, and exit.
|
| 7 |
-h host
Specifies the host name of the machine on which the server is running.
|
| 8 |
-p port
Specifies the TCP port or the local Unix domain socket file extension on which the server is listening for connections.
|
| 9 |
-U username
User name to connect as.
|
| 10 |
-w
Never issue a password prompt.
|
| 11 |
-W
Force createdb to prompt for a password before connecting to a database.
|
Open the command prompt and go to the directory where PostgreSQL is installed. Go to the bin directory and execute the following command to create a database.
createdb -h localhost -p 5432 -U postgres testdb
password ******
The above given command will prompt you for password of the PostgreSQL admin user, which is postgres, by default. Hence, provide a password and proceed to create your new database
Once a database is created using either of the above-mentioned methods, you can check it in the list of databases using l, i.e., backslash el command as follows −
postgres-# l
List of databases
Name | Owner | Encoding | Collate | Ctype | Access privileges
-----------+----------+----------+---------+-------+-----------------------
postgres | postgres | UTF8 | C | C |
template0 | postgres | UTF8 | C | C | =c/postgres +
| | | | | postgres=CTc/postgres
template1 | postgres | UTF8 | C | C | =c/postgres +
| | | | | postgres=CTc/postgres
testdb | postgres | UTF8 | C | C |
(4 rows)
postgres-#
PostgreSQL – SELECT Database
This chapter explains various methods of accessing the database. Assume that we have already created a database in our previous chapter. You can select the database using either of the following methods −
- Database SQL Prompt
- OS Command Prompt
Database SQL Prompt
Assume you have already launched your PostgreSQL client and you have landed at the following SQL prompt −
postgres=#
You can check the available database list using l, i.e., backslash el command as follows −
postgres-# l
List of databases
Name | Owner | Encoding | Collate | Ctype | Access privileges
-----------+----------+----------+---------+-------+-----------------------
postgres | postgres | UTF8 | C | C |
template0 | postgres | UTF8 | C | C | =c/postgres +
| | | | | postgres=CTc/postgres
template1 | postgres | UTF8 | C | C | =c/postgres +
| | | | | postgres=CTc/postgres
testdb | postgres | UTF8 | C | C |
(4 rows)
postgres-#
Now, type the following command to connect/select a desired database; here, we will connect to the testdb database.
postgres=# c testdb;
psql (9.2.4)
Type "help" for help.
You are now connected to database "testdb" as user "postgres".
testdb=#
OS Command Prompt
You can select your database from the command prompt itself at the time when you login to your database. Following is a simple example −
psql -h localhost -p 5432 -U postgress testdb
Password for user postgress: ****
psql (9.2.4)
Type "help" for help.
You are now connected to database "testdb" as user "postgres".
testdb=#
You are now logged into PostgreSQL testdb and ready to execute your commands inside testdb. To exit from the database, you can use the command q.
PostgreSQL – DROP Database
In this chapter, we will discuss how to delete the database in PostgreSQL. There are two options to delete a database −
- Using DROP DATABASE, an SQL command.
- Using dropdb a command-line executable.
Be careful before using this operation because deleting an existing database would result in loss of complete information stored in the database.
Using DROP DATABASE
This command drops a database. It removes the catalog entries for the database and deletes the directory containing the data. It can only be executed by the database owner. This command cannot be executed while you or anyone else is connected to the target database (connect to postgres or any other database to issue this command).
Syntax
The syntax for DROP DATABASE is given below −
DROP DATABASE [ IF EXISTS ] name
Parameters
The table lists the parameters with their descriptions.
| S. No. |
Parameter & Description |
| 1 |
IF EXISTS
Do not throw an error if the database does not exist. A notice is issued in this case.
|
| 2 |
name
The name of the database to remove.
|
We cannot drop a database that has any open connections, including our own connection from psql or pgAdmin III. We must switch to another database or template1 if we want to delete the database we are currently connected to. Thus, it might be more convenient to use the program dropdb instead, which is a wrapper around this command.
Example
The following is a simple example, which will delete testdb from your PostgreSQL schema −
postgres=# DROP DATABASE testdb;
postgres-#
Using dropdb Command
PostgresSQL command line executable dropdb is a command-line wrapper around the SQL command DROP DATABASE. There is no effective difference between dropping databases via this utility and via other methods for accessing the server. dropdb destroys an existing PostgreSQL database. The user, who executes this command must be a database super user or the owner of the database.
Syntax
The syntax for dropdb is as shown below −
dropdb [option...] dbname
Parameters
The following table lists the parameters with their descriptions
| S. No. |
Parameter & Description |
| 1 |
dbname
The name of a database to be deleted.
|
| 2 |
option
command-line arguments, which dropdb accepts.
|
Options
The following table lists the command-line arguments dropdb accepts −
| S. No. |
Option & Description |
| 1 |
-e
Shows the commands being sent to the server.
|
| 2 |
-i
Issues a verification prompt before doing anything destructive.
|
| 3 |
-V
Print the dropdb version and exit.
|
| 4 |
–if-exists
Do not throw an error if the database does not exist. A notice is issued in this case.
|
| 5 |
–help
Show help about dropdb command-line arguments, and exit.
|
| 6 |
-h host
Specifies the host name of the machine on which the server is running.
|
| 7 |
-p port
Specifies the TCP port or the local UNIX domain socket file extension on which the server is listening for connections.
|
| 8 |
-U username
User name to connect as.
|
| 9 |
-w
Never issue a password prompt.
|
| 10 |
-W
Force dropdb to prompt for a password before connecting to a database.
|
| 11 |
–maintenance-db=dbname
Specifies the name of the database to connect to in order to drop the target database.
|
Example
The following example demonstrates deleting a database from OS command prompt −
dropdb -h localhost -p 5432 -U postgress testdb
Password for user postgress: ****
The above command drops the database testdb. Here, I have used the postgres (found under the pg_roles of template1) username to drop the database.
PostgreSQL – CREATE Table
The PostgreSQL CREATE TABLE statement is used to create a new table in any of the given database.
Syntax
Basic syntax of CREATE TABLE statement is as follows −
CREATE TABLE table_name(
column1 datatype,
column2 datatype,
column3 datatype,
.....
columnN datatype,
PRIMARY KEY( one or more columns )
);
CREATE TABLE is a keyword, telling the database system to create a new table. The unique name or identifier for the table follows the CREATE TABLE statement. Initially, the empty table in the current database is owned by the user issuing the command.
Then, in brackets, comes the list, defining each column in the table and what sort of data type it is. The syntax will become clear with an example given below.
Examples
The following is an example, which creates a COMPANY table with ID as primary key and NOT NULL are the constraints showing that these fields cannot be NULL while creating records in this table −
CREATE TABLE COMPANY(
ID INT PRIMARY KEY NOT NULL,
NAME TEXT NOT NULL,
AGE INT NOT NULL,
ADDRESS CHAR(50),
SALARY REAL
);
Let us create one more table, which we will use in our exercises in subsequent chapters −
CREATE TABLE DEPARTMENT(
ID INT PRIMARY KEY NOT NULL,
DEPT CHAR(50) NOT NULL,
EMP_ID INT NOT NULL
);
You can verify if your table has been created successfully using d command, which will be used to list down all the tables in an attached database.
testdb-# d
The above given PostgreSQL statement will produce the following result −
List of relations
Schema | Name | Type | Owner
--------+------------+-------+----------
public | company | table | postgres
public | department | table | postgres
(2 rows)
Use d tablename to describe each table as shown below −
testdb-# d company
The above given PostgreSQL statement will produce the following result −
Table "public.company"
Column | Type | Modifiers
-----------+---------------+-----------
id | integer | not null
name | text | not null
age | integer | not null
address | character(50) |
salary | real |
join_date | date |
Indexes:
"company_pkey" PRIMARY KEY, btree (id)
PostgreSQL – DROP Table
The PostgreSQL DROP TABLE statement is used to remove a table definition and all associated data, indexes, rules, triggers, and constraints for that table.
You have to be careful while using this command because once a table is deleted then all the information available in the table would also be lost forever.
Syntax
Basic syntax of DROP TABLE statement is as follows −
DROP TABLE table_name;
Example
We had created the tables DEPARTMENT and COMPANY in the previous chapter. First, verify these tables (use d to list the tables) −
testdb-# d
This would produce the following result −
List of relations
Schema | Name | Type | Owner
--------+------------+-------+----------
public | company | table | postgres
public | department | table | postgres
(2 rows)
This means DEPARTMENT and COMPANY tables are present. So let us drop them as follows −
testdb=# drop table department, company;
This would produce the following result −
DROP TABLE
testdb=# d
relations found.
testdb=#
The message returned DROP TABLE indicates that drop command is executed successfully.
PostgreSQL – Schema
A schema is a named collection of tables. A schema can also contain views, indexes, sequences, data types, operators, and functions. Schemas are analogous to directories at the operating system level, except that schemas cannot be nested. PostgreSQL statement CREATE SCHEMA creates a schema.
Syntax
The basic syntax of CREATE SCHEMA is as follows −
CREATE SCHEMA name;
Where name is the name of the schema.
Syntax to Create Table in Schema
The basic syntax to create table in schema is as follows −
CREATE TABLE myschema.mytable (
...
);
Example
Let us see an example for creating a schema. Connect to the database testdb and create a schema myschema as follows −
testdb=# create schema myschema;
CREATE SCHEMA
The message “CREATE SCHEMA” signifies that the schema is created successfully.
Now, let us create a table in the above schema as follows −
testdb=# create table myschema.company(
ID INT NOT NULL,
NAME VARCHAR (20) NOT NULL,
AGE INT NOT NULL,
ADDRESS CHAR (25),
SALARY DECIMAL (18, 2),
PRIMARY KEY (ID)
);
This will create an empty table. You can verify the table created with the command given below −
testdb=# select * from myschema.company;
This would produce the following result −
id | name | age | address | salary
----+------+-----+---------+--------
(0 rows)
Syntax to Drop Schema
To drop a schema if it is empty (all objects in it have been dropped), use the command −
DROP SCHEMA myschema;
To drop a schema including all contained objects, use the command −
DROP SCHEMA myschema CASCADE;
Advantages of using a Schema
-
It allows many users to use one database without interfering with each other.
-
It organizes database objects into logical groups to make them more manageable.
-
Third-party applications can be put into separate schemas so they do not collide with the names of other objects.
PostgreSQL – INSERT Query
The PostgreSQL INSERT INTO statement allows one to insert new rows into a table. One can insert a single row at a time or several rows as a result of a query.
Syntax
Basic syntax of INSERT INTO statement is as follows −
INSERT INTO TABLE_NAME (column1, column2, column3,...columnN)
VALUES (value1, value2, value3,...valueN);
-
Here, column1, column2,…columnN are the names of the columns in the table into which you want to insert data.
-
The target column names can be listed in any order. The values supplied by the VALUES clause or query are associated with the explicit or implicit column list left-to-right.
You may not need to specify the column(s) name in the SQL query if you are adding values for all the columns of the table. However, make sure the order of the values is in the same order as the columns in the table. The SQL INSERT INTO syntax would be as follows −
INSERT INTO TABLE_NAME VALUES (value1,value2,value3,...valueN);
Output
The following table summarizes the output messages and their meaning −
| S. No. |
Output Message & Description |
| 1 |
INSERT oid 1
Message returned if only one row was inserted. oid is the numeric OID of the inserted row.
|
| 2 |
INSERT 0 #
Message returned if more than one rows were inserted. # is the number of rows inserted.
|
Examples
Let us create COMPANY table in testdb as follows −
CREATE TABLE COMPANY(
ID INT PRIMARY KEY NOT NULL,
NAME TEXT NOT NULL,
AGE INT NOT NULL,
ADDRESS CHAR(50),
SALARY REAL,
JOIN_DATE DATE
);
The following example inserts a row into the COMPANY table −
INSERT INTO COMPANY (ID,NAME,AGE,ADDRESS,SALARY,JOIN_DATE) VALUES (1, ''Paul'', 32, ''California'', 20000.00,''2001-07-13'');
The following example is to insert a row; here salary column is omitted and therefore it will have the default value −
INSERT INTO COMPANY (ID,NAME,AGE,ADDRESS,JOIN_DATE) VALUES (2, ''Allen'', 25, ''Texas'', ''2007-12-13'');
The following example uses the DEFAULT clause for the JOIN_DATE column rather than specifying a value −
INSERT INTO COMPANY (ID,NAME,AGE,ADDRESS,SALARY,JOIN_DATE) VALUES (3, ''Teddy'', 23, ''Norway'', 20000.00, DEFAULT );
The following example inserts multiple rows using the multirow VALUES syntax −
INSERT INTO COMPANY (ID,NAME,AGE,ADDRESS,SALARY,JOIN_DATE) VALUES (4, ''Mark'', 25, ''Rich-Mond '', 65000.00, ''2007-12-13'' ), (5, ''David'', 27, ''Texas'', 85000.00, ''2007-12-13'');
All the above statements would create the following records in COMPANY table. The next chapter will teach you how to display all these records from a table.
ID NAME AGE ADDRESS SALARY JOIN_DATE
---- ---------- ----- ---------- ------- --------
1 Paul 32 California 20000.0 2001-07-13
2 Allen 25 Texas 2007-12-13
3 Teddy 23 Norway 20000.0
4 Mark 25 Rich-Mond 65000.0 2007-12-13
5 David 27 Texas 85000.0 2007-12-13
PostgreSQL – SELECT Query
PostgreSQL SELECT statement is used to fetch the data from a database table, which returns data in the form of result table. These result tables are called result-sets.
Syntax
The basic syntax of SELECT statement is as follows −
SELECT column1, column2, columnN FROM table_name;
Here, column1, column2…are the fields of a table, whose values you want to fetch. If you want to fetch all the fields available in the field then you can use the following syntax −
SELECT * FROM table_name;
Example
Consider the table having records as follows −
id | name | age | address | salary
----+-------+-----+-----------+--------
1 | Paul | 32 | California| 20000
2 | Allen | 25 | Texas | 15000
3 | Teddy | 23 | Norway | 20000
4 | Mark | 25 | Rich-Mond | 65000
5 | David | 27 | Texas | 85000
6 | Kim | 22 | South-Hall| 45000
7 | James | 24 | Houston | 10000
(7 rows)
The following is an example, which would fetch ID, Name and Salary fields of the customers available in CUSTOMERS table −
testdb=# SELECT ID, NAME, SALARY FROM COMPANY ;
This would produce the following result −
id | name | salary
----+-------+--------
1 | Paul | 20000
2 | Allen | 15000
3 | Teddy | 20000
4 | Mark | 65000
5 | David | 85000
6 | Kim | 45000
7 | James | 10000
(7 rows)
If you want to fetch all the fields of CUSTOMERS table, then use the following query −
testdb=# SELECT * FROM COMPANY;
This would produce the following result −
id | name | age | address | salary
----+-------+-----+-----------+--------
1 | Paul | 32 | California| 20000
2 | Allen | 25 | Texas | 15000
3 | Teddy | 23 | Norway | 20000
4 | Mark | 25 | Rich-Mond | 65000
5 | David | 27 | Texas | 85000
6 | Kim | 22 | South-Hall| 45000
7 | James | 24 | Houston | 10000
(7 rows)
PostgreSQL – Operators
What is an Operator in PostgreSQL?
An operator is a reserved word or a character used primarily in a PostgreSQL statement”s WHERE clause to perform operation(s), such as comparisons and arithmetic operations.
Operators are used to specify conditions in a PostgreSQL statement and to serve as conjunctions for multiple conditions in a statement.
- Arithmetic operators
- Comparison operators
- Logical operators
- Bitwise operators
PostgreSQL Arithmetic Operators
Assume variable a holds 2 and variable b holds 3, then −
| Operator |
Description |
Example |
| + |
Addition – Adds values on either side of the operator |
a + b will give 5 |
| – |
Subtraction – Subtracts right hand operand from left hand operand |
a – b will give -1 |
| * |
Multiplication – Multiplies values on either side of the operator |
a * b will give 6 |
| / |
Division – Divides left hand operand by right hand operand |
b / a will give 1 |
| % |
Modulus – Divides left hand operand by right hand operand and returns remainder |
b % a will give 1 |
| ^ |
Exponentiation – This gives the exponent value of the right hand operand |
a ^ b will give 8 |
| |/ |
square root |
|/ 25.0 will give 5 |
| ||/ |
Cube root |
||/ 27.0 will give 3 |
| ! |
factorial |
5 ! will give 120 |
| !! |
factorial (prefix operator) |
!! 5 will give 120 |
PostgreSQL Comparison Operators
Assume variable a holds 10 and variable b holds 20, then −
| Operator |
Description |
Example |
| = |
Checks if the values of two operands are equal or not, if yes then condition becomes true. |
(a = b) is not true. |
| != |
Checks if the values of two operands are equal or not, if values are not equal then condition becomes true. |
(a != b) is true. |
| <> |
Checks if the values of two operands are equal or not, if values are not equal then condition becomes true. |
(a <> b) is true. |
| > |
Checks if the value of left operand is greater than the value of right operand, if yes then condition becomes true. |
(a > b) is not true. |
| < |
Checks if the value of left operand is less than the value of right operand, if yes then condition becomes true. |
(a < b) is true. |
| >= |
Checks if the value of left operand is greater than or equal to the value of right operand, if yes then condition becomes true. |
(a >= b) is not true. |
| <= |
Checks if the value of left operand is less than or equal to the value of right operand, if yes then condition becomes true. |
(a <= b) is true. |
PostgreSQL Logical Operators
Here is a list of all the logical operators available in PostgresSQL.
| S. No. |
Operator & Description |
| 1 |
AND
The AND operator allows the existence of multiple conditions in a PostgresSQL statement”s WHERE clause.
|
| 2 |
NOT
The NOT operator reverses the meaning of the logical operator with which it is used. Eg. NOT EXISTS, NOT BETWEEN, NOT IN etc. This is negate operator.
|
| 3 |
OR
The OR operator is used to combine multiple conditions in a PostgresSQL statement”s WHERE clause.
|
PostgreSQL Bit String Operators
Bitwise operator works on bits and performs bit-by-bit operation. The truth table for & and | is as follows −
| p |
q |
p & q |
p | q |
| 0 |
0 |
0 |
0 |
| 0 |
1 |
0 |
1 |
| 1 |
1 |
1 |
1 |
| 1 |
0 |
0 |
1 |
Assume if A = 60; and B = 13; now in binary format they will be as follows −
A = 0011 1100
B = 0000 1101
—————–
A&B = 0000 1100
A|B = 0011 1101
~A = 1100 0011
The Bitwise operators supported by PostgreSQL are listed in the following table −
| Operator |
Description |
Example |
| & |
Binary AND Operator copies a bit to the result if it exists in both operands. |
(A & B) will give 12 which is 0000 1100 |
| | |
Binary OR Operator copies a bit if it exists in either operand. |
(A | B) will give 61 which is 0011 1101 |
| ~ |
Binary Ones Complement Operator is unary and has the effect of ”flipping” bits. |
(~A ) will give -61 which is 1100 0011 in 2”s complement form due to a signed binary number. |
| << |
Binary Left Shift Operator. The left operands value is moved left by the number of bits specified by the right operand. |
A << 2 will give 240 which is 1111 0000 |
| >> |
Binary Right Shift Operator. The left operands value is moved right by the number of bits specified by the right operand. |
A >> 2 will give 15 which is 0000 1111 |
| # |
bitwise XOR. |
A # B will give 49 which is 00110001 |
PostgreSQL – Expressions
An expression is a combination of one or more values, operators, and PostgresSQL functions that evaluate to a value.
PostgreSQL EXPRESSIONS are like formulas and they are written in query language. You can also use to query the database for specific set of data.
Syntax
Consider the basic syntax of the SELECT statement as follows −
SELECT column1, column2, columnN
FROM table_name
WHERE [CONDITION | EXPRESSION];
There are different types of PostgreSQL expressions, which are mentioned below −
PostgreSQL – Boolean Expressions
PostgreSQL Boolean Expressions fetch the data on the basis of matching single value. Following is the syntax −
SELECT column1, column2, columnN
FROM table_name
WHERE SINGLE VALUE MATCHTING EXPRESSION;
Consider the table having records as follows −
testdb# select * from COMPANY;
id | name | age | address | salary
----+-------+-----+-----------+--------
1 | Paul | 32 | California| 20000
2 | Allen | 25 | Texas | 15000
3 | Teddy | 23 | Norway | 20000
4 | Mark | 25 | Rich-Mond | 65000
5 | David | 27 | Texas | 85000
6 | Kim | 22 | South-Hall| 45000
7 | James | 24 | Houston | 10000
(7 rows)
Here is the simple example showing usage of PostgreSQL Boolean Expressions −
testdb=# SELECT * FROM COMPANY WHERE SALARY = 10000;
The above given PostgreSQL statement will produce the following result −
id | name | age | address | salary
----+-------+-----+----------+--------
7 | James | 24 | Houston | 10000
(1 row)
PostgreSQL – Numeric Expression
These expressions are used to perform any mathematical operation in any query. Following is the syntax −
SELECT numerical_expression as OPERATION_NAME
[FROM table_name WHERE CONDITION] ;
Here numerical_expression is used for mathematical expression or any formula. Following is a simple example showing usage of SQL Numeric Expressions −
testdb=# SELECT (15 + 6) AS ADDITION ;
The above given PostgreSQL statement will produce the following result −
addition
----------
21
(1 row)
There are several built-in functions like avg(), sum(), count() to perform what is known as aggregate data calculations against a table or a specific table column.
testdb=# SELECT COUNT(*) AS "RECORDS" FROM COMPANY;
The above given PostgreSQL statement will produce the following result −
RECORDS
---------
7
(1 row)
PostgreSQL – Date Expressions
Date Expressions return the current system date and time values and these expressions are used in various data manipulations.
testdb=# SELECT CURRENT_TIMESTAMP;
The above given PostgreSQL statement will produce the following result −
now
-------------------------------
2013-05-06 14:38:28.078+05:30
(1 row)
PostgreSQL – WHERE Clause
The PostgreSQL WHERE clause is used to specify a condition while fetching the data from single table or joining with multiple tables.
If the given condition is satisfied, only then it returns specific value from the table. You can filter out rows that you do not want included in the result-set by using the WHERE clause.
The WHERE clause not only is used in SELECT statement, but it is also used in UPDATE, DELETE statement, etc., which we would examine in subsequent chapters.
Syntax
The basic syntax of SELECT statement with WHERE clause is as follows −
SELECT column1, column2, columnN
FROM table_name
WHERE [search_condition]
You can specify a search_condition using like >, <, =, LIKE, NOT, etc. The following examples would make this concept clear.
Example
Consider the table having records as follows −
testdb# select * from COMPANY;
id | name | age | address | salary
----+-------+-----+-----------+--------
1 | Paul | 32 | California| 20000
2 | Allen | 25 | Texas | 15000
3 | Teddy | 23 | Norway | 20000
4 | Mark | 25 | Rich-Mond | 65000
5 | David | 27 | Texas | 85000
6 | Kim | 22 | South-Hall| 45000
7 | James | 24 | Houston | 10000
(7 rows)
Here are simple examples showing usage of PostgreSQL Logical Operators. Following SELECT statement will list down all the records where AGE is greater than or equal to 25 AND salary is greater than or equal to 65000.00 −
testdb=# SELECT * FROM COMPANY WHERE AGE >= 25 AND SALARY >= 65000;
The above given PostgreSQL statement will produce the following result −
id | name | age | address | salary
----+-------+-----+------------+--------
4 | Mark | 25 | Rich-Mond | 65000
5 | David | 27 | Texas | 85000
(2 rows)
The following SELECT statement lists down all the records where AGE is greater than or equal to 25 OR salary is greater than or equal to 65000.00 −
testdb=# SELECT * FROM COMPANY WHERE AGE >= 25 OR SALARY >= 65000;
The above given PostgreSQL statement will produce the following result −
id | name | age | address | salary
----+-------+-----+-------------+--------
1 | Paul | 32 | California | 20000
2 | Allen | 25 | Texas | 15000
4 | Mark | 25 | Rich-Mond | 65000
5 | David | 27 | Texas | 85000
(4 rows)
The following SELECT statement lists down all the records where AGE is not NULL which means all the records, because none of the record has AGE equal to NULL −
testdb=# SELECT * FROM COMPANY WHERE AGE IS NOT NULL;
The above given PostgreSQL statement will produce the following result −
id | name | age | address | salary
----+-------+-----+------------+--------
1 | Paul | 32 | California | 20000
2 | Allen | 25 | Texas | 15000
3 | Teddy | 23 | Norway | 20000
4 | Mark | 25 | Rich-Mond | 65000
5 | David | 27 | Texas | 85000
6 | Kim | 22 | South-Hall | 45000
7 | James | 24 | Houston | 10000
(7 rows)
The following SELECT statement lists down all the records where NAME starts with ”Pa”, does not matter what comes after ”Pa”.
testdb=# SELECT * FROM COMPANY WHERE NAME LIKE ''Pa%
The above given PostgreSQL statement will produce the following result −
id | name | age |address | salary
----+------+-----+-----------+--------
1 | Paul | 32 | California| 20000
The following SELECT statement lists down all the records where AGE value is either 25 or 27 −
testdb=# SELECT * FROM COMPANY WHERE AGE IN ( 25, 27 );
The above given PostgreSQL statement will produce the following result −
id | name | age | address | salary
----+-------+-----+------------+--------
2 | Allen | 25 | Texas | 15000
4 | Mark | 25 | Rich-Mond | 65000
5 | David | 27 | Texas | 85000
(3 rows)
The following SELECT statement lists down all the records where AGE value is neither 25 nor 27 −
testdb=# SELECT * FROM COMPANY WHERE AGE NOT IN ( 25, 27 );
The above given PostgreSQL statement will produce the following result −
id | name | age | address | salary
----+-------+-----+------------+--------
1 | Paul | 32 | California | 20000
3 | Teddy | 23 | Norway | 20000
6 | Kim | 22 | South-Hall | 45000
7 | James | 24 | Houston | 10000
(4 rows)
The following SELECT statement lists down all the records where AGE value is in BETWEEN 25 AND 27 −
testdb=# SELECT * FROM COMPANY WHERE AGE BETWEEN 25 AND 27;
The above given PostgreSQL statement will produce the following result −
id | name | age | address | salary
----+-------+-----+------------+--------
2 | Allen | 25 | Texas | 15000
4 | Mark | 25 | Rich-Mond | 65000
5 | David | 27 | Texas | 85000
(3 rows)
The following SELECT statement makes use of SQL subquery where subquery finds all the records with AGE field having SALARY > 65000 and later WHERE clause is being used along with EXISTS operator to list down all the records where AGE from the outside query exists in the result returned by sub-query −
testdb=# SELECT AGE FROM COMPANY
WHERE EXISTS (SELECT AGE FROM COMPANY WHERE SALARY > 65000);
The above given PostgreSQL statement will produce the following result −
age
-----
32
25
23
25
27
22
24
(7 rows)
The following SELECT statement makes use of SQL subquery where subquery finds all the records with AGE field having SALARY > 65000 and later WHERE clause is being used along with > operator to list down all the records where AGE from outside query is greater than the age in the result returned by sub-query −
testdb=# SELECT * FROM COMPANY
WHERE AGE > (SELECT AGE FROM COMPANY WHERE SALARY > 65000);
The above given PostgreSQL statement will produce the following result −
id | name | age | address | salary
----+------+-----+------------+--------
1 | Paul | 32 | California | 20000
AND and OR Conjunctive Operators
The PostgreSQL AND and OR operators are used to combine multiple conditions to narrow down selected data in a PostgreSQL statement. These two operators are called conjunctive operators.
These operators provide a means to make multiple comparisons with different operators in the same PostgreSQL statement.
The AND Operator
The AND operator allows the existence of multiple conditions in a PostgreSQL statement”s WHERE clause. While using AND operator, complete condition will be assumed true when all the conditions are true. For example [condition1] AND [condition2] will be true only when both condition1 and condition2 are true.
Syntax
The basic syntax of AND operator with WHERE clause is as follows −
SELECT column1, column2, columnN
FROM table_name
WHERE [condition1] AND [condition2]...AND [conditionN];
You can combine N number of conditions using AND operator. For an action to be taken by the PostgreSQL statement, whether it be a transaction or query, all conditions separated by the AND must be TRUE.
Example
Consider the table having records as follows −
testdb# select * from COMPANY;
id | name | age | address | salary
----+-------+-----+-----------+--------
1 | Paul | 32 | California| 20000
2 | Allen | 25 | Texas | 15000
3 | Teddy | 23 | Norway | 20000
4 | Mark | 25 | Rich-Mond | 65000
5 | David | 27 | Texas | 85000
6 | Kim | 22 | South-Hall| 45000
7 | James | 24 | Houston | 10000
(7 rows)
The following SELECT statement lists down all the records where AGE is greater than or equal to 25 AND salary is greater than or equal to 65000.00 −
testdb=# SELECT * FROM COMPANY WHERE AGE >= 25 AND SALARY >= 65000;
The above given PostgreSQL statement will produce the following result −
id | name | age | address | salary
----+-------+-----+------------+--------
4 | Mark | 25 | Rich-Mond | 65000
5 | David | 27 | Texas | 85000
(2 rows)
The OR Operator
The OR operator is also used to combine multiple conditions in a PostgreSQL statement”s WHERE clause. While using OR operator, complete condition will be assumed true when at least any of the conditions is true. For example [condition1] OR [condition2] will be true if either condition1 or condition2 is true.
Syntax
The basic syntax of OR operator with WHERE clause is as follows −
SELECT column1, column2, columnN
FROM table_name
WHERE [condition1] OR [condition2]...OR [conditionN]
You can combine N number of conditions using OR operator. For an action to be taken by the PostgreSQL statement, whether it be a transaction or query, only any ONE of the conditions separated by the OR must be TRUE.
Example
Consider the table, having the following records −
# select * from COMPANY;
id | name | age | address | salary
----+-------+-----+-----------+--------
1 | Paul | 32 | California| 20000
2 | Allen | 25 | Texas | 15000
3 | Teddy | 23 | Norway | 20000
4 | Mark | 25 | Rich-Mond | 65000
5 | David | 27 | Texas | 85000
6 | Kim | 22 | South-Hall| 45000
7 | James | 24 | Houston | 10000
(7 rows)
The following SELECT statement lists down all the records where AGE is greater than or equal to 25 OR salary is greater than or equal to 65000.00 −
testdb=# SELECT * FROM COMPANY WHERE AGE >= 25 OR SALARY >= 65000;
The above given PostgreSQL statement will produce the following result −
id | name | age | address | salary
----+-------+-----+------------+--------
1 | Paul | 32 | California | 20000
2 | Allen | 25 | Texas | 15000
4 | Mark | 25 | Rich-Mond | 65000
5 | David | 27 | Texas | 85000
(4 rows)
PostgreSQL – UPDATE Query
The PostgreSQL UPDATE Query is used to modify the existing records in a table. You can use WHERE clause with UPDATE query to update the selected rows. Otherwise, all the rows would be updated.
Syntax
The basic syntax of UPDATE query with WHERE clause is as follows −
UPDATE table_name
SET column1 = value1, column2 = value2...., columnN = valueN
WHERE [condition];
You can combine N number of conditions using AND or OR operators.
Example
Consider the table , having records as follows −
testdb# select * from COMPANY;
id | name | age | address | salary
----+-------+-----+-----------+--------
1 | Paul | 32 | California| 20000
2 | Allen | 25 | Texas | 15000
3 | Teddy | 23 | Norway | 20000
4 | Mark | 25 | Rich-Mond | 65000
5 | David | 27 | Texas | 85000
6 | Kim | 22 | South-Hall| 45000
7 | James | 24 | Houston | 10000
(7 rows)
The following is an example, which would update ADDRESS for a customer, whose ID is 6 −
testdb=# UPDATE COMPANY SET SALARY = 15000 WHERE ID = 3;
Now, COMPANY table would have the following records −
id | name | age | address | salary
----+-------+-----+------------+--------
1 | Paul | 32 | California | 20000
2 | Allen | 25 | Texas | 15000
4 | Mark | 25 | Rich-Mond | 65000
5 | David | 27 | Texas | 85000
6 | Kim | 22 | South-Hall | 45000
7 | James | 24 | Houston | 10000
3 | Teddy | 23 | Norway | 15000
(7 rows)
If you want to modify all ADDRESS and SALARY column values in COMPANY table, you do not need to use WHERE clause and UPDATE query would be as follows −
testdb=# UPDATE COMPANY SET ADDRESS = ''Texas'', SALARY=20000;
Now, COMPANY table will have the following records −
id | name | age | address | salary
----+-------+-----+---------+--------
1 | Paul | 32 | Texas | 20000
2 | Allen | 25 | Texas | 20000
4 | Mark | 25 | Texas | 20000
5 | David | 27 | Texas | 20000
6 | Kim | 22 | Texas | 20000
7 | James | 24 | Texas | 20000
3 | Teddy | 23 | Texas | 20000
(7 rows)
PostgreSQL – DELETE Query
The PostgreSQL DELETE Query is used to delete the existing records from a table. You can use WHERE clause with DELETE query to delete the selected rows. Otherwise, all the records would be deleted.
Syntax
The basic syntax of DELETE query with WHERE clause is as follows −
DELETE FROM table_name
WHERE [condition];
You can combine N number of conditions using AND or OR operators.
Example
Consider the table , having records as follows −
# select * from COMPANY;
id | name | age | address | salary
----+-------+-----+-----------+--------
1 | Paul | 32 | California| 20000
2 | Allen | 25 | Texas | 15000
3 | Teddy | 23 | Norway | 20000
4 | Mark | 25 | Rich-Mond | 65000
5 | David | 27 | Texas | 85000
6 | Kim | 22 | South-Hall| 45000
7 | James | 24 | Houston | 10000
(7 rows)
The following is an example, which would DELETE a customer whose ID is 7 −
testdb=# DELETE FROM COMPANY WHERE ID = 2;
Now, COMPANY table will have the following records −
id | name | age | address | salary
----+-------+-----+-------------+--------
1 | Paul | 32 | California | 20000
3 | Teddy | 23 | Norway | 20000
4 | Mark | 25 | Rich-Mond | 65000
5 | David | 27 | Texas | 85000
6 | Kim | 22 | South-Hall | 45000
7 | James | 24 | Houston | 10000
(6 rows)
If you want to DELETE all the records from COMPANY table, you do not need to use WHERE clause with DELETE queries, which would be as follows −
testdb=# DELETE FROM COMPANY;
Now, COMPANY table does not have any record because all the records have been deleted by the DELETE statement.
PostgreSQL – LIKE Clause
The PostgreSQL LIKE operator is used to match text values against a pattern using wildcards. If the search expression can be matched to the pattern expression, the LIKE operator will return true, which is 1.
There are two wildcards used in conjunction with the LIKE operator −
- The percent sign (%)
- The underscore (_)
The percent sign represents zero, one, or multiple numbers or characters. The underscore represents a single number or character. These symbols can be used in combinations.
If either of these two signs is not used in conjunction with the LIKE clause, then the LIKE acts like the equals operator.
Syntax
The basic syntax of % and _ is as follows −
SELECT FROM table_name
WHERE column LIKE ''XXXX%''
or
SELECT FROM table_name
WHERE column LIKE ''%XXXX%''
or
SELECT FROM table_name
WHERE column LIKE ''XXXX_''
or
SELECT FROM table_name
WHERE column LIKE ''_XXXX''
or
SELECT FROM table_name
WHERE column LIKE ''_XXXX_''
You can combine N number of conditions using AND or OR operators. Here XXXX could be any numeric or string value.
Example
Here are number of examples showing WHERE part having different LIKE clause with ”%” and ”_” operators −
| S. No. |
Statement & Description |
| 1 |
WHERE SALARY::text LIKE ”200%”
Finds any values that start with 200
|
| 2 |
WHERE SALARY::text LIKE ”%200%”
Finds any values that have 200 in any position
|
| 3 |
WHERE SALARY::text LIKE ”_00%”
Finds any values that have 00 in the second and third positions
|
| 4 |
WHERE SALARY::text LIKE ”2_%_%”
Finds any values that start with 2 and are at least 3 characters in length
|
| 5 |
WHERE SALARY::text LIKE ”%2”
Finds any values that end with 2
|
| 6 |
WHERE SALARY::text LIKE ”_2%3”
Finds any values that have 2 in the second position and end with a 3
|
| 7 |
WHERE SALARY::text LIKE ”2___3”
Finds any values in a five-digit number that start with 2 and end with 3
|
Postgres LIKE is String compare only. Hence, we need to explicitly cast the integer column to string as in the examples above.
Let us take a real example, consider the table , having records as follows −
# select * from COMPANY;
id | name | age | address | salary
----+-------+-----+-----------+--------
1 | Paul | 32 | California| 20000
2 | Allen | 25 | Texas | 15000
3 | Teddy | 23 | Norway | 20000
4 | Mark | 25 | Rich-Mond | 65000
5 | David | 27 | Texas | 85000
6 | Kim | 22 | South-Hall| 45000
7 | James | 24 | Houston | 10000
(7 rows)
The following is an example, which would display all the records from COMPANY table where AGE starts with 2 −
testdb=# SELECT * FROM COMPANY WHERE AGE::text LIKE ''2%
This would produce the following result −
id | name | age | address | salary
----+-------+-----+-------------+--------
2 | Allen | 25 | Texas | 15000
3 | Teddy | 23 | Norway | 20000
4 | Mark | 25 | Rich-Mond | 65000
5 | David | 27 | Texas | 85000
6 | Kim | 22 | South-Hall | 45000
7 | James | 24 | Houston | 10000
8 | Paul | 24 | Houston | 20000
(7 rows)
The following is an example, which would display all the records from COMPANY table where ADDRESS will have a hyphen (-) inside the text −
testdb=# SELECT * FROM COMPANY WHERE ADDRESS LIKE ''%-%
This would produce the following result −
id | name | age | address | salary
----+------+-----+-------------------------------------------+--------
4 | Mark | 25 | Rich-Mond | 65000
6 | Kim | 22 | South-Hall | 45000
(2 rows)
PostgreSQL – LIMIT Clause
The PostgreSQL LIMIT clause is used to limit the data amount returned by the SELECT statement.
Syntax
The basic syntax of SELECT statement with LIMIT clause is as follows −
SELECT column1, column2, columnN
FROM table_name
LIMIT [no of rows]
The following is the syntax of LIMIT clause when it is used along with OFFSET clause −
SELECT column1, column2, columnN
FROM table_name
LIMIT [no of rows] OFFSET [row num]
LIMIT and OFFSET allow you to retrieve just a portion of the rows that are generated by the rest of the query.
Example
Consider the table having records as follows −
# select * from COMPANY;
id | name | age | address | salary
----+-------+-----+-----------+--------
1 | Paul | 32 | California| 20000
2 | Allen | 25 | Texas | 15000
3 | Teddy | 23 | Norway | 20000
4 | Mark | 25 | Rich-Mond | 65000
5 | David | 27 | Texas | 85000
6 | Kim | 22 | South-Hall| 45000
7 | James | 24 | Houston | 10000
(7 rows)
The following is an example, which limits the row in the table according to the number of rows you want to fetch from table −
testdb=# SELECT * FROM COMPANY LIMIT 4;
This would produce the following result −
id | name | age | address | salary
----+-------+-----+-------------+--------
1 | Paul | 32 | California | 20000
2 | Allen | 25 | Texas | 15000
3 | Teddy | 23 | Norway | 20000
4 | Mark | 25 | Rich-Mond | 65000
(4 rows)
However, in certain situation, you may need to pick up a set of records from a particular offset. Here is an example, which picks up three records starting from the third position −
testdb=# SELECT * FROM COMPANY LIMIT 3 OFFSET 2;
This would produce the following result −
id | name | age | address | salary
----+-------+-----+-----------+--------
3 | Teddy | 23 | Norway | 20000
4 | Mark | 25 | Rich-Mond | 65000
5 | David | 27 | Texas | 85000
(3 rows)
PostgreSQL – ORDER BY Clause
The PostgreSQL ORDER BY clause is used to sort the data in ascending or descending order, based on one or more columns.
Syntax
The basic syntax of ORDER BY clause is as follows −
SELECT column-list
FROM table_name
[WHERE condition]
[ORDER BY column1, column2, .. columnN] [ASC | DESC];
You can use more than one column in the ORDER BY clause. Make sure whatever column you are using to sort, that column should be available in column-list.
Example
Consider the table having records as follows −
testdb# select * from COMPANY;
id | name | age | address | salary
----+-------+-----+-----------+--------
1 | Paul | 32 | California| 20000
2 | Allen | 25 | Texas | 15000
3 | Teddy | 23 | Norway | 20000
4 | Mark | 25 | Rich-Mond | 65000
5 | David | 27 | Texas | 85000
6 | Kim | 22 | South-Hall| 45000
7 | James | 24 | Houston | 10000
(7 rows)
The following is an example, which would sort the result in ascending order by SALARY −
testdb=# SELECT * FROM COMPANY ORDER BY AGE ASC;
This would produce the following result −
id | name | age | address | salary
----+-------+-----+------------+--------
6 | Kim | 22 | South-Hall | 45000
3 | Teddy | 23 | Norway | 20000
7 | James | 24 | Houston | 10000
8 | Paul | 24 | Houston | 20000
4 | Mark | 25 | Rich-Mond | 65000
2 | Allen | 25 | Texas | 15000
5 | David | 27 | Texas | 85000
1 | Paul | 32 | California | 20000
9 | James | 44 | Norway | 5000
10 | James | 45 | Texas | 5000
(10 rows)
The following is an example, which would sort the result in ascending order by NAME and SALARY −
testdb=# SELECT * FROM COMPANY ORDER BY NAME, SALARY ASC;
This would produce the following result −
id | name | age | address | salary
----+-------+-----+--------------+--------
2 | Allen | 25 | Texas | 15000
5 | David | 27 | Texas | 85000
10 | James | 45 | Texas | 5000
9 | James | 44 | Norway | 5000
7 | James | 24 | Houston | 10000
6 | Kim | 22 | South-Hall | 45000
4 | Mark | 25 | Rich-Mond | 65000
1 | Paul | 32 | California | 20000
8 | Paul | 24 | Houston | 20000
3 | Teddy | 23 | Norway | 20000
(10 rows)
The following is an example, which would sort the result in descending order by NAME −
testdb=# SELECT * FROM COMPANY ORDER BY NAME DESC;
This would produce the following result −
id | name | age | address | salary
----+-------+-----+------------+--------
3 | Teddy | 23 | Norway | 20000
1 | Paul | 32 | California | 20000
8 | Paul | 24 | Houston | 20000
4 | Mark | 25 | Rich-Mond | 65000
6 | Kim | 22 | South-Hall | 45000
7 | James | 24 | Houston | 10000
9 | James | 44 | Norway | 5000
10 | James | 45 | Texas | 5000
5 | David | 27 | Texas | 85000
2 | Allen | 25 | Texas | 15000
(10 rows)
PostgreSQL – GROUP BY
The PostgreSQL GROUP BY clause is used in collaboration with the SELECT statement to group together those rows in a table that have identical data. This is done to eliminate redundancy in the output and/or compute aggregates that apply to these groups.
The GROUP BY clause follows the WHERE clause in a SELECT statement and precedes the ORDER BY clause.
Syntax
The basic syntax of GROUP BY clause is given below. The GROUP BY clause must follow the conditions in the WHERE clause and must precede the ORDER BY clause if one is used.
SELECT column-list
FROM table_name
WHERE [ conditions ]
GROUP BY column1, column2....columnN
ORDER BY column1, column2....columnN
You can use more than one column in the GROUP BY clause. Make sure whatever column you are using to group, that column should be available in column-list.
Example
Consider the table having records as follows −
# select * from COMPANY;
id | name | age | address | salary
----+-------+-----+-----------+--------
1 | Paul | 32 | California| 20000
2 | Allen | 25 | Texas | 15000
3 | Teddy | 23 | Norway | 20000
4 | Mark | 25 | Rich-Mond | 65000
5 | David | 27 | Texas | 85000
6 | Kim | 22 | South-Hall| 45000
7 | James | 24 | Houston | 10000
(7 rows)
If you want to know the total amount of salary of each customer, then GROUP BY query would be as follows −
testdb=# SELECT NAME, SUM(SALARY) FROM COMPANY GROUP BY NAME;
This would produce the following result −
name | sum
-------+-------
Teddy | 20000
Paul | 20000
Mark | 65000
David | 85000
Allen | 15000
Kim | 45000
James | 10000
(7 rows)
Now, let us create three more records in COMPANY table using the following INSERT statements −
INSERT INTO COMPANY VALUES (8, ''Paul'', 24, ''Houston'', 20000.00);
INSERT INTO COMPANY VALUES (9, ''James'', 44, ''Norway'', 5000.00);
INSERT INTO COMPANY VALUES (10, ''James'', 45, ''Texas'', 5000.00);
Now, our table has the following records with duplicate names −
id | name | age | address | salary
----+-------+-----+--------------+--------
1 | Paul | 32 | California | 20000
2 | Allen | 25 | Texas | 15000
3 | Teddy | 23 | Norway | 20000
4 | Mark | 25 | Rich-Mond | 65000
5 | David | 27 | Texas | 85000
6 | Kim | 22 | South-Hall | 45000
7 | James | 24 | Houston | 10000
8 | Paul | 24 | Houston | 20000
9 | James | 44 | Norway | 5000
10 | James | 45 | Texas | 5000
(10 rows)
Again, let us use the same statement to group-by all the records using NAME column as follows −
testdb=# SELECT NAME, SUM(SALARY) FROM COMPANY GROUP BY NAME ORDER BY NAME;
This would produce the following result −
name | sum
-------+-------
Allen | 15000
David | 85000
James | 20000
Kim | 45000
Mark | 65000
Paul | 40000
Teddy | 20000
(7 rows)
Let us use ORDER BY clause along with GROUP BY clause as follows −
testdb=# SELECT NAME, SUM(SALARY)
FROM COMPANY GROUP BY NAME ORDER BY NAME DESC;
This would produce the following result −
name | sum
-------+-------
Teddy | 20000
Paul | 40000
Mark | 65000
Kim | 45000
James | 20000
David | 85000
Allen | 15000
(7 rows)
PostgreSQL – WITH Clause
In PostgreSQL, the WITH query provides a way to write auxiliary statements for use in a larger query. It helps in breaking down complicated and large queries into simpler forms, which are easily readable. These statements often referred to as Common Table Expressions or CTEs, can be thought of as defining temporary tables that exist just for one query.
The WITH query being CTE query, is particularly useful when subquery is executed multiple times. It is equally helpful in place of temporary tables. It computes the aggregation once and allows us to reference it by its name (may be multiple times) in the queries.
The WITH clause must be defined before it is used in the query.
Syntax
The basic syntax of WITH query is as follows −
WITH
name_for_summary_data AS (
SELECT Statement)
SELECT columns
FROM name_for_summary_data
WHERE conditions <=> (
SELECT column
FROM name_for_summary_data)
[ORDER BY columns]
Where name_for_summary_data is the name given to the WITH clause. The name_for_summary_data can be the same as an existing table name and will take precedence.
You can use data-modifying statements (INSERT, UPDATE or DELETE) in WITH. This allows you to perform several different operations in the same query.
Recursive WITH
Recursive WITH or Hierarchical queries, is a form of CTE where a CTE can reference to itself, i.e., a WITH query can refer to its own output, hence the name recursive.
Example
Consider the table having records as follows −
testdb# select * from COMPANY;
id | name | age | address | salary
----+-------+-----+-----------+--------
1 | Paul | 32 | California| 20000
2 | Allen | 25 | Texas | 15000
3 | Teddy | 23 | Norway | 20000
4 | Mark | 25 | Rich-Mond | 65000
5 | David | 27 | Texas | 85000
6 | Kim | 22 | South-Hall| 45000
7 | James | 24 | Houston | 10000
(7 rows)
Now, let us write a query using the WITH clause to select the records from the above table, as follows −
With CTE AS
(Select
ID
, NAME
, AGE
, ADDRESS
, SALARY
FROM COMPANY )
Select * From CTE;
The above given PostgreSQL statement will produce the following result −
id | name | age | address | salary
----+-------+-----+-----------+--------
1 | Paul | 32 | California| 20000
2 | Allen | 25 | Texas | 15000
3 | Teddy | 23 | Norway | 20000
4 | Mark | 25 | Rich-Mond | 65000
5 | David | 27 | Texas | 85000
6 | Kim | 22 | South-Hall| 45000
7 | James | 24 | Houston | 10000
(7 rows)
Now, let us write a query using the RECURSIVE keyword along with the WITH clause, to find the sum of the salaries less than 20000, as follows −
WITH RECURSIVE t(n) AS (
VALUES (0)
UNION ALL
SELECT SALARY FROM COMPANY WHERE SALARY < 20000
)
SELECT sum(n) FROM t;
The above given PostgreSQL statement will produce the following result −
sum
-------
25000
(1 row)
Let us write a query using data modifying statements along with the WITH clause, as shown below.
First, create a table COMPANY1 similar to the table COMPANY. The query in the example effectively moves rows from COMPANY to COMPANY1. The DELETE in WITH deletes the specified rows from COMPANY, returning their contents by means of its RETURNING clause; and then the primary query reads that output and inserts it into COMPANY1 TABLE −
CREATE TABLE COMPANY1(
ID INT PRIMARY KEY NOT NULL,
NAME TEXT NOT NULL,
AGE INT NOT NULL,
ADDRESS CHAR(50),
SALARY REAL
);
WITH moved_rows AS (
DELETE FROM COMPANY
WHERE
SALARY >= 30000
RETURNING *
)
INSERT INTO COMPANY1 (SELECT * FROM moved_rows);
The above given PostgreSQL statement will produce the following result −
INSERT 0 3
Now, the records in the tables COMPANY and COMPANY1 are as follows −
testdb=# SELECT * FROM COMPANY;
id | name | age | address | salary
----+-------+-----+------------+--------
1 | Paul | 32 | California | 20000
2 | Allen | 25 | Texas | 15000
3 | Teddy | 23 | Norway | 20000
7 | James | 24 | Houston | 10000
(4 rows)
testdb=# SELECT * FROM COMPANY1;
id | name | age | address | salary
----+-------+-----+-------------+--------
4 | Mark | 25 | Rich-Mond | 65000
5 | David | 27 | Texas | 85000
6 | Kim | 22 | South-Hall | 45000
(3 rows)
PostgreSQL – HAVING Clause
The HAVING clause allows us to pick out particular rows where the function”s result meets some condition.
The WHERE clause places conditions on the selected columns, whereas the HAVING clause places conditions on groups created by the GROUP BY clause.
Syntax
The following is the position of the HAVING clause in a SELECT query −
SELECT
FROM
WHERE
GROUP BY
HAVING
ORDER BY
The HAVING clause must follow the GROUP BY clause in a query and must also precede the ORDER BY clause if used. The following is the syntax of the SELECT statement, including the HAVING clause −
SELECT column1, column2
FROM table1, table2
WHERE [ conditions ]
GROUP BY column1, column2
HAVING [ conditions ]
ORDER BY column1, column2
Example
Consider the table having records as follows −
# select * from COMPANY;
id | name | age | address | salary
----+-------+-----+-----------+--------
1 | Paul | 32 | California| 20000
2 | Allen | 25 | Texas | 15000
3 | Teddy | 23 | Norway | 20000
4 | Mark | 25 | Rich-Mond | 65000
5 | David | 27 | Texas | 85000
6 | Kim | 22 | South-Hall| 45000
7 | James | 24 | Houston | 10000
(7 rows)
The following is an example, which would display record for which the name count is less than 2 −
testdb-# SELECT NAME FROM COMPANY GROUP BY name HAVING count(name) < 2;
This would produce the following result −
name
-------
Teddy
Paul
Mark
David
Allen
Kim
James
(7 rows)
Now, let us create three more records in COMPANY table using the following INSERT statements −
INSERT INTO COMPANY VALUES (8, ''Paul'', 24, ''Houston'', 20000.00);
INSERT INTO COMPANY VALUES (9, ''James'', 44, ''Norway'', 5000.00);
INSERT INTO COMPANY VALUES (10, ''James'', 45, ''Texas'', 5000.00);
Now, our table has the following records with duplicate names −
id | name | age | address | salary
----+-------+-----+--------------+--------
1 | Paul | 32 | California | 20000
2 | Allen | 25 | Texas | 15000
3 | Teddy | 23 | Norway | 20000
4 | Mark | 25 | Rich-Mond | 65000
5 | David | 27 | Texas | 85000
6 | Kim | 22 | South-Hall | 45000
7 | James | 24 | Houston | 10000
8 | Paul | 24 | Houston | 20000
9 | James | 44 | Norway | 5000
10 | James | 45 | Texas | 5000
(10 rows)
The following is the example, which would display record for which the name count is greater than 1 −
testdb-# SELECT NAME FROM COMPANY GROUP BY name HAVING count(name) > 1;
This would produce the following result −
name
-------
Paul
James
(2 rows)
PostgreSQL – DISTINCT Keyword
The PostgreSQL DISTINCT keyword is used in conjunction with SELECT statement to eliminate all the duplicate records and fetching only unique records.
There may be a situation when you have multiple duplicate records in a table. While fetching such records, it makes more sense to fetch only unique records instead of fetching duplicate records.
Syntax
The basic syntax of DISTINCT keyword to eliminate duplicate records is as follows −
SELECT DISTINCT column1, column2,.....columnN
FROM table_name
WHERE [condition]
Example
Consider the table having records as follows −
# select * from COMPANY;
id | name | age | address | salary
----+-------+-----+-----------+--------
1 | Paul | 32 | California| 20000
2 | Allen | 25 | Texas | 15000
3 | Teddy | 23 | Norway | 20000
4 | Mark | 25 | Rich-Mond | 65000
5 | David | 27 | Texas | 85000
6 | Kim | 22 | South-Hall| 45000
7 | James | 24 | Houston | 10000
(7 rows)
Let us add two more records to this table as follows −
INSERT INTO COMPANY (ID,NAME,AGE,ADDRESS,SALARY)
VALUES (8, ''Paul'', 32, ''California'', 20000.00 );
INSERT INTO COMPANY (ID,NAME,AGE,ADDRESS,SALARY)
VALUES (9, ''Allen'', 25, ''Texas'', 15000.00 );
Now, the records in the COMPANY table would be −
id | name | age | address | salary
----+-------+-----+------------+--------
1 | Paul | 32 | California | 20000
2 | Allen | 25 | Texas | 15000
3 | Teddy | 23 | Norway | 20000
4 | Mark | 25 | Rich-Mond | 65000
5 | David | 27 | Texas | 85000
6 | Kim | 22 | South-Hall | 45000
7 | James | 24 | Houston | 10000
8 | Paul | 32 | California | 20000
9 | Allen | 25 | Texas | 15000
(9 rows)
First, let us see how the following SELECT query returns duplicate salary records −
testdb=# SELECT name FROM COMPANY;
This would produce the following result −
name
-------
Paul
Allen
Teddy
Mark
David
Kim
James
Paul
Allen
(9 rows)
Now, let us use DISTINCT keyword with the above SELECT query and see the result −
testdb=# SELECT DISTINCT name FROM COMPANY;
This would produce the following result where we do not have any duplicate entry −
name
-------
Teddy
Paul
Mark
David
Allen
Kim
James
(7 rows)
PostgreSQL – CONSTRAINTS
Constraints are the rules enforced on data columns on table. These are used to prevent invalid data from being entered into the database. This ensures the accuracy and reliability of the data in the database.
Constraints could be column level or table level. Column level constraints are applied only to one column whereas table level constraints are applied to the whole table. Defining a data type for a column is a constraint in itself. For example, a column of type DATE constrains the column to valid dates.
The following are commonly used constraints available in PostgreSQL.
-
NOT NULL Constraint − Ensures that a column cannot have NULL value.
-
UNIQUE Constraint − Ensures that all values in a column are different.
-
PRIMARY Key − Uniquely identifies each row/record in a database table.
-
FOREIGN Key − Constrains data based on columns in other tables.
-
CHECK Constraint − The CHECK constraint ensures that all values in a column satisfy certain conditions.
-
EXCLUSION Constraint − The EXCLUDE constraint ensures that if any two rows are compared on the specified column(s) or expression(s) using the specified operator(s), not all of these comparisons will return TRUE.
NOT NULL Constraint
By default, a column can hold NULL values. If you do not want a column to have a NULL value, then you need to define such constraint on this column specifying that NULL is now not allowed for that column. A NOT NULL constraint is always written as a column constraint.
A NULL is not the same as no data; rather, it represents unknown data.
Example
For example, the following PostgreSQL statement creates a new table called COMPANY1 and adds five columns, three of which, ID and NAME and AGE, specify not to accept NULL values −
CREATE TABLE COMPANY1(
ID INT PRIMARY KEY NOT NULL,
NAME TEXT NOT NULL,
AGE INT NOT NULL,
ADDRESS CHAR(50),
SALARY REAL
);
UNIQUE Constraint
The UNIQUE Constraint prevents two records from having identical values in a particular column. In the COMPANY table, for example, you might want to prevent two or more people from having identical age.
Example
For example, the following PostgreSQL statement creates a new table called COMPANY3 and adds five columns. Here, AGE column is set to UNIQUE, so that you cannot have two records with same age −
CREATE TABLE COMPANY3(
ID INT PRIMARY KEY NOT NULL,
NAME TEXT NOT NULL,
AGE INT NOT NULL UNIQUE,
ADDRESS CHAR(50),
SALARY REAL DEFAULT 50000.00
);
PRIMARY KEY Constraint
The PRIMARY KEY constraint uniquely identifies each record in a database table. There can be more UNIQUE columns, but only one primary key in a table. Primary keys are important when designing the database tables. Primary keys are unique ids.
We use them to refer to table rows. Primary keys become foreign keys in other tables, when creating relations among tables. Due to a ”longstanding coding oversight”, primary keys can be NULL in SQLite. This is not the case with other databases
A primary key is a field in a table, which uniquely identifies each row/record in a database table. Primary keys must contain unique values. A primary key column cannot have NULL values.
A table can have only one primary key, which may consist of single or multiple fields. When multiple fields are used as a primary key, they are called a composite key.
If a table has a primary key defined on any field(s), then you cannot have two records having the same value of that field(s).
Example
You already have seen various examples above where we have created COMAPNY4 table with ID as primary key −
CREATE TABLE COMPANY4(
ID INT PRIMARY KEY NOT NULL,
NAME TEXT NOT NULL,
AGE INT NOT NULL,
ADDRESS CHAR(50),
SALARY REAL
);
FOREIGN KEY Constraint
A foreign key constraint specifies that the values in a column (or a group of columns) must match the values appearing in some row of another table. We say this maintains the referential integrity between two related tables. They are called foreign keys because the constraints are foreign; that is, outside the table. Foreign keys are sometimes called a referencing key.
Example
For example, the following PostgreSQL statement creates a new table called COMPANY5 and adds five columns.
CREATE TABLE COMPANY6(
ID INT PRIMARY KEY NOT NULL,
NAME TEXT NOT NULL,
AGE INT NOT NULL,
ADDRESS CHAR(50),
SALARY REAL
);
For example, the following PostgreSQL statement creates a new table called DEPARTMENT1, which adds three columns. The column EMP_ID is the foreign key and references the ID field of the table COMPANY6.
CREATE TABLE DEPARTMENT1(
ID INT PRIMARY KEY NOT NULL,
DEPT CHAR(50) NOT NULL,
EMP_ID INT references COMPANY6(ID)
);
CHECK Constraint
The CHECK Constraint enables a condition to check the value being entered into a record. If the condition evaluates to false, the record violates the constraint and is not entered into the table.
Example
For example, the following PostgreSQL statement creates a new table called COMPANY5 and adds five columns. Here, we add a CHECK with SALARY column, so that you cannot have any SALARY as Zero.
CREATE TABLE COMPANY5(
ID INT PRIMARY KEY NOT NULL,
NAME TEXT NOT NULL,
AGE INT NOT NULL,
ADDRESS CHAR(50),
SALARY REAL CHECK(SALARY > 0)
);
EXCLUSION Constraint
Exclusion constraints ensure that if any two rows are compared on the specified columns or expressions using the specified operators, at least one of these operator comparisons will return false or null.
Example
For example, the following PostgreSQL statement creates a new table called COMPANY7 and adds five columns. Here, we add an EXCLUDE constraint −
CREATE TABLE COMPANY7(
ID INT PRIMARY KEY NOT NULL,
NAME TEXT,
AGE INT ,
ADDRESS CHAR(50),
SALARY REAL,
EXCLUDE USING gist
(NAME WITH =,
AGE WITH )
);
Here, USING gist is the type of index to build and use for enforcement.
You need to execute the command CREATE EXTENSION btree_gist, once per database. This will install the btree_gist extension, which defines the exclusion constraints on plain scalar data types.
As we have enforced the age has to be same, let us see this by inserting records to the table −
INSERT INTO COMPANY7 VALUES(1, ''Paul'', 32, ''California'', 20000.00 );
INSERT INTO COMPANY7 VALUES(2, ''Paul'', 32, ''Texas'', 20000.00 );
INSERT INTO COMPANY7 VALUES(3, ''Paul'', 42, ''California'', 20000.00 );
For the first two INSERT statements, the records are added to the COMPANY7 table. For the third INSERT statement, the following error is displayed −
ERROR: conflicting key value violates exclusion constraint "company7_name_age_excl"
DETAIL: Key (name, age)=(Paul, 42) conflicts with existing key (name, age)=(Paul, 32).
Dropping Constraints
To remove a constraint you need to know its name. If the name is known, it is easy to drop. Else, you need to find out the system-generated name. The psql command d table name can be helpful here. The general syntax is −
ALTER TABLE table_name DROP CONSTRAINT some_name;
PostgreSQL – JOINS
The PostgreSQL Joins clause is used to combine records from two or more tables in a database. A JOIN is a means for combining fields from two tables by using values common to each.
Join Types in PostgreSQL are −
- The CROSS JOIN
- The INNER JOIN
- The LEFT OUTER JOIN
- The RIGHT OUTER JOIN
- The FULL OUTER JOIN
Before we proceed, let us consider two tables, COMPANY and DEPARTMENT. We already have seen INSERT statements to populate COMPANY table. So just let us assume the list of records available in COMPANY table −
id | name | age | address | salary | join_date
----+-------+-----+-----------+--------+-----------
1 | Paul | 32 | California| 20000 | 2001-07-13
3 | Teddy | 23 | Norway | 20000 |
4 | Mark | 25 | Rich-Mond | 65000 | 2007-12-13
5 | David | 27 | Texas | 85000 | 2007-12-13
2 | Allen | 25 | Texas | | 2007-12-13
8 | Paul | 24 | Houston | 20000 | 2005-07-13
9 | James | 44 | Norway | 5000 | 2005-07-13
10 | James | 45 | Texas | 5000 | 2005-07-13
Another table is DEPARTMENT, has the following definition −
CREATE TABLE DEPARTMENT(
ID INT PRIMARY KEY NOT NULL,
DEPT CHAR(50) NOT NULL,
EMP_ID INT NOT NULL
);
Here is the list of INSERT statements to populate DEPARTMENT table −
INSERT INTO DEPARTMENT (ID, DEPT, EMP_ID)
VALUES (1, ''IT Billing'', 1 );
INSERT INTO DEPARTMENT (ID, DEPT, EMP_ID)
VALUES (2, ''Engineering'', 2 );
INSERT INTO DEPARTMENT (ID, DEPT, EMP_ID)
VALUES (3, ''Finance'', 7 );
Finally, we have the following list of records available in DEPARTMENT table −
id | dept | emp_id
----+-------------+--------
1 | IT Billing | 1
2 | Engineering | 2
3 | Finance | 7
The CROSS JOIN
A CROSS JOIN matches every row of the first table with every row of the second table. If the input tables have x and y columns, respectively, the resulting table will have x+y columns. Because CROSS JOINs have the potential to generate extremely large tables, care must be taken to use them only when appropriate.
The following is the syntax of CROSS JOIN −
SELECT ... FROM table1 CROSS JOIN table2 ...
Based on the above tables, we can write a CROSS JOIN as follows −
testdb=# SELECT EMP_ID, NAME, DEPT FROM COMPANY CROSS JOIN DEPARTMENT;
The above given query will produce the following result −
emp_id| name | dept
------|-------|--------------
1 | Paul | IT Billing
1 | Teddy | IT Billing
1 | Mark | IT Billing
1 | David | IT Billing
1 | Allen | IT Billing
1 | Paul | IT Billing
1 | James | IT Billing
1 | James | IT Billing
2 | Paul | Engineering
2 | Teddy | Engineering
2 | Mark | Engineering
2 | David | Engineering
2 | Allen | Engineering
2 | Paul | Engineering
2 | James | Engineering
2 | James | Engineering
7 | Paul | Finance
7 | Teddy | Finance
7 | Mark | Finance
7 | David | Finance
7 | Allen | Finance
7 | Paul | Finance
7 | James | Finance
7 | James | Finance
The INNER JOIN
A INNER JOIN creates a new result table by combining column values of two tables (table1 and table2) based upon the join-predicate. The query compares each row of table1 with each row of table2 to find all pairs of rows, which satisfy the join-predicate. When the join-predicate is satisfied, column values for each matched pair of rows of table1 and table2 are combined into a result row.
An INNER JOIN is the most common type of join and is the default type of join. You can use INNER keyword optionally.
The following is the syntax of INNER JOIN −
SELECT table1.column1, table2.column2...
FROM table1
INNER JOIN table2
ON table1.common_filed = table2.common_field;
Based on the above tables, we can write an INNER JOIN as follows −
testdb=# SELECT EMP_ID, NAME, DEPT FROM COMPANY INNER JOIN DEPARTMENT
ON COMPANY.ID = DEPARTMENT.EMP_ID;
The above given query will produce the following result −
emp_id | name | dept
--------+-------+------------
1 | Paul | IT Billing
2 | Allen | Engineering
The LEFT OUTER JOIN
The OUTER JOIN is an extension of the INNER JOIN. SQL standard defines three types of OUTER JOINs: LEFT, RIGHT, and FULL and PostgreSQL supports all of these.
In case of LEFT OUTER JOIN, an inner join is performed first. Then, for each row in table T1 that does not satisfy the join condition with any row in table T2, a joined row is added with null values in columns of T2. Thus, the joined table always has at least one row for each row in T1.
The following is the syntax of LEFT OUTER JOIN −
SELECT ... FROM table1 LEFT OUTER JOIN table2 ON conditional_expression ...
Based on the above tables, we can write an inner join as follows −
testdb=# SELECT EMP_ID, NAME, DEPT FROM COMPANY LEFT OUTER JOIN DEPARTMENT
ON COMPANY.ID = DEPARTMENT.EMP_ID;
The above given query will produce the following result −
emp_id | name | dept
--------+-------+------------
1 | Paul | IT Billing
2 | Allen | Engineering
| James |
| David |
| Paul |
| Mark |
| Teddy |
| James |
The RIGHT OUTER JOIN
First, an inner join is performed. Then, for each row in table T2 that does not satisfy the join condition with any row in table T1, a joined row is added with null values in columns of T1. This is the converse of a left join; the result table will always have a row for each row in T2.
The following is the syntax of RIGHT OUTER JOIN −
SELECT ... FROM table1 RIGHT OUTER JOIN table2 ON conditional_expression ...
Based on the above tables, we can write an inner join as follows −
testdb=# SELECT EMP_ID, NAME, DEPT FROM COMPANY RIGHT OUTER JOIN DEPARTMENT
ON COMPANY.ID = DEPARTMENT.EMP_ID;
The above given query will produce the following result −
emp_id | name | dept
--------+-------+--------
1 | Paul | IT Billing
2 | Allen | Engineering
7 | | Finance
The FULL OUTER JOIN
First, an inner join is performed. Then, for each row in table T1 that does not satisfy the join condition with any row in table T2, a joined row is added with null values in columns of T2. In addition, for each row of T2 that does not satisfy the join condition with any row in T1, a joined row with null values in the columns of T1 is added.
The following is the syntax of FULL OUTER JOIN −
SELECT ... FROM table1 FULL OUTER JOIN table2 ON conditional_expression ...
Based on the above tables, we can write an inner join as follows −
testdb=# SELECT EMP_ID, NAME, DEPT FROM COMPANY FULL OUTER JOIN DEPARTMENT
ON COMPANY.ID = DEPARTMENT.EMP_ID;
The above given query will produce the following result −
emp_id | name | dept
--------+-------+---------------
1 | Paul | IT Billing
2 | Allen | Engineering
7 | | Finance
| James |
| David |
| Paul |
| Mark |
| Teddy |
| James |
PostgreSQL – UNIONS Clause
The PostgreSQL UNION clause/operator is used to combine the results of two or more SELECT statements without returning any duplicate rows.
To use UNION, each SELECT must have the same number of columns selected, the same number of column expressions, the same data type, and have them in the same order but they do not have to be the same length.
Syntax
The basic syntax of UNION is as follows −
SELECT column1 [, column2 ]
FROM table1 [, table2 ]
[WHERE condition]
UNION
SELECT column1 [, column2 ]
FROM table1 [, table2 ]
[WHERE condition]
Here, given condition could be any given expression based on your requirement.
Example
Consider the following two tables, (a) table is as follows −
testdb=# SELECT * from COMPANY;
id | name | age | address | salary
----+-------+-----+-----------+--------
1 | Paul | 32 | California| 20000
2 | Allen | 25 | Texas | 15000
3 | Teddy | 23 | Norway | 20000
4 | Mark | 25 | Rich-Mond | 65000
5 | David | 27 | Texas | 85000
6 | Kim | 22 | South-Hall| 45000
7 | James | 24 | Houston | 10000
(7 rows)
(b) Another table is as follows −
testdb=# SELECT * from DEPARTMENT;
id | dept | emp_id
----+-------------+--------
1 | IT Billing | 1
2 | Engineering | 2
3 | Finance | 7
4 | Engineering | 3
5 | Finance | 4
6 | Engineering | 5
7 | Finance | 6
(7 rows)
Now let us join these two tables using SELECT statement along with UNION clause as follows −
testdb=# SELECT EMP_ID, NAME, DEPT FROM COMPANY INNER JOIN DEPARTMENT
ON COMPANY.ID = DEPARTMENT.EMP_ID
UNION
SELECT EMP_ID, NAME, DEPT FROM COMPANY LEFT OUTER JOIN DEPARTMENT
ON COMPANY.ID = DEPARTMENT.EMP_ID;
This would produce the following result −
emp_id | name | dept
--------+-------+--------------
5 | David | Engineering
6 | Kim | Finance
2 | Allen | Engineering
3 | Teddy | Engineering
4 | Mark | Finance
1 | Paul | IT Billing
7 | James | Finance
(7 rows)
The UNION ALL Clause
The UNION ALL operator is used to combine the results of two SELECT statements including duplicate rows. The same rules that apply to UNION apply to the UNION ALL operator as well.
Syntax
The basic syntax of UNION ALL is as follows −
SELECT column1 [, column2 ]
FROM table1 [, table2 ]
[WHERE condition]
UNION ALL
SELECT column1 [, column2 ]
FROM table1 [, table2 ]
[WHERE condition]
Here, given condition could be any given expression based on your requirement.
Example
Now, let us join above-mentioned two tables in our SELECT statement as follows −
testdb=# SELECT EMP_ID, NAME, DEPT FROM COMPANY INNER JOIN DEPARTMENT
ON COMPANY.ID = DEPARTMENT.EMP_ID
UNION ALL
SELECT EMP_ID, NAME, DEPT FROM COMPANY LEFT OUTER JOIN DEPARTMENT
ON COMPANY.ID = DEPARTMENT.EMP_ID;
This would produce the following result −
emp_id | name | dept
--------+-------+--------------
1 | Paul | IT Billing
2 | Allen | Engineering
7 | James | Finance
3 | Teddy | Engineering
4 | Mark | Finance
5 | David | Engineering
6 | Kim | Finance
1 | Paul | IT Billing
2 | Allen | Engineering
7 | James | Finance
3 | Teddy | Engineering
4 | Mark | Finance
5 | David | Engineering
6 | Kim | Finance
(14 rows)
PostgreSQL – NULL Values
The PostgreSQL NULL is the term used to represent a missing value. A NULL value in a table is a value in a field that appears to be blank.
A field with a NULL value is a field with no value. It is very important to understand that a NULL value is different from a zero value or a field that contains spaces.
Syntax
The basic syntax of using NULL while creating a table is as follows −
CREATE TABLE COMPANY(
ID INT PRIMARY KEY NOT NULL,
NAME TEXT NOT NULL,
AGE INT NOT NULL,
ADDRESS CHAR(50),
SALARY REAL
);
Here, NOT NULL signifies that column should always accept an explicit value of the given data type. There are two columns where we did not use NOT NULL. Hence, this means these columns could be NULL.>
A field with a NULL value is one that has been left blank during record creation.
Example
The NULL value can cause problems when selecting data, because when comparing an unknown value to any other value, the result is always unknown and not included in the final results. Consider the following table, having the following records −
ID NAME AGE ADDRESS SALARY
---------- ---------- ---------- ---------- ----------
1 Paul 32 California 20000.0
2 Allen 25 Texas 15000.0
3 Teddy 23 Norway 20000.0
4 Mark 25 Rich-Mond 65000.0
5 David 27 Texas 85000.0
6 Kim 22 South-Hall 45000.0
7 James 24 Houston 10000.0
Let us use the UPDATE statement to set few nullable values as NULL as follows −
testdb=# UPDATE COMPANY SET ADDRESS = NULL, SALARY = NULL where ID IN(6,7);
Now, COMPANY table should have the following records −
id | name | age | address | salary
----+-------+-----+-------------+--------
1 | Paul | 32 | California | 20000
2 | Allen | 25 | Texas | 15000
3 | Teddy | 23 | Norway | 20000
4 | Mark | 25 | Rich-Mond | 65000
5 | David | 27 | Texas | 85000
6 | Kim | 22 | |
7 | James | 24 | |
(7 rows)
Next, let us see the usage of IS NOT NULL operator to list down all the records where SALARY is not NULL −
testdb=# SELECT ID, NAME, AGE, ADDRESS, SALARY
FROM COMPANY
WHERE SALARY IS NOT NULL;
The above given PostgreSQL statement will produce the following result −
id | name | age | address | salary
----+-------+-----+------------+--------
1 | Paul | 32 | California | 20000
2 | Allen | 25 | Texas | 15000
3 | Teddy | 23 | Norway | 20000
4 | Mark | 25 | Rich-Mond | 65000
5 | David | 27 | Texas | 85000
(5 rows)
The following is the usage of IS NULL operator which will list down all the records where SALARY is NULL −
testdb=# SELECT ID, NAME, AGE, ADDRESS, SALARY
FROM COMPANY
WHERE SALARY IS NULL;
The above given PostgreSQL statement will produce the following result −
id | name | age | address | salary
----+-------+-----+---------+--------
6 | Kim | 22 | |
7 | James | 24 | |
(2 rows)
PostgreSQL – ALIAS Syntax
You can rename a table or a column temporarily by giving another name, which is known as ALIAS. The use of table aliases means to rename a table in a particular PostgreSQL statement. Renaming is a temporary change and the actual table name does not change in the database.
The column aliases are used to rename a table”s columns for the purpose of a particular PostgreSQL query.
Syntax
The basic syntax of table alias is as follows −
SELECT column1, column2....
FROM table_name AS alias_name
WHERE [condition];
The basic syntax of column alias is as follows −
SELECT column_name AS alias_name
FROM table_name
WHERE [condition];
Example
Consider the following two tables, (a) table is as follows −
testdb=# select * from COMPANY;
id | name | age | address | salary
----+-------+-----+-----------+--------
1 | Paul | 32 | California| 20000
2 | Allen | 25 | Texas | 15000
3 | Teddy | 23 | Norway | 20000
4 | Mark | 25 | Rich-Mond | 65000
5 | David | 27 | Texas | 85000
6 | Kim | 22 | South-Hall| 45000
7 | James | 24 | Houston | 10000
(7 rows)
(b) Another table is as follows −
id | dept | emp_id
----+--------------+--------
1 | IT Billing | 1
2 | Engineering | 2
3 | Finance | 7
4 | Engineering | 3
5 | Finance | 4
6 | Engineering | 5
7 | Finance | 6
(7 rows)
Now, following is the usage of TABLE ALIAS where we use C and D as aliases for COMPANY and DEPARTMENT tables, respectively −
testdb=# SELECT C.ID, C.NAME, C.AGE, D.DEPT
FROM COMPANY AS C, DEPARTMENT AS D
WHERE C.ID = D.EMP_ID;
The above given PostgreSQL statement will produce the following result −
id | name | age | dept
----+-------+-----+------------
1 | Paul | 32 | IT Billing
2 | Allen | 25 | Engineering
7 | James | 24 | Finance
3 | Teddy | 23 | Engineering
4 | Mark | 25 | Finance
5 | David | 27 | Engineering
6 | Kim | 22 | Finance
(7 rows)
Let us see an example for the usage of COLUMN ALIAS where COMPANY_ID is an alias of ID column and COMPANY_NAME is an alias of name column −
testdb=# SELECT C.ID AS COMPANY_ID, C.NAME AS COMPANY_NAME, C.AGE, D.DEPT
FROM COMPANY AS C, DEPARTMENT AS D
WHERE C.ID = D.EMP_ID;
The above given PostgreSQL statement will produce the following result −
company_id | company_name | age | dept
------------+--------------+-----+------------
1 | Paul | 32 | IT Billing
2 | Allen | 25 | Engineering
7 | James | 24 | Finance
3 | Teddy | 23 | Engineering
4 | Mark | 25 | Finance
5 | David | 27 | Engineering
6 | Kim | 22 | Finance
(7 rows)
PostgreSQL – TRIGGERS
PostgreSQL Triggers are database callback functions, which are automatically performed/invoked when a specified database event occurs.
The following are important points about PostgreSQL triggers −
-
PostgreSQL trigger can be specified to fire
-
Before the operation is attempted on a row (before constraints are checked and the INSERT, UPDATE or DELETE is attempted)
-
After the operation has completed (after constraints are checked and the INSERT, UPDATE, or DELETE has completed)
-
Instead of the operation (in the case of inserts, updates or deletes on a view)
-
A trigger that is marked FOR EACH ROW is called once for every row that the operation modifies. In contrast, a trigger that is marked FOR EACH STATEMENT only executes once for any given operation, regardless of how many rows it modifies.
-
Both, the WHEN clause and the trigger actions, may access elements of the row being inserted, deleted or updated using references of the form NEW.column-name and OLD.column-name, where column-name is the name of a column from the table that the trigger is associated with.
-
If a WHEN clause is supplied, the PostgreSQL statements specified are only executed for rows for which the WHEN clause is true. If no WHEN clause is supplied, the PostgreSQL statements are executed for all rows.
-
If multiple triggers of the same kind are defined for the same event, they will be fired in alphabetical order by name.
-
The BEFORE, AFTER or INSTEAD OF keyword determines when the trigger actions will be executed relative to the insertion, modification or removal of the associated row.
-
Triggers are automatically dropped when the table that they are associated with is dropped.
-
The table to be modified must exist in the same database as the table or view to which the trigger is attached and one must use just tablename, not database.tablename.
-
A CONSTRAINT option when specified creates a constraint trigger. This is the same as a regular trigger except that the timing of the trigger firing can be adjusted using SET CONSTRAINTS. Constraint triggers are expected to raise an exception when the constraints they implement are violated.
Syntax
The basic syntax of creating a trigger is as follows −
CREATE TRIGGER trigger_name [BEFORE|AFTER|INSTEAD OF] event_name
ON table_name
[
-- Trigger logic goes here....
];
Here, event_name could be INSERT, DELETE, UPDATE, and TRUNCATE database operation on the mentioned table table_name. You can optionally specify FOR EACH ROW after table name.
The following is the syntax of creating a trigger on an UPDATE operation on one or more specified columns of a table as follows −
CREATE TRIGGER trigger_name [BEFORE|AFTER] UPDATE OF column_name
ON table_name
[
-- Trigger logic goes here....
];
Example
Let us consider a case where we want to keep audit trial for every record being inserted in COMPANY table, which we will create newly as follows (Drop COMPANY table if you already have it).
testdb=# CREATE TABLE COMPANY(
ID INT PRIMARY KEY NOT NULL,
NAME TEXT NOT NULL,
AGE INT NOT NULL,
ADDRESS CHAR(50),
SALARY REAL
);
To keep audit trial, we will create a new table called AUDIT where log messages will be inserted whenever there is an entry in COMPANY table for a new record −
testdb=# CREATE TABLE AUDIT(
EMP_ID INT NOT NULL,
ENTRY_DATE TEXT NOT NULL
);
Here, ID is the AUDIT record ID, and EMP_ID is the ID, which will come from COMPANY table, and DATE will keep timestamp when the record will be created in COMPANY table. So now, let us create a trigger on COMPANY table as follows −
testdb=# CREATE TRIGGER example_trigger AFTER INSERT ON COMPANY
FOR EACH ROW EXECUTE PROCEDURE auditlogfunc();
Where auditlogfunc() is a PostgreSQL procedure and has the following definition −
CREATE OR REPLACE FUNCTION auditlogfunc() RETURNS TRIGGER AS $example_table$
BEGIN
INSERT INTO AUDIT(EMP_ID, ENTRY_DATE) VALUES (new.ID, current_timestamp);
RETURN NEW;
END;
$example_table$ LANGUAGE plpgsql;
Now, we will start the actual work. Let us start inserting record in COMPANY table which should result in creating an audit log record in AUDIT table. So let us create one record in COMPANY table as follows −
testdb=# INSERT INTO COMPANY (ID,NAME,AGE,ADDRESS,SALARY)
VALUES (1, ''Paul'', 32, ''California'', 20000.00 );
This will create one record in COMPANY table, which is as follows −
id | name | age | address | salary
----+------+-----+--------------+--------
1 | Paul | 32 | California | 20000
Same time, one record will be created in AUDIT table. This record is the result of a trigger, which we have created on INSERT operation on COMPANY table. Similarly, you can create your triggers on UPDATE and DELETE operations based on your requirements.
emp_id | entry_date
--------+-------------------------------
1 | 2013-05-05 15:49:59.968+05:30
(1 row)
Listing TRIGGERS
You can list down all the triggers in the current database from pg_trigger table as follows −
testdb=# SELECT * FROM pg_trigger;
The above given PostgreSQL statement will list down all triggers.
If you want to list the triggers on a particular table, then use AND clause with table name as follows −
testdb=# SELECT tgname FROM pg_trigger, pg_class WHERE tgrelid=pg_class.oid AND relname=''company
The above given PostgreSQL statement will also list down only one entry as follows −
tgname
-----------------
example_trigger
(1 row)
Dropping TRIGGERS
The following is the DROP command, which can be used to drop an existing trigger −
testdb=# DROP TRIGGER trigger_name;
PostgreSQL – INDEXES
Indexes are special lookup tables that the database search engine can use to speed up data retrieval. Simply put, an index is a pointer to data in a table. An index in a database is very similar to an index in the back of a book.
For example, if you want to reference all pages in a book that discusses a certain topic, you have to first refer to the index, which lists all topics alphabetically and then refer to one or more specific page numbers.
An index helps to speed up SELECT queries and WHERE clauses; however, it slows down data input, with UPDATE and INSERT statements. Indexes can be created or dropped with no effect on the data.
Creating an index involves the CREATE INDEX statement, which allows you to name the index, to specify the table and which column or columns to index, and to indicate whether the index is in ascending or descending order.
Indexes can also be unique, similar to the UNIQUE constraint, in that the index prevents duplicate entries in the column or combination of columns on which there”s an index.
The CREATE INDEX Command
The basic syntax of CREATE INDEX is as follows −
CREATE INDEX index_name ON table_name;
Index Types
PostgreSQL provides several index types: B-tree, Hash, GiST, SP-GiST and GIN. Each Index type uses a different algorithm that is best suited to different types of queries. By default, the CREATE INDEX command creates B-tree indexes, which fit the most common situations.
Single-Column Indexes
A single-column index is one that is created based on only one table column. The basic syntax is as follows −
CREATE INDEX index_name
ON table_name (column_name);
Multicolumn Indexes
A multicolumn index is defined on more than one column of a table. The basic syntax is as follows −
CREATE INDEX index_name
ON table_name (column1_name, column2_name);
Whether to create a single-column index or a multicolumn index, take into consideration the column(s) that you may use very frequently in a query”s WHERE clause as filter conditions.
Should there be only one column used, a single-column index should be the choice. Should there be two or more columns that are frequently used in the WHERE clause as filters, the multicolumn index would be the best choice.
Unique Indexes
Unique indexes are used not only for performance, but also for data integrity. A unique index does not allow any duplicate values to be inserted into the table. The basic syntax is as follows −
CREATE UNIQUE INDEX index_name
on table_name (column_name);
Partial Indexes
A partial index is an index built over a subset of a table; the subset is defined by a conditional expression (called the predicate of the partial index). The index contains entries only for those table rows that satisfy the predicate. The basic syntax is as follows −
CREATE INDEX index_name
on table_name (conditional_expression);
Implicit Indexes
Implicit indexes are indexes that are automatically created by the database server when an object is created. Indexes are automatically created for primary key constraints and unique constraints.
Example
The following is an example where we will create an index on table for salary column −
# CREATE INDEX salary_index ON COMPANY (salary);
Now, let us list down all the indices available on COMPANY table using d company command.
# d company
This will produce the following result, where company_pkey is an implicit index, which got created when the table was created.
Table "public.company"
Column | Type | Modifiers
---------+---------------+-----------
id | integer | not null
name | text | not null
age | integer | not null
address | character(50) |
salary | real |
Indexes:
"company_pkey" PRIMARY KEY, btree (id)
"salary_index" btree (salary)
You can list down the entire indexes database wide using the di command −
The DROP INDEX Command
An index can be dropped using PostgreSQL DROP command. Care should be taken when dropping an index because performance may be slowed or improved.
The basic syntax is as follows −
DROP INDEX index_name;
You can use following statement to delete previously created index −
# DROP INDEX salary_index;
When Should Indexes be Avoided?
Although indexes are intended to enhance a database”s performance, there are times when they should be avoided. The following guidelines indicate when the use of an index should be reconsidered −
-
Indexes should not be used on small tables.
-
Tables that have frequent, large batch update or insert operations.
-
Indexes should not be used on columns that contain a high number of NULL values.
-
Columns that are frequently manipulated should not be indexed.
PostgreSQL – ALTER TABLE Command
The PostgreSQL ALTER TABLE command is used to add, delete or modify columns in an existing table.
You would also use ALTER TABLE command to add and drop various constraints on an existing table.
Syntax
The basic syntax of ALTER TABLE to add a new column in an existing table is as follows −
ALTER TABLE table_name ADD column_name datatype;
The basic syntax of ALTER TABLE to DROP COLUMN in an existing table is as follows −
ALTER TABLE table_name DROP COLUMN column_name;
The basic syntax of ALTER TABLE to change the DATA TYPE of a column in a table is as follows −
ALTER TABLE table_name ALTER COLUMN column_name TYPE datatype;
The basic syntax of ALTER TABLE to add a NOT NULL constraint to a column in a table is as follows −
ALTER TABLE table_name MODIFY column_name datatype NOT NULL;
The basic syntax of ALTER TABLE to ADD UNIQUE CONSTRAINT to a table is as follows −
ALTER TABLE table_name
ADD CONSTRAINT MyUniqueConstraint UNIQUE(column1, column2...);
The basic syntax of ALTER TABLE to ADD CHECK CONSTRAINT to a table is as follows −
ALTER TABLE table_name
ADD CONSTRAINT MyUniqueConstraint CHECK (CONDITION);
The basic syntax of ALTER TABLE to ADD PRIMARY KEY constraint to a table is as follows −
ALTER TABLE table_name
ADD CONSTRAINT MyPrimaryKey PRIMARY KEY (column1, column2...);
The basic syntax of ALTER TABLE to DROP CONSTRAINT from a table is as follows −
ALTER TABLE table_name
DROP CONSTRAINT MyUniqueConstraint;
If you are using MySQL, the code is as follows −
ALTER TABLE table_name
DROP INDEX MyUniqueConstraint;
The basic syntax of ALTER TABLE to DROP PRIMARY KEY constraint from a table is as follows −
ALTER TABLE table_name
DROP CONSTRAINT MyPrimaryKey;
If you are using MySQL, the code is as follows −
ALTER TABLE table_name
DROP PRIMARY KEY;
Example
Consider our table has the following records −
id | name | age | address | salary
----+-------+-----+-----------+--------
1 | Paul | 32 | California| 20000
2 | Allen | 25 | Texas | 15000
3 | Teddy | 23 | Norway | 20000
4 | Mark | 25 | Rich-Mond | 65000
5 | David | 27 | Texas | 85000
6 | Kim | 22 | South-Hall| 45000
7 | James | 24 | Houston | 10000
The following is the example to ADD a new column in an existing table −
testdb=# ALTER TABLE COMPANY ADD GENDER char(1);
Now, COMPANY table is changed and the following would be the output from SELECT statement −
id | name | age | address | salary | gender
----+-------+-----+-------------+--------+--------
1 | Paul | 32 | California | 20000 |
2 | Allen | 25 | Texas | 15000 |
3 | Teddy | 23 | Norway | 20000 |
4 | Mark | 25 | Rich-Mond | 65000 |
5 | David | 27 | Texas | 85000 |
6 | Kim | 22 | South-Hall | 45000 |
7 | James | 24 | Houston | 10000 |
(7 rows)
The following is the example to DROP gender column from existing table −
testdb=# ALTER TABLE COMPANY DROP GENDER;
Now, COMPANY table is changed and the following would be the output from SELECT statement −
id | name | age | address | salary
----+-------+-----+-----------+--------
1 | Paul | 32 | California| 20000
2 | Allen | 25 | Texas | 15000
3 | Teddy | 23 | Norway | 20000
4 | Mark | 25 | Rich-Mond | 65000
5 | David | 27 | Texas | 85000
6 | Kim | 22 | South-Hall| 45000
7 | James | 24 | Houston | 10000
PostgreSQL – TRUNCATE TABLE Command
The PostgreSQL TRUNCATE TABLE command is used to delete complete data from an existing table. You can also use DROP TABLE command to delete complete table but it would remove complete table structure from the database and you would need to re-create this table once again if you wish to store some data.
It has the same effect as DELETE on each table, but since it does not actually scan the tables, it is faster. Furthermore, it reclaims disk space immediately, rather than requiring a subsequent VACUUM operation. This is most useful on large tables.
Syntax
The basic syntax of TRUNCATE TABLE is as follows −
TRUNCATE TABLE table_name;
Example
Consider the COMPANY table has the following records −
id | name | age | address | salary
----+-------+-----+------------+--------
1 | Paul | 32 | California | 20000
2 | Allen | 25 | Texas | 15000
3 | Teddy | 23 | Norway | 20000
4 | Mark | 25 | Rich-Mond | 65000
5 | David | 27 | Texas | 85000
6 | Kim | 22 | South-Hall | 45000
7 | James | 24 | Houston | 10000
(7 rows)
The following is the example to truncate −
testdb=# TRUNCATE TABLE COMPANY;
Now, COMPANY table is truncated and the following would be the output of SELECT statement −
testdb=# SELECT * FROM CUSTOMERS;
id | name | age | address | salary
----+------+-----+---------+--------
(0 rows)
PostgreSQL – VIEWS
Views are pseudo-tables. That is, they are not real tables; nevertheless appear as ordinary tables to SELECT. A view can represent a subset of a real table, selecting certain columns or certain rows from an ordinary table. A view can even represent joined tables. Because views are assigned separate permissions, you can use them to restrict table access so that the users see only specific rows or columns of a table.
A view can contain all rows of a table or selected rows from one or more tables. A view can be created from one or many tables, which depends on the written PostgreSQL query to create a view.
Views, which are kind of virtual tables, allow users to do the following −
-
Structure data in a way that users or classes of users find natural or intuitive.
-
Restrict access to the data such that a user can only see limited data instead of complete table.
-
Summarize data from various tables, which can be used to generate reports.
Since views are not ordinary tables, you may not be able to execute a DELETE, INSERT, or UPDATE statement on a view. However, you can create a RULE to correct this problem of using DELETE, INSERT or UPDATE on a view.
Creating Views
The PostgreSQL views are created using the CREATE VIEW statement. The PostgreSQL views can be created from a single table, multiple tables, or another view.
The basic CREATE VIEW syntax is as follows −
CREATE [TEMP | TEMPORARY] VIEW view_name AS
SELECT column1, column2.....
FROM table_name
WHERE [condition];
You can include multiple tables in your SELECT statement in very similar way as you use them in normal PostgreSQL SELECT query. If the optional TEMP or TEMPORARY keyword is present, the view will be created in the temporary space. Temporary views are automatically dropped at the end of the current session.
Example
Consider, the table is having the following records −
id | name | age | address | salary
----+-------+-----+------------+--------
1 | Paul | 32 | California | 20000
2 | Allen | 25 | Texas | 15000
3 | Teddy | 23 | Norway | 20000
4 | Mark | 25 | Rich-Mond | 65000
5 | David | 27 | Texas | 85000
6 | Kim | 22 | South-Hall | 45000
7 | James | 24 | Houston | 10000
Now, following is an example to create a view from COMPANY table. This view would be used to have only few columns from COMPANY table −
testdb=# CREATE VIEW COMPANY_VIEW AS
SELECT ID, NAME, AGE
FROM COMPANY;
Now, you can query COMPANY_VIEW in a similar way as you query an actual table. Following is the example −
testdb=# SELECT * FROM COMPANY_VIEW;
This would produce the following result −
id | name | age
----+-------+-----
1 | Paul | 32
2 | Allen | 25
3 | Teddy | 23
4 | Mark | 25
5 | David | 27
6 | Kim | 22
7 | James | 24
(7 rows)
Dropping Views
To drop a view, simply use the DROP VIEW statement with the view_name. The basic DROP VIEW syntax is as follows −
testdb=# DROP VIEW view_name;
The following command will delete COMPANY_VIEW view, which we created in the last section −
testdb=# DROP VIEW COMPANY_VIEW;
PostgreSQL – TRANSACTIONS
A transaction is a unit of work that is performed against a database. Transactions are units or sequences of work accomplished in a logical order, whether in a manual fashion by a user or automatically by some sort of a database program.
A transaction is the propagation of one or more changes to the database. For example, if you are creating a record, updating a record, or deleting a record from the table, then you are performing transaction on the table. It is important to control transactions to ensure data integrity and to handle database errors.
Practically, you will club many PostgreSQL queries into a group and you will execute all of them together as a part of a transaction.
Properties of Transactions
Transactions have the following four standard properties, usually referred to by the acronym ACID −
-
Atomicity − Ensures that all operations within the work unit are completed successfully; otherwise, the transaction is aborted at the point of failure and previous operations are rolled back to their former state.
-
Consistency − Ensures that the database properly changes states upon a successfully committed transaction.
-
Isolation − Enables transactions to operate independently of and transparent to each other.
-
Durability − Ensures that the result or effect of a committed transaction persists in case of a system failure.
Transaction Control
The following commands are used to control transactions −
-
BEGIN TRANSACTION − To start a transaction.
-
COMMIT − To save the changes, alternatively you can use END TRANSACTION command.
-
ROLLBACK − To rollback the changes.
Transactional control commands are only used with the DML commands INSERT, UPDATE and DELETE only. They cannot be used while creating tables or dropping them because these operations are automatically committed in the database.
The BEGIN TRANSACTION Command
Transactions can be started using BEGIN TRANSACTION or simply BEGIN command. Such transactions usually persist until the next COMMIT or ROLLBACK command is encountered. But a transaction will also ROLLBACK if the database is closed or if an error occurs.
The following is the simple syntax to start a transaction −
BEGIN;
or
BEGIN TRANSACTION;
The COMMIT Command
The COMMIT command is the transactional command used to save changes invoked by a transaction to the database.
The COMMIT command saves all transactions to the database since the last COMMIT or ROLLBACK command.
The syntax for COMMIT command is as follows −
COMMIT;
or
END TRANSACTION;
The ROLLBACK Command
The ROLLBACK command is the transactional command used to undo transactions that have not already been saved to the database.
The ROLLBACK command can only be used to undo transactions since the last COMMIT or ROLLBACK command was issued.
The syntax for ROLLBACK command is as follows −
ROLLBACK;
Example
Consider the table is having the following records −
id | name | age | address | salary
----+-------+-----+-----------+--------
1 | Paul | 32 | California| 20000
2 | Allen | 25 | Texas | 15000
3 | Teddy | 23 | Norway | 20000
4 | Mark | 25 | Rich-Mond | 65000
5 | David | 27 | Texas | 85000
6 | Kim | 22 | South-Hall| 45000
7 | James | 24 | Houston | 10000
Now, let us start a transaction and delete records from the table having age = 25 and finally we use ROLLBACK command to undo all the changes.
testdb=# BEGIN;
DELETE FROM COMPANY WHERE AGE = 25;
ROLLBACK;
If you will check COMPANY table is still having the following records −
id | name | age | address | salary
----+-------+-----+-----------+--------
1 | Paul | 32 | California| 20000
2 | Allen | 25 | Texas | 15000
3 | Teddy | 23 | Norway | 20000
4 | Mark | 25 | Rich-Mond | 65000
5 | David | 27 | Texas | 85000
6 | Kim | 22 | South-Hall| 45000
7 | James | 24 | Houston | 10000
Now, let us start another transaction and delete records from the table having age = 25 and finally we use COMMIT command to commit all the changes.
testdb=# BEGIN;
DELETE FROM COMPANY WHERE AGE = 25;
COMMIT;
If you will check the COMPANY table, it still has the following records −
id | name | age | address | salary
----+-------+-----+------------+--------
1 | Paul | 32 | California | 20000
3 | Teddy | 23 | Norway | 20000
5 | David | 27 | Texas | 85000
6 | Kim | 22 | South-Hall | 45000
7 | James | 24 | Houston | 10000
(5 rows)
PostgreSQL – LOCKS
Locks or Exclusive Locks or Write Locks prevent users from modifying a row or an entire table. Rows modified by UPDATE and DELETE are then exclusively locked automatically for the duration of the transaction. This prevents other users from changing the row until the transaction is either committed or rolled back.
The only time when users must wait for other users is when they are trying to modify the same row. If they modify different rows, no waiting is necessary. SELECT queries never have to wait.
The database performs locking automatically. In certain cases, however, locking must be controlled manually. Manual locking can be done by using the LOCK command. It allows specification of a transaction”s lock type and scope.
Syntax for LOCK command
The basic syntax for LOCK command is as follows −
LOCK [ TABLE ]
name
IN
lock_mode
-
name − The name (optionally schema-qualified) of an existing table to lock. If ONLY is specified before the table name, only that table is locked. If ONLY is not specified, the table and all its descendant tables (if any) are locked.
-
lock_mode − The lock mode specifies which locks this lock conflicts with. If no lock mode is specified, then ACCESS EXCLUSIVE, the most restrictive mode, is used. Possible values are: ACCESS SHARE, ROW SHARE, ROW EXCLUSIVE, SHARE UPDATE EXCLUSIVE, SHARE, SHARE ROW EXCLUSIVE, EXCLUSIVE, ACCESS EXCLUSIVE.
Once obtained, the lock is held for the remainder of the current transaction. There is no UNLOCK TABLE command; locks are always released at the transaction end.
DeadLocks
Deadlocks can occur when two transactions are waiting for each other to finish their operations. While PostgreSQL can detect them and end them with a ROLLBACK, deadlocks can still be inconvenient. To prevent your applications from running into this problem, make sure to design them in such a way that they will lock objects in the same order.
Advisory Locks
PostgreSQL provides means for creating locks that have application-defined meanings. These are called advisory locks. As the system does not enforce their use, it is up to the application to use them correctly. Advisory locks can be useful for locking strategies that are an awkward fit for the MVCC model.
For example, a common use of advisory locks is to emulate pessimistic locking strategies typical of the so-called “flat file” data management systems. While a flag stored in a table could be used for the same purpose, advisory locks are faster, avoid table bloat, and are automatically cleaned up by the server at the end of the session.
Example
Consider the table having records as follows −
testdb# select * from COMPANY;
id | name | age | address | salary
----+-------+-----+-----------+--------
1 | Paul | 32 | California| 20000
2 | Allen | 25 | Texas | 15000
3 | Teddy | 23 | Norway | 20000
4 | Mark | 25 | Rich-Mond | 65000
5 | David | 27 | Texas | 85000
6 | Kim | 22 | South-Hall| 45000
7 | James | 24 | Houston | 10000
(7 rows)
The following example locks the COMPANY table within the testdb database in ACCESS EXCLUSIVE mode. The LOCK statement works only in a transaction mode −
testdb=#BEGIN;
LOCK TABLE company1 IN ACCESS EXCLUSIVE MODE;
The above given PostgreSQL statement will produce the following result −
LOCK TABLE
The above message indicates that the table is locked until the transaction ends and to finish the transaction you will have to either rollback or commit the transaction.
PostgreSQL – Sub Queries
A subquery or Inner query or Nested query is a query within another PostgreSQL query and embedded within the WHERE clause.
A subquery is used to return data that will be used in the main query as a condition to further restrict the data to be retrieved.
Subqueries can be used with the SELECT, INSERT, UPDATE and DELETE statements along with the operators like =, <, >, >=, <=, IN, etc.
There are a few rules that subqueries must follow −
-
Subqueries must be enclosed within parentheses.
-
A subquery can have only one column in the SELECT clause, unless multiple columns are in the main query for the subquery to compare its selected columns.
-
An ORDER BY cannot be used in a subquery, although the main query can use an ORDER BY. The GROUP BY can be used to perform the same function as the ORDER BY in a subquery.
-
Subqueries that return more than one row can only be used with multiple value operators, such as the IN, EXISTS, NOT IN, ANY/SOME, ALL operator.
-
The BETWEEN operator cannot be used with a subquery; however, the BETWEEN can be used within the subquery.
Subqueries with the SELECT Statement
Subqueries are most frequently used with the SELECT statement. The basic syntax is as follows −
SELECT column_name [, column_name ]
FROM table1 [, table2 ]
WHERE column_name OPERATOR
(SELECT column_name [, column_name ]
FROM table1 [, table2 ]
[WHERE])
Example
Consider the table having the following records −
id | name | age | address | salary
----+-------+-----+-----------+--------
1 | Paul | 32 | California| 20000
2 | Allen | 25 | Texas | 15000
3 | Teddy | 23 | Norway | 20000
4 | Mark | 25 | Rich-Mond | 65000
5 | David | 27 | Texas | 85000
6 | Kim | 22 | South-Hall| 45000
7 | James | 24 | Houston | 10000
(7 rows)
Now, let us check the following sub-query with SELECT statement −
testdb=# SELECT *
FROM COMPANY
WHERE ID IN (SELECT ID
FROM COMPANY
WHERE SALARY > 45000) ;
This would produce the following result −
id | name | age | address | salary
----+-------+-----+-------------+--------
4 | Mark | 25 | Rich-Mond | 65000
5 | David | 27 | Texas | 85000
(2 rows)
Subqueries with the INSERT Statement
Subqueries also can be used with INSERT statements. The INSERT statement uses the data returned from the subquery to insert into another table. The selected data in the subquery can be modified with any of the character, date, or number functions.
The basic syntax is as follows −
INSERT INTO table_name [ (column1 [, column2 ]) ]
SELECT [ *|column1 [, column2 ] ]
FROM table1 [, table2 ]
[ WHERE VALUE OPERATOR ]
Example
Consider a table COMPANY_BKP, with similar structure as COMPANY table and can be created using the same CREATE TABLE using COMPANY_BKP as the table name. Now, to copy complete COMPANY table into COMPANY_BKP, following is the syntax −
testdb=# INSERT INTO COMPANY_BKP
SELECT * FROM COMPANY
WHERE ID IN (SELECT ID
FROM COMPANY) ;
Subqueries with the UPDATE Statement
The subquery can be used in conjunction with the UPDATE statement. Either single or multiple columns in a table can be updated when using a subquery with the UPDATE statement.
The basic syntax is as follows −
UPDATE table
SET column_name = new_value
[ WHERE OPERATOR [ VALUE ]
(SELECT COLUMN_NAME
FROM TABLE_NAME)
[ WHERE) ]
Example
Assuming, we have COMPANY_BKP table available, which is backup of the COMPANY table.
The following example updates SALARY by 0.50 times in the COMPANY table for all the customers, whose AGE is greater than or equal to 27 −
testdb=# UPDATE COMPANY
SET SALARY = SALARY * 0.50
WHERE AGE IN (SELECT AGE FROM COMPANY_BKP
WHERE AGE >= 27 );
This would affect two rows and finally the COMPANY table would have the following records −
id | name | age | address | salary
----+-------+-----+-------------+--------
2 | Allen | 25 | Texas | 15000
3 | Teddy | 23 | Norway | 20000
4 | Mark | 25 | Rich-Mond | 65000
6 | Kim | 22 | South-Hall | 45000
7 | James | 24 | Houston | 10000
1 | Paul | 32 | California | 10000
5 | David | 27 | Texas | 42500
(7 rows)
Subqueries with the DELETE Statement
The subquery can be used in conjunction with the DELETE statement like with any other statements mentioned above.
The basic syntax is as follows −
DELETE FROM TABLE_NAME
[ WHERE OPERATOR [ VALUE ]
(SELECT COLUMN_NAME
FROM TABLE_NAME)
[ WHERE) ]
Example
Assuming, we have COMPANY_BKP table available, which is a backup of the COMPANY table.
The following example deletes records from the COMPANY table for all the customers, whose AGE is greater than or equal to 27 −
testdb=# DELETE FROM COMPANY
WHERE AGE IN (SELECT AGE FROM COMPANY_BKP
WHERE AGE > 27 );
This would affect two rows and finally the COMPANY table would have the following records −
id | name | age | address | salary
----+-------+-----+-------------+--------
2 | Allen | 25 | Texas | 15000
3 | Teddy | 23 | Norway | 20000
4 | Mark | 25 | Rich-Mond | 65000
6 | Kim | 22 | South-Hall | 45000
7 | James | 24 | Houston | 10000
5 | David | 27 | Texas | 42500
(6 rows)
PostgreSQL – AUTO INCREMENT
PostgreSQL has the data types smallserial, serial and bigserial; these are not true types, but merely a notational convenience for creating unique identifier columns. These are similar to AUTO_INCREMENT property supported by some other databases.
If you wish a serial column to have a unique constraint or be a primary key, it must now be specified, just like any other data type.
The type name serial creates an integer columns. The type name bigserial creates a bigint column. bigserial should be used if you anticipate the use of more than 231 identifiers over the lifetime of the table. The type name smallserial creates a smallint column.
Syntax
The basic usage of SERIAL dataype is as follows −
CREATE TABLE tablename (
colname SERIAL
);
Example
Consider the COMPANY table to be created as follows −
testdb=# CREATE TABLE COMPANY(
ID SERIAL PRIMARY KEY,
NAME TEXT NOT NULL,
AGE INT NOT NULL,
ADDRESS CHAR(50),
SALARY REAL
);
Now, insert the following records into table COMPANY −
INSERT INTO COMPANY (NAME,AGE,ADDRESS,SALARY)
VALUES ( ''Paul'', 32, ''California'', 20000.00 );
INSERT INTO COMPANY (NAME,AGE,ADDRESS,SALARY)
VALUES (''Allen'', 25, ''Texas'', 15000.00 );
INSERT INTO COMPANY (NAME,AGE,ADDRESS,SALARY)
VALUES (''Teddy'', 23, ''Norway'', 20000.00 );
INSERT INTO COMPANY (NAME,AGE,ADDRESS,SALARY)
VALUES ( ''Mark'', 25, ''Rich-Mond '', 65000.00 );
INSERT INTO COMPANY (NAME,AGE,ADDRESS,SALARY)
VALUES ( ''David'', 27, ''Texas'', 85000.00 );
INSERT INTO COMPANY (NAME,AGE,ADDRESS,SALARY)
VALUES ( ''Kim'', 22, ''South-Hall'', 45000.00 );
INSERT INTO COMPANY (NAME,AGE,ADDRESS,SALARY)
VALUES ( ''James'', 24, ''Houston'', 10000.00 );
This will insert seven tuples into the table COMPANY and COMPANY will have the following records −
id | name | age | address | salary
----+-------+-----+------------+--------
1 | Paul | 32 | California | 20000
2 | Allen | 25 | Texas | 15000
3 | Teddy | 23 | Norway | 20000
4 | Mark | 25 | Rich-Mond | 65000
5 | David | 27 | Texas | 85000
6 | Kim | 22 | South-Hall | 45000
7 | James | 24 | Houston | 10000
PostgreSQL – PRIVILEGES
Whenever an object is created in a database, an owner is assigned to it. The owner is usually the one who executed the creation statement. For most kinds of objects, the initial state is that only the owner (or a superuser) can modify or delete the object. To allow other roles or users to use it, privileges or permission must be granted.
Different kinds of privileges in PostgreSQL are −
- SELECT,
- INSERT,
- UPDATE,
- DELETE,
- TRUNCATE,
- REFERENCES,
- TRIGGER,
- CREATE,
- CONNECT,
- TEMPORARY,
- EXECUTE, and
- USAGE
Depending on the type of the object (table, function, etc.,), privileges are applied to the object. To assign privileges to the users, the GRANT command is used.
Syntax for GRANT
Basic syntax for GRANT command is as follows −
GRANT privilege [, ...]
ON object [, ...]
TO { PUBLIC | GROUP group | username }
-
privilege − values could be: SELECT, INSERT, UPDATE, DELETE, RULE, ALL.
-
object − The name of an object to which to grant access. The possible objects are: table, view, sequence
-
PUBLIC − A short form representing all users.
-
GROUP group − A group to whom to grant privileges.
-
username − The name of a user to whom to grant privileges. PUBLIC is a short form representing all users.
The privileges can be revoked using the REVOKE command.
Syntax for REVOKE
Basic syntax for REVOKE command is as follows −
REVOKE privilege [, ...]
ON object [, ...]
FROM { PUBLIC | GROUP groupname | username }
-
privilege − values could be: SELECT, INSERT, UPDATE, DELETE, RULE, ALL.
-
object − The name of an object to which to grant access. The possible objects are: table, view, sequence
-
PUBLIC − A short form representing all users.
-
GROUP group − A group to whom to grant privileges.
-
username − The name of a user to whom to grant privileges. PUBLIC is a short form representing all users.
Example
To understand the privileges, let us first create a USER as follows −
testdb=# CREATE USER manisha WITH PASSWORD ''password
CREATE ROLE
The message CREATE ROLE indicates that the USER “manisha” is created.
Consider the table having records as follows −
testdb# select * from COMPANY;
id | name | age | address | salary
----+-------+-----+-----------+--------
1 | Paul | 32 | California| 20000
2 | Allen | 25 | Texas | 15000
3 | Teddy | 23 | Norway | 20000
4 | Mark | 25 | Rich-Mond | 65000
5 | David | 27 | Texas | 85000
6 | Kim | 22 | South-Hall| 45000
7 | James | 24 | Houston | 10000
(7 rows)
Next, let us grant all privileges on a table COMPANY to the user “manisha” as follows −
testdb=# GRANT ALL ON COMPANY TO manisha;
GRANT
The message GRANT indicates that all privileges are assigned to the USER.
Next, let us revoke the privileges from the USER “manisha” as follows −
testdb=# REVOKE ALL ON COMPANY FROM manisha;
REVOKE
The message REVOKE indicates that all privileges are revoked from the USER.
You can even delete the user as follows −
testdb=# DROP USER manisha;
DROP ROLE
The message DROP ROLE indicates USER ‘Manisha’ is deleted from the database.
PostgreSQL – DATE/TIME Functions and Operators
We had discussed about the Date/Time data types in the chapter . Now, let us see the Date/Time operators and Functions.
The following table lists the behaviors of the basic arithmetic operators −
| Operator |
Example |
Result |
| + |
date ”2001-09-28” + integer ”7” |
date ”2001-10-05” |
| + |
date ”2001-09-28” + interval ”1 hour” |
timestamp ”2001-09-28 01:00:00” |
| + |
date ”2001-09-28” + time ”03:00” |
timestamp ”2001-09-28 03:00:00” |
| + |
interval ”1 day” + interval ”1 hour” |
interval ”1 day 01:00:00” |
| + |
timestamp ”2001-09-28 01:00” + interval ”23 hours” |
timestamp ”2001-09-29 00:00:00” |
| + |
time ”01:00” + interval ”3 hours” |
time ”04:00:00” |
| – |
– interval ”23 hours” |
interval ”-23:00:00” |
| – |
date ”2001-10-01” – date ”2001-09-28” |
integer ”3” (days) |
| – |
date ”2001-10-01” – integer ”7” |
date ”2001-09-24” |
| – |
date ”2001-09-28” – interval ”1 hour” |
timestamp ”2001-09-27 23:00:00” |
| – |
time ”05:00” – time ”03:00” |
interval ”02:00:00” |
| – |
time ”05:00” – interval ”2 hours” |
time ”03:00:00” |
| – |
timestamp ”2001-09-28 23:00” – interval ”23 hours” |
timestamp ”2001-09-28 00:00:00” |
| – |
interval ”1 day” – interval ”1 hour” |
interval ”1 day -01:00:00” |
| – |
timestamp ”2001-09-29 03:00” – timestamp ”2001-09-27 12:00” |
interval ”1 day 15:00:00” |
| * |
900 * interval ”1 second” |
interval ”00:15:00” |
| * |
21 * interval ”1 day” |
interval ”21 days” |
| * |
double precision ”3.5” * interval ”1 hour” |
interval ”03:30:00” |
| / |
interval ”1 hour” / double precision ”1.5” |
interval ”00:40:00” |
The following is the list of all important Date and Time related functions available.
| S. No. |
Function & Description |
| 1 |
Subtract arguments
|
| 2 |
Current date and time
|
| 3 |
Get subfield (equivalent to extract)
|
| 4 |
Get subfield
|
| 5 |
Test for finite date, time and interval (not +/-infinity)
|
| 6 |
Adjust interval
|
AGE(timestamp, timestamp), AGE(timestamp)
| S. No. |
Function & Description |
| 1 |
AGE(timestamp, timestamp)
When invoked with the TIMESTAMP form of the second argument, AGE() subtract arguments, producing a “symbolic” result that uses years and months and is of type INTERVAL.
|
| 2 |
AGE(timestamp)
When invoked with only the TIMESTAMP as argument, AGE() subtracts from the current_date (at midnight).
|
Example of the function AGE(timestamp, timestamp) is −
testdb=# SELECT AGE(timestamp ''2001-04-10'', timestamp ''1957-06-13'');
The above given PostgreSQL statement will produce the following result −
age
-------------------------
43 years 9 mons 27 days
Example of the function AGE(timestamp) is −
testdb=# select age(timestamp ''1957-06-13'');
The above given PostgreSQL statement will produce the following result −
age
--------------------------
55 years 10 mons 22 days
CURRENT DATE/TIME()
PostgreSQL provides a number of functions that return values related to the current date and time. Following are some functions −
| S. No. |
Function & Description |
| 1 |
CURRENT_DATE
Delivers current date.
|
| 2 |
CURRENT_TIME
Delivers values with time zone.
|
| 3 |
CURRENT_TIMESTAMP
Delivers values with time zone.
|
| 4 |
CURRENT_TIME(precision)
Optionally takes a precision parameter, which causes the result to be rounded to that many fractional digits in the seconds field.
|
| 5 |
CURRENT_TIMESTAMP(precision)
Optionally takes a precision parameter, which causes the result to be rounded to that many fractional digits in the seconds field.
|
| 6 |
LOCALTIME
Delivers values without time zone.
|
| 7 |
LOCALTIMESTAMP
Delivers values without time zone.
|
| 8 |
LOCALTIME(precision)
Optionally takes a precision parameter, which causes the result to be rounded to that many fractional digits in the seconds field.
|
| 9 |
LOCALTIMESTAMP(precision)
Optionally takes a precision parameter, which causes the result to be rounded to that many fractional digits in the seconds field.
|
Examples using the functions from the table above −
testdb=# SELECT CURRENT_TIME;
timetz
--------------------
08:01:34.656+05:30
(1 row)
testdb=# SELECT CURRENT_DATE;
date
------------
2013-05-05
(1 row)
testdb=# SELECT CURRENT_TIMESTAMP;
now
-------------------------------
2013-05-05 08:01:45.375+05:30
(1 row)
testdb=# SELECT CURRENT_TIMESTAMP(2);
timestamptz
------------------------------
2013-05-05 08:01:50.89+05:30
(1 row)
testdb=# SELECT LOCALTIMESTAMP;
timestamp
------------------------
2013-05-05 08:01:55.75
(1 row)
PostgreSQL also provides functions that return the start time of the current statement, as well as the actual current time at the instant the function is called. These functions are −
| S. No. |
Function & Description |
| 1 |
transaction_timestamp()
It is equivalent to CURRENT_TIMESTAMP, but is named to clearly reflect what it returns.
|
| 2 |
statement_timestamp()
It returns the start time of the current statement.
|
| 3 |
clock_timestamp()
It returns the actual current time, and therefore its value changes even within a single SQL command.
|
| 4 |
timeofday()
It returns the actual current time, but as a formatted text string rather than a timestamp with time zone value.
|
| 5 |
now()
It is a traditional PostgreSQL equivalent to transaction_timestamp().
|
DATE_PART(text, timestamp), DATE_PART(text, interval), DATE_TRUNC(text, timestamp)
| S. No. |
Function & Description |
| 1 |
DATE_PART(”field”, source)
These functions get the subfields. The field parameter needs to be a string value, not a name.
The valid field names are: century, day, decade, dow, doy, epoch, hour, isodow, isoyear, microseconds, millennium, milliseconds, minute, month, quarter, second, timezone, timezone_hour, timezone_minute, week, year.
|
| 2 |
DATE_TRUNC(”field”, source)
This function is conceptually similar to the trunc function for numbers. source is a value expression of type timestamp or interval. field selects to which precision to truncate the input value. The return value is of type timestamp or interval.
The valid values for field are : microseconds, milliseconds, second, minute, hour, day, week, month, quarter, year, decade, century, millennium
|
The following are examples for DATE_PART(”field”, source) functions −
testdb=# SELECT date_part(''day'', TIMESTAMP ''2001-02-16 20:38:40'');
date_part
-----------
16
(1 row)
testdb=# SELECT date_part(''hour'', INTERVAL ''4 hours 3 minutes'');
date_part
-----------
4
(1 row)
The following are examples for DATE_TRUNC(”field”, source) functions −
testdb=# SELECT date_trunc(''hour'', TIMESTAMP ''2001-02-16 20:38:40'');
date_trunc
---------------------
2001-02-16 20:00:00
(1 row)
testdb=# SELECT date_trunc(''year'', TIMESTAMP ''2001-02-16 20:38:40'');
date_trunc
---------------------
2001-01-01 00:00:00
(1 row)
EXTRACT(field from timestamp), EXTRACT(field from interval)
The EXTRACT(field FROM source) function retrieves subfields such as year or hour from date/time values. The source must be a value expression of type timestamp, time, or interval. The field is an identifier or string that selects what field to extract from the source value. The EXTRACT function returns values of type double precision.
The following are valid field names (similar to DATE_PART function field names): century, day, decade, dow, doy, epoch, hour, isodow, isoyear, microseconds, millennium, milliseconds, minute, month, quarter, second, timezone, timezone_hour, timezone_minute, week, year.
The following are examples of EXTRACT(”field”, source) functions −
testdb=# SELECT EXTRACT(CENTURY FROM TIMESTAMP ''2000-12-16 12:21:13'');
date_part
-----------
20
(1 row)
testdb=# SELECT EXTRACT(DAY FROM TIMESTAMP ''2001-02-16 20:38:40'');
date_part
-----------
16
(1 row)
ISFINITE(date), ISFINITE(timestamp), ISFINITE(interval)
| S. No. |
Function & Description |
| 1 |
ISFINITE(date)
Tests for finite date.
|
| 2 |
ISFINITE(timestamp)
Tests for finite time stamp.
|
| 3 |
ISFINITE(interval)
Tests for finite interval.
|
The following are the examples of the ISFINITE() functions −
testdb=# SELECT isfinite(date ''2001-02-16'');
isfinite
----------
t
(1 row)
testdb=# SELECT isfinite(timestamp ''2001-02-16 21:28:30'');
isfinite
----------
t
(1 row)
testdb=# SELECT isfinite(interval ''4 hours'');
isfinite
----------
t
(1 row)
JUSTIFY_DAYS(interval), JUSTIFY_HOURS(interval), JUSTIFY_INTERVAL(interval)
| S. No. |
Function & Description |
| 1 |
JUSTIFY_DAYS(interval)
Adjusts interval so 30-day time periods are represented as months. Return the interval type
|
| 2 |
JUSTIFY_HOURS(interval)
Adjusts interval so 24-hour time periods are represented as days. Return the interval type
|
| 3 |
JUSTIFY_INTERVAL(interval)
Adjusts interval using JUSTIFY_DAYS and JUSTIFY_HOURS, with additional sign adjustments. Return the interval type
|
The following are the examples for the ISFINITE() functions −
testdb=# SELECT justify_days(interval ''35 days'');
justify_days
--------------
1 mon 5 days
(1 row)
testdb=# SELECT justify_hours(interval ''27 hours'');
justify_hours
----------------
1 day 03:00:00
(1 row)
testdb=# SELECT justify_interval(interval ''1 mon -1 hour'');
justify_interval
------------------
29 days 23:00:00
(1 row)
PostgreSQL – Functions
PostgreSQL functions, also known as Stored Procedures, allow you to carry out operations that would normally take several queries and round trips in a single function within the database. Functions allow database reuse as other applications can interact directly with your stored procedures instead of a middle-tier or duplicating code.
Functions can be created in a language of your choice like SQL, PL/pgSQL, C, Python, etc.
Syntax
The basic syntax to create a function is as follows −
CREATE [OR REPLACE] FUNCTION function_name (arguments)
RETURNS return_datatype AS $variable_name$
DECLARE
declaration;
[...]
BEGIN
< function_body >
[...]
RETURN { variable_name | value }
END; LANGUAGE plpgsql;
Where,
-
function-name specifies the name of the function.
-
[OR REPLACE] option allows modifying an existing function.
-
The function must contain a return statement.
-
RETURN clause specifies that data type you are going to return from the function. The return_datatype can be a base, composite, or domain type, or can reference the type of a table column.
-
function-body contains the executable part.
-
The AS keyword is used for creating a standalone function.
-
plpgsql is the name of the language that the function is implemented in. Here, we use this option for PostgreSQL, it Can be SQL, C, internal, or the name of a user-defined procedural language. For backward compatibility, the name can be enclosed by single quotes.
Example
The following example illustrates creating and calling a standalone function. This function returns the total number of records in the COMPANY table. We will use the table, which has the following records −
testdb# select * from COMPANY;
id | name | age | address | salary
----+-------+-----+-----------+--------
1 | Paul | 32 | California| 20000
2 | Allen | 25 | Texas | 15000
3 | Teddy | 23 | Norway | 20000
4 | Mark | 25 | Rich-Mond | 65000
5 | David | 27 | Texas | 85000
6 | Kim | 22 | South-Hall| 45000
7 | James | 24 | Houston | 10000
(7 rows)
Function totalRecords() is as follows −
CREATE OR REPLACE FUNCTION totalRecords ()
RETURNS integer AS $total$
declare
total integer;
BEGIN
SELECT count(*) into total FROM COMPANY;
RETURN total;
END;
$total$ LANGUAGE plpgsql;
When the above query is executed, the result would be −
testdb# CREATE FUNCTION
Now, let us execute a call to this function and check the records in the COMPANY table
testdb=# select totalRecords();
When the above query is executed, the result would be −
totalrecords
--------------
7
(1 row)
PostgreSQL – Useful Functions
PostgreSQL built-in functions, also called as Aggregate functions, are used for performing processing on string or numeric data.
The following is the list of all general-purpose PostgreSQL built-in functions −
-
− The PostgreSQL COUNT aggregate function is used to count the number of rows in a database table.
-
− The PostgreSQL MAX aggregate function allows us to select the highest (maximum) value for a certain column.
-
− The PostgreSQL MIN aggregate function allows us to select the lowest (minimum) value for a certain column.
-
− The PostgreSQL AVG aggregate function selects the average value for certain table column.
-
− The PostgreSQL SUM aggregate function allows selecting the total for a numeric column.
-
− The PostgreSQL ARRAY aggregate function puts input values, including nulls, concatenated into an array.
-
− Complete list of PostgreSQL functions required to manipulate numbers in SQL.
-
− Complete list of PostgreSQL functions required to manipulate strings in PostgreSQL.
PostgreSQL – C/C++ Interface
This tutorial is going to use libpqxx library, which is the official C++ client API for PostgreSQL. The source code for libpqxx is available under the BSD license, so you are free to download it, pass it on to others, change it, sell it, include it in your own code, and share your changes with anyone you choose.
Installation
The the latest version of libpqxx is available to be downloaded from the link . So download the latest version and follow the following steps −
wget http://pqxx.org/download/software/libpqxx/libpqxx-4.0.tar.gz
tar xvfz libpqxx-4.0.tar.gz
cd libpqxx-4.0
./configure
make
make install
Before you start using C/C++ PostgreSQL interface, find the pg_hba.conf file in your PostgreSQL installation directory and add the following line −
# IPv4 local connections:
host    all         all         127.0.0.1/32          md5
You can start/restart postgres server in case it is not running using the following command −
[root@host]# service postgresql restart
Stopping postgresql service:                               [  OK  ]
Starting postgresql service:                               [  OK  ]
C/C++ Interface APIs
The following are important interface routines which can sufice your requirement to work with PostgreSQL database from your C/C++ program. If you are looking for a more sophisticated application then you can look into the libpqxx official documentation, or you can use commercially available APIs.
| S. No. |
API & Description |
| 1 |
pqxx::connection C( const std::string & dbstring )
This is a typedef which will be used to connect to the database. Here, dbstring provides required parameters to connect to the datbase, for example dbname = testdb user = postgres password=pass123 hostaddr=127.0.0.1 port=5432.
If connection is setup successfully then it creates C with connection object which provides various useful function public function.
|
| 2 |
C.is_open()
The method is_open() is a public method of connection object and returns boolean value. If connection is active, then this method returns true otherwise it returns false.
|
| 3 |
C.disconnect()
This method is used to disconnect an opened database connection.
|
| 4 |
pqxx::work W( C )
This is a typedef which will be used to create a transactional object using connection C, which ultimately will be used to execute SQL statements in transactional mode.
If transaction object gets created successfully, then it is assigned to variable W which will be used to access public methods related to transactional object.
|
| 5 |
W.exec(const std::string & sql)
This public method from transactional object will be used to execute SQL statement.
|
| 6 |
W.commit()
This public method from transactional object will be used to commit the transaction.
|
| 7 |
W.abort()
This public method from transactional object will be used to rollback the transaction.
|
| 8 |
pqxx::nontransaction N( C )
This is a typedef which will be used to create a non-transactional object using connection C, which ultimately will be used to execute SQL statements in non-transactional mode.
If transaction object gets created successfully, then it is assigned to variable N which will be used to access public methods related to non-transactional object.
|
| 9 |
N.exec(const std::string & sql)
This public method from non-transactional object will be used to execute SQL statement and returns a result object which is actually an interator holding all the returned records.
|
Connecting To Database
The following C code segment shows how to connect to an existing database running on local machine at port 5432. Here, I used backslash for line continuation.
#include <iostream>
#include <pqxx/pqxx>

using namespace std;
using namespace pqxx;

int main(int argc, char* argv[]) {
   try {
      connection C("dbname = testdb user = postgres password = cohondob
      hostaddr = 127.0.0.1 port = 5432");
      if (C.is_open()) {
         cout << "Opened database successfully: " << C.dbname() << endl;
      } else {
         cout << "Can''t open database" << endl;
         return 1;
      }
      C.disconnect ();
   } catch (const std::exception &e) {
      cerr << e.what() << std::endl;
      return 1;
   }
}
Now, let us compile and run the above program to connect to our database testdb, which is already available in your schema and can be accessed using user postgres and password pass123.
You can use the user ID and password based on your database setting. Remember to keep the -lpqxx and -lpq in the given order! Otherwise, the linker will complain bitterly about the missing functions with names starting with “PQ.”
$g++ test.cpp -lpqxx -lpq
$./a.out
Opened database successfully: testdb
Create a Table
The following C code segment will be used to create a table in previously created database −
#include <iostream>
#include <pqxx/pqxx>

using namespace std;
using namespace pqxx;

int main(int argc, char* argv[]) {
   char * sql;

   try {
      connection C("dbname = testdb user = postgres password = cohondob
      hostaddr = 127.0.0.1 port = 5432");
      if (C.is_open()) {
         cout << "Opened database successfully: " << C.dbname() << endl;
      } else {
         cout << "Can''t open database" << endl;
         return 1;
      }

      /* Create SQL statement */
      sql = "CREATE TABLE COMPANY("
      "ID INT PRIMARY KEY     NOT NULL,"
      "NAME           TEXT    NOT NULL,"
      "AGE            INT     NOT NULL,"
      "ADDRESS        CHAR(50),"
      "SALARY         REAL );";

      /* Create a transactional object. */
      work W(C);

      /* Execute SQL query */
      W.exec( sql );
      W.commit();
      cout << "Table created successfully" << endl;
      C.disconnect ();
   } catch (const std::exception &e) {
      cerr << e.what() << std::endl;
      return 1;
   }

   return 0;
}
When the above given program is compiled and executed, it will create COMPANY table in your testdb database and will display the following statements −
Opened database successfully: testdb
Table created successfully
INSERT Operation
The following C code segment shows how we can create records in our COMPANY table created in above example −
#include <iostream>
#include <pqxx/pqxx>

using namespace std;
using namespace pqxx;

int main(int argc, char* argv[]) {
   char * sql;

   try {
      connection C("dbname = testdb user = postgres password = cohondob
      hostaddr = 127.0.0.1 port = 5432");
      if (C.is_open()) {
         cout << "Opened database successfully: " << C.dbname() << endl;
      } else {
         cout << "Can''t open database" << endl;
         return 1;
      }

      /* Create SQL statement */
      sql = "INSERT INTO COMPANY (ID,NAME,AGE,ADDRESS,SALARY) "
         "VALUES (1, ''Paul'', 32, ''California'', 20000.00 ); "
         "INSERT INTO COMPANY (ID,NAME,AGE,ADDRESS,SALARY) "
         "VALUES (2, ''Allen'', 25, ''Texas'', 15000.00 ); "
         "INSERT INTO COMPANY (ID,NAME,AGE,ADDRESS,SALARY)"
         "VALUES (3, ''Teddy'', 23, ''Norway'', 20000.00 );"
         "INSERT INTO COMPANY (ID,NAME,AGE,ADDRESS,SALARY)"
         "VALUES (4, ''Mark'', 25, ''Rich-Mond '', 65000.00 );";

      /* Create a transactional object. */
      work W(C);

      /* Execute SQL query */
      W.exec( sql );
      W.commit();
      cout << "Records created successfully" << endl;
      C.disconnect ();
   } catch (const std::exception &e) {
      cerr << e.what() << std::endl;
      return 1;
   }

   return 0;
}
When the above given program is compiled and executed, it will create given records in COMPANY table and will display the following two lines −
Opened database successfully: testdb
Records created successfully
SELECT Operation
The following C code segment shows how we can fetch and display records from our COMPANY table created in above example −
#include <iostream>
#include <pqxx/pqxx>

using namespace std;
using namespace pqxx;

int main(int argc, char* argv[]) {
   char * sql;

   try {
      connection C("dbname = testdb user = postgres password = cohondob
      hostaddr = 127.0.0.1 port = 5432");
      if (C.is_open()) {
         cout << "Opened database successfully: " << C.dbname() << endl;
      } else {
         cout << "Can''t open database" << endl;
         return 1;
      }

      /* Create SQL statement */
      sql = "SELECT * from COMPANY";

      /* Create a non-transactional object. */
      nontransaction N(C);

      /* Execute SQL query */
      result R( N.exec( sql ));

      /* List down all the records */
      for (result::const_iterator c = R.begin(); c != R.end(); ++c) {
         cout << "ID = " << c[0].as<int>() << endl;
         cout << "Name = " << c[1].as<string>() << endl;
         cout << "Age = " << c[2].as<int>() << endl;
         cout << "Address = " << c[3].as<string>() << endl;
         cout << "Salary = " << c[4].as<float>() << endl;
      }
      cout << "Operation done successfully" << endl;
      C.disconnect ();
   } catch (const std::exception &e) {
      cerr << e.what() << std::endl;
      return 1;
   }

   return 0;
}
When the above given program is compiled and executed, it will produce the following result −
Opened database successfully: testdb
ID = 1
Name = Paul
Age = 32
Address = California
Salary = 20000
ID = 2
Name = Allen
Age = 25
Address = Texas
Salary = 15000
ID = 3
Name = Teddy
Age = 23
Address = Norway
Salary = 20000
ID = 4
Name = Mark
Age = 25
Address = Rich-Mond
Salary = 65000
Operation done successfully
UPDATE Operation
The following C code segment shows how we can use the UPDATE statement to update any record and then fetch and display updated records from our COMPANY table −
#include <iostream>
#include <pqxx/pqxx>

using namespace std;
using namespace pqxx;

int main(int argc, char* argv[]) {
   char * sql;

   try {
      connection C("dbname = testdb user = postgres password = cohondob
      hostaddr = 127.0.0.1 port = 5432");
      if (C.is_open()) {
         cout << "Opened database successfully: " << C.dbname() << endl;
      } else {
         cout << "Can''t open database" << endl;
         return 1;
      }

      /* Create a transactional object. */
      work W(C);
      /* Create  SQL UPDATE statement */
      sql = "UPDATE COMPANY set SALARY = 25000.00 where ID=1";
      /* Execute SQL query */
      W.exec( sql );
      W.commit();
      cout << "Records updated successfully" << endl;

      /* Create SQL SELECT statement */
      sql = "SELECT * from COMPANY";

      /* Create a non-transactional object. */
      nontransaction N(C);

      /* Execute SQL query */
      result R( N.exec( sql ));

      /* List down all the records */
      for (result::const_iterator c = R.begin(); c != R.end(); ++c) {
         cout << "ID = " << c[0].as<int>() << endl;
         cout << "Name = " << c[1].as<string>() << endl;
         cout << "Age = " << c[2].as<int>() << endl;
         cout << "Address = " << c[3].as<string>() << endl;
         cout << "Salary = " << c[4].as<float>() << endl;
      }
      cout << "Operation done successfully" << endl;
      C.disconnect ();
   } catch (const std::exception &e) {
      cerr << e.what() << std::endl;
      return 1;
   }

   return 0;
}
When the above given program is compiled and executed, it will produce the following result −
Opened database successfully: testdb
Records updated successfully
ID = 2
Name = Allen
Age = 25
Address = Texas
Salary = 15000
ID = 3
Name = Teddy
Age = 23
Address = Norway
Salary = 20000
ID = 4
Name = Mark
Age = 25
Address = Rich-Mond
Salary = 65000
ID = 1
Name = Paul
Age = 32
Address = California
Salary = 25000
Operation done successfully
DELETE Operation
The following C code segment shows how we can use the DELETE statement to delete any record and then fetch and display remaining records from our COMPANY table −
#include <iostream>
#include <pqxx/pqxx>

using namespace std;
using namespace pqxx;

int main(int argc, char* argv[]) {
   char * sql;

   try {
      connection C("dbname = testdb user = postgres password = cohondob
      hostaddr = 127.0.0.1 port = 5432");
      if (C.is_open()) {
         cout << "Opened database successfully: " << C.dbname() << endl;
      } else {
         cout << "Can''t open database" << endl;
         return 1;
      }

      /* Create a transactional object. */
      work W(C);
      /* Create  SQL DELETE statement */
      sql = "DELETE from COMPANY where ID = 2";
      /* Execute SQL query */
      W.exec( sql );
      W.commit();
      cout << "Records deleted successfully" << endl;

      /* Create SQL SELECT statement */
      sql = "SELECT * from COMPANY";

      /* Create a non-transactional object. */
      nontransaction N(C);

      /* Execute SQL query */
      result R( N.exec( sql ));

      /* List down all the records */
      for (result::const_iterator c = R.begin(); c != R.end(); ++c) {
         cout << "ID = " << c[0].as<int>() << endl;
         cout << "Name = " << c[1].as<string>() << endl;
         cout << "Age = " << c[2].as<int>() << endl;
         cout << "Address = " << c[3].as<string>() << endl;
         cout << "Salary = " << c[4].as<float>() << endl;
      }
      cout << "Operation done successfully" << endl;
      C.disconnect ();
   } catch (const std::exception &e) {
      cerr << e.what() << std::endl;
      return 1;
   }

   return 0;
}
When the above given program is compiled and executed, it will produce the following result −
Opened database successfully: testdb
Records deleted successfully
ID = 3
Name = Teddy
Age = 23
Address = Norway
Salary = 20000
ID = 4
Name = Mark
Age = 25
Address = Rich-Mond
Salary = 65000
ID = 1
Name = Paul
Age = 32
Address = California
Salary = 25000
Operation done successfully
PostgreSQL – JAVA Interface
Installation
Before we start using PostgreSQL in our Java programs, we need to make sure that we have PostgreSQL JDBC and Java set up on the machine. You can check Java tutorial for Java installation on your machine. Now let us check how to set up PostgreSQL JDBC driver.
-
Download the latest version of postgresql-(VERSION).jdbc.jar from repository.
-
Add downloaded jar file postgresql-(VERSION).jdbc.jar in your class path, or you can use it along with -classpath option as explained below in the examples.
The following section assumes you have little knowledge about Java JDBC concepts. If you do not have, then it is suggested to spent half and hour with to become comfortable with concepts explained below.
Connecting To Database
The following Java code shows how to connect to an existing database. If the database does not exist, then it will be created and finally a database object will be returned.
import java.sql.Connection;
import java.sql.DriverManager;
public class PostgreSQLJDBC {
public static void main(String args[]) {
Connection c = null;
try {
Class.forName("org.postgresql.Driver");
c = DriverManager
.getConnection("jdbc:postgresql://localhost:5432/testdb",
"postgres", "123");
} catch (Exception e) {
e.printStackTrace();
System.err.println(e.getClass().getName()+": "+e.getMessage());
System.exit(0);
}
System.out.println("Opened database successfully");
}
}
Before you compile and run above program, find pg_hba.conf file in your PostgreSQL installation directory and add the following line −
# IPv4 local connections:
host all all 127.0.0.1/32 md5
You can start/restart the postgres server in case it is not running using the following command −
[root@host]# service postgresql restart
Stopping postgresql service: [ OK ]
Starting postgresql service: [ OK ]
Now, let us compile and run the above program to connect with testdb. Here, we are using postgres as user ID and 123 as password to access the database. You can change this as per your database configuration and setup. We are also assuming current version of JDBC driver postgresql-9.2-1002.jdbc3.jar is available in the current path.
C:JavaPostgresIntegration>javac PostgreSQLJDBC.java
C:JavaPostgresIntegration>java -cp c:toolspostgresql-9.2-1002.jdbc3.jar;C:JavaPostgresIntegration PostgreSQLJDBC
Open database successfully
Create a Table
The following Java program will be used to create a table in previously opened database. Make sure you do not have this table already in your target database.
import java.sql.*;
import java.sql.Connection;
import java.sql.DriverManager;
import java.sql.Statement;
public class PostgreSQLJDBC {
public static void main( String args[] ) {
Connection c = null;
Statement stmt = null;
try {
Class.forName("org.postgresql.Driver");
c = DriverManager
.getConnection("jdbc:postgresql://localhost:5432/testdb",
"manisha", "123");
System.out.println("Opened database successfully");
stmt = c.createStatement();
String sql = "CREATE TABLE COMPANY " +
"(ID INT PRIMARY KEY NOT NULL," +
" NAME TEXT NOT NULL, " +
" AGE INT NOT NULL, " +
" ADDRESS CHAR(50), " +
" SALARY REAL)";
stmt.executeUpdate(sql);
stmt.close();
c.close();
} catch ( Exception e ) {
System.err.println( e.getClass().getName()+": "+ e.getMessage() );
System.exit(0);
}
System.out.println("Table created successfully");
}
}
When a program is compiled and executed, it will create the COMPANY table in testdb database and will display the following two lines −
Opened database successfully
Table created successfully
INSERT Operation
The following Java program shows how we can create records in our COMPANY table created in above example −
import java.sql.Connection;
import java.sql.DriverManager;
import java.sql.Statement;
public class PostgreSQLJDBC {
public static void main(String args[]) {
Connection c = null;
Statement stmt = null;
try {
Class.forName("org.postgresql.Driver");
c = DriverManager
.getConnection("jdbc:postgresql://localhost:5432/testdb",
"manisha", "123");
c.setAutoCommit(false);
System.out.println("Opened database successfully");
stmt = c.createStatement();
String sql = "INSERT INTO COMPANY (ID,NAME,AGE,ADDRESS,SALARY) "
+ "VALUES (1, ''Paul'', 32, ''California'', 20000.00 );";
stmt.executeUpdate(sql);
sql = "INSERT INTO COMPANY (ID,NAME,AGE,ADDRESS,SALARY) "
+ "VALUES (2, ''Allen'', 25, ''Texas'', 15000.00 );";
stmt.executeUpdate(sql);
sql = "INSERT INTO COMPANY (ID,NAME,AGE,ADDRESS,SALARY) "
+ "VALUES (3, ''Teddy'', 23, ''Norway'', 20000.00 );";
stmt.executeUpdate(sql);
sql = "INSERT INTO COMPANY (ID,NAME,AGE,ADDRESS,SALARY) "
+ "VALUES (4, ''Mark'', 25, ''Rich-Mond '', 65000.00 );";
stmt.executeUpdate(sql);
stmt.close();
c.commit();
c.close();
} catch (Exception e) {
System.err.println( e.getClass().getName()+": "+ e.getMessage() );
System.exit(0);
}
System.out.println("Records created successfully");
}
}
When the above program is compiled and executed, it will create given records in COMPANY table and will display the following two lines −
Opened database successfully
Records created successfully
SELECT Operation
The following Java program shows how we can fetch and display records from our COMPANY table created in above example −
import java.sql.Connection;
import java.sql.DriverManager;
import java.sql.ResultSet;
import java.sql.Statement;
public class PostgreSQLJDBC {
public static void main( String args[] ) {
Connection c = null;
Statement stmt = null;
try {
Class.forName("org.postgresql.Driver");
c = DriverManager
.getConnection("jdbc:postgresql://localhost:5432/testdb",
"manisha", "123");
c.setAutoCommit(false);
System.out.println("Opened database successfully");
stmt = c.createStatement();
ResultSet rs = stmt.executeQuery( "SELECT * FROM COMPANY;" );
while ( rs.next() ) {
int id = rs.getInt("id");
String name = rs.getString("name");
int age = rs.getInt("age");
String address = rs.getString("address");
float salary = rs.getFloat("salary");
System.out.println( "ID = " + id );
System.out.println( "NAME = " + name );
System.out.println( "AGE = " + age );
System.out.println( "ADDRESS = " + address );
System.out.println( "SALARY = " + salary );
System.out.println();
}
rs.close();
stmt.close();
c.close();
} catch ( Exception e ) {
System.err.println( e.getClass().getName()+": "+ e.getMessage() );
System.exit(0);
}
System.out.println("Operation done successfully");
}
}
When the program is compiled and executed, it will produce the following result −
Opened database successfully
ID = 1
NAME = Paul
AGE = 32
ADDRESS = California
SALARY = 20000.0
ID = 2
NAME = Allen
AGE = 25
ADDRESS = Texas
SALARY = 15000.0
ID = 3
NAME = Teddy
AGE = 23
ADDRESS = Norway
SALARY = 20000.0
ID = 4
NAME = Mark
AGE = 25
ADDRESS = Rich-Mond
SALARY = 65000.0
Operation done successfully
UPDATE Operation
The following Java code shows how we can use the UPDATE statement to update any record and then fetch and display updated records from our COMPANY table −
import java.sql.Connection;
import java.sql.DriverManager;
import java.sql.ResultSet;
import java.sql.Statement;
public class PostgreSQLJDBC {
public static void main( String args[] ) {
Connection c = null;
Statement stmt = null;
try {
Class.forName("org.postgresql.Driver");
c = DriverManager
.getConnection("jdbc:postgresql://localhost:5432/testdb",
"manisha", "123");
c.setAutoCommit(false);
System.out.println("Opened database successfully");
stmt = c.createStatement();
String sql = "UPDATE COMPANY set SALARY = 25000.00 where ID=1;";
stmt.executeUpdate(sql);
c.commit();
ResultSet rs = stmt.executeQuery( "SELECT * FROM COMPANY;" );
while ( rs.next() ) {
int id = rs.getInt("id");
String name = rs.getString("name");
int age = rs.getInt("age");
String address = rs.getString("address");
float salary = rs.getFloat("salary");
System.out.println( "ID = " + id );
System.out.println( "NAME = " + name );
System.out.println( "AGE = " + age );
System.out.println( "ADDRESS = " + address );
System.out.println( "SALARY = " + salary );
System.out.println();
}
rs.close();
stmt.close();
c.close();
} catch ( Exception e ) {
System.err.println( e.getClass().getName()+": "+ e.getMessage() );
System.exit(0);
}
System.out.println("Operation done successfully");
}
}
When the program is compiled and executed, it will produce the following result −
Opened database successfully
ID = 2
NAME = Allen
AGE = 25
ADDRESS = Texas
SALARY = 15000.0
ID = 3
NAME = Teddy
AGE = 23
ADDRESS = Norway
SALARY = 20000.0
ID = 4
NAME = Mark
AGE = 25
ADDRESS = Rich-Mond
SALARY = 65000.0
ID = 1
NAME = Paul
AGE = 32
ADDRESS = California
SALARY = 25000.0
Operation done successfully
DELETE Operation
The following Java code shows how we can use the DELETE statement to delete any record and then fetch and display remaining records from our COMPANY table −
import java.sql.Connection;
import java.sql.DriverManager;
import java.sql.ResultSet;
import java.sql.Statement;
public class PostgreSQLJDBC6 {
public static void main( String args[] ) {
Connection c = null;
Statement stmt = null;
try {
Class.forName("org.postgresql.Driver");
c = DriverManager
.getConnection("jdbc:postgresql://localhost:5432/testdb",
"manisha", "123");
c.setAutoCommit(false);
System.out.println("Opened database successfully");
stmt = c.createStatement();
String sql = "DELETE from COMPANY where ID = 2;";
stmt.executeUpdate(sql);
c.commit();
ResultSet rs = stmt.executeQuery( "SELECT * FROM COMPANY;" );
while ( rs.next() ) {
int id = rs.getInt("id");
String name = rs.getString("name");
int age = rs.getInt("age");
String address = rs.getString("address");
float salary = rs.getFloat("salary");
System.out.println( "ID = " + id );
System.out.println( "NAME = " + name );
System.out.println( "AGE = " + age );
System.out.println( "ADDRESS = " + address );
System.out.println( "SALARY = " + salary );
System.out.println();
}
rs.close();
stmt.close();
c.close();
} catch ( Exception e ) {
System.err.println( e.getClass().getName()+": "+ e.getMessage() );
System.exit(0);
}
System.out.println("Operation done successfully");
}
}
When the program is compiled and executed, it will produce the following result −
Opened database successfully
ID = 3
NAME = Teddy
AGE = 23
ADDRESS = Norway
SALARY = 20000.0
ID = 4
NAME = Mark
AGE = 25
ADDRESS = Rich-Mond
SALARY = 65000.0
ID = 1
NAME = Paul
AGE = 32
ADDRESS = California
SALARY = 25000.0
Operation done successfully
PostgreSQL – PHP Interface
Installation
The PostgreSQL extension is enabled by default in the latest releases of PHP 5.3.x. It is possible to disable it by using –without-pgsql at compile time. Still you can use yum command to install PHP -PostgreSQL interface −
yum install php-pgsql
Before you start using the PHP PostgreSQL interface, find the pg_hba.conf file in your PostgreSQL installation directory and add the following line −
# IPv4 local connections:
host all all 127.0.0.1/32 md5
You can start/restart the postgres server, in case it is not running, using the following command −
[root@host]# service postgresql restart
Stopping postgresql service: [ OK ]
Starting postgresql service: [ OK ]
Windows users must enable php_pgsql.dll in order to use this extension. This DLL is included with Windows distributions in the latest releases of PHP 5.3.x
For detailed installation instructions, kindly check our PHP tutorial and its official website.
PHP Interface APIs
The following are important PHP routines, which can suffice your requirement to work with PostgreSQL database from your PHP program. If you are looking for a more sophisticated application, then you can look into the PHP official documentation.
| S. No. |
API & Description |
| 1 |
resource pg_connect ( string $connection_string [, int $connect_type ] )
This opens a connection to a PostgreSQL database specified by the connection_string.
If PGSQL_CONNECT_FORCE_NEW is passed as connect_type, then a new connection is created in case of a second call to pg_connect(), even if the connection_string is identical to an existing connection.
|
| 2 |
bool pg_connection_reset ( resource $connection )
This routine resets the connection. It is useful for error recovery. Returns TRUE on success or FALSE on failure.
|
| 3 |
int pg_connection_status ( resource $connection )
This routine returns the status of the specified connection. Returns PGSQL_CONNECTION_OK or PGSQL_CONNECTION_BAD.
|
| 4 |
string pg_dbname ([ resource $connection ] )
This routine returns the name of the database that the given PostgreSQL connection resource.
|
| 5 |
resource pg_prepare ([ resource $connection ], string $stmtname, string $query )
This submits a request to create a prepared statement with the given parameters and waits for completion.
|
| 6 |
resource pg_execute ([ resource $connection ], string $stmtname, array $params )
This routine sends a request to execute a prepared statement with given parameters and waits for the result.
|
| 7 |
resource pg_query ([ resource $connection ], string $query )
This routine executes the query on the specified database connection.
|
| 8 |
array pg_fetch_row ( resource $result [, int $row ] )
This routine fetches one row of data from the result associated with the specified result resource.
|
| 9 |
array pg_fetch_all ( resource $result )
This routine returns an array that contains all rows (records) in the result resource.
|
| 10 |
int pg_affected_rows ( resource $result )
This routine returns the number of rows affected by INSERT, UPDATE, and DELETE queries.
|
| 11 |
int pg_num_rows ( resource $result )
This routine returns the number of rows in a PostgreSQL result resource for example number of rows returned by SELECT statement.
|
| 12 |
bool pg_close ([ resource $connection ] )
This routine closes the non-persistent connection to a PostgreSQL database associated with the given connection resource.
|
| 13 |
string pg_last_error ([ resource $connection ] )
This routine returns the last error message for a given connection.
|
| 14 |
string pg_escape_literal ([ resource $connection ], string $data )
This routine escapes a literal for insertion into a text field.
|
| 15 |
string pg_escape_string ([ resource $connection ], string $data )
This routine escapes a string for querying the database.
|
Connecting to Database
The following PHP code shows how to connect to an existing database on a local machine and finally a database connection object will be returned.
<?php
$host = "host = 127.0.0.1";
$port = "port = 5432";
$dbname = "dbname = testdb";
$credentials = "user = postgres password=pass123";
$db = pg_connect( "$host $port $dbname $credentials" );
if(!$db) {
echo "Error : Unable to open databasen";
} else {
echo "Opened database successfullyn";
}
?>
Now, let us run the above given program to open our database testdb: if the database is successfully opened, then it will give the following message −
Opened database successfully
Create a Table
The following PHP program will be used to create a table in a previously created database −
<?php
$host = "host = 127.0.0.1";
$port = "port = 5432";
$dbname = "dbname = testdb";
$credentials = "user = postgres password=pass123";
$db = pg_connect( "$host $port $dbname $credentials" );
if(!$db) {
echo "Error : Unable to open databasen";
} else {
echo "Opened database successfullyn";
}
$sql =<<<EOF
CREATE TABLE COMPANY
(ID INT PRIMARY KEY NOT NULL,
NAME TEXT NOT NULL,
AGE INT NOT NULL,
ADDRESS CHAR(50),
SALARY REAL);
EOF;
$ret = pg_query($db, $sql);
if(!$ret) {
echo pg_last_error($db);
} else {
echo "Table created successfullyn";
}
pg_close($db);
?>
When the above given program is executed, it will create COMPANY table in your testdb and it will display the following messages −
Opened database successfully
Table created successfully
INSERT Operation
The following PHP program shows how we can create records in our COMPANY table created in above example −
<?php
$host = "host=127.0.0.1";
$port = "port=5432";
$dbname = "dbname = testdb";
$credentials = "user = postgres password=pass123";
$db = pg_connect( "$host $port $dbname $credentials" );
if(!$db) {
echo "Error : Unable to open databasen";
} else {
echo "Opened database successfullyn";
}
$sql =<<<EOF
INSERT INTO COMPANY (ID,NAME,AGE,ADDRESS,SALARY)
VALUES (1, ''Paul'', 32, ''California'', 20000.00 );
INSERT INTO COMPANY (ID,NAME,AGE,ADDRESS,SALARY)
VALUES (2, ''Allen'', 25, ''Texas'', 15000.00 );
INSERT INTO COMPANY (ID,NAME,AGE,ADDRESS,SALARY)
VALUES (3, ''Teddy'', 23, ''Norway'', 20000.00 );
INSERT INTO COMPANY (ID,NAME,AGE,ADDRESS,SALARY)
VALUES (4, ''Mark'', 25, ''Rich-Mond '', 65000.00 );
EOF;
$ret = pg_query($db, $sql);
if(!$ret) {
echo pg_last_error($db);
} else {
echo "Records created successfullyn";
}
pg_close($db);
?>
When the above given program is executed, it will create the given records in COMPANY table and will display the following two lines −
Opened database successfully
Records created successfully
SELECT Operation
The following PHP program shows how we can fetch and display records from our COMPANY table created in above example −
<?php
$host = "host = 127.0.0.1";
$port = "port = 5432";
$dbname = "dbname = testdb";
$credentials = "user = postgres password=pass123";
$db = pg_connect( "$host $port $dbname $credentials" );
if(!$db) {
echo "Error : Unable to open databasen";
} else {
echo "Opened database successfullyn";
}
$sql =<<<EOF
SELECT * from COMPANY;
EOF;
$ret = pg_query($db, $sql);
if(!$ret) {
echo pg_last_error($db);
exit;
}
while($row = pg_fetch_row($ret)) {
echo "ID = ". $row[0] . "n";
echo "NAME = ". $row[1] ."n";
echo "ADDRESS = ". $row[2] ."n";
echo "SALARY = ".$row[4] ."nn";
}
echo "Operation done successfullyn";
pg_close($db);
?>
When the above given program is executed, it will produce the following result. Keep a note that fields are returned in the sequence they were used while creating table.
Opened database successfully
ID = 1
NAME = Paul
ADDRESS = California
SALARY = 20000
ID = 2
NAME = Allen
ADDRESS = Texas
SALARY = 15000
ID = 3
NAME = Teddy
ADDRESS = Norway
SALARY = 20000
ID = 4
NAME = Mark
ADDRESS = Rich-Mond
SALARY = 65000
Operation done successfully
UPDATE Operation
The following PHP code shows how we can use the UPDATE statement to update any record and then fetch and display updated records from our COMPANY table −
<?php
$host = "host=127.0.0.1";
$port = "port=5432";
$dbname = "dbname = testdb";
$credentials = "user = postgres password=pass123";
$db = pg_connect( "$host $port $dbname $credentials" );
if(!$db) {
echo "Error : Unable to open databasen";
} else {
echo "Opened database successfullyn";
}
$sql =<<<EOF
UPDATE COMPANY set SALARY = 25000.00 where ID=1;
EOF;
$ret = pg_query($db, $sql);
if(!$ret) {
echo pg_last_error($db);
exit;
} else {
echo "Record updated successfullyn";
}
$sql =<<<EOF
SELECT * from COMPANY;
EOF;
$ret = pg_query($db, $sql);
if(!$ret) {
echo pg_last_error($db);
exit;
}
while($row = pg_fetch_row($ret)) {
echo "ID = ". $row[0] . "n";
echo "NAME = ". $row[1] ."n";
echo "ADDRESS = ". $row[2] ."n";
echo "SALARY = ".$row[4] ."nn";
}
echo "Operation done successfullyn";
pg_close($db);
?>
When the above given program is executed, it will produce the following result −
Opened database successfully
Record updated successfully
ID = 2
NAME = Allen
ADDRESS = 25
SALARY = 15000
ID = 3
NAME = Teddy
ADDRESS = 23
SALARY = 20000
ID = 4
NAME = Mark
ADDRESS = 25
SALARY = 65000
ID = 1
NAME = Paul
ADDRESS = 32
SALARY = 25000
Operation done successfully
DELETE Operation
The following PHP code shows how we can use the DELETE statement to delete any record and then fetch and display the remaining records from our COMPANY table −
<?php
$host = "host = 127.0.0.1";
$port = "port = 5432";
$dbname = "dbname = testdb";
$credentials = "user = postgres password=pass123";
$db = pg_connect( "$host $port $dbname $credentials" );
if(!$db) {
echo "Error : Unable to open databasen";
} else {
echo "Opened database successfullyn";
}
$sql =<<<EOF
DELETE from COMPANY where ID=2;
EOF;
$ret = pg_query($db, $sql);
if(!$ret) {
echo pg_last_error($db);
exit;
} else {
echo "Record deleted successfullyn";
}
$sql =<<<EOF
SELECT * from COMPANY;
EOF;
$ret = pg_query($db, $sql);
if(!$ret) {
echo pg_last_error($db);
exit;
}
while($row = pg_fetch_row($ret)) {
echo "ID = ". $row[0] . "n";
echo "NAME = ". $row[1] ."n";
echo "ADDRESS = ". $row[2] ."n";
echo "SALARY = ".$row[4] ."nn";
}
echo "Operation done successfullyn";
pg_close($db);
?>
When the above given program is executed, it will produce the following result −
Opened database successfully
Record deleted successfully
ID = 3
NAME = Teddy
ADDRESS = 23
SALARY = 20000
ID = 4
NAME = Mark
ADDRESS = 25
SALARY = 65000
ID = 1
NAME = Paul
ADDRESS = 32
SALARY = 25000
Operation done successfully
PostgreSQL – Perl Interface
Installation
The PostgreSQL can be integrated with Perl using Perl DBI module, which is a database access module for the Perl programming language. It defines a set of methods, variables and conventions that provide a standard database interface.
Here are simple steps to install DBI module on your Linux/Unix machine −
$ wget http://search.cpan.org/CPAN/authors/id/T/TI/TIMB/DBI-1.625.tar.gz
$ tar xvfz DBI-1.625.tar.gz
$ cd DBI-1.625
$ perl Makefile.PL
$ make
$ make install
If you need to install SQLite driver for DBI, then it can be installed as follows −
$ wget http://search.cpan.org/CPAN/authors/id/T/TU/TURNSTEP/DBD-Pg-2.19.3.tar.gz
$ tar xvfz DBD-Pg-2.19.3.tar.gz
$ cd DBD-Pg-2.19.3
$ perl Makefile.PL
$ make
$ make install
Before you start using Perl PostgreSQL interface, find the pg_hba.conf file in your PostgreSQL installation directory and add the following line −
# IPv4 local connections:
host all all 127.0.0.1/32 md5
You can start/restart the postgres server, in case it is not running, using the following command −
[root@host]# service postgresql restart
Stopping postgresql service: [ OK ]
Starting postgresql service: [ OK ]
DBI Interface APIs
Following are the important DBI routines, which can suffice your requirement to work with SQLite database from your Perl program. If you are looking for a more sophisticated application, then you can look into Perl DBI official documentation.
| S. No. |
API & Description |
| 1 |
DBI→connect($data_source, “userid”, “password”, %attr)
Establishes a database connection, or session, to the requested $data_source. Returns a database handle object if the connection succeeds.
Datasource has the form like : DBI:Pg:dbname=$database;host=127.0.0.1;port=5432 Pg is PostgreSQL driver name and testdb is the name of database.
|
| 2 |
$dbh→do($sql)
This routine prepares and executes a single SQL statement. Returns the number of rows affected or undef on error. A return value of -1 means the number of rows is not known, not applicable, or not available. Here $dbh is a handle returned by DBI→connect() call.
|
| 3 |
$dbh→prepare($sql)
This routine prepares a statement for later execution by the database engine and returns a reference to a statement handle object.
|
| 4 |
$sth→execute()
This routine performs whatever processing is necessary to execute the prepared statement. An undef is returned if an error occurs. A successful execute always returns true regardless of the number of rows affected. Here $sth is a statement handle returned by $dbh→prepare($sql) call.
|
| 5 |
$sth→fetchrow_array()
This routine fetches the next row of data and returns it as a list containing the field values. Null fields are returned as undef values in the list.
|
| 6 |
$DBI::err
This is equivalent to $h→err, where $h is any of the handle types like $dbh, $sth, or $drh. This returns native database engine error code from the last driver method called.
|
| 7 |
$DBI::errstr
This is equivalent to $h→errstr, where $h is any of the handle types like $dbh, $sth, or $drh. This returns the native database engine error message from the last DBI method called.
|
| 8 |
$dbh->disconnect()
This routine closes a database connection previously opened by a call to DBI→connect().
|
Connecting to Database
The following Perl code shows how to connect to an existing database. If the database does not exist, then it will be created and finally a database object will be returned.
#!/usr/bin/perl
use DBI;
use strict;
my $driver = "Pg";
my $database = "testdb";
my $dsn = "DBI:$driver:dbname = $database;host = 127.0.0.1;port = 5432";
my $userid = "postgres";
my $password = "pass123";
my $dbh = DBI->connect($dsn, $userid, $password, { RaiseError => 1 })
or die $DBI::errstr;
print "Opened database successfullyn";
Now, let us run the above given program to open our database testdb; if the database is successfully opened then it will give the following message −
Open database successfully
Create a Table
The following Perl program will be used to create a table in previously created database −
#!/usr/bin/perl
use DBI;
use strict;
my $driver = "Pg";
my $database = "testdb";
my $dsn = "DBI:$driver:dbname=$database;host=127.0.0.1;port=5432";
my $userid = "postgres";
my $password = "pass123";
my $dbh = DBI->connect($dsn, $userid, $password, { RaiseError => 1 })
or die $DBI::errstr;
print "Opened database successfullyn";
my $stmt = qq(CREATE TABLE COMPANY
(ID INT PRIMARY KEY NOT NULL,
NAME TEXT NOT NULL,
AGE INT NOT NULL,
ADDRESS CHAR(50),
SALARY REAL););
my $rv = $dbh->do($stmt);
if($rv < 0) {
print $DBI::errstr;
} else {
print "Table created successfullyn";
}
$dbh->disconnect();
When the above given program is executed, it will create COMPANY table in your testdb and it will display the following messages −
Opened database successfully
Table created successfully
INSERT Operation
The following Perl program shows how we can create records in our COMPANY table created in above example −
#!/usr/bin/perl
use DBI;
use strict;
my $driver = "Pg";
my $database = "testdb";
my $dsn = "DBI:$driver:dbname = $database;host = 127.0.0.1;port = 5432";
my $userid = "postgres";
my $password = "pass123";
my $dbh = DBI->connect($dsn, $userid, $password, { RaiseError => 1 })
or die $DBI::errstr;
print "Opened database successfullyn";
my $stmt = qq(INSERT INTO COMPANY (ID,NAME,AGE,ADDRESS,SALARY)
VALUES (1, ''Paul'', 32, ''California'', 20000.00 ));
my $rv = $dbh->do($stmt) or die $DBI::errstr;
$stmt = qq(INSERT INTO COMPANY (ID,NAME,AGE,ADDRESS,SALARY)
VALUES (2, ''Allen'', 25, ''Texas'', 15000.00 ));
$rv = $dbh->do($stmt) or die $DBI::errstr;
$stmt = qq(INSERT INTO COMPANY (ID,NAME,AGE,ADDRESS,SALARY)
VALUES (3, ''Teddy'', 23, ''Norway'', 20000.00 ));
$rv = $dbh->do($stmt) or die $DBI::errstr;
$stmt = qq(INSERT INTO COMPANY (ID,NAME,AGE,ADDRESS,SALARY)
VALUES (4, ''Mark'', 25, ''Rich-Mond '', 65000.00 ););
$rv = $dbh->do($stmt) or die $DBI::errstr;
print "Records created successfullyn";
$dbh->disconnect();
When the above given program is executed, it will create given records in COMPANY table and will display the following two lines −
Opened database successfully
Records created successfully
SELECT Operation
The following Perl program shows how we can fetch and display records from our COMPANY table created in above example −
#!/usr/bin/perl
use DBI;
use strict;
my $driver = "Pg";
my $database = "testdb";
my $dsn = "DBI:$driver:dbname = $database;host = 127.0.0.1;port = 5432";
my $userid = "postgres";
my $password = "pass123";
my $dbh = DBI->connect($dsn, $userid, $password, { RaiseError => 1 })
or die $DBI::errstr;
print "Opened database successfullyn";
my $stmt = qq(SELECT id, name, address, salary from COMPANY;);
my $sth = $dbh->prepare( $stmt );
my $rv = $sth->execute() or die $DBI::errstr;
if($rv < 0) {
print $DBI::errstr;
}
while(my @row = $sth->fetchrow_array()) {
print "ID = ". $row[0] . "n";
print "NAME = ". $row[1] ."n";
print "ADDRESS = ". $row[2] ."n";
print "SALARY = ". $row[3] ."nn";
}
print "Operation done successfullyn";
$dbh->disconnect();
When the above given program is executed, it will produce the following result −
Opened database successfully
ID = 1
NAME = Paul
ADDRESS = California
SALARY = 20000
ID = 2
NAME = Allen
ADDRESS = Texas
SALARY = 15000
ID = 3
NAME = Teddy
ADDRESS = Norway
SALARY = 20000
ID = 4
NAME = Mark
ADDRESS = Rich-Mond
SALARY = 65000
Operation done successfully
UPDATE Operation
The following Perl code shows how we can use the UPDATE statement to update any record and then fetch and display updated records from our COMPANY table −
#!/usr/bin/perl
use DBI;
use strict;
my $driver = "Pg";
my $database = "testdb";
my $dsn = "DBI:$driver:dbname = $database;host = 127.0.0.1;port = 5432";
my $userid = "postgres";
my $password = "pass123";
my $dbh = DBI->connect($dsn, $userid, $password, { RaiseError => 1 })
or die $DBI::errstr;
print "Opened database successfullyn";
my $stmt = qq(UPDATE COMPANY set SALARY = 25000.00 where ID=1;);
my $rv = $dbh->do($stmt) or die $DBI::errstr;
if( $rv < 0 ) {
print $DBI::errstr;
}else{
print "Total number of rows updated : $rvn";
}
$stmt = qq(SELECT id, name, address, salary from COMPANY;);
my $sth = $dbh->prepare( $stmt );
$rv = $sth->execute() or die $DBI::errstr;
if($rv < 0) {
print $DBI::errstr;
}
while(my @row = $sth->fetchrow_array()) {
print "ID = ". $row[0] . "n";
print "NAME = ". $row[1] ."n";
print "ADDRESS = ". $row[2] ."n";
print "SALARY = ". $row[3] ."nn";
}
print "Operation done successfullyn";
$dbh->disconnect();
When the above given program is executed, it will produce the following result −
Opened database successfully
Total number of rows updated : 1
ID = 1
NAME = Paul
ADDRESS = California
SALARY = 25000
ID = 2
NAME = Allen
ADDRESS = Texas
SALARY = 15000
ID = 3
NAME = Teddy
ADDRESS = Norway
SALARY = 20000
ID = 4
NAME = Mark
ADDRESS = Rich-Mond
SALARY = 65000
Operation done successfully
DELETE Operation
The following Perl code shows how we can use the DELETE statement to delete any record and then fetch and display the remaining records from our COMPANY table −
#!/usr/bin/perl
use DBI;
use strict;
my $driver = "Pg";
my $database = "testdb";
my $dsn = "DBI:$driver:dbname = $database;host = 127.0.0.1;port = 5432";
my $userid = "postgres";
my $password = "pass123";
my $dbh = DBI->connect($dsn, $userid, $password, { RaiseError => 1 })
or die $DBI::errstr;
print "Opened database successfullyn";
my $stmt = qq(DELETE from COMPANY where ID=2;);
my $rv = $dbh->do($stmt) or die $DBI::errstr;
if( $rv < 0 ) {
print $DBI::errstr;
} else{
print "Total number of rows deleted : $rvn";
}
$stmt = qq(SELECT id, name, address, salary from COMPANY;);
my $sth = $dbh->prepare( $stmt );
$rv = $sth->execute() or die $DBI::errstr;
if($rv < 0) {
print $DBI::errstr;
}
while(my @row = $sth->fetchrow_array()) {
print "ID = ". $row[0] . "n";
print "NAME = ". $row[1] ."n";
print "ADDRESS = ". $row[2] ."n";
print "SALARY = ". $row[3] ."nn";
}
print "Operation done successfullyn";
$dbh->disconnect();
When the above given program is executed, it will produce the following result −
Opened database successfully
Total number of rows deleted : 1
ID = 1
NAME = Paul
ADDRESS = California
SALARY = 25000
ID = 3
NAME = Teddy
ADDRESS = Norway
SALARY = 20000
ID = 4
NAME = Mark
ADDRESS = Rich-Mond
SALARY = 65000
Operation done successfully
PostgreSQL – Python Interface
Installation
The PostgreSQL can be integrated with Python using psycopg2 module. sycopg2 is a PostgreSQL database adapter for the Python programming language. psycopg2 was written with the aim of being very small and fast, and stable as a rock. You do not need to install this module separately because it is shipped, by default, along with Python version 2.5.x onwards.
If you do not have it installed on your machine then you can use yum command to install it as follows −
$yum install python-psycopg2
To use psycopg2 module, you must first create a Connection object that represents the database and then optionally you can create cursor object which will help you in executing all the SQL statements.
Python psycopg2 module APIs
The following are important psycopg2 module routines, which can suffice your requirement to work with PostgreSQL database from your Python program. If you are looking for a more sophisticated application, then you can look into Python psycopg2 module”s official documentation.
| S. No. |
API & Description |
| 1 |
psycopg2.connect(database=”testdb”, user=”postgres”, password=”cohondob”, host=”127.0.0.1″, port=”5432″)
This API opens a connection to the PostgreSQL database. If database is opened successfully, it returns a connection object.
|
| 2 |
connection.cursor()
This routine creates a cursor which will be used throughout of your database programming with Python.
|
| 3 |
cursor.execute(sql [, optional parameters])
This routine executes an SQL statement. The SQL statement may be parameterized (i.e., placeholders instead of SQL literals). The psycopg2 module supports placeholder using %s sign
For example:cursor.execute(“insert into people values (%s, %s)”, (who, age))
|
| 4 |
cursor.executemany(sql, seq_of_parameters)
This routine executes an SQL command against all parameter sequences or mappings found in the sequence sql.
|
| 5 |
cursor.callproc(procname[, parameters])
This routine executes a stored database procedure with the given name. The sequence of parameters must contain one entry for each argument that the procedure expects.
|
| 6 |
cursor.rowcount
This read-only attribute which returns the total number of database rows that have been modified, inserted, or deleted by the last last execute*().
|
| 7 |
connection.commit()
This method commits the current transaction. If you do not call this method, anything you did since the last call to commit() is not visible from other database connections.
|
| 8 |
connection.rollback()
This method rolls back any changes to the database since the last call to commit().
|
| 9 |
connection.close()
This method closes the database connection. Note that this does not automatically call commit(). If you just close your database connection without calling commit() first, your changes will be lost!
|
| 10 |
cursor.fetchone()
This method fetches the next row of a query result set, returning a single sequence, or None when no more data is available.
|
| 11 |
cursor.fetchmany([size=cursor.arraysize])
This routine fetches the next set of rows of a query result, returning a list. An empty list is returned when no more rows are available. The method tries to fetch as many rows as indicated by the size parameter.
|
| 12 |
cursor.fetchall()
This routine fetches all (remaining) rows of a query result, returning a list. An empty list is returned when no rows are available.
|
Connecting to Database
The following Python code shows how to connect to an existing database. If the database does not exist, then it will be created and finally a database object will be returned.
#!/usr/bin/python

import psycopg2

conn = psycopg2.connect(database="testdb", user = "postgres", password = "pass123", host = "127.0.0.1", port = "5432")

print "Opened database successfully"
Here, you can also supply database testdb as name and if database is successfully opened, then it will give the following message −
Open database successfully
Create a Table
The following Python program will be used to create a table in previously created database −
#!/usr/bin/python

import psycopg2

conn = psycopg2.connect(database = "testdb", user = "postgres", password = "pass123", host = "127.0.0.1", port = "5432")
print "Opened database successfully"

cur = conn.cursor()
cur.execute(''''''CREATE TABLE COMPANY
      (ID INT PRIMARY KEY     NOT NULL,
      NAME           TEXT    NOT NULL,
      AGE            INT     NOT NULL,
      ADDRESS        CHAR(50),
      SALARY         REAL);'''''')
print "Table created successfully"

conn.commit()
conn.close()
When the above given program is executed, it will create COMPANY table in your test.db and it will display the following messages −
Opened database successfully
Table created successfully
INSERT Operation
The following Python program shows how we can create records in our COMPANY table created in the above example −
#!/usr/bin/python

import psycopg2

conn = psycopg2.connect(database = "testdb", user = "postgres", password = "pass123", host = "127.0.0.1", port = "5432")
print "Opened database successfully"

cur = conn.cursor()

cur.execute("INSERT INTO COMPANY (ID,NAME,AGE,ADDRESS,SALARY)
      VALUES (1, ''Paul'', 32, ''California'', 20000.00 )");

cur.execute("INSERT INTO COMPANY (ID,NAME,AGE,ADDRESS,SALARY)
      VALUES (2, ''Allen'', 25, ''Texas'', 15000.00 )");

cur.execute("INSERT INTO COMPANY (ID,NAME,AGE,ADDRESS,SALARY)
      VALUES (3, ''Teddy'', 23, ''Norway'', 20000.00 )");

cur.execute("INSERT INTO COMPANY (ID,NAME,AGE,ADDRESS,SALARY)
      VALUES (4, ''Mark'', 25, ''Rich-Mond '', 65000.00 )");

conn.commit()
print "Records created successfully";
conn.close()
When the above given program is executed, it will create given records in COMPANY table and will display the following two lines −
Opened database successfully
Records created successfully
SELECT Operation
The following Python program shows how we can fetch and display records from our COMPANY table created in the above example −
#!/usr/bin/python

import psycopg2

conn = psycopg2.connect(database = "testdb", user = "postgres", password = "pass123", host = "127.0.0.1", port = "5432")
print "Opened database successfully"

cur = conn.cursor()

cur.execute("SELECT id, name, address, salary  from COMPANY")
rows = cur.fetchall()
for row in rows:
   print "ID = ", row[0]
   print "NAME = ", row[1]
   print "ADDRESS = ", row[2]
   print "SALARY = ", row[3], "n"

print "Operation done successfully";
conn.close()
When the above given program is executed, it will produce the following result −
Opened database successfully
ID =  1
NAME =  Paul
ADDRESS =  California
SALARY =  20000.0

ID =  2
NAME =  Allen
ADDRESS =  Texas
SALARY =  15000.0

ID =  3
NAME =  Teddy
ADDRESS =  Norway
SALARY =  20000.0

ID =  4
NAME =  Mark
ADDRESS =  Rich-Mond
SALARY =  65000.0

Operation done successfully
UPDATE Operation
The following Python code shows how we can use the UPDATE statement to update any record and then fetch and display updated records from our COMPANY table −
#!/usr/bin/python

import psycopg2

conn = psycopg2.connect(database = "testdb", user = "postgres", password = "pass123", host = "127.0.0.1", port = "5432")
print "Opened database successfully"

cur = conn.cursor()

cur.execute("UPDATE COMPANY set SALARY = 25000.00 where ID = 1")
conn.commit()
print "Total number of rows updated :", cur.rowcount

cur.execute("SELECT id, name, address, salary  from COMPANY")
rows = cur.fetchall()
for row in rows:
   print "ID = ", row[0]
   print "NAME = ", row[1]
   print "ADDRESS = ", row[2]
   print "SALARY = ", row[3], "n"

print "Operation done successfully";
conn.close()
When the above given program is executed, it will produce the following result −
Opened database successfully
Total number of rows updated : 1
ID =  1
NAME =  Paul
ADDRESS =  California
SALARY =  25000.0

ID =  2
NAME =  Allen
ADDRESS =  Texas
SALARY =  15000.0

ID =  3
NAME =  Teddy
ADDRESS =  Norway
SALARY =  20000.0

ID =  4
NAME =  Mark
ADDRESS =  Rich-Mond
SALARY =  65000.0

Operation done successfully
DELETE Operation
The following Python code shows how we can use the DELETE statement to delete any record and then fetch and display the remaining records from our COMPANY table −
#!/usr/bin/python

import psycopg2

conn = psycopg2.connect(database = "testdb", user = "postgres", password = "pass123", host = "127.0.0.1", port = "5432")
print "Opened database successfully"

cur = conn.cursor()

cur.execute("DELETE from COMPANY where ID=2;")
conn.commit()
print "Total number of rows deleted :", cur.rowcount

cur.execute("SELECT id, name, address, salary  from COMPANY")
rows = cur.fetchall()
for row in rows:
   print "ID = ", row[0]
   print "NAME = ", row[1]
   print "ADDRESS = ", row[2]
   print "SALARY = ", row[3], "n"

print "Operation done successfully";
conn.close()
When the above given program is executed, it will produce the following result −
Opened database successfully
Total number of rows deleted : 1
ID =  1
NAME =  Paul
ADDRESS =  California
SALARY =  20000.0

ID =  3
NAME =  Teddy
ADDRESS =  Norway
SALARY =  20000.0

ID =  4
NAME =  Mark
ADDRESS =  Rich-Mond
SALARY =  65000.0

Operation done successfully