Category: mysql

  • Khóa học miễn phí MySQL – Export Table into CSV File nhận dự án làm có lương

    MySQL – Export Table into CSV File

    Table of content


    MySQL is an open-source relational database management system that allows us to store and manage large volume of data. One of its key feature is to export data from a table into various formats and CSV is one of it. CSV stands for “Comma Separated Values” file.

    This allows users to extract data from a table in a structured format that can be easily manipulated and analysed using other tools such as Microsoft Excel, Google documents, open office etc.

    Export MySQL Table into CSV File

    To export the MySQL table data into a CSV file, we can use the MySQL “SELECT INTO … OUTFILE” statement. Before exporting any table data into CSV files in the database server, we must ensure the following things −

    • The MySQL server”s process must have the read/write privileges to the specified target folder, where CSV file will be created.

    • The specified CSV file should be already present in the system (No duplicate file).

    The exported CSV file can contain data from one or more tables, and it can be modified to include only particular columns or rows.

    Syntax

    Following is the syntax of SELECT INTO … OUTFILE statement −

    SELECT column_name1, column_name2,...
    INTO OUTFILE ''C:/ProgramData/MySQL/MySQL Server 8.0/Uploads/file_name.csv''
    FIELDS TERMINATED BY '',''
    OPTIONALLY ENCLOSED BY ''"''
    LINES TERMINATED BY ''rn
    

    Where,

    • INTO OUTFILE is the path and name of the CSV file that we want to export the table data to.

    • FIELDS TERMINATED BY is the delimiter that separates the fields in the exported CSV file.

    • LINES TERMINATED is the line terminator character for exported CSV file.

    Storage Location of Exported .csv File

    In MySQL, when you export a file, such as a .csv file, the default storage location for the exported file is determined by the “secure_file_priv” variable.

    To find out the default path for exported files, you can use the following SQL query −

    SHOW VARIABLES LIKE "secure_file_priv";
    

    We get the following output −

    Variable_name Value
    secure_file_priv C:ProgramDataMySQLMySQL Server 8.0Uploads

    Before exporting data to a .csv file, you will need to have at least one table in your MySQL database. Let us create a table named “CUSTOMERS” using the following SQL query −

    CREATE TABLE CUSTOMERS (
       ID INT NOT NULL,
       NAME VARCHAR (20) NOT NULL,
       AGE INT NULL,
       ADDRESS CHAR (25),
       SALARY DECIMAL (18, 2),
       PRIMARY KEY (ID)
    );
    

    Now, we are inserting data into the above created table as shown below −

    INSERT INTO CUSTOMERS VALUES
    (1, ''Ramesh'', 32, ''Ahmedabad'', 2000.00 ),
    (2, ''Khilan'', 25, ''Delhi'', 1500.00 ),
    (3, ''Kaushik'', 23, NULL, 2000.00 ),
    (4, ''Chaitali'', NULL, ''Mumbai'', 6500.00 ),
    (5, ''Hardik'', 27, ''Bhopal'', 8500.00 ),
    (6, ''Komal'', 22, NULL, 4500.00 ),
    (7, ''Muffy'', 24, ''Indore'', 10000.00 );
    

    The CUSTOMERS table obtained is as shown below −

    ID NAME AGE ADDRESS SALARY
    1 Ramesh 32 Ahmedabad 2000.00
    2 Khilan 25 Delhi 1500.00
    3 Kaushik 23 NULL 2000.00
    4 Chaitali NULL Mumbai 6500.00
    5 Hardik 27 Bhopal 8500.00
    6 Komal 22 NULL 4500.00
    7 Muffy 24 Indore 10000.00

    Exporting MySQL Data in CSV Format

    You can export MySQL data in CSV file using the SELECT INTO … OUTFILE statement. Here, we are exporting the data of CUSTOMERS table into a CSV file named “CUSTOMERS_BACKUP” using the following query −

    SELECT ID, NAME, AGE, ADDRESS, SALARY FROM CUSTOMERS
    INTO OUTFILE ''C:/ProgramData/MySQL/MySQL Server 8.0/Uploads/CUSTOMERS_BACKUP.csv''
    FIELDS ENCLOSED BY ''"''
    TERMINATED BY ''
    ESCAPED BY ''"''
    LINES TERMINATED BY ''rn
    

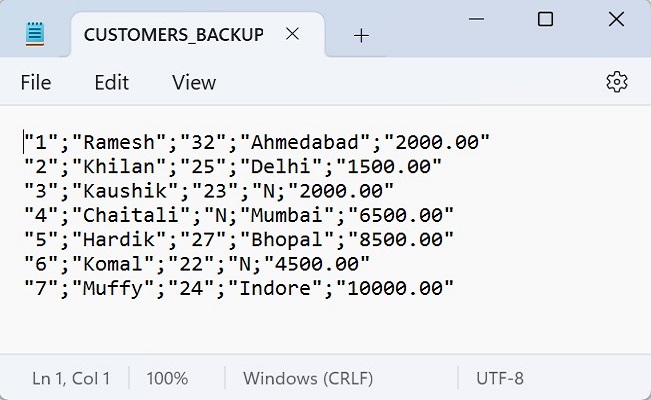
    After executing the above query, the CSV format file will be created at the specified path. Following is the output obtained after executing the above query −

    Query OK, 7 rows affected (0.01 sec)
    

    Following is the image of “CUSTOMERS_BACKUP.csv” file when we opened it −

    Export table into csv

    Handling File Already Exists Error −

    If you attempt to export data into a file that already exists, MySQL will generate an error −

    SELECT ID, NAME, AGE, ADDRESS, SALARY FROM CUSTOMERS
    INTO OUTFILE ''C:/ProgramData/MySQL/MySQL Server 8.0/Uploads/CUSTOMERS_BACKUP.csv''
    FIELDS ENCLOSED BY ''"''
    TERMINATED BY ''
    ESCAPED BY ''"''
    LINES TERMINATED BY ''rn
    

    Following is the error obtained −

    ERROR 1086 (HY000): File ''C:/ProgramData/MySQL/MySQL Server 8.0/Uploads/CUSTOMERS_BACKUP.csv'' already exists
    

    To avoid this error, you can either choose a different filename or delete the existing file before executing the export query.

    Removing Enclosing Quotes for Numeric Records −

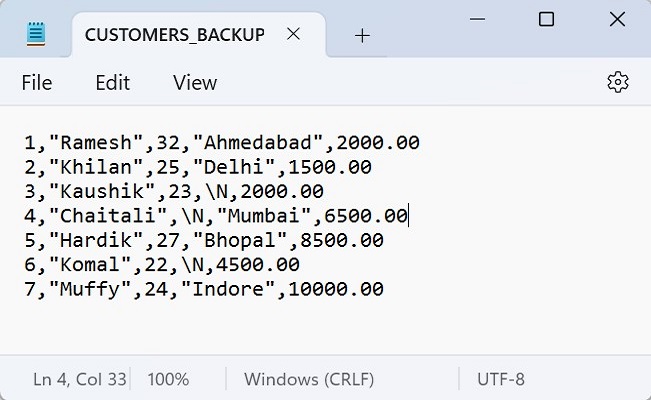
    By default, all records in the CSV file will be enclosed in double quotes, including numeric values. If you want to remove the quotes for numeric records, you can use the OPTIONALLY clause before the ENCLOSED BY clause, as shown below −

    SELECT ID, NAME, AGE, ADDRESS, SALARY FROM CUSTOMERS
    INTO OUTFILE ''C:/ProgramData/MySQL/MySQL Server 8.0/Uploads/CUSTOMERS_BACKUP.csv''
    FIELDS TERMINATED BY '',''
    OPTIONALLY ENCLOSED BY ''"''
    LINES TERMINATED BY ''rn
    

    Following is the output obtained after executing the above query −

    Query OK, 7 rows affected (0.00 sec)
    

    As we can see the image of CSV file below, the double quotes (“”) are removed for the numeric records.

    Export table into csv2

    Exporting Table Data Along with Column Headings

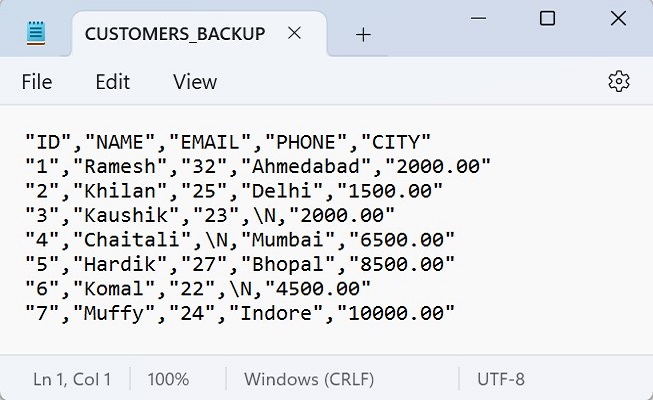
    To export table data along with their respective column headings, you can use the UNION ALL statement. This allows you to create a row with column names and then append the data rows. Here is an example query −

    SELECT ''ID'', ''NAME'', ''EMAIL'', ''PHONE'', ''CITY''
    UNION ALL
    SELECT ID, NAME, AGE, ADDRESS, SALARY FROM CUSTOMERS
    INTO OUTFILE ''C:/ProgramData/MySQL/MySQL Server 8.0/Uploads/CUSTOMERS_BACKUP.csv''
    FIELDS TERMINATED BY '',''
    OPTIONALLY ENCLOSED BY ''"''
    LINES TERMINATED BY ''rn
    

    Output

    The output obtained is as follows −

    Query OK, 8 rows affected (0.01 sec)
    

    Verification

    If we verify the .csv file, we can see that the respective column names are added −

    Export table into csv3

    Exporting Table Data Without Specifying Column Names

    You can also export table data into a CSV file without specifying column names.

    Syntax

    Following is the syntax to export table data into a CSV file without specifying column names −

    TABLE table_name ORDER BY column_name LIMIT 100
    INTO OUTFILE ''/path/filename.txt''
    FIELDS ENCLOSED BY ''"''
    TERMINATED BY ''
    ESCAPED BY ''"''
    LINES TERMINATED BY ''rn;
    

    Example

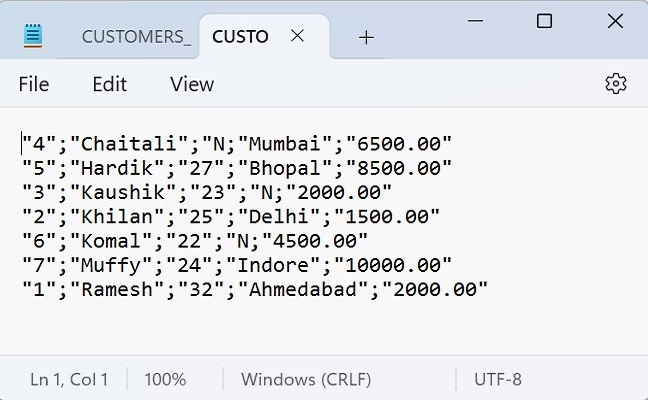
    In the following query, we are exporting the CUSTOMERS table data into “CUSTOMERS_BACKUP.csv” file without specifying their column names −

    TABLE CUSTOMERS ORDER BY NAME LIMIT 100
    INTO OUTFILE ''C:/ProgramData/MySQL/MySQL Server 8.0/Uploads/CUSTOMERS_BACKUP.csv''
    FIELDS ENCLOSED BY ''"''
    TERMINATED BY ''
    ESCAPED BY ''"''
    LINES TERMINATED BY ''rn
    

    Output

    The result produced is as follows −

    Query OK, 7 rows affected (0.01 sec)
    

    Verification

    As we can see in the “CUSTOMERS_BACKUP.csv” file, the table data got exported −

    Export table into csv4

    Replacing NULL Values

    If your table contains NULL values, you can use the IFNULL() function to replace them with specific values before exporting the data to a CSV file.

    Example

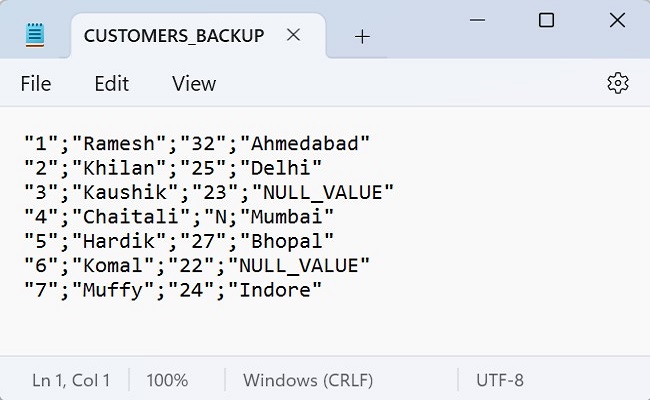
    In the following query, the IFNULL() function is used to replace NULL values in the “ADDRESS” column with “NULL_VALUE” before exporting the data as shown below −

    SELECT ID, NAME, AGE, IFNULL(ADDRESS, ''NULL_VALUE'') FROM CUSTOMERS
    INTO OUTFILE ''C:/ProgramData/MySQL/MySQL Server 8.0/Uploads/CUSTOMERS_BACKUP.csv''
    FIELDS ENCLOSED BY ''"''
    TERMINATED BY ''
    ESCAPED BY ''"''
    LINES TERMINATED BY ''rn
    

    Output

    The result obtained is as shown below −

    Query OK, 7 rows affected (0.00 sec)
    

    Verification

    The NULL values (N) are replaced with “NULL_VALUE” −

    Export table into csv5

    Using Client Program

    We can also export table into CSV file using Client Program.

    Syntax

    To export the table into the CSV file through a PHP program, we have to pass the source file path and need to execute the “SELECT” statement using the mysqli function query() as follows −

    $sql = "SELECT ID, NAME, AGE, ADDRESS, SALARY FROM CUSTOMERS INTO OUTFILE ''C:/ProgramData/MySQL/MySQL Server 8.0/Uploads/CUSTOMERS_BACKUP_new.csv'' FIELDS ENCLOSED BY '''' TERMINATED BY
    '' ESCAPED BY '''' LINES TERMINATED BY ''rn''";
    $mysqli->query($sql);
    

    To export the table into the CSV file through a JavaScript program, we have to pass the source file path and need to execute the “SELECT” statement using the query() function of mysql2 library as follows −

    sql = `SELECT ID, NAME, AGE, ADDRESS, SALARY FROM CUSTOMERS INTO OUTFILE ''C:/ProgramData/MySQL/MySQL Server 8.0/Uploads/CUSTOMERS_BACKUP_new1.csv'' FIELDS ENCLOSED BY ''"'' TERMINATED BY
    '' ESCAPED BY ''"'' LINES TERMINATED BY ''rn''`;
    con.query(sql);
    

    To export the table into the CSV file through a Java program, we have to pass the source file path and need to execute the “SELECT” statement using the JDBC function execute() as follows −

    String sql = "SELECT ID, NAME, AGE, ADDRESS, SALARY FROM CUSTOMERS INTO OUTFILE ''C:/ProgramData/MySQL/MySQL Server 8.0/Uploads/CUSTOMERS_BACKUP_new.csv'' FIELDS ENCLOSED BY '''' TERMINATED BY
    '' ESCAPED BY '''' LINES TERMINATED BY ''\r\n''";
    statement.execute(sql);
    

    To export the table into the CSV file through a Python program, we have to pass the source file path and need to execute the “SELECT” statement using the execute() function of the MySQL Connector/Python as follows −

    sql = "SELECT ID, NAME, AGE, ADDRESS, SALARY FROM CUSTOMERS INTO OUTFILE ''C:/ProgramData/MySQL/MySQL Server 8.0/Uploads/CUSTOMERS_BACKUP.csv''FIELDS ENCLOSED BY ''"''TERMINATED BY ''
    '' ESCAPED BY ''"''LINES TERMINATED BY ''rn''"
    cursorObj.execute(sql)
    

    Example

    Following are the programs −

    $dbhost = ''localhost
    $dbuser = ''root
    $dbpass = ''password
    $db = ''TUTORIALS
    $mysqli = new mysqli($dbhost, $dbuser, $dbpass, $db);
    if ($mysqli->connect_errno) {
        printf("Connect failed: %s
    ", $mysqli->connect_error); exit(); } //printf(''Connected successfully.
    ''); $sql = "SELECT ID, NAME, AGE, ADDRESS, SALARY FROM CUSTOMERS INTO OUTFILE ''C:/ProgramData/MySQL/MySQL Server 8.0/Uploads/CUSTOMERS_BACKUP_new.csv'' FIELDS ENCLOSED BY '''' TERMINATED BY '' ESCAPED BY '''' LINES TERMINATED BY ''rn''"; if($result = $mysqli->query($sql)){ printf("Table data exported successfully....!n"); print_r($result); } if($mysqli->error){ printf("Error message: ", $mysqli->error); } $mysqli->close();

    Output

    The output obtained is as shown below −

    Table data exported successfully....!
    1
    
    var mysql = require(''mysql2'');
    var con = mysql.createConnection({
    host:"localhost",
    user:"root",
    password:"password"
    });
    
     //Connecting to MySQL
     con.connect(function(err) {
     if (err) throw err;
    //   console.log("Connected successfully...!");
    //   console.log("--------------------------");
     sql = "USE TUTORIALS";
     con.query(sql);
     sql = `SELECT ID, NAME, AGE, ADDRESS, SALARY FROM CUSTOMERS INTO OUTFILE ''C:/ProgramData/MySQL/MySQL Server 8.0/Uploads/CUSTOMERS_BACKUP_new1.csv'' FIELDS ENCLOSED BY ''"'' TERMINATED BY '' ESCAPED BY ''"'' LINES TERMINATED BY ''rn''`;
     con.query(sql, function(err, result){
        console.log("Table data exported successfully...!");
        console.log("Data: ")
        if (err) throw err;
        console.log(result);
        });
    });
    

    Output

    The output obtained is as shown below −

    Table data exported successfully...!
    Data:
    ResultSetHeader {
      fieldCount: 0,
      affectedRows: 7,
      insertId: 0,
      info: '''',
      serverStatus: 34,
      warningStatus: 0,
      changedRows: 0
    }
    
    import java.sql.Connection;
    import java.sql.DriverManager;
    import java.sql.ResultSet;
    import java.sql.Statement;
    public class ExportTableToCSVFile {
      public static void main(String[] args) {
        String url = "jdbc:mysql://localhost:3306/TUTORIALS";
        String user = "root";
        String password = "password";
        ResultSet rs;
        try {
          Class.forName("com.mysql.cj.jdbc.Driver");
                Connection con = DriverManager.getConnection(url, user, password);
                Statement st = con.createStatement();
                //System.out.println("Database connected successfully...!");
                String sql = "SELECT ID, NAME, AGE, ADDRESS, SALARY FROM CUSTOMERS INTO OUTFILE ''C:/ProgramData/MySQL/MySQL Server 8.0/Uploads/CUSTOMERS_BACKUP_new.csv'' FIELDS ENCLOSED BY '''' TERMINATED BY '' ESCAPED BY '''' LINES TERMINATED BY ''\r\n''";
                st.execute(sql);
                System.out.println("Successfully...! table exported into CSV file..");
        }catch(Exception e) {
          e.printStackTrace();
        }
      }
    }
    

    Output

    The output obtained is as shown below −

    Successfully...! table exported into CSV file..
    
    import mysql.connector
    #establishing the connection
    connection = mysql.connector.connect(
        host=''localhost'',
        user=''root'',
        password=''password'',
        database=''tut''
    )
    cursorObj = connection.cursor()
    # Query to export table into csv file
    sql = """
    SELECT ID, NAME, AGE, ADDRESS, SALARY FROM CUSTOMERS
    INTO OUTFILE ''C:/ProgramData/MySQL/MySQL Server 8.0/Uploads/CUSTOMERS_BACKUP.csv''
    FIELDS ENCLOSED BY ''"''
    TERMINATED BY ''
    ESCAPED BY ''"''
    LINES TERMINATED BY ''rn
    """
    cursorObj.execute(sql)
    print("Table data expoted successfully")
    # Reading and displaying the exported CSV file
    with open(''C:/ProgramData/MySQL/MySQL Server 8.0/Uploads/CUSTOMERS_BACKUP.csv'', ''r'') as csvfile:
        for row in csvfile:
            # Use strip() to remove extra newlines
            print(row.strip())
    # Closing the cursor and connection
    cursorObj.close()
    connection.close()
    

    Output

    The output obtained is as shown below −

    Table data expoted successfully
    "1";"Ramesh";"32";"Ahmedabad";"2000.00"
    "2";"Khilan";"25";"Delhi";"1500.00"
    "3";"kaushik";"23";"Kota";"2000.00"
    "4";"Chaitali";"25";"Mumbai";"6500.00"
    "5";"Hardik";"27";"Bhopal";"8500.00"
    "6";"Komal";"22";"MP";"4500.00"
    "7";"Muffy";"24";"Indore";"10000.00"
    

    Khóa học lập trình tại Toidayhoc vừa học vừa làm dự án vừa nhận lương: Khóa học lập trình nhận lương tại trung tâm Toidayhoc

  • Khóa học miễn phí MySQL – Arithmetic Operators nhận dự án làm có lương

    MySQL – Arithmetic Operators


    MySQL – Arithmetic Operators

    Arithmetic operators in MySQL are tools for performing mathematical calculations, similar to how we use them in basic math. They allow us to manipulate numeric values in your database, just like we would in simple math problems. Following are the arithmetic operators in MySQL −

    Sr.No. Name & Description
    1

    This operator divides left-hand operand by right-hand operand and, returns the remainder.

    2

    This operator multiplies values on either side of the operator.

    3

    This operator adds values on either side of the operator.

    4

    This operator subtracts right-hand operand from left-hand operand.

    5

    This operator is used to change the sign of the operand.

    6

    This operator divides left-hand operand by right-hand operand.

    7

    This operator performs the division operation and discards all the digits after the decimal.


    Khóa học lập trình tại Toidayhoc vừa học vừa làm dự án vừa nhận lương: Khóa học lập trình nhận lương tại trung tâm Toidayhoc

  • Khóa học miễn phí MySQL – Common Table Expressions nhận dự án làm có lương

    MySQL – Common Table Expression (WITH)

    Table of content


    The MySQL Common Table Expression

    The MySQL Common Table Expression (CTE) is a temporary result-set or table that exists for the duration of a single query. We can use the CTEs to reference the result-set within the context of a single SELECT, UPDATE, INSERT, DELETE, CREATE, VIEW, or MERGE statement.

    The scope of a CTE is limited to that specific query. It makes complex queries simple by breaking them into simple blocks.

    The MySQL WITH Clause

    The MySQL WITH clause is used to create CTEs by having one or more comma-separated subclauses. The subclauses provide a subquery that generates the result-set.

    WITH clause cannot be used in MySQL versions before 8.0.

    Syntax

    Following is the syntax of the MySQL WITH clause −

    WITH name_for_summary_data AS (SELECT Statement)
    SELECT columns
    FROM name_for_summary_data
    WHERE conditions  (
       SELECT column
       FROM name_for_summary_data
    )
    [ORDER BY columns]
    

    Example

    Assume we have created a table named DATA containing details such as id, name, age and salary −

    CREATE TABLE DATA(
       ID INT,
       NAME CHAR(20),
       AGE INT,
       SALARY INT
    );
    

    Now, let us insert values into the table created above using the INSERT INTO statement as shown below −

    INSERT INTO DATA VALUES
    (101, ''John'', 25, 55452),
    (102, ''Jane'', 29, 66458),
    (103, ''Arub'', 35, 36944);
    

    In the following example, the WITH clause is used to create a CTE named CTE, which is then queried to retrieve the data from the DATA table −

    WITH CTE AS
    (Select ID, NAME, AGE, SALARY FROM DATA)
    SELECT * FROM CTE;
    

    After executing the above code, we get the output as follows −

    ID NAME AGE SALARY
    101 John 25 55452
    102 Jane 29 66458
    103 Arub 35 36944

    CTE from Multiple Tables

    We can create CTEs from multiple tables by separating each CTE subclause using a comma (”,”).

    Example

    Suppose we have created a table with name EMPLOYEE and populated data into it as shown below −

    CREATE TABLE EMPLOYEE(
       ID INT NOT NULL,
       FIRST_NAME CHAR(20) NOT NULL,
       LAST_NAME CHAR(20),
       AGE INT,
       SEX CHAR(1),
       INCOME FLOAT,
       CONTACT INT
    );
    

    Here, we are inserting records into the EMPLOYEE table −

    INSERT INTO EMPLOYEE VALUES
    (101, ''Serena'', ''Williams'', 27, ''F'', 9000, 101),
    (102, ''Virat'', ''Kohli'', 20, ''M'', 6000, 102);
    

    The EMPLOYEE table obtained is as follows −

    ID FIRST_NAME LAST_NAME AGE SEX INCOME CONTACT
    101 Serena Williams 27 F 9000 101
    102 Virat Kohli 20 M 6000 102

    Now, we create another table CONTACT −

    CREATE TABLE CONTACT(
       ID INT NOT NULL,
       EMAIL CHAR(20) NOT NULL,
       PHONE LONG,
       CITY CHAR(20)
    );
    

    Let us insert some records in the CONTACT table −

    INSERT INTO CONTACT (ID, EMAIL, CITY) VALUES
    (101, ''serena@mymail.com'', ''Hyderabad''),
    (102, ''virat@mymail.com'', ''Vishakhapatnam'');
    

    The CONTACT table produced is as follows −

    ID EMAIL CITY
    101 serena@mymail.com Hyderabad
    102 virat@mymail.com Vishakhapatnam

    Following example uses Common Table Expressions (CTEs) named “exp1” and “exp2” to separately select specific columns from the EMPLOYEE and CONTACT tables. The final SELECT statement joins these CTEs, combining the chosen columns from each −

    WITH
    exp1 AS (SELECT ID, FIRST_NAME, LAST_NAME FROM EMPLOYEE),
    exp2 AS (SELECT EMAIL, PHONE FROM CONTACT)
    SELECT * FROM exp1 JOIN exp2;
    

    Following is the output of the above code −

    ID FIRST_NAME LAST_NAME EMAIL PHONE
    102 Virat Kohli serena@mymail.com NULL
    101 Serena Williams serena@mymail.com NULL
    102 Virat Kohli virat@mymail.com NULL
    101 Serena Williams virat@mymail.com NULL

    Khóa học lập trình tại Toidayhoc vừa học vừa làm dự án vừa nhận lương: Khóa học lập trình nhận lương tại trung tâm Toidayhoc

  • Khóa học miễn phí MySQL – Date and Time Functions nhận dự án làm có lương

    MySQL – Date and Time Functions


    In MySQL, we have a set of functions using which we can manipulate the date and time values. Following are the MySQL date time functions −

    Sr.No. Name & Description
    1

    This function adds two given dates

    2

    This function adds given time values

    3

    This function converts from one timezone to another

    4

    This function returns the current date

    5

    Synonyms for CURDATE()

    6

    Synonyms for CURTIME()

    7

    Synonyms for NOW()

    8

    This function returns the current time

    9

    Adds two dates

    10

    This function formats the given date as specified

    11

    This function subtracts two dates

    12

    This function extracts the date part of a date or datetime expression

    13

    This function subtracts two dates

    14

    This function retrieves the day of the month from the given date

    15

    This function returns the name of the weekday

    16

    This function returns the day of the month (1-31)

    17

    This function returns the weekday index of the argument

    18

    This function returns the day of the year (1-366)

    19

    This function extracts part of a date

    20

    This function converts a day number to a date

    21

    This function formats date as a UNIX timestamp

    22

    This function Extracts the hour

    23

    This function returns the last day of the month for the argument

    24

    Synonym for NOW()

    25

    Synonym for NOW()

    26

    This function creates a date from the year and day of year

    27

    This function creates a time value from the given hours, minutes, and seconds.

    28

    This function returns the microseconds from argument

    29

    This function returns the minute from the argument

    30

    This function returns the month from the date passed

    31

    This function returns the name of the month

    32

    This function returns the current date and time

    33

    This function adds a period to a year-month

    34

    This function returns the number of months between periods

    35

    This function returns the quarter from a date argument

    36

    This function converts seconds to ”HH:MM:SS” format

    37

    This function returns the second (0-59)

    38

    This function converts a string to a date

    39

    This function subtracts the specified interval to a date value

    40

    This function subtracts the specified time interval to a date time or, time value

    41

    This function returns the time at which the function executes

    42

    This function formats the given date in the specified format

    43

    This function returns the argument converted to seconds

    44

    This function extracts the time portion of the expression passed

    45

    This function subtracts two time values

    46

    With a single argument, this function returns the date or datetime expression. With two arguments, the sum of the arguments

    47

    This function adds an interval to a datetime expression

    48

    This function subtracts an interval from a datetime expression

    49

    This function returns the date argument converted to days

    50

    This function returns a UNIX timestamp

    51

    This function returns the current UTC date

    52

    This function returns the current UTC time

    53

    This function returns the current UTC date and time

    54

    This function returns the week number

    55

    This function returns the weekday index

    56

    This function returns the calendar week of the date (1-53)

    57

    This function returns the year

    58

    This function returns the year and week

    59

    This function converts the date or date-time values into seconds and returns the result.


    Khóa học lập trình tại Toidayhoc vừa học vừa làm dự án vừa nhận lương: Khóa học lập trình nhận lương tại trung tâm Toidayhoc

  • Khóa học miễn phí MySQL – UUID nhận dự án làm có lương

    MySQL – UUID

    Table of content


    The MySQL UUID function

    The MySQL UUID() function is used to generate “Universal Unique Identifiers” (UUIDs) in accordance with RFC 4122. UUIDs are designed to be universally unique, even when generated on different servers. The UUID is generated using a combination of the current timestamp, the unique identifier of the server, and a random number.

    UUID Format

    The UUID value is represented as a UTF-8 string and is a 128-bit number. The format of the UUID value is in hexadecimal number, and it consists of five segments which are separated by hyphens.

    The general format of the UUID value is: aaaaaaaa-bbbb-cccc-dddd-eeeeeeeeeeee, where each segment represents a hexadecimal value.

    Generating a UUID

    Following is the basic example to generate a UUID using the UUID() function in MySQL −

    SELECT UUID();
    

    Output

    It will display a universal unique identifier as shown below −

    UUID()
    55f7685d-e99c-11ed-adfc-88a4c2bbd1f9

    Generating Multiple UUIDs

    You can generate multiple UUIDs in a single query, and each UUID will be different as shown below −

    SELECT UUID() AS ID1, UUID() AS ID2;
    

    Output

    The output will show two different UUIDs, with differences generally in the first segment −

    ID1 ID2
    78c3fb43-e99c-11ed-adfc-88a4c2bbd1f9 78c3fb4f-e99c-11ed-adfc-88a4c2bbd1f9

    UUIDs in a Database Table

    You can use UUIDs as unique identifiers in a database table. Following is an example of how to create a table with a UUID column and insert data −

    Here, we are first creating a table with the name “ORDERS”, with an ORDER_ID column of type VARCHAR using the following query −

    CREATE TABLE ORDERS(
       ID int auto_increment primary key,
       NAME varchar(40),
       PRODUCT varchar(40),
       ORDER_ID varchar(100)
    );
    

    Now, we are inserting data into the ORDERS table, using the UUID() function to generate unique values for the ORDER_ID column −

    INSERT INTO ORDERS (NAME, PRODUCT, ORDER_ID) VALUES ("Varun", "Headphones", UUID());
    INSERT INTO ORDERS (NAME, PRODUCT, ORDER_ID) VALUES ("Priya", "Mouse", UUID());
    INSERT INTO ORDERS (NAME, PRODUCT, ORDER_ID) VALUES ("Nikhil", "Monitor", UUID());
    INSERT INTO ORDERS (NAME, PRODUCT, ORDER_ID) VALUES ("Sarah", "Keyboard", UUID());
    INSERT INTO ORDERS (NAME, PRODUCT, ORDER_ID) VALUES ("Vaidhya", "Printer", UUID());
    

    Following is the ORDERS table obtained −

    ID NAME PRODUCT ORDER_ID
    1 Varun Headphones a45a9632-e99d-11ed-adfc-88a4c2bbd1f9
    2 Priya Mouse a45b03a3-e99d-11ed-adfc-88a4c2bbd1f9
    3 Nikhil Monitor a45b49cc-e99d-11ed-adfc-88a4c2bbd1f9
    4 Sarah Keyboard a45b8d3f-e99d-11ed-adfc-88a4c2bbd1f9
    5 Vaidhya Printer a4b003d0-e99d-11ed-adfc-88a4c2bbd1f9

    Modifying UUIDs

    You can modify UUIDs without losing their uniqueness. For example, you can remove hyphens or convert them to base64 notation using functions like REPLACE() and TO_BASE64().

    Example

    Here, we are updating the UUID value for the record where ID = 1 using the following query −

    UPDATE ORDERS SET ORDER_ID = UUID() WHERE ID=1;
    

    Output

    Following is the output of the above code −

    Query OK, 1 row affected (0.00 sec)
    Rows matched: 1  Changed: 1  Warnings: 0
    

    Verification

    To verify the modified UUID values, we can use the following SELECT query −

    SELECT * FROM ORDERS;
    

    As we can see in the output below, every time we execute the UUID() function, we get a different UUID value −

    ID NAME PRODUCT ORDER_ID
    1 Varun Headphones 38f4d94a-e99d-11ed-adfc-88a4c2bbd1f9
    2 Priya Mouse a45b03a3-e99d-11ed-adfc-88a4c2bbd1f9
    3 Nikhil Monitor a45b49cc-e99d-11ed-adfc-88a4c2bbd1f9
    4 Sarah Keyboard a45b8d3f-e99d-11ed-adfc-88a4c2bbd1f9
    5 Vaidhya Printer a4b003d0-e99d-11ed-adfc-88a4c2bbd1f9

    Example

    Assume the previously created table and let us remove hyphens from the UUID of the row with ID = 2 using the REPLACE() function as shown below −

    UPDATE ORDERS
    SET ORDER_ID = REPLACE(UUID(), ''-'', '''')
    WHERE ID = 2;
    

    Output

    Output of the above code is as follows −

    Query OK, 1 row affected (0.00 sec)
    Rows matched: 1  Changed: 1  Warnings: 0
    

    Verification

    To verify the modified UUID value, we can use the following SELECT query −

    SELECT * FROM ORDERS;
    

    As we can see in the output below, the UUID of row = 2 is modified without disturbing the “unique” part of it −

    ID NAME PRODUCT ORDER_ID
    1 Varun Headphones a45a9632-e99d-11ed-adfc-88a4c2bbd1f9
    2 Priya Mouse 069b0ca-7e99e11ed-adfc-88a4c2bbd1f9
    3 Nikhil Monitor a45b49cc-e99d-11ed-adfc-88a4c2bbd1f9
    4 Sarah Keyboard a45b8d3f-e99d-11ed-adfc-88a4c2bbd1f9
    5 Vaidhya Printer a4b003d0-e99d-11ed-adfc-88a4c2bbd1f9

    Example

    In the following query, we are converting the UUID of ID = 4 to base64 notation using the TO_BASE64() function −

    UPDATE ORDERS
    SET ORDER_ID = TO_BASE64(UNHEX(REPLACE(UUID(),''-'','''')))
    WHERE ID=4;
    

    Output

    The result produced is as follows −

    Query OK, 1 row affected (0.00 sec)
    Rows matched: 1  Changed: 1  Warnings: 0
    

    Verification

    Let us verify the modified UUID value using the following SELECT query −

    SELECT * FROM ORDERS;
    

    The output produced is as given below −

    ID NAME PRODUCT ORDER_ID
    1 Varun Headphones a45a9632-e99d-11ed-adfc-88a4c2bbd1f9
    2 Priya Mouse 069b0ca7-e99e11ed-adfc-88a4c2bbd1f9
    3 Nikhil Monitor a45b49cc-e99d-11ed-adfc-88a4c2bbd1f9
    4 Sarah Keyboard ObRYA+mfEe2t/IikwrvR+Q==
    5 Vaidhya Printer a4b003d0-e99d-11ed-adfc-88a4c2bbd1f9

    Khóa học lập trình tại Toidayhoc vừa học vừa làm dự án vừa nhận lương: Khóa học lập trình nhận lương tại trung tâm Toidayhoc

  • Khóa học miễn phí MySQL – Aggregate Functions nhận dự án làm có lương

    MySQL – Aggregate Functions


    In general, aggregation is a consideration of a collection of objects that are bound together as a single entity. MySQL provides a set of aggregate functions that perform operations on all the entities of the column of a table considering them as a single unit. Following are the MySQL aggregate functions −

    Sr.No. Name & Description
    1

    This function is used to calculate the average value.

    2

    This function is used to calculate the bitwise AND value.

    3

    This function is used to calculate the bitwise OR value.

    4

    This function is used to calculate the bitwise XOR value.

    5

    This function is used to count the number of rows returned.

    6

    This function returns the concatenated string.

    7

    This function returns the given values as a single JSON array.

    8

    This function returns the given values as a single JSON object.

    9

    This function returns the maximum value.

    10

    This function returns the minimum value.

    11

    This function calculates and returns the population standard deviation.

    12

    This function calculates and returns the population standard deviation.

    13

    This function calculates and returns the population standard deviation.

    14

    This function calculates and returns the sample standard deviation.

    15

    This function is used to calculate the sum of the values.

    16

    This function calculates and returns the population standard variance.

    17

    This function calculates and returns the sample variance.

    18

    This function calculates and returns the population standard variance.


    Khóa học lập trình tại Toidayhoc vừa học vừa làm dự án vừa nhận lương: Khóa học lập trình nhận lương tại trung tâm Toidayhoc

  • Khóa học miễn phí MySQL – String Functions nhận dự án làm có lương

    MySQL – String Functions


    MySQL – String Functions

    MySQL string functions are used to manipulate the string values. The following table details the string functions that are available in the MySQL.

    Sr.No. Name & Description
    1

    This function returns numeric value of left-most character.

    2

    This function returns a string representation of the argument.

    3

    This function returns length of argument in bits.

    4

    This function returns the character for each integer passed.

    5

    This function returns number of characters in argument.

    6

    This function is a synonym for CHAR_LENGTH().

    7

    This function returns concatenated string.

    8

    This function returns concatenate with separator.

    9

    This function returns string at index number.

    10

    This function returns a string such that for every bit set in the value bits, you get an on string and for every unset bit, you get an off string.

    11

    This function returns the index (position) of the first argument in the subsequent arguments.

    12

    This function returns the index position of the first argument within the second argument.

    13

    This function decodes a base-64 encoded string as a binary string.

    14

    Inserts a substring at the specified position up to the specified number of characters.

    15

    This function returns the index of the first occurrence of substring.

    16

    Synonym for LOWER().

    17

    This function returns the leftmost number of characters as specified.

    18

    This function returns the length of a string in bytes.

    19

    This function is used to load the specified file.

    20

    This function returns the position of the first occurrence of substring.

    21

    This function returns the argument in lowercase.

    22

    This function returns the string argument, left-padded with the specified string.

    23

    This function is used to removes leading spaces from the given string.

    24

    This function returns a set of comma-separated strings that have the corresponding bit in bits set.

    25

    This function returns a substring starting from the specified position.

    26

    This function returns a string representation of the octal argument.

    27

    This function is a synonym for LENGTH().

    28

    If the leftmost character of the argument is a multi-byte character, returns the code for that character.

    29

    This function is a synonym for LOCATE().

    30

    This function escapes the argument for use in an SQL statement.

    31

    This function returns the starting index of the substring matching given regular expression.

    32

    This function replaces the matched sub string with the replacement string and returns the result.

    33

    This function is used to reverse the characters in a string

    34

    This function returns the specified rightmost number of characters.

    35

    This function is used to add padding to the right side of the string until it reaches the desired length.

    36

    This function is used to remove trailing spaces.

    37

    This function returns a soundex string.

    38

    This function returns a string of the specified number of spaces.

    39

    This function is used to compare two given strings.

    40

    This function returns the substring as specified.

    41

    This function returns the substring as specified.

    42

    This function returns a substring from a string before the specified number of occurrences of the delimiter.

    43

    This function encodes a string value to base-64 string.

    44

    This function is used to removes the leading and trailing spaces of the given string.

    45

    This function is a synonym for UPPER().

    46

    This function converts each pair of hexadecimal digits to a character.

    47

    This function is used to convert the characters in the given string to uppercase.

    48

    This function returns the weight string value of the given argument.

    49

    This operator is used to search for particular string in the specified list of columns.

    50

    This operator is similar to the REGEXP_LIKE() function it is used to match a particular pattern in the given string.

    51

    This operator is used to compare the soundex values of two strings.


    Khóa học lập trình tại Toidayhoc vừa học vừa làm dự án vừa nhận lương: Khóa học lập trình nhận lương tại trung tâm Toidayhoc

  • Khóa học miễn phí MySQL – Numeric Functions nhận dự án làm có lương

    MySQL – Numeric Functions


    MySQL – Numeric Functions

    MySQL numeric functions are used primarily for numeric manipulation and/or mathematical calculations. The following table details the numeric functions that are available in the MySQL.

    Sr.No. Name & Description
    1

    Returns the absolute value of numeric expression.

    2

    Returns the arccosine of numeric expression. Returns NULL if the value is not in the range -1 to 1.

    3

    Returns the arcsine of numeric expression. Returns NULL if value is not in the range -1 to 1

    4

    Returns the arctangent of numeric expression.

    5

    Returns the arctangent of the two variables passed to it.

    6

    Returns the smallest integer value that is not less than passed numeric expression

    7

    Returns the smallest integer value that is not less than passed numeric expression

    8

    Converts numeric expression from one base to another.

    9

    Returns the cosine of passed numeric expression. The numeric expression should be expressed in radians.

    10

    Returns the cotangent of passed numeric expression.

    11

    Returns the Cyclic Redundancy Check (CRC) for the given value.

    12

    Returns numeric expression converted from radians to degrees.

    13

    Returns the base of the natural logarithm (e) raised to the power of passed numeric expression.

    14

    Returns the largest integer value that is not greater than passed numeric expression.

    15

    Returns a numeric expression rounded to a number of decimal places.

    16

    returns the hexadecimal representation of the given value.

    17

    Returns the natural logarithm of the passed numeric expression.

    18

    Returns the natural logarithm of the passed numeric expression.

    19

    Returns the base-10 logarithm of the passed numeric expression.

    20

    Returns the base-2 logarithm of the passed numeric expression.

    21

    Returns the remainder of one expression by diving by another expression.

    22

    Returns the value of pi

    23

    Returns the value of one expression raised to the power of another expression

    24

    Returns the value of one expression raised to the power of another expression

    25

    Returns the value of passed expression converted from degrees to radians.

    26

    Returns a random floating-point value with in the range 0 to 1.0.

    27

    Returns numeric expression rounded to an integer. Can be used to round an expression to a number of decimal points

    28

    Returns the sign of the given number.

    29

    Returns the sine of numeric expression given in radians.

    30

    Returns the non-negative square root of numeric expression.

    31

    Returns the tangent of numeric expression expressed in radians.

    32

    Returns numeric exp1 truncated to exp2 decimal places. If exp2 is 0, then the result will have no decimal point.


    Khóa học lập trình tại Toidayhoc vừa học vừa làm dự án vừa nhận lương: Khóa học lập trình nhận lương tại trung tâm Toidayhoc

  • Khóa học miễn phí MySQL – NULL Values nhận dự án làm có lương

    MySQL – NULL Values

    Table of content


    The MySQL NULL Values

    MySQL uses the term “NULL” to represent a non-existent data value in the database. These values are different from an empty string or zero and do not occupy any storage space in the database. They are used to indicate the absence of a value or an unknown value in a data field.

    There are some common reasons why a value may be NULL −

    • The value may not be provided during data entry.

    • The value is not yet known.

    Since NULL values are non-existent, you cannot use standard comparison operators such as “=”, “<,” or “>” with them. Instead, you can use the “IS NULL,” “IS NOT NULL,” or “NOT NULL” operators to check if a value is NULL.

    Creating a Table without NULL Values

    To create a table without NULL values, you can use the “NOT NULL” keyword while defining the columns. If a column is specified as “NOT NULL,” an error will occur when attempting to insert NULL values into that specific column.

    Syntax

    The basic syntax for creating a table with “NOT NULL” columns is as follows −

    CREATE TABLE table_name (
       column1 datatype NOT NULL,
       column2 datatype NOT NULL,
       ...
       columnN datatype
    );
    

    Where, “NOT NULL” indicates that a column must always contain a specific value of the defined data type. Columns marked as “NOT NULL” cannot accept NULL values. On the other hand, you can insert NULL values into the columns without the “NOT NULL” constraint.

    Example

    Let us create a table named “CUSTOMERS” using the following query −

    CREATE TABLE CUSTOMERS(
       ID INT NOT NULL,
       NAME VARCHAR (20) NOT NULL,
       AGE INT NOT NULL,
       ADDRESS CHAR (25) ,
       SALARY DECIMAL (18, 2),
       PRIMARY KEY (ID)
    );
    

    Now, let us insert some records into the above-created table −

    INSERT INTO CUSTOMERS VALUES
    (1, ''Ramesh'', 32, ''Ahmedabad'', 2000.00),
    (2, ''Khilan'', 25, ''Delhi'', 1500.00),
    (3, ''Kaushik'', 23, ''Kota'', 2000.00),
    (4, ''Chaitali'', 25, ''Mumbai'', 6500.00),
    (5, ''Hardik'', 27, ''Bhopal'', 8500.00),
    (6, ''Komal'', 22, ''Hyderabad'', NULL),
    (7, ''Muffy'', 24, ''Indore'', NULL);
    

    The CUSTOMERS table obtained is as follows −

    ID NAME AGE ADDRESS SALARY
    1 Ramesh 32 Ahmedabad 2000.00
    2 Khilan 25 Delhi 1500.00
    3 Kaushik 23 Kota 2000.00
    4 Chaitali 25 Mumbai 6500.00
    5 Hardik 27 Bhopal 8500.00
    6 Komal 22 Hyderabad NULL
    7 Muffy 24 Indore NULL

    Now, to retrieve records that are not NULL, you can use the “IS NOT NULL” operator as shown below−

    SELECT ID, NAME, AGE, ADDRESS, SALARY
    FROM CUSTOMERS
    WHERE SALARY IS NOT NULL;
    

    Following is the output of the above code −

    ID NAME AGE ADDRESS SALARY
    1 Ramesh 32 Ahmedabad 2000.00
    2 Khilan 25 Delhi 1500.00
    3 Kaushik 23 Kota 2000.00
    4 Chaitali 25 Mumbai 6500.00
    5 Hardik 27 Bhopal 8500.00

    To retrieve records that are NULL, you can use the “IS NULL” operator as shown below −

    SELECT ID, NAME, AGE, ADDRESS, SALARY
    FROM CUSTOMERS
    WHERE SALARY IS NULL;
    

    The output produced is as follows −

    ID NAME AGE ADDRESS SALARY
    6 Komal 22 Hyderabad NULL
    7 Muffy 24 Indore NULL

    Updating NULL Values in a Table

    To update NULL values in a table, you can use the “UPDATE” statement with the “IS NULL” operator. This filter the rows containing NULL values and set new values using the “SET” keyword.

    Example

    Here, we are updating the NULL values in the SALARY column of the CUSTOMERS table as shown below −

    UPDATE CUSTOMERS SET SALARY = 9000 WHERE SALARY IS NULL;
    

    Output

    After executing the above code, we get the following output −

    Query OK, 2 rows affected (0.01 sec)
    Rows matched: 2  Changed: 2  Warnings: 0
    

    Verification

    You can verify whether the records in the table are updated or not using the following query −

    SELECT * FROM CUSTOMERS;
    

    The output displayed is as follows −

    ID NAME AGE ADDRESS SALARY
    1 Ramesh 32 Ahmedabad 2000.00
    2 Khilan 25 Delhi 1500.00
    3 Kaushik 23 Kota 2000.00
    4 Chaitali 25 Mumbai 6500.00
    5 Hardik 27 Bhopal 8500.00
    6 Komal 22 Hyderabad 9000.00
    7 Muffy 24 Indore 9000.00

    Deleting Records with NULL Values

    To delete records with NULL values from a table, you can use the “DELETE FROM” statement with the “IS NULL” operator in the “WHERE” clause.

    Example

    Now, we are deleting records with NULL values in the SALARY column as shown below −

    DELETE FROM CUSTOMERS WHERE SALARY IS NULL;
    

    Output

    Output of the above code is as shown below −

    Query OK, 2 rows affected (0.01 sec)
    

    Verification

    You can verify whether the records in the table is deleted or not using the SELECT statement as follows −

    SELECT * FROM CUSTOMERS;
    

    The table produced is as shown below −

    ID NAME AGE ADDRESS SALARY
    1 Ramesh 32 Ahmedabad 2000.00
    2 Khilan 25 Delhi 1500.00
    3 Kaushik 23 Kota 2000.00
    4 Chaitali 25 Mumbai 6500.00
    5 Hardik 27 Bhopal 8500.00

    NULL Value Using a Client Program

    We can also execute NULL value using the client program.

    Syntax

    To check whether a column”s value is null through a PHP program, we need to execute the “SELECT” statement using the mysqli function query() as follows −

    $sql = "SELECT * from tcount_tbl WHERE tutorial_count IS NULL";
    $mysqli->query($sql);
    

    To check whether a column”s value is null through a JavaScript program, we need to execute the “SELECT” statement using the query() function of mysql2 library as follows −

    sql = "SELECT * from tcount_tbl WHERE tutorial_count IS NOT NULL";
    con.query(sql);
    

    To check whether a column”s value is null through a Java program, we need to execute the “SELECT” statement using the JDBC function executeQuery() as follows −

    String sql = "SELECT * FROM tcount_tbl WHERE tutorial_count IS NULL";
    statement.executeQuery(sql);
    

    To check whether a column”s value is null through a Python program, we need to execute the “SELECT” statement using the execute() function of the MySQL Connector/Python as follows: −

    null_values_query = "SELECT * FROM tcount_tbl WHERE tutorial_count IS NULL"
    cursorObj.execute(null_values_query)
    

    Example

    Following are the programs −

    $dbhost = ''localhost
    $dbuser = ''root
    $dbpass = ''password
    $db = ''TUTORIALS
    $mysqli = new mysqli($dbhost, $dbuser, $dbpass, $db);
    if ($mysqli->connect_errno) {
        printf("Connect failed: %s
    ", $mysqli->connect_error); exit(); } //printf(''Connected successfully.
    ''); $sql = "SELECT * from tcount_tbl WHERE tutorial_count IS NULL"; if($result = $mysqli->query($sql)){ printf("Table record: n"); while($row = mysqli_fetch_array($result)){ printf("Tutorial_author %s, Tutorial_count %d", $row[''tutorial_author''], $row[''tutorial_count'']); printf("n"); } } if($mysqli->error){ printf("Error message: ", $mysqli->error); } $mysqli->close();

    Output

    The output obtained is as shown below −

    Table record:
    Tutorial_author mahnaz, Tutorial_count 0
    Tutorial_author Jen, Tutorial_count 0
    
    var mysql = require(''mysql2'');
    var con = mysql.createConnection({
    host:"localhost",
    user:"root",
    password:"password"
    });
     //Connecting to MySQL
     con.connect(function(err) {
     if (err) throw err;
      //console.log("Connected successfully...!");
      //console.log("--------------------------");
     sql = "USE TUTORIALS";
     con.query(sql);
     sql = "SELECT * from tcount_tbl WHERE tutorial_count IS NOT NULL";
     if(con.query(sql)){
        console.log("Select query executed successfully....!");
     }
     else{
        console.log("Error");
     }
     console.log("Table records: ");
     con.query(sql, function(err, result){
     if (err) throw err;
     console.log(result);
     });
    });
    

    Output

    The output obtained is as shown below −

    Select query executed successfully....!
    Table records:
    [
      { tutorial_author: ''mahran'', tutorial_count: 20 },
      { tutorial_author: ''Gill'', tutorial_count: 20 }
    ]
    
    import java.sql.Connection;
    import java.sql.DriverManager;
    import java.sql.ResultSet;
    import java.sql.Statement;
    public class NullValues {
       public static void main(String[] args) {
          String url = "jdbc:mysql://localhost:3306/TUTORIALS";
          String user = "root";
          String password = "password";
          ResultSet rs;
          try {
             Class.forName("com.mysql.cj.jdbc.Driver");
                Connection con = DriverManager.getConnection(url, user, password);
                Statement st = con.createStatement();
                //System.out.println("Database connected successfully...!");
                String sql = " SELECT * FROM tcount_tbl WHERE tutorial_count = NULL";
                rs = st.executeQuery(sql);
                System.out.println("Table records(tutorial_count = null): ");
                while(rs.next()) {
                   String tutorial_author = rs.getString("tutorial_author");
                   String tutorial_count = rs.getString("tutorial_count");
                   System.out.println("Author: " + tutorial_author + ", Tutorial_count: " + tutorial_count);
                }
                String sql1 = "SELECT * FROM tcount_tbl WHERE tutorial_count IS NULL";
                rs = st.executeQuery(sql1);
                System.out.println("Table records(tutorial_count is null): ");
                while(rs.next()) {
                   String tutorial_author = rs.getString("tutorial_author");
                   String tutorial_count = rs.getString("tutorial_count");
                   System.out.println("Author: " + tutorial_author + ", Tutorial_count: " + tutorial_count);
                }
          }catch(Exception e) {
             e.printStackTrace();
          }
       }
    }
    

    Output

    The output obtained is as shown below −

    This will generate the following output -
    Table records(tutorial_count = null):
    Table records(tutorial_count is null):
    Author: mahnaz, Tutorial_count: null
    Author: Jen, Tutorial_count: null
    
    import mysql.connector
    #establishing the connection
    connection = mysql.connector.connect(
        host=''localhost'',
        user=''root'',
        password=''password'',
        database=''tut''
    )
    cursorObj = connection.cursor()
    null_values_query = f"""
    SELECT * FROM tcount_tbl
    WHERE tutorial_count IS NULL
    """
    cursorObj.execute(null_values_query)
    # Fetching all the rows that meet the criteria
    filtered_rows = cursorObj.fetchall()
    for row in filtered_rows:
        print(row)
    cursorObj.close()
    connection.close()
    

    Output

    The output obtained is as shown below −

    (''mahnaz'', None)
    (''Jen'', None)
    

    Khóa học lập trình tại Toidayhoc vừa học vừa làm dự án vừa nhận lương: Khóa học lập trình nhận lương tại trung tâm Toidayhoc

  • Khóa học miễn phí MySQL – Using Sequences nhận dự án làm có lương

    MySQL – Sequences

    Table of content


    A sequence is a series of integers, starting from 1 and incrementing by 1 with each successive value. These sequences are usually used in databases, as many applications require each row in a table to have a unique identifier, and sequences provide an easy way to generate such values.

    Sequences in MySQL

    MySQL does not have a built-in sequence feature but provides an alternative in the form of the AUTO_INCREMENT column, which serves a similar purpose.

    In MySQL, the AUTO_INCREMENT attribute is used to automatically generate unique integer values (sequences) for a column. By default, this sequence begins with an initial value of 1 and increments by 1 for each new row that is added.

    Syntax

    Following is the syntax of AUTO_INCREMENT attribute in MySQL −

    CREATE TABLE table_name (
       column1 datatype AUTO_INCREMENT,
       column2 datatype,
       column3 datatype,
       ...
       columnN datatype
    );
    

    Example

    In the following example, we are creating a table named “CUSTOMERS” and, in addition, defining the AUTO_INCREMENT attribute for the “ID” column of the table −

    CREATE TABLE CUSTOMERS (
       ID INT AUTO_INCREMENT,
       NAME VARCHAR (20) NOT NULL,
       AGE INT NOT NULL,
       ADDRESS CHAR (25),
       SALARY DECIMAL (18, 2),
       PRIMARY KEY (ID)
    );
    

    Now, let us insert some records into the above-created table −

    INSERT INTO CUSTOMERS VALUES
    (NULL, ''Ramesh'', 32, ''Ahmedabad'', 2000.00),
    (NULL, ''Khilan'', 25, ''Delhi'', 1500.00),
    (NULL, ''Kaushik'', 23, ''Kota'', 2000.00),
    (NULL, ''Chaitali'', 25, ''Mumbai'', 6500.00),
    (NULL, ''Hardik'', 27, ''Bhopal'', 8500.00),
    (NULL, ''Komal'', 22, ''Hyderabad'', 4500.00),
    (NULL, ''Muffy'', 24, ''Indore'', 10000.00);
    

    Output

    We can see in the table displayed below that the values in the “ID” column are automatically incremented −

    ID NAME AGE ADDRESS SALARY
    1 Ramesh 32 Ahmedabad 2000.00
    2 Khilan 25 Delhi 1500.00
    3 Kaushik 23 Kota 2000.00
    4 Chaitali 25 Mumbai 6500.00
    5 Hardik 27 Bhopal 8500.00
    6 Komal 22 Hyderabad 4500.00
    7 Muffy 24 Indore 10000.00

    Retrieving AUTO_INCREMENT Values

    To obtain AUTO_INCREMENT values in MySQL, you can use the LAST_INSERT_ID() SQL function. This function can be used in any client that can issue SQL statements. Alternatively, in PERL and PHP scripts, specific functions are available to retrieve the auto-incremented value of the last record.

    PERL Example

    You can access the AUTO_INCREMENT value generated by a query using the mysql_insertid attribute. This attribute can be accessed either through a database handle or a statement handle, depending on how you execute the query.

    The following example references it through the database handle −

    $dbh->do ("INSERT INTO insect (name,date,origin)
    VALUES(''moth'',''2001-09-14'',''windowsill'')");
    my $seq = $dbh->{mysql_insertid};
    

    PHP Example

    After executing a query that generates an AUTO_INCREMENT value, you can retrieve the value using the mysql_insert_id( ) command −

    mysql_query ("INSERT INTO insect (name,date,origin)
    VALUES(''moth'',''2001-09-14'',''windowsill'')", $conn_id);
    $seq = mysql_insert_id ($conn_id);
    

    Renumbering an Existing Sequence

    In some cases, you may need to re-sequence records in a table, especially if you have deleted many records. Be careful when resequencing if your table is related to other tables through joins.

    If you determine that the resequencing of an AUTO_INCREMENT column is unavoidable, the way to do it is to drop the AUTO_INCREMENT column from the table, then add it again.

    Example

    The following example shows how to renumber the id values in the table using this technique.

    ALTER TABLE CUSTOMERS DROP id;
    ALTER TABLE CUSTOMERS
    ADD id INT UNSIGNED NOT NULL AUTO_INCREMENT FIRST,
    ADD PRIMARY KEY (id);
    

    Output

    Following is the output obtained −

    Query OK, 0 rows affected (0.10 sec)
    Records: 0  Duplicates: 0  Warnings: 0
    

    Starting a Sequence at a Specific Value

    By default, MySQL starts sequences from 1, but you can specify a different initial value when creating the table.

    Example

    The following example demonstrates how to start the sequence from 100 during table creation −

    CREATE TABLE CUSTOMERS (
       ID INT UNSIGNED NOT NULL AUTO_INCREMENT,
       PRIMARY KEY (ID),
       NAME VARCHAR(20) NOT NULL,
       AGE INT NOT NULL,
       ADDRESS CHAR (25),
       SALARY DECIMAL (18, 2)
    )AUTO_INCREMENT = 100;
    

    Output

    Output of the above code is as shown below −

    Query OK, 0 rows affected (0.04 sec)
    

    Alternatively, you can create the table first and then set the initial sequence value using the ALTER TABLE command as shown below −

    ALTER TABLE CUSTOMERS AUTO_INCREMENT = 100;
    

    Sequence Using a Client Program

    We can also create a sequence using the client program.

    Syntax

    To create a sequence on a column of a table through a PHP program, we need to specify auto_increment for a specific column while creating the table using the mysqli function query() as follows −

    $sql = "CREATE TABLE insect (id INT UNSIGNED NOT NULL AUTO_INCREMENT,PRIMARY KEY (id),name VARCHAR(30) NOT NULL,date DATE NOT NULL,origin VARCHAR(30) NOT NULL)";
    $mysqli->query($sql);
    

    To create a sequence on a column of a table through a JavaScript program, we need to specify auto_increment for a specific column while creating the table using the query() function of mysql2 library as follows −

    sql = "CREATE TABLE insect (id INT UNSIGNED NOT NULL AUTO_INCREMENT,PRIMARY KEY (id),name VARCHAR(30) NOT NULL,date DATE NOT NULL,origin VARCHAR(30) NOT NULL)";
    con.query(sql);
    

    To create a sequence on a column of a table through a Java program, we need to specify auto_increment for a specific column while creating the table using the JDBC function execute() as follows −

    String sql = "CREATE TABLE insect (id INT UNSIGNED NOT NULL AUTO_INCREMENT,PRIMARY KEY (id),name VARCHAR(30) NOT NULL,date DATE NOT NULL,origin VARCHAR(30) NOT NULL)";
    statement.execute(sql);
    

    To create a sequence on a column of a table through a Python program, we need to specify auto_increment for a specific column while creating the table using the execute() function of the MySQL Connector/Python as follows −

    create_table_query = "CREATE TABLE insect (id INT UNSIGNED NOT NULL AUTO_INCREMENT, PRIMARY KEY (id), name VARCHAR(30) NOT NULL, date DATE NOT NULL, origin VARCHAR(30) NOT NULL)"
    cursorObj.execute(create_table_query)
    

    Example

    Following are the programs −

    $dbhost = ''localhost
    $dbuser = ''root
    $dbpass = ''password
    $db = ''TUTORIALS
    $mysqli = new mysqli($dbhost, $dbuser, $dbpass, $db);
    if ($mysqli->connect_errno) {
        printf("Connect failed: %s
    ", $mysqli->connect_error); exit(); } //printf(''Connected successfully.
    ''); //create table with autoincrement sequene $sql = "CREATE TABLE insect (id INT UNSIGNED NOT NULL AUTO_INCREMENT,PRIMARY KEY (id),name VARCHAR(30) NOT NULL,date DATE NOT NULL,origin VARCHAR(30) NOT NULL)"; if($mysqli->query($sql)){ printf("Table created successfully....!n"); } //let''s insert some record $sql = "INSERT INTO insect (id,name,date,origin) VALUES(NULL,''housefly'',''2001-09-10'',''kitchen'')"; if($mysqli->query($sql)){ printf("First record inserted successfully...!n"); } $sql = "INSERT INTO insect (id,name,date,origin) VALUES(NULL,''millipede'',''2001-09-10'',''driveway'')"; if($mysqli->query($sql)){ printf("Second record inserted successfully...!n"); } $sql = "INSERT INTO insect (id,name,date,origin) VALUES(NULL,''grasshopper'',''2001-09-10'',''front yard'')"; if($mysqli->query($sql)){ printf("Third record inserted successfully...!n"); } printf("Table records: n"); $sql = "SELECT * FROM insect"; if($result = $mysqli->query($sql)){ printf("Table record: n"); while($row = mysqli_fetch_array($result)){ printf("Id: %d, Name: %s, Date: %s, Origin %s", $row[''id''], $row[''name''], $row[''date''], $row[''origin'']); printf("n"); } } if($mysqli->error){ printf("Error message: ", $mysqli->error); } $mysqli->close();

    Output

    The output obtained is as shown below −

    Table created successfully....!
    First record inserted successfully...!
    Second record inserted successfully...!
    Third record inserted successfully...!
    Table records:
    Table record:
    Id: 1, Name: housefly, Date: 2001-09-10, Origin kitchen
    Id: 2, Name: millipede, Date: 2001-09-10, Origin driveway
    Id: 3, Name: grasshopper, Date: 2001-09-10, Origin front yard
    
    var mysql = require(''mysql2'');
    var con = mysql.createConnection({
    host:"localhost",
    user:"root",
    password:"password"
    });
    
     //Connecting to MySQL
     con.connect(function(err) {
     if (err) throw err;
    //   console.log("Connected successfully...!");
    //   console.log("--------------------------");
     sql = "USE TUTORIALS";
     con.query(sql);
     //create table
     sql = "CREATE TABLE insect (id INT UNSIGNED NOT NULL AUTO_INCREMENT,PRIMARY KEY (id),name VARCHAR(30) NOT NULL,date DATE NOT NULL,origin VARCHAR(30) NOT NULL)";
     con.query(sql, function(err, result){
        if (err) throw err;
        console.log("Table created successfully....!");
        });
    //now let''s insert some record
    sql = "INSERT INTO insect (id,name,date,origin) VALUES(NULL,''housefly'',''2001-09-10'',''kitchen'')";
    con.query(sql, function(err, result){
        if (err) throw err;
        console.log("First record inserted successfully...!");
        });
    sql = "INSERT INTO insect (id,name,date,origin) VALUES(NULL,''millipede'',''2001-09-10'',''driveway'')";
    con.query(sql, function(err, result){
        if (err) throw err;
        console.log("Second record inserted successfully...!");
        });
    sql = "INSERT INTO insect (id,name,date,origin) VALUES(NULL,''grasshopper'',''2001-09-10'',''front yard'')";
        con.query(sql, function(err, result){
        if (err) throw err;
        console.log("Third record inserted successfully...!");
        });
    sql = "SELECT * FROM INSECT";
    con.query(sql, function(err, result){
    console.log("Table records(with ID auto_increment sequence).");
        if (err) throw err;
        console.log(result);
        });
    });
    

    Output

    The output obtained is as shown below −

    Table created successfully....!
    First record inserted successfully...!
    Second record inserted successfully...!
    Third record inserted successfully...!
    Table records(with ID auto_increment sequence).
    [
      {
        id: 1,
        name: ''housefly'',
        date: 2001-09-09T18:30:00.000Z,
        origin: ''kitchen''
      },
      {
        id: 2,
        name: ''millipede'',
        date: 2001-09-09T18:30:00.000Z,
        origin: ''driveway''
      },
      {
        id: 3,
        name: ''grasshopper'',
        date: 2001-09-09T18:30:00.000Z,
        origin: ''front yard''
      }
    ]
    
    import java.sql.Connection;
    import java.sql.DriverManager;
    import java.sql.ResultSet;
    import java.sql.Statement;
    public class Sequence {
       public static void main(String[] args) {
          String url = "jdbc:mysql://localhost:3306/TUTORIALS";
          String user = "root";
          String password = "password";
          ResultSet rs;
          try {
             Class.forName("com.mysql.cj.jdbc.Driver");
                Connection con = DriverManager.getConnection(url, user, password);
                Statement st = con.createStatement();
                //System.out.println("Database connected successfully...!");
                //create table
                String sql = "CREATE TABLE insect (id INT UNSIGNED NOT NULL AUTO_INCREMENT,PRIMARY KEY (id),name VARCHAR(30) NOT NULL,date DATE NOT NULL,origin VARCHAR(30) NOT NULL)";
                st.execute(sql);
                System.out.println("Table ''insect'' created successfully...!");
                //lets insert some records into the table
                String sql1 = "INSERT INTO insect (id,name,date,origin) VALUES(NULL,''housefly'',''2001-09-10'',''kitchen''), (NULL,''millipede'',''2001-09-10'',''driveway''), (NULL,''grasshopper'',''2001-09-10'',''front yard'')";
                st.execute(sql1);
                System.out.println("Records inserted successfully...!");
                //lets print table records
                String sql2 = "SELECT * FROM INSECT";
                rs = st.executeQuery(sql2);
                System.out.println("Table records: ");
                while(rs.next()) {
                   String id = rs.getString("id");
                   String name = rs.getString("name");
                   String date = rs.getString("date");
                   String origin = rs.getString("origin");
                   System.out.println("Id: " + id + ", Name: " + name + ", Date: " + date + ", Origin: " + origin);
                }
          }catch(Exception e) {
             e.printStackTrace();
          }
       }
    }
    

    Output

    The output obtained is as shown below −

    Table ''insect'' created successfully...!
    Records inserted successfully...!
    Table records:
    Id: 1, Name: housefly, Date: 2001-09-10, Origin: kitchen
    Id: 2, Name: millipede, Date: 2001-09-10, Origin: driveway
    Id: 3, Name: grasshopper, Date: 2001-09-10, Origin: front yard
    
    import mysql.connector
    # Connecting to MySQL
    con = mysql.connector.connect(
        host="localhost",
        user="root",
        password="password",
        database="tut"
    )
    # Creating a cursor object
    cursorObj = con.cursor()
    # Creating the table
    create_table_query = """
    CREATE TABLE insect (
    id INT UNSIGNED NOT NULL AUTO_INCREMENT,
    PRIMARY KEY (id),
    name VARCHAR(30) NOT NULL,
    date DATE NOT NULL,
    origin VARCHAR(30) NOT NULL
    )
    """
    cursorObj.execute(create_table_query)
    print("Table ''insect'' is created successfully!")
    # Inserting records
    sql = "INSERT INTO insect (name, date, origin) VALUES (%s, %s, %s)"
    values = [
        (''housefly'', ''2001-09-10'', ''kitchen''),
        (''millipede'', ''2001-09-10'', ''driveway''),
        (''grasshopper'', ''2001-09-10'', ''front yard'')
    ]
    cursorObj.executemany(sql, values)
    print("Data inserted into the ''insect'' table.")
    con.commit()
    # Retrieving records
    cursorObj.execute("SELECT * FROM insect")
    records = cursorObj.fetchall()
    # Printing the records
    print("Table records(with ID auto_increment sequence).")
    for record in records:
        print(record)
    # Closing the connection
    cursorObj.close()
    con.close()
    

    Output

    The output obtained is as shown below −

    Table ''insect'' is created successfully!
    Data inserted into the ''insect'' table.
    Table records(with ID auto_increment sequence).
    (1, ''housefly'', datetime.date(2001, 9, 10), ''kitchen'')
    (2, ''millipede'', datetime.date(2001, 9, 10), ''driveway'')
    (3, ''grasshopper'', datetime.date(2001, 9, 10), ''front yard'')
    

    Khóa học lập trình tại Toidayhoc vừa học vừa làm dự án vừa nhận lương: Khóa học lập trình nhận lương tại trung tâm Toidayhoc