In this chapter, we will learn how to limit records using MongoDB.
The Limit() Method
To limit the records in MongoDB, you need to use limit() method. The method accepts one number type argument, which is the number of documents that you want to be displayed.
Syntax
The basic syntax of limit() method is as follows −
>db.COLLECTION_NAME.find().limit(NUMBER)
Example
Consider the collection myycol has the following data.
In this chapter, we will learn how to sort records in MongoDB.
The sort() Method
To sort documents in MongoDB, you need to use sort() method. The method accepts a document containing a list of fields along with their sorting order. To specify sorting order 1 and -1 are used. 1 is used for ascending order while -1 is used for descending order.
Syntax
The basic syntax of sort() method is as follows −
>db.COLLECTION_NAME.find().sort({KEY:1})
Example
Consider the collection myycol has the following data.
Aggregations operations process data records and return computed results. Aggregation operations group values from multiple documents together, and can perform a variety of operations on the grouped data to return a single result. In SQL count(*) and with group by is an equivalent of MongoDB aggregation.
The aggregate() Method
For the aggregation in MongoDB, you should use aggregate() method.
Syntax
Basic syntax of aggregate() method is as follows −
Now from the above collection, if you want to display a list stating how many tutorials are written by each user, then you will use the following aggregate() method −
Sql equivalent query for the above use case will be select by_user, count(*) from mycol group by by_user.
In the above example, we have grouped documents by field by_user and on each occurrence of by user previous value of sum is incremented. Following is a list of available aggregation expressions.
Expression
Description
Example
$sum
Sums up the defined value from all documents in the collection.
Gets the first document from the source documents according to the grouping. Typically this makes only sense together with some previously applied “$sort”-stage.
Gets the last document from the source documents according to the grouping. Typically this makes only sense together with some previously applied “$sort”-stage.
In UNIX command, shell pipeline means the possibility to execute an operation on some input and use the output as the input for the next command and so on. MongoDB also supports same concept in aggregation framework. There is a set of possible stages and each of those is taken as a set of documents as an input and produces a resulting set of documents (or the final resulting JSON document at the end of the pipeline). This can then in turn be used for the next stage and so on.
Following are the possible stages in aggregation framework −
$project − Used to select some specific fields from a collection.
$match − This is a filtering operation and thus this can reduce the amount of documents that are given as input to the next stage.
$group − This does the actual aggregation as discussed above.
$sort − Sorts the documents.
$skip − With this, it is possible to skip forward in the list of documents for a given amount of documents.
$limit − This limits the amount of documents to look at, by the given number starting from the current positions.
$unwind − This is used to unwind document that are using arrays. When using an array, the data is kind of pre-joined and this operation will be undone with this to have individual documents again. Thus with this stage we will increase the amount of documents for the next stage.
Replication is the process of synchronizing data across multiple servers. Replication provides redundancy and increases data availability with multiple copies of data on different database servers. Replication protects a database from the loss of a single server. Replication also allows you to recover from hardware failure and service interruptions. With additional copies of the data, you can dedicate one to disaster recovery, reporting, or backup.
Why Replication?
To keep your data safe
High (24*7) availability of data
Disaster recovery
No downtime for maintenance (like backups, index rebuilds, compaction)
Read scaling (extra copies to read from)
Replica set is transparent to the application
How Replication Works in MongoDB
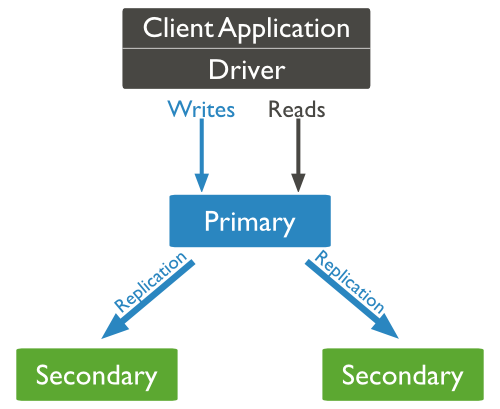
MongoDB achieves replication by the use of replica set. A replica set is a group of mongod instances that host the same data set. In a replica, one node is primary node that receives all write operations. All other instances, such as secondaries, apply operations from the primary so that they have the same data set. Replica set can have only one primary node.
Replica set is a group of two or more nodes (generally minimum 3 nodes are required).
In a replica set, one node is primary node and remaining nodes are secondary.
All data replicates from primary to secondary node.
At the time of automatic failover or maintenance, election establishes for primary and a new primary node is elected.
After the recovery of failed node, it again join the replica set and works as a secondary node.
A typical diagram of MongoDB replication is shown in which client application always interact with the primary node and the primary node then replicates the data to the secondary nodes.
Replica Set Features
A cluster of N nodes
Any one node can be primary
All write operations go to primary
Automatic failover
Automatic recovery
Consensus election of primary
Set Up a Replica Set
In this tutorial, we will convert standalone MongoDB instance to a replica set. To convert to replica set, following are the steps −
Shutdown already running MongoDB server.
Start the MongoDB server by specifying — replSet option. Following is the basic syntax of –replSet −
It will start a mongod instance with the name rs0, on port 27017.
Now start the command prompt and connect to this mongod instance.
In Mongo client, issue the command rs.initiate() to initiate a new replica set.
To check the replica set configuration, issue the command rs.conf(). To check the status of replica set issue the command rs.status().
Add Members to Replica Set
To add members to replica set, start mongod instances on multiple machines. Now start a mongo client and issue a command rs.add().
Syntax
The basic syntax of rs.add() command is as follows −
>rs.add(HOST_NAME:PORT)
Example
Suppose your mongod instance name is mongod1.net and it is running on port 27017. To add this instance to replica set, issue the command rs.add() in Mongo client.
>rs.add("mongod1.net:27017")
>
You can add mongod instance to replica set only when you are connected to primary node. To check whether you are connected to primary or not, issue the command db.isMaster() in mongo client.
In this chapter, we will see how to create a database in MongoDB.
The use Command
MongoDB use DATABASE_NAME is used to create database. The command will create a new database if it doesn”t exist, otherwise it will return the existing database.
Syntax
Basic syntax of use DATABASE statement is as follows −
use DATABASE_NAME
Example
If you want to use a database with name <mydb>, then use DATABASE statement would be as follows −
>use mydb
switched to db mydb
To check your currently selected database, use the command db
>db
mydb
If you want to check your databases list, use the command show dbs.
>show dbs
local     0.78125GB
test      0.23012GB
Your created database (mydb) is not present in list. To display database, you need to insert at least one document into it.
>db.movie.insert({"name":"tutorials point"})
>show dbs
local      0.78125GB
mydb       0.23012GB
test       0.23012GB
In MongoDB default database is test. If you didn”t create any database, then collections will be stored in test database.
Data in MongoDB has a flexible schema.documents in the same collection. They do not need to have the same set of fields or structure Common fields in a collection’s documents may hold different types of data.
Data Model Design
MongoDB provides two types of data models: — Embedded data model and Normalized data model. Based on the requirement, you can use either of the models while preparing your document.
Embedded Data Model
In this model, you can have (embed) all the related data in a single document, it is also known as de-normalized data model.
For example, assume we are getting the details of employees in three different documents namely, Personal_details, Contact and, Address, you can embed all the three documents in a single one as shown below −
In this model, you can refer the sub documents in the original document, using references. For example, you can re-write the above document in the normalized model as:
Design your schema according to user requirements.
Combine objects into one document if you will use them together. Otherwise separate them (but make sure there should not be need of joins).
Duplicate the data (but limited) because disk space is cheap as compare to compute time.
Do joins while write, not on read.
Optimize your schema for most frequent use cases.
Do complex aggregation in the schema.
Example
Suppose a client needs a database design for his blog/website and see the differences between RDBMS and MongoDB schema design. Website has the following requirements.
Every post has the unique title, description and url.
Every post can have one or more tags.
Every post has the name of its publisher and total number of likes.
Every post has comments given by users along with their name, message, data-time and likes.
On each post, there can be zero or more comments.
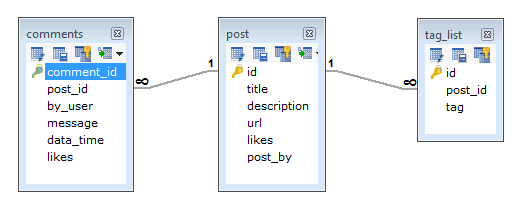
In RDBMS schema, design for above requirements will have minimum three tables.
While in MongoDB schema, design will have one collection post and the following structure −
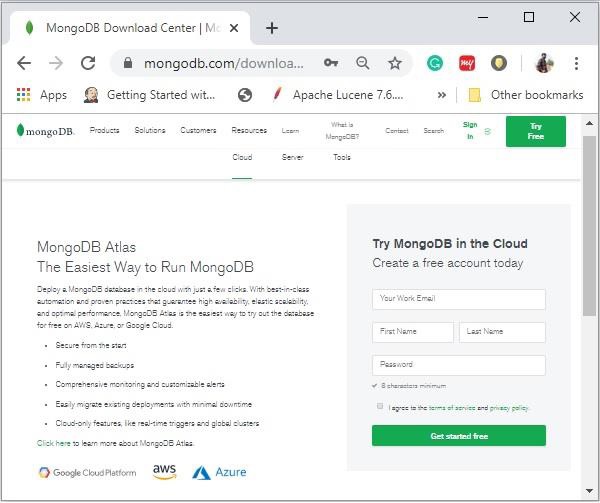
To install MongoDB on Windows, first download the latest release of MongoDB from .
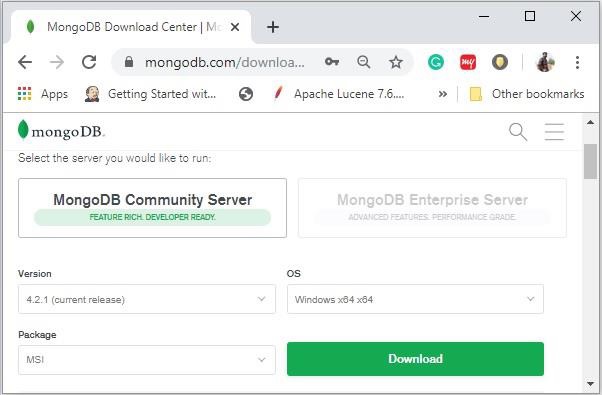
Enter the required details, select the Server tab, in it you can choose the version of MongoDB, operating system and, packaging as:
Now install the downloaded file, by default, it will be installed in the folder C:Program Files.
MongoDB requires a data folder to store its files. The default location for the MongoDB data directory is c:datadb. So you need to create this folder using the Command Prompt. Execute the following command sequence.
C:>md data
C:md datadb
Then you need to specify set the dbpath to the created directory in mongod.exe. For the same, issue the following commands.
In the command prompt, navigate to the bin directory current in the MongoDB installation folder. Suppose my installation folder is C:Program FilesMongoDB
Create a /etc/apt/sources.list.d/mongodb.list file using the following command.
echo ''deb http://downloads-distro.mongodb.org/repo/ubuntu-upstart dist 10gen''
   | sudo tee /etc/apt/sources.list.d/mongodb.list
Now issue the following command to update the repository −
sudo apt-get update
Next install the MongoDB by using the following command −
apt-get install mongodb-10gen = 4.2
In the above installation, 2.2.3 is currently released MongoDB version. Make sure to install the latest version always. Now MongoDB is installed successfully.
Start MongoDB
sudo service mongodb start
Stop MongoDB
sudo service mongodb stop
Restart MongoDB
sudo service mongodb restart
To use MongoDB run the following command.
mongo
This will connect you to running MongoDB instance.
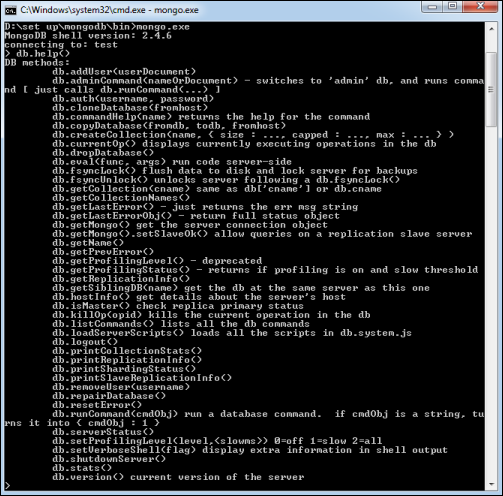
MongoDB Help
To get a list of commands, type db.help() in MongoDB client. This will give you a list of commands as shown in the following screenshot.
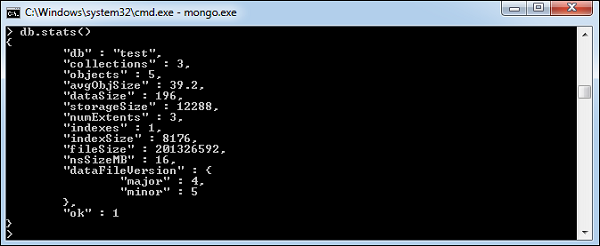
MongoDB Statistics
To get stats about MongoDB server, type the command db.stats() in MongoDB client. This will show the database name, number of collection and documents in the database. Output of the command is shown in the following screenshot.
MongoDB is a cross-platform, document oriented database that provides, high performance, high availability, and easy scalability. MongoDB works on concept of collection and document.
Database
Database is a physical container for collections. Each database gets its own set of files on the file system. A single MongoDB server typically has multiple databases.
Collection
Collection is a group of MongoDB documents. It is the equivalent of an RDBMS table. A collection exists within a single database. Collections do not enforce a schema. Documents within a collection can have different fields. Typically, all documents in a collection are of similar or related purpose.
Document
A document is a set of key-value pairs. Documents have dynamic schema. Dynamic schema means that documents in the same collection do not need to have the same set of fields or structure, and common fields in a collection”s documents may hold different types of data.
The following table shows the relationship of RDBMS terminology with MongoDB.
RDBMS
MongoDB
Database
Database
Table
Collection
Tuple/Row
Document
column
Field
Table Join
Embedded Documents
Primary Key
Primary Key (Default key _id provided by MongoDB itself)
Database Server and Client
mysqld/Oracle
mongod
mysql/sqlplus
mongo
Sample Document
Following example shows the document structure of a blog site, which is simply a comma separated key value pair.
{
   _id: ObjectId(7df78ad8902c)
   title: ''MongoDB Overview'',
   description: ''MongoDB is no sql database'',
   by: ''tutorials point'',
   url: ''http://www.tutorialspoint.com'',
   tags: [''mongodb'', ''database'', ''NoSQL''],
   likes: 100,
   comments: [
      {
         user:''user1'',
         message: ''My first comment'',
         dateCreated: new Date(2011,1,20,2,15),
         like: 0
      },
      {
         user:''user2'',
         message: ''My second comments'',
         dateCreated: new Date(2011,1,25,7,45),
         like: 5
      }
   ]
}
_id is a 12 bytes hexadecimal number which assures the uniqueness of every document. You can provide _id while inserting the document. If you don’t provide then MongoDB provides a unique id for every document. These 12 bytes first 4 bytes for the current timestamp, next 3 bytes for machine id, next 2 bytes for process id of MongoDB server and remaining 3 bytes are simple incremental VALUE.
The MongoDB is an open-source document database and leading NoSQL database. MongoDB is written in C++. This tutorial will give you great understanding on MongoDB concepts needed to create and deploy a highly scalable and performance-oriented database.
MongoDB features are flexible data models that allows the storage of unstructured data. This provides full support indexing, replication, capabilities and also user friendly APIs.
The MongoDB is a multipurpose dataset that is used for modern application development and cloud environments. This scalable architecture enables us to handle system demands and also adding more nodes to distribute the load.
MongoDB is an open source NOSQL dataset in C++, this offers flexible data models, indexing, replication and modern applications for scalable architecture.
MongoDB Basic Commands
We have a list of standard MongoDb commands to interact with the database, These commands are CREATE, READ, INSERT, UPDATE, DELETE, DROP and AGGREGATE can be classified into following groups based on their nature −
Command
Description
CREATE
Creates a new table in the database and other objects in the database.
INSERT
Inserts collection name in existing database.
DROP
Deletes an entire table or specified objects in the database.
UPDATE
Updates the document into a collection.
Why to Learn MongoDB?
MongoDB can handle unstructured data, which provides better indexing and operations. MongoDB ensures the development software applications that can handle all sorts of data in a scalable way.
MongoDB is a rapid iterative development that enables the collaboration of a large number of teams. MongoDB has become the most necessary database in the world, which makes it easy for every developer to store, manage, and retrieve data.
MongoDB Applications
MongoDB is a NoSQL database. MongoDB provides following functionality to the database programmers −
Stores user data, comments and metadata
MongoDB performs complex analytics queries and stores the behavioral data.
This is used to manage chain data and optimize logistics.
Environmental data and IoT devices are stored and analyzed.
Who Should Learn MongoDB
This MongoDB tutorial will help web developers, devops engineer, mobile apps, backend, full-stack, database administrators, etc. We recommend reading this tutorial, in the sequence listed in the left side menu.
Prerequisites to Learn MongoDB
Before proceeding with this tutorial, you should have a basic understanding of database, text editor and execution of programs, etc. Because we are going to develop high performance database, so it will be good if you have an understanding on the basic concepts of Database (RDBMS).
MongoDB is typically used in the development of applications, at least one programming language is very helpful to work with APIs.
MongoDB Jobs and Opportunities
MongoDB is in high demand professionally and it is exponentially growing in the IT industry.
In MongoDB jobs are in high demand with a growth rate of 50%. The NoSQL database market is growing at a rate of 30%.
Average salaries for a MongoDB professional are around $100,000 to $200,000. This may vary depending on the location. The Following companies recruit MongoDB professionals:
Accenture
IBM
Deloitte
Capgemini
TCS
Infosys
Wipro
Google
Amazon
Microsoft
HCL
You could be the next employee for any of these major companies. We have developed great learning material for MongoDB that helps you prepare for technical interviews and certifications. So, start learning MongoDB using our tutorial anywhere and anytime, absolutely at your place.
Frequently Asked Questions about MongoDB
There are some very Frequently Asked Questions(FAQ) about MongoDB, this section tries to answer them briefly.
MangoDB can manage document information, stores and retrieves the information. This is used for high data storage and performing large amount of data while performing the dataset. This is a distributed database at its level, high availability, horizontal scaling are built in and easy to use.
Sharding is a database that separates large database into smaller, faster, and easily managed parts. These smaller parts are called data shards. Shard is defined as a “small part of a whole”.
MongoDB is not a programming language, but this is a NOSQL database. This query language allows us to interact with the data. MongoDB is a non-relational database management system that stores the data in flexible JSON documents.
This supports multi-document transactions, even though they are less performed as compared to traditional relational databases.
This can be used in memory intensive situation because memory maps the entire data file into memory.
This is designed for eventual consistency, which means there can be a lag before all the nodes in a distributed system.
Yes, you can learn MongoDB without knowledge of SQL. MongoDB uses its own query language, which is different from SQL. You need to learn about NoSQL databases, and these vary very much from the SQL database. MongoDB Compass is a user-friendly interface that visualizes your data and understands your schema without using the command line.
MongoDB supports wide range of platforms, that are useful for developing various environments.
Operating System performs Windows 7 and Linux with various distributions.
Cloud Platform in MongoDB manages data-base-as-a-service available in Google, AWS and Azure.
Docker provides the official Docker images for deployment.
Following are MongoDB Indexes.
Single Field Index.
Compound Index.
Multikey Index.
Text Index.
Hashed Index.
MongoDB implements the primary key using the ”_id” field. Every primary key acts as a different identifier for the document. This field is automatically created by MongoDB when the document is inserted. This can be any type, as long as it is different from the collection.