Your cart is currently empty!
Category: h2 Database
-
Khóa học miễn phí H2 Database – Useful Resources nhận dự án làm có lương
H2 Database – Useful Resources
The following resources contain additional information on H2 Database. Please use them to get more in-depth knowledge on this.
Useful Video Courses
Khóa học lập trình tại Toidayhoc vừa học vừa làm dự án vừa nhận lương: Khóa học lập trình nhận lương tại trung tâm Toidayhoc
Khóa học miễn phí H2 Database – Quick Guide nhận dự án làm có lương
H2 Database – Quick Guide
H2 Database – Introduction
H2 is an open-source lightweight Java database. It can be embedded in Java applications or run in the client-server mode. Mainly, H2 database can be configured to run as inmemory database, which means that data will not persist on the disk. Because of embedded database it is not used for production development, but mostly used for development and testing.
This database can be used in embedded mode or in server mode. Following are the main features of H2 database −
- Extremely fast, open source, JDBC API
- Available in embedded and server modes; in-memory databases
- Browser-based Console application
- Small footprint − Around 1.5MB jar file size
Features of H2 Database
The main features of H2 Database are as follows −
-
It is an extremely fast database engine.
-
H2 is open source and written in Java.
-
It supports standard SQL and JDBC API. It can use PostgreSQL ODBC driver too.
-
It has embedded and Server mode.
-
H2 supports clustering and multi-version concurrency.
-
It has strong security features.
Additional Features
Following are some additional features of H2 Database −
-
H2 is a disk-based or in-memory databases and tables, read-only database support, temporary tables.
-
H2 provides transaction support (read committed), 2-phase-commit multiple connections, table level locking.
-
H2 is a cost-based optimizer, using a genetic algorithm for complex queries, zeroadministration.
-
H2 contains scrollable and updatable result set support, large result set, external result sorting, functions can return a result set.
-
H2 supports encrypted database (AES), SHA-256 password encryption, encryption functions, and SSL.
Components in H2 Database
In order to use H2 Database, you need to have the following components −
- A web browser
- A H2 console server
This is a client/server application, so both server and client (a browser) are required to run it.
H2 Database – Installation
H2 is a database written in Java. We can easily embed this database to our application by using JDBC. We can run this on many different platforms or any version of Java Runtime Environment. However, before installing the database, there should be Java installed in the system.
Verify Java Installation
If JDK is installed in the system, try the following command to verify the Java version.
java –version
If JDk is successfully installed in the system, then we will get the following output.
java version "1.8.0_91"
Java(TM) SE Runtime Environment (build 1.8.0_91-b14)
Java HotSpot(TM) 64-Bit Server VM (build 25.91-b14, mixed mode)
If JDK is not installed in the system, then visit the following link to .
Install H2 Database
We can run this database on many different platforms. In this chapter, we will learn about H2 Database installation on Windows.
Following are the steps to install H2 Database on Windows operating system.
Step 1: Download H2 Setup File
Download the latest version of from the given link. In this link, you will get the latest version of H2 database in two types. One is Windows Installer type (that is .exe file) and second is Platform-Independent zip file for other operating systems.
Click the Windows installer for downloading the Windows supportable H2 database after downloading the .exe file. In this case, we are using H2 Database with the version 1.4.192.
Step 2: Install H2 Database
After downloading we get the H2 Windows installer file (i.e. h2-setup-yyyy-mm-dd.exe) in the Downloads directory. To start the installation process of H2 Database, double click on the installer file.
The following screen is the first step in the installation process. Provide a path where we want to install the H2 database server as shown in the following screenshot.
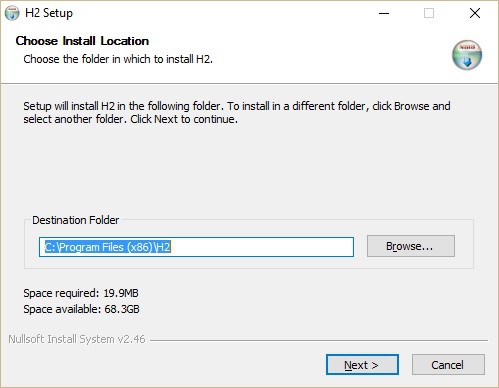
As seen in the above screenshot, by default it will take C:ProgramFiles (x86)H2 as the destination folder. Click next to proceed to the next step. The following screen pops up.
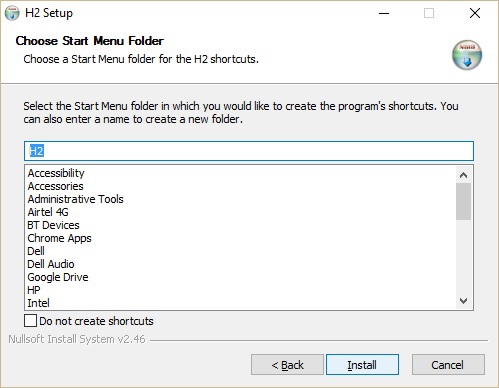
In the above screenshot, click the Install button to start the installation process. After installation, we get the following screenshot.
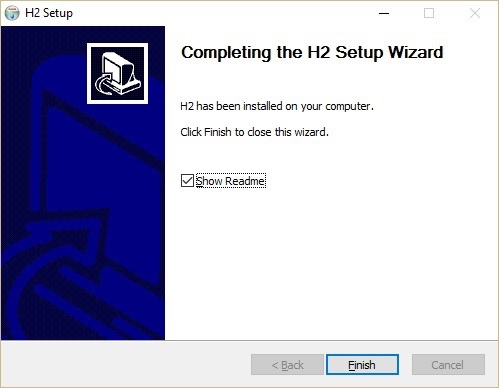
Click Finish to complete the installation process.
Step 3: Verify H2 Database Installation
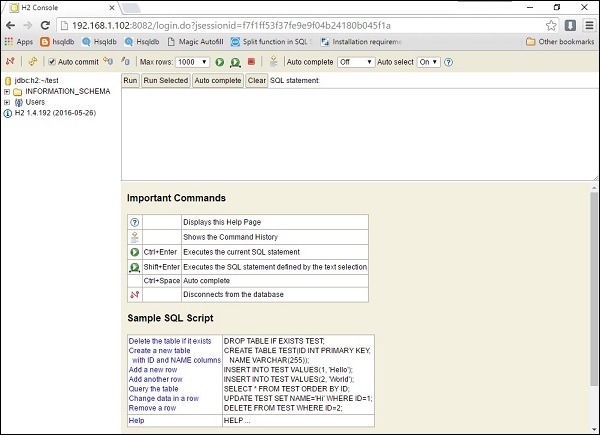
After installation, let us verify the database installation in the system. Click Windows → type H2 Console → Click H2 console icon. Connect to the URL http://localhost:8082. At the time of connecting, the H2 database will ask for database registration as shown in the following screenshot.
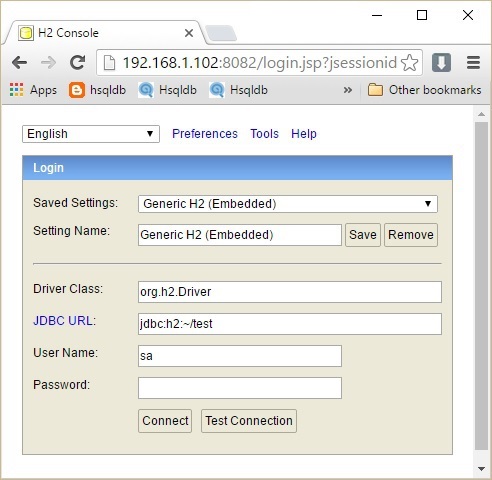
Fill all the details in the above dialog box such as Saved Settings, Settings Name, Driver Class, JDBC URL, User Name, and Password. In the JDBC URL, specify the database is located and the database name. User Name and Password are the fields for user name and password of the database. Click Connect.
The Database welcome page pops up as shown in the following screenshot.
H2 Database – Select
Select command is used to fetch record data from a table or multiple tables. If we design a select query, then it returns data in the form of result table called result sets.
Syntax
The basic syntax of SELECT statement is as follows −
SELECT [ TOP term ] [ DISTINCT | ALL ] selectExpression [,...]
FROM tableExpression [,...] [ WHERE expression ]
[ GROUP BY expression [,...] ] [ HAVING expression ]
[ { UNION [ ALL ] | MINUS | EXCEPT | INTERSECT } select ] [ ORDER BY order [,...] ]
[ [ LIMIT expression ] [ OFFSET expression ] [ SAMPLE_SIZE rowCountInt ] ]
[ FOR UPDATE ]
To fetch all the available fields, use the following syntax.
SELECT * FROM table_name;
Example
Consider the CUSTOMER table having the following records −
+----+----------+-----+-----------+----------+
| ID | NAME     | AGE | ADDRESS   | SALARY   |
+----+----------+-----+-----------+----------+
|  1 | Ramesh   |  32 | Ahmedabad |  2000.00 |
|  2 | Khilan   |  25 | Delhi     |  1500.00 |
|  3 | kaushik  |  23 | Kota      |  2000.00 |
|  4 | Chaitali |  25 | Mumbai    |  6500.00 |
|  5 | Hardik   |  27 | Bhopal    |  8500.00 |
|  6 | Komal    |  22 | MP        |  4500.00 |
|  7 | Muffy    |  24 | Indore    | 10000.00 |
+----+----------+-----+-----------+----------+
To get the customer table along with the given data, execute the following queries.
CREATE TABLE CUSTOMER (id number, name varchar(20), age number, address varchar(20),
salary number);

INSERT into CUSTOMER values (1, ''Ramesh'', 32, ''Ahmedabad'', 2000);
INSERT into CUSTOMER values (2, ''Khilan'', 25, ''Delhi'', 1500);
INSERT into CUSTOMER values (3, ''kaushik'', 23, ''Kota'', 2000);
INSERT into CUSTOMER values (4, ''Chaitali'', 25, ''Mumbai'', 6500);
INSERT into CUSTOMER values (5, ''Hardik'', 27, ''Bhopal'', 8500);
INSERT into CUSTOMER values (6, ''Komal'', 22, ''MP'', 4500);
INSERT into CUSTOMER values (7, ''Muffy'', 24, ''Indore'', 10000);
The following command is an example, which would fetch ID, Name and Salary fields of the customers available in the CUSTOMER table.
SELECT ID, NAME, SALARY FROM CUSTOMERS;
The above command produces the following result.
+----+----------+----------+
| ID | NAME     | SALARY   |
+----+----------+----------+
|  1 | Ramesh   |  2000.00 |
|  2 | Khilan   |  1500.00 |
|  3 | kaushik  |  2000.00 |
|  4 | Chaitali |  6500.00 |
|  5 | Hardik   |  8500.00 |
|  6 | Komal    |  4500.00 |
|  7 | Muffy    | 10000.00 |
+----+----------+----------+
Use the following query to fetch all the fields of CUSTOMERS table.
SQL> SELECT * FROM CUSTOMERS;
The above query produces the following result −
+----+----------+-----+-----------+----------+
| ID | NAME     | AGE | ADDRESS   | SALARY   |
+----+----------+-----+-----------+----------+
|  1 | Ramesh   |  32 | Ahmedabad |  2000.00 |
|  2 | Khilan   |  25 | Delhi     |  1500.00 |
|  3 | kaushik  |  23 | Kota      |  2000.00 |
|  4 | Chaitali |  25 | Mumbai    |  6500.00 |
|  5 | Hardik   |  27 | Bhopal    |  8500.00 |
|  6 | Komal    |  22 | MP        |  4500.00 |
|  7 | Muffy    |  24 | Indore    | 10000.00 |
+----+----------+-----+-----------+----------+
H2 Database – Insert
The SQL INSERT statement is used to add new rows of data to a table in the database.
Syntax
Following is the basic syntax of INSERT INTO statement.
INSERT INTO tableName
{ [ ( columnName [,...] ) ]
{ VALUES
{ ( { DEFAULT | expression } [,...] ) } [,...] | [ DIRECT ] [ SORTED ] select } } |
{ SET { columnName = { DEFAULT | expression } } [,...] }
Using this INSERT statement, we can insert a new record or new rows into a table. When using DIRECT clause, the results are directly affected to the target table without any intermediate step. However, while adding values for all the columns of the table, make sure the order of the values is in the same order as the columns in the table.
Example
Let us take an example and try to insert the following given records into the Customer table.
| ID | Name | Age | Address | Salary |
|---|---|---|---|---|
| 1 | Ramesh | 32 | Ahmedabad | 2000 |
| 2 | Khilan | 25 | Delhi | 1500 |
| 3 | Kaushik | 23 | Kota | 2000 |
| 4 | Chaitail | 25 | Mumbai | 6500 |
| 5 | Hardik | 27 | Bhopal | 8500 |
| 6 | Komal | 22 | MP | 4500 |
| 7 | Muffy | 24 | Indore | 10000 |
We can get all the given records into the customer table by executing the following commands.
INSERT INTO CUSTOMER VALUES (1, ''Ramesh'', 32, ''Ahmedabad'', 2000);
INSERT INTO CUSTOMER VALUES (2, ''Khilan'', 25, ''Delhi'', 1500);
INSERT INTO CUSTOMER VALUES (3, ''kaushik'', 23, ''Kota'', 2000);
INSERT INTO CUSTOMER VALUES (4, ''Chaitali'', 25, ''Mumbai'', 6500);
INSERT INTO CUSTOMER VALUES (5, ''Hardik'', 27, ''Bhopal'', 8500);
INSERT INTO CUSTOMER VALUES (6, ''Komal'', 22, ''MP'', 4500);
INSERT INTO CUSTOMER VALUES (7, ''Muffy'', 24, ''Indore'', 10000);
H2 Database – Update
The UPDATE query is used to update or modify the existing records in a table. We can use WHERE clause with UPDATE query to update the selected rows, otherwise all the rows would be affected.
Syntax
Following is the basic syntax of the UPDATE query.
UPDATE tableName [ [ AS ] newTableAlias ] SET
{ { columnName = { DEFAULT | expression } } [,...] } |
{ ( columnName [,...] ) = ( select ) }
[ WHERE expression ] [ ORDER BY order [,...] ] [ LIMIT expression ]
In this UPDATE syntax, we can combine more than one condition by using AND or OR clauses.
Example
Consider the CUSTOMER table having the following records.
+----+----------+-----+-----------+----------+
| ID | NAME     | AGE | ADDRESS   | SALARY   |
+----+----------+-----+-----------+----------+
|  1 | Ramesh   |  32 | Ahmedabad |  2000.00 |
|  2 | Khilan   |  25 | Delhi     |  1500.00 |
|  3 | kaushik  |  23 | Kota      |  2000.00 |
|  4 | Chaitali |  25 | Mumbai    |  6500.00 |
|  5 | Hardik   |  27 | Bhopal    |  8500.00 |
|  6 | Komal    |  22 | MP        |  4500.00 |
|  7 | Muffy    |  24 | Indore    | 10000.00 |
+----+----------+-----+-----------+----------+
If you want to get the customer table along with the given data, execute the following queries.
CREATE TABLE CUSTOMER (id number, name varchar(20), age number, address varchar(20),
   salary number);
INSERT into CUSTOMER values (1, ''Ramesh'', 32, ''Ahmedabad'', 2000);
INSERT into CUSTOMER values (2, ''Khilan'', 25, ''Delhi'', 1500);
INSERT into CUSTOMER values (3, ''kaushik'', 23, ''Kota'', 2000);
INSERT into CUSTOMER values (4, ''Chaitali'', 25, ''Mumbai'', 6500);
INSERT into CUSTOMER values (5, ''Hardik'', 27, ''Bhopal'', 8500);
INSERT into CUSTOMER values (6, ''Komal'', 22, ''MP'', 4500);
INSERT into CUSTOMER values (7, ''Muffy'', 24, ''Indore'', 10000);
The following command is an example, which would update ADDRESS for a customer whose ID is 6 −
UPDATE CUSTOMERS SET ADDRESS = ''Pune'' WHERE ID = 6;
Now, CUSTOMERS table would have the following records. We can check the customer table records by executing the following query.
SELECT * FROM CUSTOMERS;
The above query produces the following result.
+----+----------+-----+-----------+----------+
| ID | NAME     | AGE | ADDRESS   | SALARY   |
+----+----------+-----+-----------+----------+
|  1 | Ramesh   |  32 | Ahmedabad |  2000.00 |
|  2 | Khilan   |  25 | Delhi     |  1500.00 |
|  3 | kaushik  |  23 | Kota      |  2000.00 |
|  4 | Chaitali |  25 | Mumbai    |  6500.00 |
|  5 | Hardik   |  27 | Bhopal    |  8500.00 |
|  6 | Komal    |  22 | Pune      |  4500.00 |
|  7 | Muffy    |  24 | Indore    | 10000.00 |
+----+----------+-----+-----------+----------+
To modify all ADDRESS and SALARY column values in CUSTOMERS table, we need not use the WHERE clause. The UPDATE query would be as follows −
UPDATE CUSTOMERS SET ADDRESS = ''Pune'', SALARY = 1000.00;
Now, CUSTOMERS table would have the following records. We can check the customer table records by executing the following query.
SELECT * FROM CUSTOMERS;
The above query produces the following result −
+----+----------+-----+---------+---------+
| ID | NAME     | AGE | ADDRESS | SALARY  |
+----+----------+-----+---------+---------+
|  1 | Ramesh   |  32 | Pune    | 1000.00 |
|  2 | Khilan   |  25 | Pune    | 1000.00 |
|  3 | kaushik  |  23 | Pune    | 1000.00 |
|  4 | Chaitali |  25 | Pune    | 1000.00 |
|  5 | Hardik   |  27 | Pune    | 1000.00 |
|  6 | Komal    |  22 | Pune    | 1000.00 |
|  7 | Muffy    |  24 | Pune    | 1000.00 |
+----+----------+-----+---------+---------+
H2 Database – Delete
The SQL DELETE query is used to delete the existing records from a table. We can use WHERE clause with DELETE query to delete selected records, otherwise all the records will be deleted.
Syntax
Following is the generic query syntax of the delete command.
DELETE [ TOP term ] FROM tableName [ WHERE expression ] [ LIMIT term ]
The above syntax deletes the rows from a table. If TOP or LIMIT is specified, at most the specified number of rows are deleted (no limit if null or smaller than zero).
Example
Consider the CUSTOMER table having the following records.
+----+----------+-----+-----------+----------+
| ID | NAME     | AGE | ADDRESS   | SALARY   |
+----+----------+-----+-----------+----------+
|  1 | Ramesh   |  32 | Ahmedabad |  2000.00 |
|  2 | Khilan   |  25 | Delhi     |  1500.00 |
|  3 | kaushik  |  23 | Kota      |  2000.00 |
|  4 | Chaitali |  25 | Mumbai    |  6500.00 |
|  5 | Hardik   |  27 | Bhopal    |  8500.00 |
|  6 | Komal    |  22 | MP        |  4500.00 |
|  7 | Muffy    |  24 | Indore    | 10000.00 |
+----+----------+-----+-----------+----------+
The following command will delete the details of the customer, whose ID is 6.
DELETE FROM CUSTOMERS WHERE ID = 6;
After execution of the above command, check the Customer table by executing the following command.
SELECT * FROM CUSTOMERS;
The above command produces the following output −
+----+----------+-----+-----------+----------+
| ID | NAME     | AGE | ADDRESS   | SALARY   |
+----+----------+-----+-----------+----------+
|  1 | Ramesh   |  32 | Ahmedabad |  2000.00 |
|  2 | Khilan   |  25 | Delhi     |  1500.00 |
|  3 | kaushik  |  23 | Kota      |  2000.00 |
|  4 | Chaitali |  25 | Mumbai    |  6500.00 |
|  5 | Hardik   |  27 | Bhopal    |  8500.00 |
|  7 | Muffy    |  24 | Indore    | 10000.00 |
+----+----------+-----+-----------+----------+
If we want to DELETE all the records from CUSTOMERS table, we do not use WHERE clause. The DELETE query would be as follows.
DELETE FROM CUSTOMER;
After executing the above command, no records will be available in the Customer table.
H2 Database – Backup
BACKUP is the command used to take database backup into a separate .zip file. Objects are not locked, and when it takes backup the transaction log is also copied. Admin rights are required to execute this command.
Syntax
Following is the generic syntax of the Backup command.
BACKUP TO fileNameString;
Example
In this example, let us take a backup of the current database into backup.zip file. Use the following command for the same.
BACKUP TO ''backup.zip
On executing the above command, you will get the backup.zip file in your local file system.
H2 Database – Call
CALL is a SQL command which belongs to H2 database server. This command is used to calculate a simple expression. It returns the result of the given expression in a single column field. When it returns an array of results, then each element in the array is displayed as a column value.
Syntax
Following is the generic syntax of the CALL command.
CALL expression;
We can use the arithmetic expression in this syntax.
Example
Let us take an example and execute an arithmetic expression (15 * 25) using call command.
CALL 15*25;
The above command produces the following output.
| 375 |
|---|
| 375 |
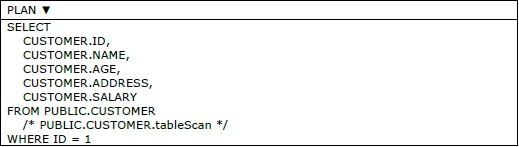
H2 Database – Explain
EXPLAIN command displays the execution plan for a statement. When we execute a statement using EXPLAIN ANALYZE command, the query plan will include the actual row scan count for each table.
Syntax
Following is the generic syntax of the EXPLAIN command.
EXPLAIN { [ PLAN FOR ] | ANALYZE } { select | insert | update | delete | merge}
Along with this syntax we can use select, insert, delete, and merge.
Example
This example explains the query plan details of the customer with ID 1.
EXPLAIN SELECT * FROM CUSTOMER WHERE ID = 1;
The above command produces the following output −
H2 Database – Merge
MERGE command is used to update the existing rows and insert new rows into a table. The primary key column plays an important role while using this command; it is used to find the row.
Syntax
Following is the generic syntax of the MERGE command.
MERGE INTO tableName [ ( columnName [,...] ) ]
[ KEY ( columnName [,...] ) ]
{ VALUES { ( { DEFAULT | expression } [,...] ) } [,...] | select }
In the above syntax, the KEY clause is used to specify the primary key column name. Along with VALUES clause, we can use primitive values to insert or we can retrieve and store another table values into this table using the select command.
Example
In this example, let us try to add a new record into Customers table. Following are the details of the new record in the table.
| Column Name | Value |
|---|---|
| ID | 8 |
| NAME | Lokesh |
| AGE | 32 |
| ADDRESS | Hyderabad |
| SALARY | 2500 |
Using the following query, let us insert the given record into the H2 database query.
MERGE INTO CUSTOMER KEY (ID) VALUES (8, ''Lokesh'', 32, ''Hyderabad'', 2500);
The above query produces the following output.
Update count: 1
Let us verify the records of the Customer table by executing the following query.
SELECT * FROM CUSTOMER;
The above query produces the following output.
| ID | Name | Age | Address | Salary |
|---|---|---|---|---|
| 1 | Ramesh | 32 | Ahmedabad | 2000 |
| 2 | Khilan | 25 | Delhi | 1500 |
| 3 | Kaushik | 23 | Kota | 2000 |
| 4 | Chaitali | 25 | Mumbai | 6500 |
| 5 | Hardik | 27 | Bhopal | 8500 |
| 6 | Komal | 22 | MP | 4500 |
| 7 | Muffy | 24 | Indore | 10000 |
| 8 | Lokesh | 32 | Hyderabad | 2500 |
Now let us try to update the record using the Merge command. Following are the details of the record to be updated.
| Column Name | Value |
|---|---|
| ID | 8 |
| NAME | Loki |
| AGE | 32 |
| ADDRESS | Hyderabad |
| SALARY | 3000 |
Use the following query to insert the given record into the H2 database query.
MERGE INTO CUSTOMER KEY (ID) VALUES (8, ''Loki'', 32, ''Hyderabad'', 3000);
The above query produces the following output.
Update count: 1
Let us verify the records of the Customer table by executing the following query.
SELECT * FROM CUSTOMER;
The above query produces the following output −
| ID | Name | Age | Address | Salary |
|---|---|---|---|---|
| 1 | Ramesh | 32 | Ahmedabad | 2000 |
| 2 | Khilan | 25 | Delhi | 1500 |
| 3 | Kaushik | 23 | Kota | 2000 |
| 4 | Chaitali | 25 | Mumbai | 6500 |
| 5 | Hardik | 27 | Bhopal | 8500 |
| 6 | Komal | 22 | MP | 4500 |
| 7 | Muffy | 24 | Indore | 10000 |
| 8 | Loki | 32 | Hyderabad | 3000 |
H2 Database – Show
SHOW is a command used to display the list of Schemas, Tables, or Columns of the table.
Syntax
Following is the generic syntax of the SHOW command.
SHOW { SCHEMAS | TABLES [ FROM schemaName ] |
COLUMNS FROM tableName [ FROM schemaName ] }
Example
The following command can be used to get the list of tables in the current database.
SHOW TABLES;
The above command produces the following output.
| TABLE_NAME | TABLE_SCHEMA |
|---|---|
| CUSTOMER | PUBLIC |
| EMP | PUBLIC |
H2 Database – Create
CREATE is a generic SQL command used to create Tables, Schemas, Sequences, Views, and Users in H2 Database server.
Create Table
Create Table is a command used to create a user-defined table in the current database.
Syntax
Following is the generic syntax for the Create Table command.
CREATE [ CACHED | MEMORY ] [ TEMP | [ GLOBAL | LOCAL ] TEMPORARY ]
TABLE [ IF NOT EXISTS ] name
[ ( { columnDefinition | constraint } [,...] ) ]
[ ENGINE tableEngineName [ WITH tableEngineParamName [,...] ] ]
[ NOT PERSISTENT ] [ TRANSACTIONAL ]
[ AS select ]
By using the generic syntax of the Create Table command, we can create different types of tables such as cached tables, memory tables, and temporary tables. Following is the list to describe different clauses from the given syntax.
-
CACHED − The cached tables are the default type for regular tables. This means the number of rows is not limited by the main memory.
-
MEMORY − The memory tables are the default type for temporary tables. This means the memory tables should not get too large and the index data is kept in the main memory.
-
TEMPORARY − Temporary tables are deleted while closing or opening a database. Basically, temporary tables are of two types −
-
GLOBAL type − Accessible by all connections.
-
LOCAL type − Accessible by the current connection.
The default type for temporary tables is global type. Indexes of temporary tables are kept in the main memory, unless the temporary table is created using CREATE CACHED TABLE.
-
-
ENGINE − The ENGINE option is only required when custom table implementations are used.
-
NOT PERSISTENT − It is a modifier to keep the complete table data in-memory and all rows are lost when the database is closed.
-
TRANSACTIONAL − It is a keyword that commits an open transaction and this command supports only temporary tables.
Example
In this example, let us create a table named tutorials_tbl using the following given data.
| Sr.No | Column Name | Data Type |
|---|---|---|
| 1 | ID | Int |
| 2 | Title | Varchar(50) |
| 3 | Author | Varchar(20) |
| 4 | Submission_date | Date |
The following query is used to create a table tutorials_tbl along with the given column data.
CREATE TABLE tutorials_tbl (
   id INT NOT NULL,
   title VARCHAR(50) NOT NULL,
   author VARCHAR(20) NOT NULL,
   submission_date DATE
);
The above query produces the following output.
(0) rows effected
Create Schema
Create Schema is a command used to create a user-dependent schema under a particular authorization (under the currently registered user).
Syntax
Following is the generic syntax of the Create Schema command.
CREATE SCHEMA [ IF NOT EXISTS ] name [ AUTHORIZATION ownerUserName ]
In the above generic syntax, AUTHORIZATION is a keyword used to provide the respective user name. This command is optional which means if we are not providing the user name, then it will consider the current user. The user that executes the command must have admin rights, as well as the owner.
This command commits an open transaction in this connection.
Example
In this example, let us create a schema named test_schema under SA user, using the following command.
CREATE SCHEMA test_schema AUTHORIZATION sa;
The above command produces the following output.
(0) rows effected
Create Sequence
Sequence is concept which is used to generate a number by following a sequence for id or any random column values.
Syntax
Following is the generic syntax of the create sequence command.
CREATE SEQUENCE [ IF NOT EXISTS ] newSequenceName [ START WITH long ]
[ INCREMENT BY long ]
[ MINVALUE long | NOMINVALUE | NO MINVALUE ]
[ MAXVALUE long | NOMAXVALUE | NO MAXVALUE ]
[ CYCLE long | NOCYCLE | NO CYCLE ]
[ CACHE long | NOCACHE | NO CACHE ]
This generic syntax is used to create a sequence. The datatype of a sequence is BIGINT. In this the sequence, values are never re-used, even when the transaction is roll backed.
Example
In this example, let us create a sequence named SEQ_ID, using the following query.
CREATE SEQUENCE SEQ_ID;
The above query produces the following output.
(0) rows effected
H2 Database – Alter
ALTER is a command used to change the table structure by adding different clauses to the alter command. Based on the scenario, we need to add respective clause to the alter command. In this chapter, we will discuss various scenarios of alter command.
Alter Table Add
Alter Table Add is a command used to add a new column to a table along with the respective data type. This command commits the transaction in this connection.
Syntax
Following is the generic syntax of the Alter Table Add command.
ALTER TABLE [ IF EXISTS ] tableName ADD [ COLUMN ]
{ [ IF NOT EXISTS ] columnDefinition [ { BEFORE | AFTER } columnName ]
   | ( { columnDefinition } [,...] ) }
Example
In this example, we will add a new column start_date to the table tutorials_tbl. The datatype for start_date is Date. Following is the query to add a new column.
ALTER TABLE tutorials_tbl ADD start_date DATE;
The above query produces the following output.
(6) rows effected
Alter Table Add Constraint
Alter table add constraint is a command used to add different constraints to the table such as primary key, foreign key, not null, etc.
The required indexes are automatically created if they don’t exist yet. It is not possible to disable checking for unique constraint. This command commits an open transaction in this connection.
Syntax
Following is the generic syntax of the Alter table add constraint command.
ALTER TABLE [ IF EXISTS ] tableName ADD constraint [ CHECK | NOCHECK ]
Example
In this example, let us add a primary key constraint (tutorials_tbl_pk) to the column id of the table tutorials_tbl, using the following query.
ALTER TABLE tutorials_tbl ADD CONSTRAINT tutorials_tbl_pk PRIMARYKEY(id);
The above query produces the following output.
(6) row (s) effected
Alter Table Rename Constraint
This command is used to rename the constraint name of a particular relation table. This command commits an open transaction in this connection.
Syntax
Following is the generic syntax of the Alter Table Rename Constraint command.
ALTER TABLE [ IF EXISTS ] tableName RENAME oldConstraintName TO newConstraintName
While using this syntax, make sure that the old constraint name should exist with the respective column.
Example
In this example, we will change the primary key constraint name of the table tutorials_tbl from tutorials_tbl_pk to tutorials_tbl_pk_constraint. Following is the query to do so.
ALTER TABLE tutorials_tbl RENAME CONSTRAINT
tutorials_tbl_pk TO tutorials_tbl_pk_constraint;
The above query produces the following output.
(1) row (s) effected
Alter Table Alter Column
This command is used to change the structure and properties of the column of a particular table. Changing the properties means changing the datatype of a column, rename a column, change the identity value, or change the selectivity.
Syntax
Following is the generic syntax of the Alter Table Alter Column command.
ALTER TABLE [ IF EXISTS ] tableName ALTER COLUMN columnName
{ { dataType [ DEFAULT expression ] [ [ NOT ] NULL ] [ AUTO_INCREMENT | IDENTITY ] }
| { RENAME TO name }
| { RESTART WITH long }
| { SELECTIVITY int }
| { SET DEFAULT expression }
| { SET NULL }
| { SET NOT NULL } }
In the above syntax −
-
RESTART − command changes the next value of an auto increment column.
-
SELECTIVITY − command sets the selectivity (1-100) for a column. Based on the selectivity value we can image the value of the column.
-
SET DEFAULT − changes the default value of a column.
-
SET NULL − sets the column to allow NULL.
-
SET NOT NULL − sets the column to allow NOT NULL.
Example
In this example, we will rename the column of the table tutorials_tbl from Title to Tutorial_Title using the following query.
ALTER TABLE tutorials_tbl ALTER COLUMN title RENAME TO tutorial_title;
The above query produces the following output.
(0) row(s) effected
In a similar way, we can perform different scenarios with the ALTER command.
H2 Database – Drop
DROP is a command taken from the generic SQL grammar. This command is used to delete a database component and its structure from the memory. There are different scenarios with the Drop command that we will discuss in this chapter.
Drop Table
Drop Table is a command that deletes the respective table and its structure.
Syntax
Following is the generic syntax of the Drop Table command.
DROP TABLE [ IF EXISTS ] tableName [,...] [ RESTRICT | CASCADE ]
The command will fail if we are using RESTRICT and the table having dependent views exist. All dependent views are dropped, when we are using CASCADE keyword.
Example
In this example, we will drop a table named test using the following query.
DROP TABLE test;
The above query produces the following output.
(6) row (s) effected
Drop Schema
Drop Schema is a command that drops a respective schema from the database server. It will not work from the current schema.
Syntax
DROP SCHEMA [ IF EXISTS ] schemaName
Example
In this example, we will drop a schema named test_schema using the following query.
DROP SCHEMA TEST_SCHEMA;
The above query produces the following output.
(0) row(s) effected
Drop Sequence
Drop Sequence is a command used to drop a sequence from the table structure.
Syntax
Following is the generic syntax of the Drop Sequence command.
DROP SEQUENCE [ IF EXISTS ] sequenceName
This command commits an open transaction in this connection.
Example
In this example, we will drop a sequence named sequence_id. Following is the command.
DROP SEQUENCE sequence_id;
The above command produces the following output.
(0) row (s) effected
Drop View
Drop View is a command used to drop the existing view. All dependent views are dropped as well if the CASCADE clause is used.
Syntax
Following is the generic syntax of the Drop View command.
DROP VIEW [ IF EXISTS ] viewName [ RESTRICT | CASCADE ]
Example
In this example, we will drop a view named sample_view using the following query.
DROP VIEW sample_view;
The above query produces the following output.
(0) row (s) effected
H2 Database – Truncate
TRUNCATE is a command used to delete the data from the table. Unlike DELETE FROM without WHERE clause, this command cannot be rolled back. This command commits an open transaction in this connection.
Syntax
Following is the generic syntax of the truncate command.
TRUNCATE TABLE tableName
Example
In this example, we will truncate a table named test using the following query.
TRUNCATE TABLE test;
The above query produces the following output.
(6) row (s) effected
H2 Database – Commit
COMMIT is a command from the SQL grammar used to commit the transaction. We can either commit the specific transaction or we can commit the currently executed transaction.
Syntax
There are two different syntaxes for COMMIT command.
Following is the generic syntax for the commit command to commit the current transaction.
COMMIT [ WORK ]
Following is the generic syntax for the commit command to commit the specific transaction.
COMMIT TRANSACTION transactionName
Example 1
In this example, let us commit the current transaction using the following command.
COMMIT
The above command produces the following output.
Committed successfully
Example 2
In this example, we will commit the transaction named tx_test using the following command.
COMMIT TRANSACTION tx_test;
The above command produces the following output.
Committed successfully
H2 Database – Grant
Grant is a command coming from the SQL grammar used to grant the rights to a table, to a user, or to a role. Admin rights are required to execute this command. This command commits an open transaction in this connection.
In this chapter, we will discuss the different scenarios of Grant command.
Grant Right
Grant Right is a command to provide admin rights to a table, to a user, or to a role.
Syntax
Following is the generic syntax of the Grant command.
GRANT { SELECT | INSERT | UPDATE | DELETE | ALL } [,...] ON
{ { SCHEMA schemaName } | { tableName [,...] } }
TO { PUBLIC | userName | roleName }
Example
In this example, we will grant the test table as read-only using the following command.
GRANT SELECT ON TEST TO READONLY
The above command produces the following output.
Grant successfully
Grant Alter Any Schema
Grant Alter Any Schema is a command to grant schema altering rights to a respective user.
Syntax
Following is the generic syntax of the Grant Alter Any Schema command.
GRANT ALTER ANY SCHEMA TO userName
Example
In this example, we will grant altering privileges of a schema to a user named test_user. Make sure that test_user exists. Following is the query to grant altering privileges.
GRANT ALTER ANY SCHEMA TO test_user;
The above query produces the following output.
Granted successfully to test_user
H2 Database – Savepoint
SAVEPOINT is a command used to temporarily save the transaction. It is better to maintain savepoints in your transaction as it is helpful to roll back the transaction to the respective Savepoint whenever necessary.
Syntax
Following is the generic syntax of the Savepoint command.
SAVEPOINT savepointName
Example
In this example, we will create a Savepoint named Half_Done using the following command.
SAVEPOINT Half_Done;
The above command produces the following output.
Savepoint created
H2 Database – Rollback
ROLLBACK is a command from the SQL grammar used to roll back the transaction to a Savepoint or to the previous transaction. By using this command, we can either roll back to the specific Savepoint or we can roll back to the previous executed transaction.
Syntax
There are two different syntaxes for ROLLABCK command.
Following is the generic syntax for the rollback command.
ROLLBACK [ TO SAVEPOINT savepointName ]
Following is the generic syntax of the Rollback command to the specific transaction.
ROLLBACK TRANSACTION transactionName
Example 1
In this example, we will roll back the current transaction to a Savepoint named sp1_test using the following command.
ROLLBACK sp1_test;
The above command produces the following output.
Rollback successfully
Example 2
In the following example, we will roll back the complete transaction named tx_test using the given command.
ROLLBACK TRANSACTION tx_test;
The above command produces the following output.
Rollback successfully
H2 Database – JDBC Connection
H2 is a JAVA database. We can interact with this database by using JDBC. In this chapter, we will see how to create a JDBC connection with H2 database and the CRUD operations with the H2 database.
Generally, there are five steps to create a JDBC connection.
Step 1 − Registering the JDBC database driver.
Class.forName ("org.h2.Driver");
Step 2 − Opening the connection.
Connection conn = DriverManager.getConnection ("jdbc:h2:~/test", "sa","");
Step 3 − Creating a statement.
Statement st = conn.createStatement();
Step 4 − Executing a statement and receiving Resultset.
Stmt.executeUpdate("sql statement");
Step 5 − Closing a connection.
conn.close();
Before moving on to create a full program, we need to add h2-1.4.192.jar file to CLASSPATH. We can get this jar from the folder C:Program Files (x86)H2bin.
Create Table
In this example, we will write a program for create table. Consider a table named Registration having the following fields.
| S.No | Column Name | Data Type | NOT NULL | Primary Key |
|---|---|---|---|---|
| 1 | ID | Number | Yes | Yes |
| 2 | First | Varchar(255) | No | No |
| 3 | Last | Varchar(255) | No | No |
| 4 | Age | Number | No | No |
Following is an example program named H2jdbcCreateDemo.
import java.sql.Connection;
import java.sql.DriverManager;
import java.sql.SQLException;
import java.sql.Statement;

public class H2jdbcCreateDemo {
   // JDBC driver name and database URL
   static final String JDBC_DRIVER = "org.h2.Driver";
   static final String DB_URL = "jdbc:h2:~/test";

   //  Database credentials
   static final String USER = "sa";
   static final String PASS = "";

   public static void main(String[] args) {
      Connection conn = null;
      Statement stmt = null;
      try {
         // STEP 1: Register JDBC driver
         Class.forName(JDBC_DRIVER);

         //STEP 2: Open a connection
         System.out.println("Connecting to database...");
         conn = DriverManager.getConnection(DB_URL,USER,PASS);

         //STEP 3: Execute a query
         System.out.println("Creating table in given database...");
         stmt = conn.createStatement();
         String sql =  "CREATE TABLE   REGISTRATION " +
            "(id INTEGER not NULL, " +
            " first VARCHAR(255), " +
            " last VARCHAR(255), " +
            " age INTEGER, " +
            " PRIMARY KEY ( id ))";
         stmt.executeUpdate(sql);
         System.out.println("Created table in given database...");

         // STEP 4: Clean-up environment
         stmt.close();
         conn.close();
      } catch(SQLException se) {
         //Handle errors for JDBC
         se.printStackTrace();
      } catch(Exception e) {
         //Handle errors for Class.forName
         e.printStackTrace();
      } finally {
         //finally block used to close resources
         try{
            if(stmt!=null) stmt.close();
         } catch(SQLException se2) {
         } // nothing we can do
         try {
            if(conn!=null) conn.close();
         } catch(SQLException se){
            se.printStackTrace();
         } //end finally try
      } //end try
      System.out.println("Goodbye!");
   }
}
Save the above program into H2jdbcCreateDemo.java. Compile and execute the above program by executing the following commands in the command prompt.
>javac H2jdbcCreateDemo.java
>java H2jdbcCreateDemo
The above command produces the following output.
Connecting to database...
Creating table in given database...
Created table in given database...
Goodbye!
After this execution, we can check the table created using the H2 SQL interface.
Insert Records
In this example, we will write a program for inserting records. Let us insert the following records into the table Registration.
| ID | First | Last | Age |
|---|---|---|---|
| 100 | Zara | Ali | 18 |
| 101 | Mahnaz | Fatma | 25 |
| 102 | Zaid | Khan | 30 |
| 103 | Sumit | Mital | 28 |
Following is an example program named H2jdbcInsertDemo.
import java.sql.Connection;
import java.sql.DriverManager;
import java.sql.SQLException;
import java.sql.Statement;

public class H2jdbcInsertDemo {
   // JDBC driver name and database URL
   static final String JDBC_DRIVER = "org.h2.Driver";
   static final String DB_URL = "jdbc:h2:~/test";

   //  Database credentials
   static final String USER = "sa";
   static final String PASS = "";

   public static void main(String[] args) {
      Connection conn = null;
      Statement stmt = null;
      try{
         // STEP 1: Register JDBC driver
         Class.forName(JDBC_DRIVER);

         // STEP 2: Open a connection
         System.out.println("Connecting to a selected database...");
         conn = DriverManager.getConnection(DB_URL,USER,PASS);
         System.out.println("Connected database successfully...");

         // STEP 3: Execute a query
         stmt = conn.createStatement();
         String sql = "INSERT INTO Registration " + "VALUES (100, ''Zara'', ''Ali'', 18)";

         stmt.executeUpdate(sql);
         sql = "INSERT INTO Registration " + "VALUES (101, ''Mahnaz'', ''Fatma'', 25)";

         stmt.executeUpdate(sql);
         sql = "INSERT INTO Registration " + "VALUES (102, ''Zaid'', ''Khan'', 30)";

         stmt.executeUpdate(sql);
         sql = "INSERT INTO Registration " + "VALUES(103, ''Sumit'', ''Mittal'', 28)";

         stmt.executeUpdate(sql);
         System.out.println("Inserted records into the table...");

         // STEP 4: Clean-up environment
         stmt.close();
         conn.close();
      } catch(SQLException se) {
         // Handle errors for JDBC
         se.printStackTrace();
      } catch(Exception e) {
         // Handle errors for Class.forName
         e.printStackTrace();
      } finally {
         // finally block used to close resources
         try {
            if(stmt!=null) stmt.close();
         } catch(SQLException se2) {
         } // nothing we can do
         try {
            if(conn!=null) conn.close();
         } catch(SQLException se) {
            se.printStackTrace();
         } // end finally try
      } // end try
      System.out.println("Goodbye!");
   }
}
Save the above program into H2jdbcInsertDemo.java. Compile and execute the above program by executing the following commands in the command prompt.
>javac H2jdbcInsertDemo.java
>java H2jdbcInsertDemo
The above command produces the following output.
Connecting to a selected database...
Connected database successfully...
Inserted records into the table...
Goodbye!
Read Record
In this example, we will write a program for reading records. Let us try to read all records from the table Registration.
Following is an example program named H2jdbcRecordDemo.
import java.sql.Connection;
import java.sql.DriverManager;
import java.sql.ResultSet;
import java.sql.SQLException;
import java.sql.Statement;

public class H2jdbcReadDemo {
   // JDBC driver name and database URL
   static final String JDBC_DRIVER = "org.h2.Driver";
   static final String DB_URL = "jdbc:h2:~/test";

   //  Database credentials
   static final String USER = "sa";
   static final String PASS = "";

   public static void main(String[] args) {
      Connection conn = null;
      Statement stmt = null;
      try {
         // STEP 1: Register JDBC driver
         Class.forName(JDBC_DRIVER);

         // STEP 2: Open a connection
         System.out.println("Connecting to database...");
         conn = DriverManager.getConnection(DB_URL,USER,PASS);

         // STEP 3: Execute a query
         System.out.println("Connected database successfully...");
         stmt = conn.createStatement();
         String sql = "SELECT id, first, last, age FROM Registration";
         ResultSet rs = stmt.executeQuery(sql);

         // STEP 4: Extract data from result set
         while(rs.next()) {
            // Retrieve by column name
            int id  = rs.getInt("id");
            int age = rs.getInt("age");
            String first = rs.getString("first");
            String last = rs.getString("last");

            // Display values
            System.out.print("ID: " + id);
            System.out.print(", Age: " + age);
            System.out.print(", First: " + first);
            System.out.println(", Last: " + last);
         }
         // STEP 5: Clean-up environment
         rs.close();
      } catch(SQLException se) {
         // Handle errors for JDBC
         se.printStackTrace();
      } catch(Exception e) {
         // Handle errors for Class.forName
         e.printStackTrace();
      } finally {
         // finally block used to close resources
         try {
            if(stmt!=null) stmt.close();
         } catch(SQLException se2) {
         } // nothing we can do
         try {
            if(conn!=null) conn.close();
         } catch(SQLException se) {
            se.printStackTrace();
         } // end finally try
      } // end try
      System.out.println("Goodbye!");
   }
}
Save the above program into H2jdbcReadDemo.java. Compile and execute the above program by executing the following commands in the command prompt.
>javac H2jdbcReadDemo.java
>java H2jdbcReadDemo
The above command produces the following output.
Connecting to a selected database...
Connected database successfully...
ID: 100, Age: 18, First: Zara, Last: Ali
ID: 101, Age: 25, First: Mahnaz, Last: Fatma
ID: 102, Age: 30, First: Zaid, Last: Khan
ID: 103, Age: 28, First: Sumit, Last: Mittal
Goodbye!
Update Records
In this example, we will write a program to update records. Let us try to read all records from the table Registration.
Following is an example program named H2jdbcUpdateDemo.
import java.sql.Connection;
import java.sql.DriverManager;
import java.sql.ResultSet;
import java.sql.SQLException;
import java.sql.Statement;

public class H2jdbcUpdateDemo {
   // JDBC driver name and database URL
   static final String JDBC_DRIVER = "org.h2.Driver";
   static final String DB_URL = "jdbc:h2:~/test";

   // Database credentials
   static final String USER = "sa";
   static final String PASS = "";

   public static void main(String[] args) {
      Connection conn = null;
      Statement stmt = null;
      try {
         // STEP 1: Register JDBC driver
         Class.forName(JDBC_DRIVER);

         // STEP 2: Open a connection
         System.out.println("Connecting to a database...");
         conn = DriverManager.getConnection(DB_URL,USER,PASS);

         // STEP 3: Execute a query
         System.out.println("Connected database successfully...");
         stmt = conn.createStatement();
         String sql = "UPDATE Registration " + "SET age = 30 WHERE id in (100, 101)";
         stmt.executeUpdate(sql);

         // Now you can extract all the records
         // to see the updated records
         sql = "SELECT id, first, last, age FROM Registration";
         ResultSet rs = stmt.executeQuery(sql);

         while(rs.next()){
            // Retrieve by column name
            int id  = rs.getInt("id");
            int age = rs.getInt("age");
            String first = rs.getString("first");
            String last = rs.getString("last");

            // Display values
            System.out.print("ID: " + id);
            System.out.print(", Age: " + age);
            System.out.print(", First: " + first);
            System.out.println(", Last: " + last);
         }
         rs.close();
      } catch(SQLException se) {
         // Handle errors for JDBC
         se.printStackTrace();
      } catch(Exception e) {
         // Handle errors for Class.forName
         e.printStackTrace();
      } finally {
         // finally block used to close resources
         try {
            if(stmt!=null) stmt.close();
         } catch(SQLException se2) {
         } // nothing we can do
         try {
            if(conn!=null) conn.close();
         } catch(SQLException se) {
            se.printStackTrace();
         } // end finally try
      } // end try
      System.out.println("Goodbye!");
   }
}
Save the above program into H2jdbcUpdateDemo.java. Compile and execute the above program by executing the following commands in the command prompt.
>javac H2jdbcUpdateDemo.java
>java H2jdbcUpdateDemo
The above command produces the following output.
Connecting to a selected database...
Connected database successfully...
ID: 100, Age: 30, First: Zara, Last: Ali
ID: 101, Age: 30, First: Mahnaz, Last: Fatma
ID: 102, Age: 30, First: Zaid, Last: Khan
ID: 103, Age: 28, First: Sumit, Last: Mittal
Goodbye!
Delete Records
In this example, we will write a program to delete records. Let us try to read all records from the table Registration.
Following is an example program named H2jdbcDeleteDemo.
import java.sql.Connection;
import java.sql.DriverManager;
import java.sql.ResultSet;
import java.sql.SQLException;
import java.sql.Statement;

public class H2jdbcDeleteDemo {
   // JDBC driver name and database URL
   static final String JDBC_DRIVER = "org.h2.Driver";
   static final String DB_URL = "jdbc:h2:~/test";

   // Database credentials
   static final String USER = "sa";
   static final String PASS = "";

   public static void main(String[] args) {
      Connection conn = null;
      Statement stmt = null;
      try {
         // STEP 1: Register JDBC driver
         Class.forName(JDBC_DRIVER);

         // STEP 2: Open a connection
         System.out.println("Connecting to database...");
         conn = DriverManager.getConnection(DB_URL,USER,PASS);

         // STEP 3: Execute a query
         System.out.println("Creating table in given database...");
         stmt = conn.createStatement();
         String sql = "DELETE FROM Registration " + "WHERE id = 101";
         stmt.executeUpdate(sql);

         // Now you can extract all the records
         // to see the remaining records
         sql = "SELECT id, first, last, age FROM Registration";
         ResultSet rs = stmt.executeQuery(sql);

         while(rs.next()){
            // Retrieve by column name
            int id  = rs.getInt("id");
            int age = rs.getInt("age");
            String first = rs.getString("first");
            String last = rs.getString("last");

            // Display values
            System.out.print("ID: " + id);
            System.out.print(", Age: " + age);
            System.out.print(", First: " + first);
            System.out.println(", Last: " + last);
         }
         rs.close();
      } catch(SQLException se) {
         // Handle errors for JDBC
         se.printStackTrace();
      } catch(Exception e) {
         // Handle errors for Class.forName
         e.printStackTrace();
      } finally {
         // finally block used to close resources
         try {
            if(stmt!=null) stmt.close();
         } catch(SQLException se2) {
         } // nothing we can do
         try {
            if(conn!=null) conn.close();
         } catch(SQLException se) {
            se.printStackTrace();
         } // end finally try
      } // end try
      System.out.println("Goodbye!");
   }
}
Save the above program into H2jdbcDeleteDemo.java. Compile and execute the above program by executing the following commands in the command prompt.
>javac H2jdbcDeleteDemo.java
>java H2jdbcDeleteDemo
The above command produces the following output.
Connecting to a selected database...
Connected database successfully...
ID: 100, Age: 30, First: Zara, Last: Ali
ID: 102, Age: 30, First: Zaid, Last: Khan
ID: 103, Age: 28, First: Sumit, Last: Mittal
Goodbye!
Khóa học lập trình tại Toidayhoc vừa học vừa làm dự án vừa nhận lương: Khóa học lập trình nhận lương tại trung tâm Toidayhoc