Category: documentdb

  • Khóa học miễn phí DocumentDB – Advantages nhận dự án làm có lương

    DocumentDB – Advantages


    DocumentDB stands out with some very unique capabilities. Azure DocumentDB offers the following key capabilities and benefits.

    Schema Free

    In a relational database, every table has a schema that defines the columns and data types that each row in the table must conform to.

    In contrast, a document database has no defined schema, and every document can be structured differently.

    SQL Syntax

    DocumentDB enables complex ad-hoc queries using SQL language, and every document is instantly queryable the moment it”s created. You can search on any property anywhere within the document hierarchy.

    Tunable Consistency

    It provides some granular, well-defined consistency levels, which allows you to make sound trade-offs between consistency, availability, and latency.

    You can select from four well-defined consistency levels to achieve optimal trade-off between consistency and performance. For queries and read operations, DocumentDB offers four distinct consistency levels −

    • Strong
    • Bounded-staleness
    • Session
    • Eventual

    Elastic Scale

    Scalability is the name of the game with NoSQL, and DocumentDB delivers. DocumentDB has already been proven its scale.

    • Major services like Office OneNote and Xbox are already backed by DocumentDB with databases containing tens of terabytes of JSON documents, over a million active users, and operating consistently with 99.95% availability.

    • You can elastically scale DocumentDB with predictable performance by creating more units as your application grows.

    Fully Managed

    DocumentDB is available as a fully managed cloud-based platform as a service running on Azure.

    • There is simply nothing for you to install or manage.

    • There are no servers, cables, no operating systems or updates to deal with, no replicas to set up.

    • Microsoft does all that work and keeps the service running.

    • Within literally minutes, you can get started working with DocumentDB using just a browser and an Azure subscription.


    Khóa học lập trình tại Toidayhoc vừa học vừa làm dự án vừa nhận lương: Khóa học lập trình nhận lương tại trung tâm Toidayhoc

  • Khóa học miễn phí DocumentDB – Create Account nhận dự án làm có lương

    DocumentDB – Create Account


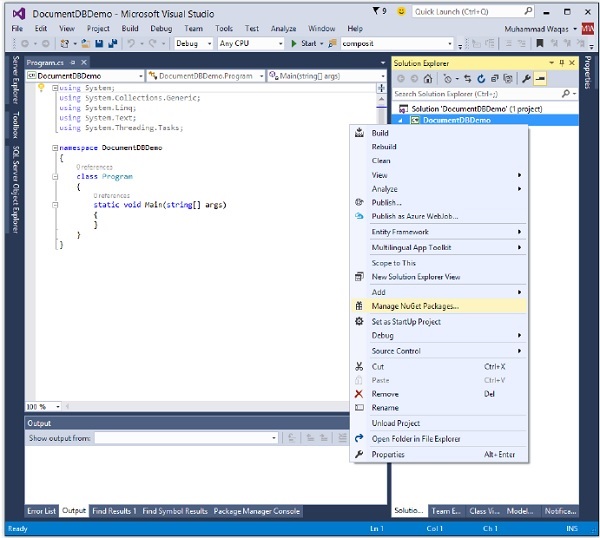
    To use Microsoft Azure DocumentDB, you must create a DocumentDB account. In this chapter, we will create a DocumentDB account using Azure portal.

    Step 1 − Log in to the online if you already have an Azure subscription otherwise you need to sign in first.

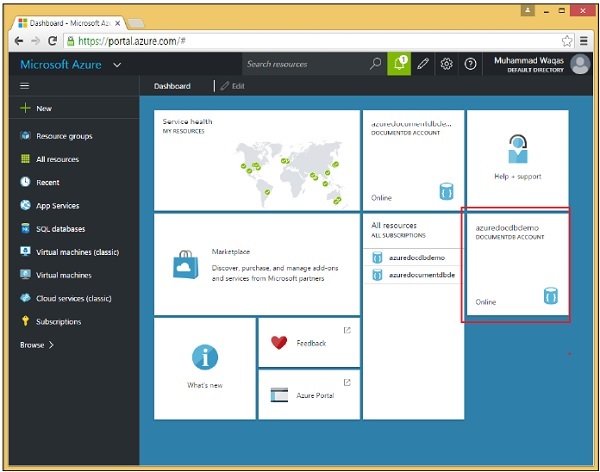
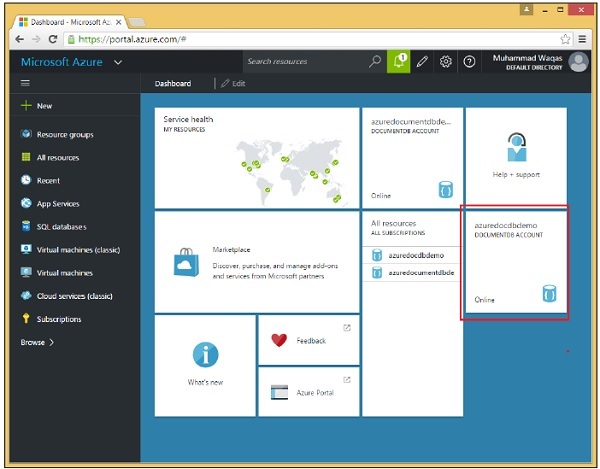
    You will see the main Dashboard. It is fully customizable so you can arrange these tiles any way you like, resize them, add and remove tiles for things you frequently use or no longer do.

    Dashboard

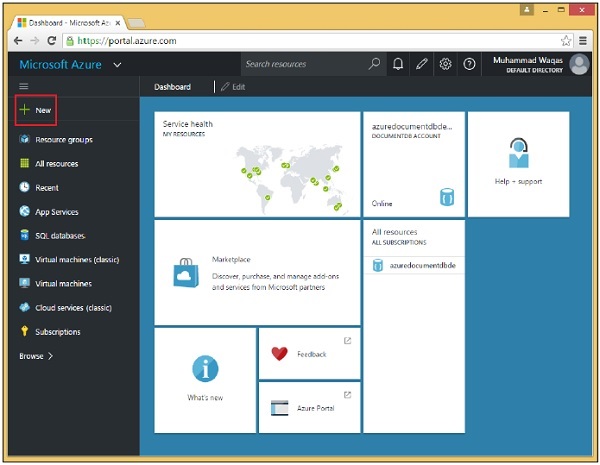
    Step 2 − Select the ‘New’ option on the top left side of the page.

    Select New Option

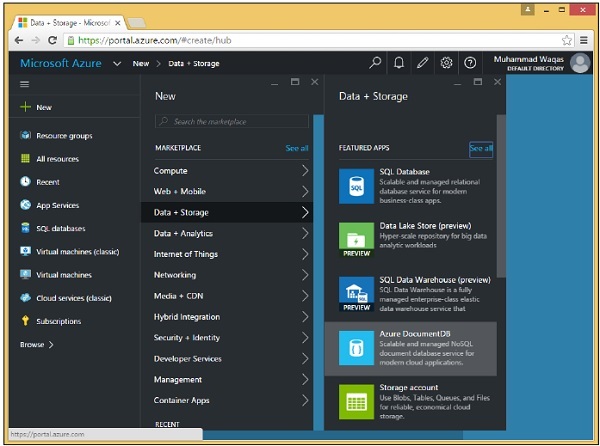
    Step 3 − Now select Data + Storage > Azure DocumentDB option and you see the following New DocumentDB account section.

    Azure DocumentDB

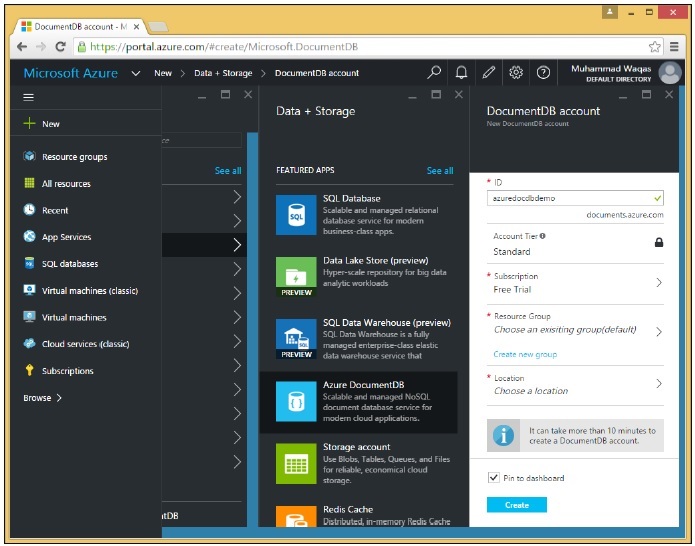
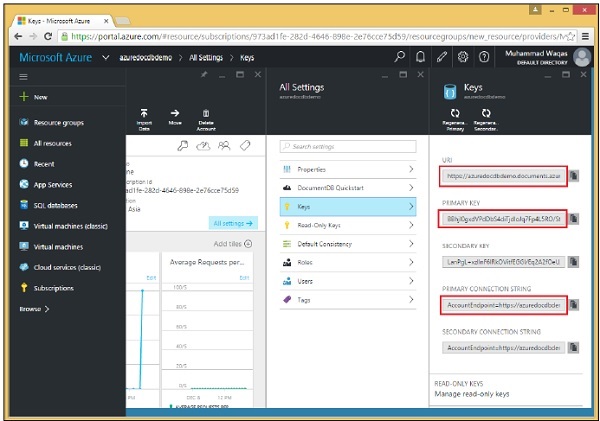
    We need to come up with a globally unique name (ID), which combined with .documents.azure.com is the publicly addressable endpoint to our DocumentDB account. All the databases we create beneath that account can be accessed over the internet using this endpoint.

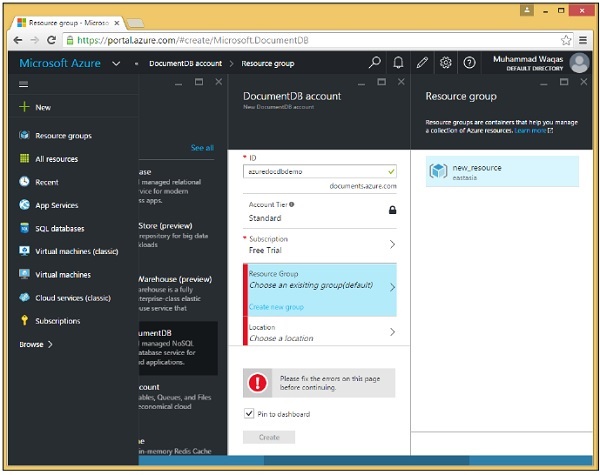
    Step 4 − Let’s name it azuredocdbdemo and click on Resource Group → new_resource.

    Resource Group

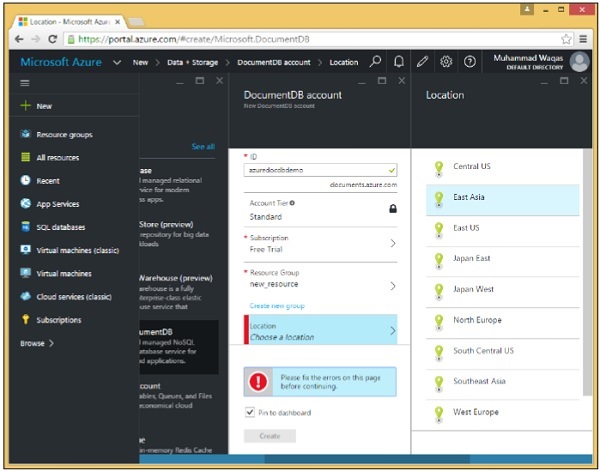
    Step 5 − Choose the location i.e., which Microsoft data center you want this account to be hosted. Select the location and choose your region.

    Select Location

    Step 6 − Check Pin to dashboard checkbox and just go ahead and click Create button.

    Create Button

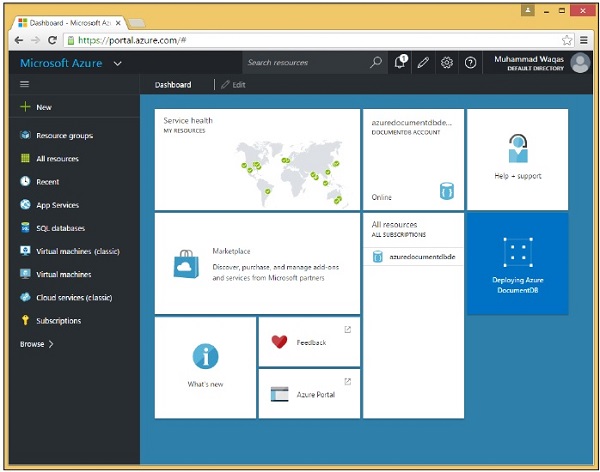
    You can see that the tile has already been added to the Dashboard, and it”s letting us know that the account is being created. It can actually take a few minutes to set things up for a new account while DocumentDB allocates the endpoint, provisions replicas, and performs other work in the background.

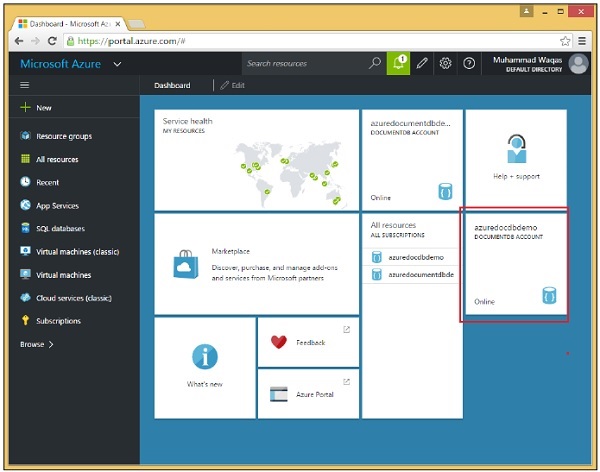
    Once it is done, you will see the dashboard.

    Account Dashboard

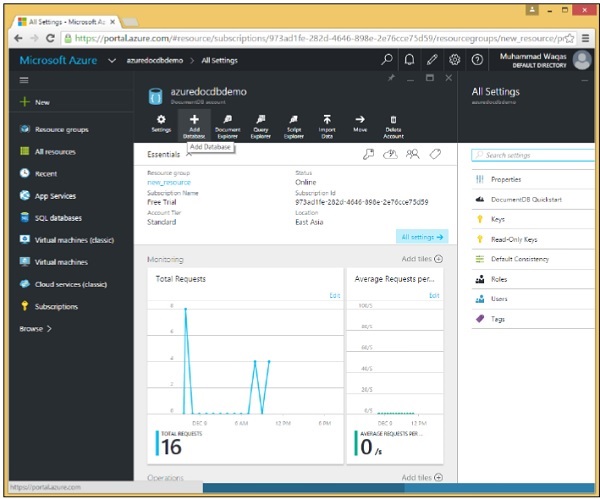
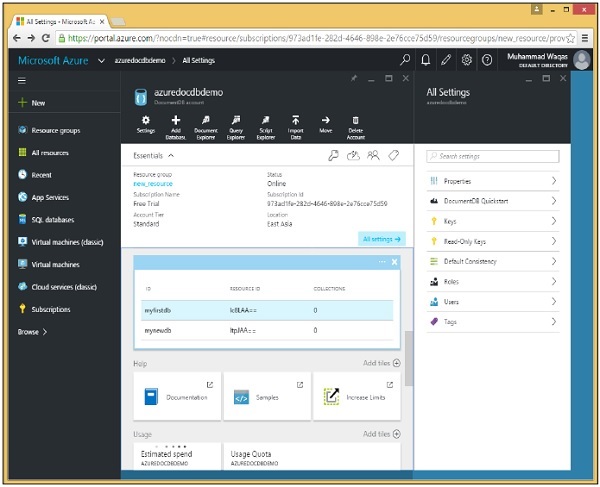
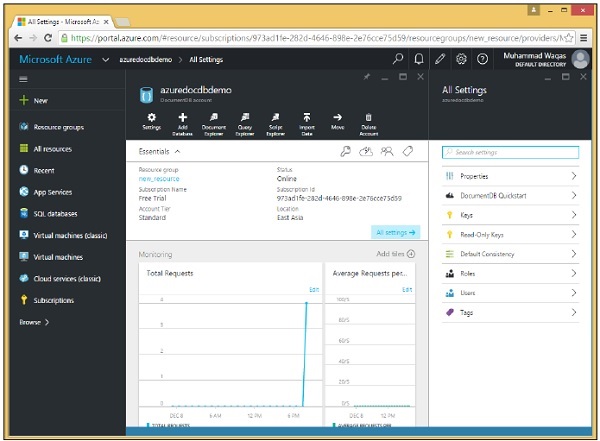
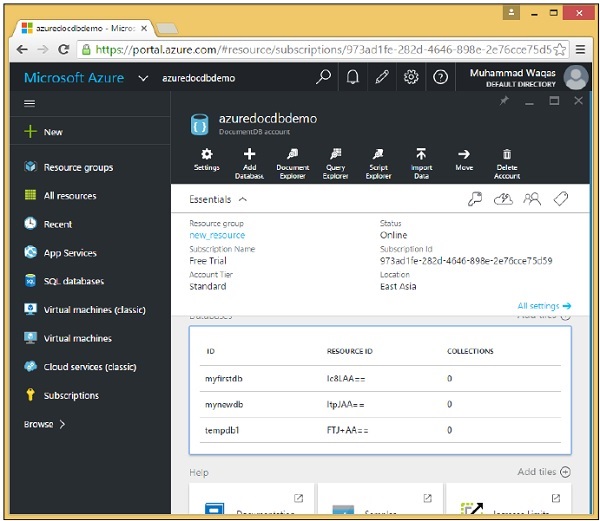
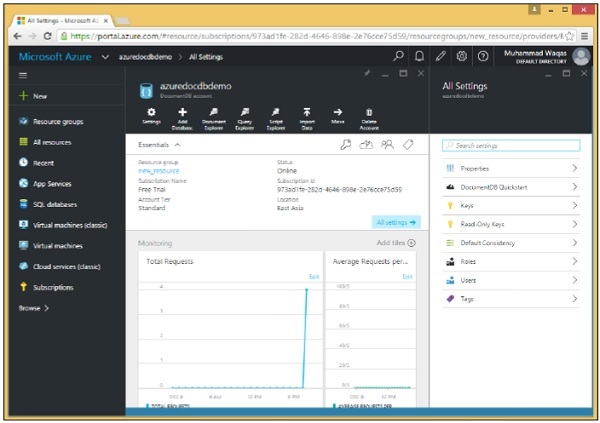
    Step 7 − Now click on the created DocumentDB account and you will see a detailed screen as the following image.

    Created Documentdb

    Khóa học lập trình tại Toidayhoc vừa học vừa làm dự án vừa nhận lương: Khóa học lập trình nhận lương tại trung tâm Toidayhoc

  • Khóa học miễn phí DocumentDB – Introduction nhận dự án làm có lương

    DocumentDB – Introduction


    In this chapter, we will briefly discuss the major concepts around NoSQL and document databases. We will also have a quick overview of DocumentDB.

    NoSQL Document Database

    DocumentDB is Microsoft”s newest NoSQL document database, so when you say NoSQL document database then, what precisely do we mean by NoSQL, and document database?

    • SQL means Structured Query Language which is traditional query language of relational databases. SQL is often equated with relational databases.

    • It”s really more helpful to think of a NoSQL database as a non-relational database, so NoSQL really means non-relational.

    There are different types of NoSQL databases which include key value stores such as −

    • Azure Table Storage.
    • Column-based stores like Cassandra.
    • Graph databases like NEO4.
    • Document databases like MongoDB and Azure DocumentDB.

    Azure DocumentDB

    Microsoft officially launched Azure DocumentDB on April 8th, 2015, and it certainly can be characterized as a typical NoSQL document database. It”s massively scalable, and it works with schema-free JSON documents.

    • DocumentDB is a true schema-free NoSQL document database service designed for modern mobile and web applications.

    • It also delivers consistently fast reads and writes, schema flexibility, and the ability to easily scale a database up and down on demand.

    • It does not assume or require any schema for the JSON documents it indexes.

    • DocumentDB automatically indexes every property in a document as soon as the document is added to the database.

    • DocumentDB enables complex ad-hoc queries using a SQL language, and every document is instantly queryable the moment it”s created, and you can search on any property anywhere within the document hierarchy.

    DocumentDB – Pricing

    DocumentDB is billed based on the number of collections contained in a database account. Each account can have one or more databases and each database can have a virtually unlimited number of collections, although there is an initial default quota of 100. This quota can be lifted by contacting Azure support.

    • A collection is not only a unit of scale, but also a unit of cost, so in DocumentDB you pay per collection, which has a storage capacity of up to 10 GB.

    • At a minimum, you”ll need one S1 collection to store documents in a database that will cost roughly $25 per month, which gets billed against your Azure subscription.

    • As your database grows in size and exceeds 10 GB, you”ll need to purchase another collection to contain the additional data.

    • Each S1 collection will give you 250 request units per second, and if that”s not enough, then you can scale the collection up to an S2 and get a 1000 request units per second for about $50 a month.

    • You can also turn it all the way up to an S3 and pay around $100 a month.


    Khóa học lập trình tại Toidayhoc vừa học vừa làm dự án vừa nhận lương: Khóa học lập trình nhận lương tại trung tâm Toidayhoc

  • Khóa học miễn phí DocumentDB – Create Database nhận dự án làm có lương

    DocumentDB – Create Database


    In this chapter, we will learn how to create a database. To use Microsoft Azure DocumentDB, you must have a DocumentDB account, a database, a collection, and documents. We already have a DocumentDB account, now to create database we have two options −

    • Microsoft Azure Portal or
    • .Net SDK

    Create a Database for DocumentDB using the Microsoft Azure Portal

    To create a database using portal, following are the steps.

    Step 1 − Login to Azure portal and you will see the dashboard.

    Login to portal

    Step 2 − Now click on the created DocumentDB account and you will see the details as shown in the following screenshot.

    click on created DocumentDB

    Step 3 − Select the Add Database option and provide the ID for your database.

    Select Add Database

    Step 4 − Click OK.

    Database added

    You can see that the database is added. At the moment, it has no collection, but we can add collections later which are the containers that will store our JSON documents. Notice that it has both an ID and a Resource ID.

    Create a Database for DocumentDB Using .Net SDK

    To create a database using .Net SDK, following are the steps.

    Step 1 − Open the Console Application in Visual Studio from the last chapter.

    Step 2 − Create the new database by creating a new database object. To create a new database, we only need to assign the Id property, which we are setting to “mynewdb” in a CreateDatabase task.

    private async static Task CreateDatabase(DocumentClient client) {
       Console.WriteLine();
       Console.WriteLine("******** Create Database *******");
    
       var databaseDefinition = new Database { Id = "mynewdb" };
       var result = await client.CreateDatabaseAsync(databaseDefinition);
       var database = result.Resource;
    
       Console.WriteLine(" Database Id: {0}; Rid: {1}", database.Id, database.ResourceId);
       Console.WriteLine("******** Database Created *******");
    }
    

    Step 3 − Now pass this databaseDefinition on to CreateDatabaseAsync, and get back a result with a Resource property. All the create object methods return a Resource property that describes the item that was created, which is a database in this case.

    We get the new database object from the Resource property and it is displayed on the Console along with the Resource ID that DocumentDB assigned to it.

    Step 4 − Now call CreateDatabase task from the CreateDocumentClient task after DocumentClient is instantiated.

    using (var client = new DocumentClient(new Uri(EndpointUrl), AuthorizationKey)) {
       await CreateDatabase(client);
    }
    

    Following is the complete Program.cs file so far.

    using System;
    using System.Collections.Generic;
    using System.Linq;
    using System.Text;
    using System.Threading.Tasks;
    
    using Microsoft.Azure.Documents;
    using Microsoft.Azure.Documents.Client;
    using Microsoft.Azure.Documents.Linq;
    using Newtonsoft.Json;
    
    namespace DocumentDBDemo {
    
       class Program {
          private const string EndpointUrl = "https://azuredocdbdemo.documents.azure.com:443/";
    
          private const string AuthorizationKey = "BBhjI0gxdVPdDbS4diTjdloJq7Fp4L5RO/
             StTt6UtEufDM78qM2CtBZWbyVwFPSJIm8AcfDu2O+AfV T+TYUnBQ==";
    
          static void Main(string[] args) {
             try {
                CreateDocumentClient().Wait();
             } catch (Exception e) {
                Exception baseException = e.GetBaseException();
                Console.WriteLine("Error: {0}, Message: {1}", e.Message, baseException.Message);
             }
             Console.ReadKey();
          }
    
          private static async Task CreateDocumentClient() {
             // Create a new instance of the DocumentClient
             using (var client = new DocumentClient(new Uri(EndpointUrl), AuthorizationKey)) {
                await CreateDatabase(client);
             }
          }
    
          private async static Task CreateDatabase(DocumentClient client) {
             Console.WriteLine();
             Console.WriteLine("******** Create Database *******");
    
             var databaseDefinition = new Database { Id = "mynewdb" };
             var result = await client.CreateDatabaseAsync(databaseDefinition);
             var database = result.Resource;
    
             Console.WriteLine(" Database Id: {0}; Rid: {1}", database.Id, database.ResourceId);
             Console.WriteLine("******** Database Created *******");
          }
    
       }
    }
    

    When the above code is compiled and executed, you will receive the following output which contains the Database and Resources IDs.

    ******** Create Database *******
     Database Id: mynewdb; Rid: ltpJAA==
    ******** Database Created *******
    

    Khóa học lập trình tại Toidayhoc vừa học vừa làm dự án vừa nhận lương: Khóa học lập trình nhận lương tại trung tâm Toidayhoc

  • Khóa học miễn phí DocumentDB – Environment Setup nhận dự án làm có lương

    DocumentDB – Environment Setup


    Microsoft provides a free version of Visual Studio which also contains SQL Server and it can be downloaded from

    Installation

    Step 1 − Once downloading is completed, run the installer. The following dialog will be displayed.

    Installer

    Step 2 − Click on the Install button and it will start the installation process.

    Installation Process

    Step 3 − Once the installation process is completed successfully, you will see the following dialog.

    Restart Now

    Step 4 − Close this dialog and restart your computer if required.

    Step 5 − Now open Visual studio from start Menu which will open the below dialog. It will take some time for the first time only for preparation.

    open visual studio

    Once all is done, you will see the main window of Visual Studio.

    Main Window

    Step 6 − Let’s create a new project from File → New → Project.

    Create New Project

    Step 7 − Select Console Application, enter DocumentDBDemo in the Name field and click OK button.

    Step 8 − In solution Explorer, right-click on your project.

    Right click on project

    Step 9 − Select Manage NuGet Packages which will open the following window in Visual Studio and in the Search Online input box, search for DocumentDB Client Library.

    Manage NuGet Packages

    Step 10 − Install the latest version by clicking the install button.

    License Acceptance

    Step 11 − Click “I Accept”. Once installation is done you will see the message in your output window.

    Start Application

    You are now ready to start your application.


    Khóa học lập trình tại Toidayhoc vừa học vừa làm dự án vừa nhận lương: Khóa học lập trình nhận lương tại trung tâm Toidayhoc

  • Khóa học miễn phí DocumentDB – Create Collection nhận dự án làm có lương

    DocumentDB – Create Collection


    In this chapter, we will learn how to create a collection. It is similar to creating a database. You can create a collection either from the portal or from the code using .Net SDK.

    Step 1 − Go to main dashboard on Azure portal.

    Create Collection

    Step 2 − Select myfirstdb from the databases list.

    myfirstdb

    Step 3 − Click on the ‘Add Collection’ option and specify the ID for collection. Select the Pricing Tier for different option.

    Add Collection

    Step 4 − Let’s select S1 Standard and click Select → OK button.

    select S1 Standard

    As you can see that MyCollection is added to the myfirstdb.

    You can also create collection from the code by using .Net SDK. Let’s have a look at the following steps to add collections from the code.

    Step 1 − Open the Console application in Visual Studio.

    Step 2 − To create a collection, first retrieve the myfirstdb database by its ID in the CreateDocumentClient task.

    private static async Task CreateDocumentClient() {
    
       // Create a new instance of the DocumentClient
       using (var client = new DocumentClient(new Uri(EndpointUrl), AuthorizationKey)) {
          database = client.CreateDatabaseQuery("SELECT * FROM c WHERE c.id =
             ''myfirstdb''").AsEnumerable().First();
    
          await CreateCollection(client, "MyCollection1");
          await CreateCollection(client, "MyCollection2", "S2");
       }
    }
    

    Following is the implementation for CreateCollection task.

    private async static Task CreateCollection(DocumentClient client, string collectionId,
       string offerType = "S1") {
    
       Console.WriteLine();
       Console.WriteLine("**** Create Collection {0} in {1} ****", collectionId, database.Id);
    
       var collectionDefinition = new DocumentCollection { Id = collectionId };
       var options = new RequestOptions { OfferType = offerType };
       var result = await client.CreateDocumentCollectionAsync(database.SelfLink,
          collectionDefinition, options);
       var collection = result.Resource;
    
       Console.WriteLine("Created new collection");
       ViewCollection(collection);
    }
    

    We create a new DocumentCollection object that defines the new collection with the desired Id for the CreateDocumentCollectionAsync method which also accepts an options parameter that we”re using here to set the performance tier of the new collection, which we”re calling offerType.

    This defaults to S1 and since we didn”t pass in an offerType, for MyCollection1, so this will be an S1 collection and for MyCollection2 we have passed S2 which make this one an S2 as shown above.

    Following is the implementation of the ViewCollection method.

    private static void ViewCollection(DocumentCollection collection) {
       Console.WriteLine("Collection ID: {0} ", collection.Id);
       Console.WriteLine("Resource ID: {0} ", collection.ResourceId);
       Console.WriteLine("Self Link: {0} ", collection.SelfLink);
       Console.WriteLine("Documents Link: {0} ", collection.DocumentsLink);
       Console.WriteLine("UDFs Link: {0} ", collection.UserDefinedFunctionsLink);
       Console.WriteLine(" StoredProcs Link: {0} ", collection.StoredProceduresLink);
       Console.WriteLine("Triggers Link: {0} ", collection.TriggersLink);
       Console.WriteLine("Timestamp: {0} ", collection.Timestamp);
    }
    

    Following is the complete implementation of program.cs file for collections.

    using System;
    using System.Collections.Generic;
    using System.Linq;
    using System.Text;
    using System.Threading.Tasks;
    
    using Microsoft.Azure.Documents;
    using Microsoft.Azure.Documents.Client;
    using Microsoft.Azure.Documents.Linq;
    
    using Newtonsoft.Json;
    
    namespace DocumentDBDemo {
    
       class Program {
    
          private const string EndpointUrl = "https://azuredocdbdemo.documents.azure.com:443/";
    
          private const string AuthorizationKey = "BBhjI0gxdVPdDbS4diTjdloJq7Fp4L5RO/
             StTt6UtEufDM78qM2CtBZWbyVwFPSJIm8AcfDu2O+AfV T+TYUnBQ==";
    
          private static Database database;
    
          static void Main(string[] args) {
             try {
                CreateDocumentClient().Wait();
             } catch (Exception e) {
                Exception baseException = e.GetBaseException();
                Console.WriteLine("Error: {0}, Message: {1}", e.Message, baseException.Message);
             }
             Console.ReadKey();
          }
    
          private static async Task CreateDocumentClient() {
             // Create a new instance of the DocumentClient
             using (var client = new DocumentClient(new Uri(EndpointUrl), AuthorizationKey)) {
                database = client.CreateDatabaseQuery("SELECT * FROM c WHERE c.id =
                   ''myfirstdb''").AsEnumerable().First();
                await CreateCollection(client, "MyCollection1");
                await CreateCollection(client, "MyCollection2", "S2");
    
                //await CreateDatabase(client);
                //GetDatabases(client);
                //await DeleteDatabase(client);
                //GetDatabases(client);
             }
          }
    
          private async static Task CreateCollection(DocumentClient client,
             string collectionId, string offerType = "S1") {
    
             Console.WriteLine();
             Console.WriteLine("**** Create Collection {0} in {1} ****", collectionId,
                database.Id);
    
             var collectionDefinition = new DocumentCollection { Id = collectionId };
             var options = new RequestOptions { OfferType = offerType };
             var result = await
    
    			client.CreateDocumentCollectionAsync(database.SelfLink,
                collectionDefinition, options);
             var collection = result.Resource;
    
             Console.WriteLine("Created new collection");
             ViewCollection(collection);
          }
    
          private static void ViewCollection(DocumentCollection collection) {
             Console.WriteLine("Collection ID: {0} ", collection.Id);
             Console.WriteLine("Resource ID: {0} ", collection.ResourceId);
             Console.WriteLine("Self Link: {0} ", collection.SelfLink);
             Console.WriteLine("Documents Link: {0} ", collection.DocumentsLink);
             Console.WriteLine("UDFs Link: {0} ", collection.UserDefinedFunctionsLink);
             Console.WriteLine("StoredProcs Link: {0} ", collection.StoredProceduresLink);
             Console.WriteLine("Triggers Link: {0} ", collection.TriggersLink);
             Console.WriteLine("Timestamp: {0} ", collection.Timestamp);
          }
    
       }
    }
    

    When the above code is compiled and executed, you will receive the following output which contains all the information related to collection.

    **** Create Collection MyCollection1 in myfirstdb ****
    Created new collection
       Collection ID: MyCollection1
          Resource ID: Ic8LAPPvnAA=
             Self Link: dbs/Ic8LAA==/colls/Ic8LAPPvnAA=/
       Documents Link: dbs/Ic8LAA==/colls/Ic8LAPPvnAA=/docs/
             UDFs Link: dbs/Ic8LAA==/colls/Ic8LAPPvnAA=/udfs/
       StoredProcs Link: dbs/Ic8LAA==/colls/Ic8LAPPvnAA=/sprocs/
          Triggers Link: dbs/Ic8LAA==/colls/Ic8LAPPvnAA=/triggers/
             Timestamp: 12/10/2015 4:55:36 PM
    
    **** Create Collection MyCollection2 in myfirstdb ****
    Created new collection
       Collection ID: MyCollection2
          Resource ID: Ic8LAKGHDwE=
             Self Link: dbs/Ic8LAA==/colls/Ic8LAKGHDwE=/
       Documents Link: dbs/Ic8LAA==/colls/Ic8LAKGHDwE=/docs/
             UDFs Link: dbs/Ic8LAA==/colls/Ic8LAKGHDwE=/udfs/
       StoredProcs Link: dbs/Ic8LAA==/colls/Ic8LAKGHDwE=/sprocs/
          Triggers Link: dbs/Ic8LAA==/colls/Ic8LAKGHDwE=/triggers/
             Timestamp: 12/10/2015 4:55:38 PM
    

    Khóa học lập trình tại Toidayhoc vừa học vừa làm dự án vừa nhận lương: Khóa học lập trình nhận lương tại trung tâm Toidayhoc

  • Khóa học miễn phí DocumentDB – Connect Account nhận dự án làm có lương

    DocumentDB – Connect Account


    When you start programming against DocumentDB, the very first step is to connect. So to connect to your DocumentDB account you will need two things;

    • Endpoint
    • Authorization Key

    Endpoint

    Endpoint is the URL to your DocumentDB account and it is constructed by combining your DocumentDB account name with .documents.azure.com. Let’s go to the Dashboard.

    Endpoint

    Now, click on the created DocumentDB account. You will see the details as shown in the following image.

    click on created DocumentDB

    When you select the ‘Keys’ option, it will display additional information as shown in the following image. You will also see the URL to your DocumentDB account, which you can use as your endpoint.

    select keys option

    Authorization Key

    Authorization key contains your credentials and there are two types of keys. The master key allows full access to all resources within the account, while resource tokens permit restricted access to specific resources.

    Master Keys

    • There”s nothing you can”t do with a master key. You can blow away your entire database if you want, using the master key.

    • For this reason, you definitely don”t want to be sharing the master key or distributing it to client environments. As an added security measure, it”s a good idea to change it frequently.

    • There are actually two master keys for each database account, the primary and the secondary as highlighted in the above screenshot.

    Resource Tokens

    • You can also use resource tokens instead of a master key.

    • Connections based on resource tokens can only access the resources specified by the tokens and no other resources.

    • Resource tokens are based on user permissions, so first you create one or more users, and these are defined at the database level.

    • You create one or more permissions for each user, based on the resources that you want to allow each user to access.

    • Each permission generates a resource token that allows either read-only or full access to a given resource and that can be any user resource within the database.

    Let’s go to console application created in chapter 3.

    Step 1 − Add the following references in the Program.cs file.

    using Microsoft.Azure.Documents;
    using Microsoft.Azure.Documents.Client;
    using Microsoft.Azure.Documents.Linq;
    using Newtonsoft.Json;
    

    Step 2 − Now add Endpoint URL and Authorization key. In this example we will be using primary key as Authorization key.

    Note that in your case both Endpoint URL and authorization key should be different.

    private const string EndpointUrl = "https://azuredocdbdemo.documents.azure.com:443/";
    private const string AuthorizationKey =
       "BBhjI0gxdVPdDbS4diTjdloJq7Fp4L5RO/StTt6UtEufDM78qM2CtBZWbyVwFPSJIm8AcfDu2O+AfV T+TYUnBQ==";
    

    Step 3 − Create a new instance of the DocumentClient in asynchronous task called CreateDocumentClient and instantiate new DocumentClient.

    Step 4 − Call your asynchronous task from your Main method.

    Following is the complete Program.cs file so far.

    using System;
    using System.Collections.Generic;
    using System.Linq;
    using System.Text;
    using System.Threading.Tasks;
    
    using Microsoft.Azure.Documents;
    using Microsoft.Azure.Documents.Client;
    using Microsoft.Azure.Documents.Linq;
    using Newtonsoft.Json;
    
    namespace DocumentDBDemo {
    
       class Program {
          private const string EndpointUrl = "https://azuredocdbdemo.documents.azure.com:443/";
    
          private const string AuthorizationKey = "BBhjI0gxdVPdDbS4diTjdloJq7Fp4L5RO/
             StTt6UtEufDM78qM2CtBZWbyVwFPSJIm8AcfDu2O+AfV T+TYUnBQ==";
    
          static void Main(string[] args) {
             try {
                CreateDocumentClient().Wait();
             } catch (Exception e) {
                Exception baseException = e.GetBaseException();
                Console.WriteLine("Error: {0}, Message: {1}", e.Message, baseException.Message);
             }
    
             Console.ReadKey();
          }
    
          private static async Task CreateDocumentClient() {
             // Create a new instance of the DocumentClient
             var client = new DocumentClient(new Uri(EndpointUrl), AuthorizationKey);
          }
    
       }
    }
    

    In this chapter, we have learnt how to connect to a DocumentDB account and create an instance of the DocumentClient class.


    Khóa học lập trình tại Toidayhoc vừa học vừa làm dự án vừa nhận lương: Khóa học lập trình nhận lương tại trung tâm Toidayhoc

  • Khóa học miễn phí DocumentDB – Drop Databases nhận dự án làm có lương

    DocumentDB – Drop Databases


    You can drop a database or databases from the portal as well as from the code by using .Net SDK. Here, we will discuss, in a step-wise manner, how to drop a database in DocumentDB.

    Step 1 − Go to your DocumentDB account on Azure portal. For the purpose of demo, I have added two more databases as seen in the following screenshot.

    Drop Databases

    Step 2 − To drop any database, you need to click that database. Let’s select tempdb, you will see the following page, select the ‘Delete Database’ option.

    Delete Database

    Step 3 − It will display the confirmation message, now click the ‘Yes’ button.

    Confirmation Message

    You will see that the tempdb is no more available in your dashboard.

    TempDB Deleted

    You can also delete databases from your code using .Net SDK. To do following are the steps.

    Step 1 − Let”s delete the database by specifying the ID of the database we want to delete, but we need its SelfLink.

    Step 2 − We are calling the CreateDatabaseQuery like before, but this time we are actually supplying a query to return just the one database with the ID tempdb1.

    private async static Task DeleteDatabase(DocumentClient client) {
       Console.WriteLine("******** Delete Database ********");
       Database database = client
          .CreateDatabaseQuery("SELECT * FROM c WHERE c.id = ''tempdb1''")
          .AsEnumerable()
          .First();
       await client.DeleteDatabaseAsync(database.SelfLink);
    }
    

    Step 3 − This time, we can call AsEnumerable instead of ToList() because we don”t actually need a list object. Expecting only result, calling AsEnumerable is sufficient so that we can get the first database object returned by the query with First(). This is the database object for tempdb1 and it has a SelfLink that we can use to call DeleteDatabaseAsync which deletes the database.

    Step 4 − You also need to call DeleteDatabase task from the CreateDocumentClient task after DocumentClient is instantiated.

    Step 5 − To view the list of databases after deleting the specified database, let’s call GetDatabases method again.

    using (var client = new DocumentClient(new Uri(EndpointUrl), AuthorizationKey)) {
       //await CreateDatabase(client);
    
       GetDatabases(client);
       await DeleteDatabase(client);
       GetDatabases(client);
    }
    

    Following is the complete Program.cs file so far.

    using System;
    using System.Collections.Generic;
    using System.Linq;
    using System.Text;
    using System.Threading.Tasks;
    
    using Microsoft.Azure.Documents;
    using Microsoft.Azure.Documents.Client;
    using Microsoft.Azure.Documents.Linq;
    using Newtonsoft.Json;
    
    namespace DocumentDBDemo {
    
       class Program {
    
          private const string EndpointUrl = "https://azuredocdbdemo.documents.azure.com:443/";
    
          private const string AuthorizationKey = "BBhjI0gxdVPdDbS4diTjdloJq7Fp4L5RO/
             StTt6UtEufDM78qM2CtBZWbyVwFPSJIm8AcfDu2O+AfV T+TYUnBQ==";
    
          static void Main(string[] args) {
             try {
                CreateDocumentClient().Wait();
             } catch (Exception e) {
                Exception baseException = e.GetBaseException();
                Console.WriteLine("Error: {0}, Message: {1}", e.Message, baseException.Message);
             }
             Console.ReadKey();
          }
    
          private static async Task CreateDocumentClient() {
             // Create a new instance of the DocumentClient
             using (var client = new DocumentClient(new Uri(EndpointUrl), AuthorizationKey)) {
                //await CreateDatabase(client);
                GetDatabases(client);
                await DeleteDatabase(client);
                GetDatabases(client);
             }
          }
    
          private async static Task CreateDatabase(DocumentClient client) {
             Console.WriteLine();
             Console.WriteLine("******** Create Database *******");
    
             var databaseDefinition = new Database { Id = "mynewdb" };
             var result = await client.CreateDatabaseAsync(databaseDefinition);
             var database = result.Resource;
    
             Console.WriteLine(" Database Id: {0}; Rid: {1}",
                database.Id, database.ResourceId);
             Console.WriteLine("******** Database Created *******");
          }
    
          private static void GetDatabases(DocumentClient client) {
             Console.WriteLine();
             Console.WriteLine();
             Console.WriteLine("******** Get Databases List ********");
    
             var databases = client.CreateDatabaseQuery().ToList();
    
             foreach (var database in databases) {
                Console.WriteLine(" Database Id: {0}; Rid: {1}", database.Id,
                   database.ResourceId);
             }
    
             Console.WriteLine();
             Console.WriteLine("Total databases: {0}", databases.Count);
          }
    
          private async static Task DeleteDatabase(DocumentClient client) {
             Console.WriteLine();
             Console.WriteLine("******** Delete Database ********");
    
             Database database = client
                .CreateDatabaseQuery("SELECT * FROM c WHERE c.id = ''tempdb1''")
                .AsEnumerable()
                .First();
             await client.DeleteDatabaseAsync(database.SelfLink);
          }
    
       }
    }
    

    When the above code is compiled and executed, you will receive the following output which contains the Database and Resources IDs of the three databases and total number of databases.

    ******** Get Databases List ********
     Database Id: myfirstdb; Rid: Ic8LAA==
     Database Id: mynewdb; Rid: ltpJAA==
     Database Id: tempdb1; Rid: 06JjAA==
    
    Total databases: 3
    
    ******** Delete Database ********
    
    ******** Get Databases List ********
     Database Id: myfirstdb; Rid: Ic8LAA==
     Database Id: mynewdb; Rid: ltpJAA==
    
    Total databases: 2
    

    After deleting the database, you will also see at the end that only two databases are left in DocumentDB account.


    Khóa học lập trình tại Toidayhoc vừa học vừa làm dự án vừa nhận lương: Khóa học lập trình nhận lương tại trung tâm Toidayhoc