Your cart is currently empty!
Category: documentdb
-
Khóa học miễn phí DocumentDB – Partitioning nhận dự án làm có lương
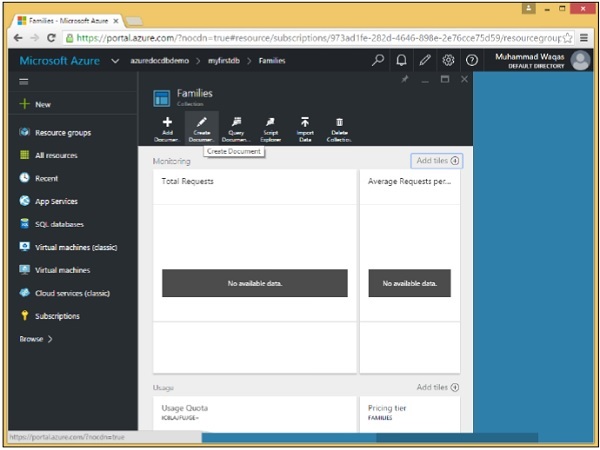
DocumentDB – Partitioning
When your database starts to grow beyond 10GB, you can scale out simply by creating new collections and then spreading or partitioning your data across more and more collections.
Sooner or later a single collection, which has a 10GB capacity, will not be enough to contain your database. Now 10GB may not sound like a very large number, but remember that we”re storing JSON documents, which is just plain text and you can fit a lot of plain text documents in 10GB, even when you consider the storage overhead for the indexes.
Storage isn”t the only concern when it comes to scalability. The maximum throughput available on a collection is two and a half thousand request units per second that you get with an S3 collection. Hence, if you need higher throughput, then you will also need to scale out by partitioning with multiple collections. Scale out partitioning is also called horizontal partitioning.
There are many approaches that can be used for partitioning data with Azure DocumentDB. Following are most common strategies −
- Spillover Partitioning
- Range Partitioning
- Lookup Partitioning
- Hash Partitioning
Spillover Partitioning
Spillover partitioning is the simplest strategy because there is no partition key. It”s often a good choice to start with when you”re unsure about a lot of things. You might not know if you”ll even ever need to scale out beyond a single collection or how many collections you may need to add or how fast you may need to add them.
-
Spillover partitioning starts with a single collection and there is no partition key.
-
The collection starts to grow and then grows some more, and then some more, until you start getting close to the 10GB limit.
-
When you reach 90 percent capacity, you spill over to a new collection and start using it for new documents.
-
Once your database scales out to a larger number of collections, you”ll probably want to shift to a strategy that”s based on a partition key.
-
When you do that you”ll need to rebalance your data by moving documents to different collections based on whatever strategy you”re migrating to.
Range Partitioning
One of the most common strategies is range partitioning. With this approach you determine the range of values that a document”s partition key might fall in and direct the document to a collection corresponding to that range.
-
Dates are very typically used with this strategy where you create a collection to hold documents that fall within the defined range of dates. When you define ranges that are small enough, where you”re confident that no collection will ever exceed its 10GB limit. For example, there may be a scenario where a single collection can reasonably handle documents for an entire month.
-
It may also be the case that most users are querying for current data, which would be data for this month or perhaps last month, but users are rarely searching for much older data. So you start off in June with an S3 collection, which is the most expensive collection you can buy and delivers the best throughput you can get.
-
In July you buy another S3 collection to store the July data and you also scale the June data down to a less-expensive S2 collection. Then in August, you get another S3 collection and scale July down to an S2 and June all the way down to an S1. It goes, month after month, where you”re always keeping the current data available for high throughput and older data is kept available at lower throughputs.
-
As long as the query provides a partition key, only the collection that needs to be queried will get queried and not all the collections in the database like it happens with spillover partitioning.
Lookup Partitioning
With lookup partitioning you can define a partition map that routes documents to specific collections based on their partition key. For example, you could partition by region.
-
Store all US documents in one collection, all European documents in another collection, and all documents from any other region in a third collection.
-
Use this partition map and a lookup partition resolver can figure out which collection to create a document in and which collections to query, based on the partition key, which is the region property contained in each document.
Hash Partitioning
In hash partitioning, partitions are assigned based on the value of a hash function, allowing you to evenly distribute requests and data across a number of partitions.
This is commonly used to partition data produced or consumed from a large number of distinct clients, and is useful for storing user profiles, catalog items, etc.
Let’s take a look at a simple example of range partitioning using the RangePartitionResolver supplied by the .NET SDK.
Step 1 − Create a new DocumentClient and we will create two collections in CreateCollections task. One will contain documents for users that have user IDs beginning with A through M and the other for user IDs N through Z.
private static async Task CreateCollections(DocumentClient client) {
   await client.CreateDocumentCollectionAsync(“dbs/myfirstdb”, new DocumentCollection {
      Id = “CollectionAM” });

   await client.CreateDocumentCollectionAsync(“dbs/myfirstdb”, new DocumentCollection {
      Id = “CollectionNZ” });
}
Step 2 − Register the range resolver for the database.
Step 3 − Create a new RangePartitionResolver<string>, which is the datatype of our partition key. The constructor takes two parameters, the property name of the partition key and a dictionary that is the shard map or partition map, which is just a list of the ranges and corresponding collections that we are predefining for the resolver.
private static void RegisterRangeResolver(DocumentClient client) {

   //Note: uffff is the largest UTF8 value, so Mufff includes all strings that start with M.

   var resolver = new RangePartitionResolver<string>(
      "userId", new Dictionary<Range<string>, string>() {
      { new Range<string>("A", "Muffff"), "dbs/myfirstdb/colls/CollectionAM" },
      { new Range<string>("N", "Zuffff"), "dbs/myfirstdb/colls/CollectionNZ" },
   });

   client.PartitionResolvers["dbs/myfirstdb"] = resolver;
 }
It”s necessary to encode the largest possible UTF-8 value here. Or else the first range wouldn”t match on any Ms except the one single M, and likewise for Z in the second range. So, you can just think of this encoded value here as a wildcard for matching on the partition key.
Step 4 − After creating the resolver, register it for the database with the current DocumentClient. To do that just assign it to the PartitionResolver”s dictionary property.
We”ll create and query for documents against the database, not a collection as you normally do, the resolver will use this map to route requests to the appropriate collections.
Now let”s create some documents. First we will create one for userId Kirk, and then one for Spock.
private static async Task CreateDocumentsAcrossPartitions(DocumentClient client) {
   Console.WriteLine();
   Console.WriteLine("**** Create Documents Across Partitions ****");

   var kirkDocument = await client.CreateDocumentAsync("dbs/myfirstdb", new { userId =
      "Kirk", title = "Captain" });
   Console.WriteLine("Document 1: {0}", kirkDocument.Resource.SelfLink);

   var spockDocument = await client.CreateDocumentAsync("dbs/myfirstdb", new { userId =
      "Spock", title = "Science Officer" });
   Console.WriteLine("Document 2: {0}", spockDocument.Resource.SelfLink);
}
The first parameter here is a self-link to the database, not a specific collection. This is not possible without a partition resolver, but with one it just works seamlessly.
Both documents were saved to the database myfirstdb, but we know that Kirk is being stored in the collection for A through M and Spock is being stored in the collection for N to Z, if our RangePartitionResolver is working properly.
Let’s call these from the CreateDocumentClient task as shown in the following code.
private static async Task CreateDocumentClient() {
   // Create a new instance of the DocumentClient
   using (var client = new DocumentClient(new Uri(EndpointUrl), AuthorizationKey)) {
      await CreateCollections(client);
      RegisterRangeResolver(client);
      await CreateDocumentsAcrossPartitions(client);
   }
}
When the above code is executed, you will receive the following output.
**** Create Documents Across Partitions ****
Document 1: dbs/Ic8LAA==/colls/Ic8LAO2DxAA=/docs/Ic8LAO2DxAABAAAAAAAAAA==/
Document 2: dbs/Ic8LAA==/colls/Ic8LAP12QAE=/docs/Ic8LAP12QAEBAAAAAAAAAA==/
As seen the self-links of the two documents have different resource IDs because they exist in two separate collections.
Khóa học lập trình tại Toidayhoc vừa học vừa làm dự án vừa nhận lương: Khóa học lập trình nhận lương tại trung tâm Toidayhoc
Khóa học miễn phí DocumentDB – Data Migration nhận dự án làm có lương
DocumentDB – Data Migration
With the DocumentDB Data Migration tool, you can easily migrate data to DocumentDB. The DocumentDB Data Migration Tool is a free and open source utility you can download from the Microsoft Download Center
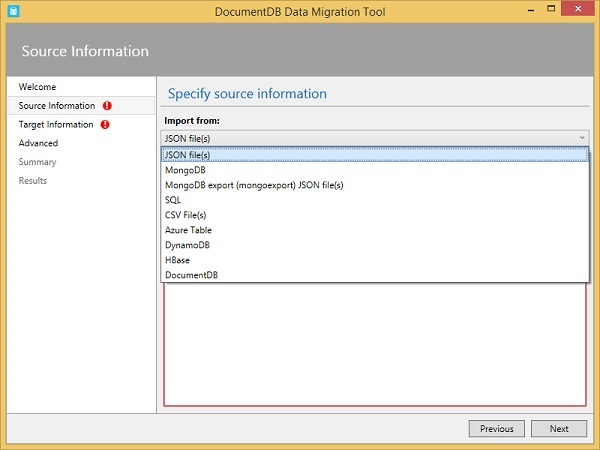
The Migration Tool supports many data sources, some of them are listed below −
- MongoDB
- Azure Table Storage
- Amazon DynamoDB
- HBase, and even other DocumentDB databases
After downloading the DocumentDB Data Migration tool, extract the zip file.
You can see two executables in this folder as shown in the following screenshot.
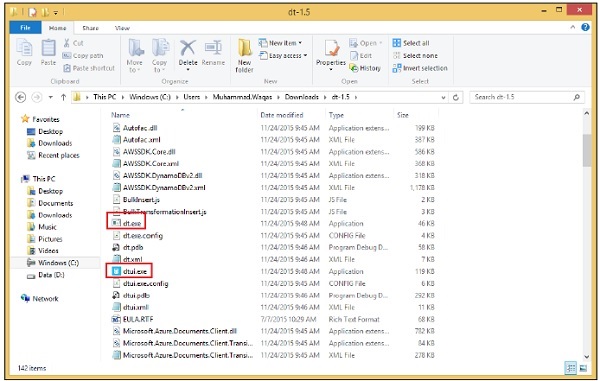
First, there is dt.exe, which is the console version with a command line interface, and then there is dtui.exe, which is the desktop version with a graphical user interface.
Let”s launch the GUI version.
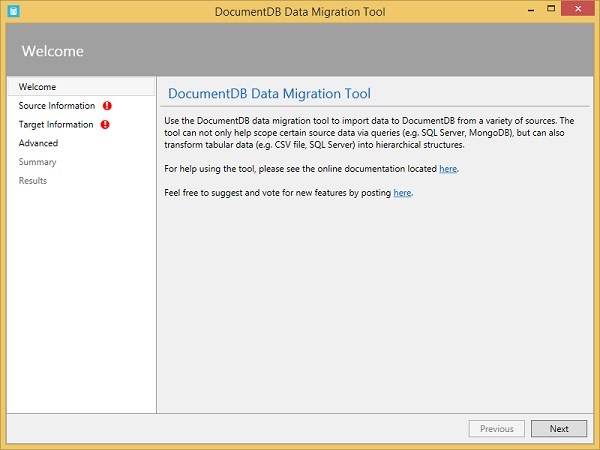
You can see the Welcome page. Click ‘Next’ for the Source Information page.
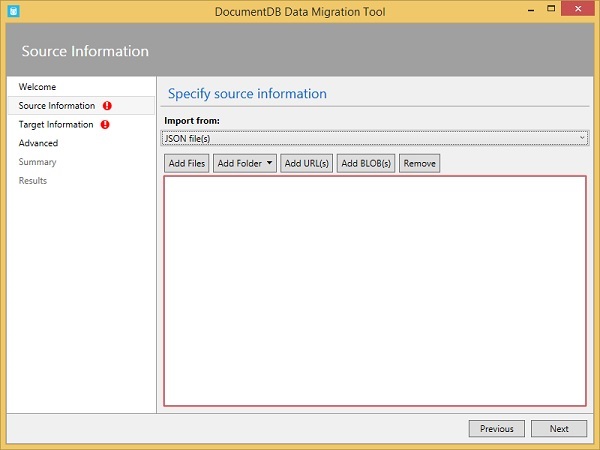
Here”s where you configure your data source, and you can see the many supported choices from the dropdown menu.
When you make a selection, the rest of the Source Information page changes accordingly.
It is very easy to import data to DocumentDB using the DocumentDB Data Migration Tool. We recommend you exercise the above examples and use the other data files as well.
Khóa học lập trình tại Toidayhoc vừa học vừa làm dự án vừa nhận lương: Khóa học lập trình nhận lương tại trung tâm Toidayhoc