Category: db2

  • Khóa học miễn phí DB2 with XML nhận dự án làm có lương

    DB2 – with XML


    This chapter describes use of XML with DB2.

    Introduction

    PureXML feature allows you to store well-formed XML documents in columns of database tables. Those columns have XML database. Data is kept in its native hierarchical form by storing XML data in XML column. The stored XML data can be accessed and managed by DB2 database server functionality. The storage of XML data in its native hierarchical form enables efficient search, retrieval, and update of XML. To update a value in XML data, you need to use XQuery, SQL or combination of both.

    Creating a database and table for storing XML data

    Create a database by issuing the following syntax:

    Syntax:

    db2 create database xmldb
    

    By default, databases use UTF-8 (UNICODE) code set. Activate the database and connect to it:

    Syntax:

    db2 activate db <db_name>
    db2 connect to <db_name>
    

    Example:

    db2 activate db xmldb
    db2 connect to xmldb
    

    Create a well-formed XML file and create a table with data type of the column as ‘XML’. It is mandatory to pass the SQL query containing XML syntax within double quotation marks.

    Syntax:

    db2 “create table <schema>.<table>(col <datatype>,
    col <xml datatype>)”
    

    Example:

    db2 "create table shope.books(id bigint not null
    primary key, book XML)"
    

    Insert xml values into table, well-formed XML documents are inserted into XML type column using SQL statement ‘INSERT’.

    Syntax:

    db2 “insert into <table_name> values(value1, value2)”
    

    Example:

    db2 "insert into shope.books values(1000, ''<catalog>
    <book>
    
    <author> Gambardella Matthew</author>
    <title>XML Developers Guide</title>
    <genre>Computer</genre>
    <price>44.95</price>
    <publish_date>2000-10-01</publish_date>
    <description>An in-depth look at creating application
    with XML</description>
    </book>
    
    </catalog>'')"
    

    Updating XML data in a table

    You can update XML data in a table by using the following syntax:

    Syntax:

    db2 “update <table_name> set <column>=<value> where
    <column>=<value>”
    

    Example:

    db2 "update shope.books set book=''<catalog>
    
    <book>
    <author> Gambardella, Matthew</author>
    <title>XML Developers Guide</title>
    <genre>Computer</genre>
    <price>44.95</price>
    <publish_date>2000-10-01</publish_date>
    <description>An in-depth XML</description>
    
    </book>
    
    </catalog>'' where id=1000"
    

    Khóa học lập trình tại Toidayhoc vừa học vừa làm dự án vừa nhận lương: Khóa học lập trình nhận lương tại trung tâm Toidayhoc

  • Khóa học miễn phí DB2 – Schemas nhận dự án làm có lương

    DB2 – Schemas


    This chapter introduces and describes the concept of Schema.

    Introduction

    A schema is a collection of named objects classified logically in the database.

    In a database, you cannot create multiple database objects with same name. To do so, the schema provides a group environment. You can create multiple schemas in a database and you can create multiple database objects with same name, with different schema groups.

    schemas

    A schema can contain tables, functions, indices, tablespaces, procedures, triggers etc. For example, you create two different schemas named as “Professional” and “Personal” for an “employee” database. It is possible to make two different tables with the same name “Employee”. In this environment, one table has professional information and the other has personal information of employee. In spite of having two tables with the same name, they have two different schemas “Personal” and “Professional”. Hence, the user can work with both without encountering any problem. This feature is useful when there are constraints on the naming of tables.

    Let us see few commands related to Schema:

    Getting currently active schema

    Syntax:

    db2 get schema
    

    Example: [To get current database schema]

    db2 get schema
    

    Setting another schema to current environment

    Syntax:

    db2 set schema=<schema_name>
    

    Example: [To arrange ‘schema1’ to current instance environment]

    db2 set schema=schema1
    

    Creating a new Schema

    Syntax: [To create a new schema with authorized user id]

    db2 create schema <schema_name> authroization <inst_user>
    

    Example: [To create “schema1” schema authorized with ‘db2inst2”]

    db2 create schema schema1 authorization db2inst2
    

    Exercise

    Let us create two different tables with same name but two different schemas. Here, you create employee table with two different schemas, one for personal and the other for professional information.

    Step 1: Create two schemas.

    Schema 1: [To create schema named professional]

    db2 create schema professional authorization db2inst2
    

    Schema 2: [To create schema named personal]

    db2 create schema personal authorization db2inst2
    

    Step 2: Create two tables with the same name for Employee details

    Table1: professional.employee

    [To create a new table ‘employee’ in the database using schema name ‘professional’]

    db2 create table professional.employee(id number, name
    varchar(20), profession varchar(20), join_date date,
    salary number);
    

    Table2: personal.employee

    [To create a new table ‘employee’ in the same database, with schema name ‘personal’]

    db2 create table personal.employee(id number, name
    varchar(20), d_birth date, phone bigint, address
    varchar(200));
    

    After executing these steps, you get two tables with same name ’employee’, with two different schemas.


    Khóa học lập trình tại Toidayhoc vừa học vừa làm dự án vừa nhận lương: Khóa học lập trình nhận lương tại trung tâm Toidayhoc

  • Khóa học miễn phí DB2 – Tablespaces nhận dự án làm có lương

    DB2 – Tablespaces


    This chapter describes the tablespaces in detail

    Tablespaces

    Introduction

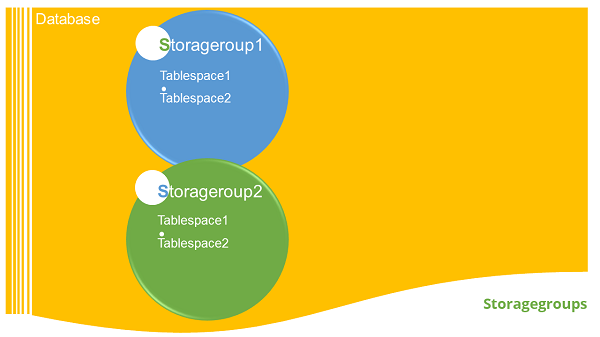
    A table space is a storage structure, it contains tables, indexes, large objects, and long data. It can be used to organize data in a database into logical storage group which is related with where data stored on a system. This tablespaces are stored in database partition groups

    Benefits of tablespaces in database

    The table spaces are beneficial in database in various ways given as follows:

    Recoverability: Tablespaces make backup and restore operations more convenient. Using a single command, you can make backup or restore all the database objects in tablespaces.

    Automatic storage Management: Database manager creates and extends containers depending on the needs.

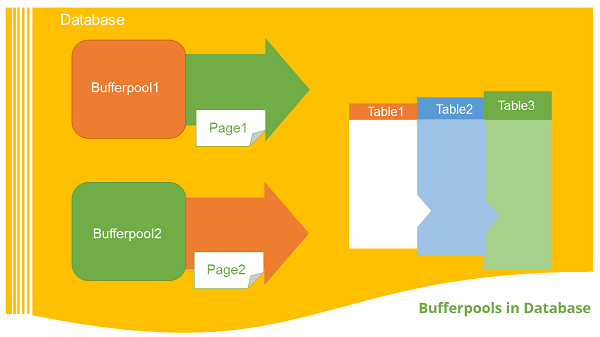
    Memory utilization: A single bufferpool can manage multiple tablespaces. You can assign temporary tablespaces to their own bufferpool to increase the performance of activities such as sorts or joins.

    Container

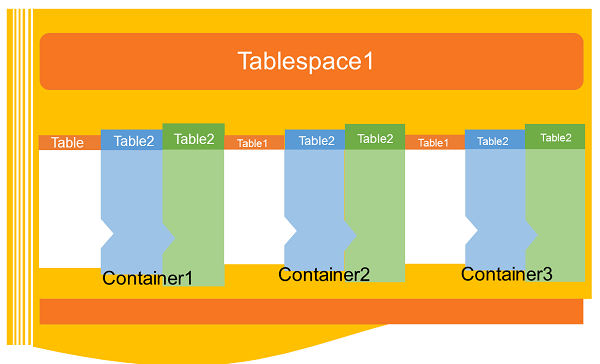
    Tablespaces contains one or more containers. A container can be a directory name, a device name, or a filename. In a database, a single tablespace can have several containers on the same physical storage device. If the tablespace is created with automatic storage tablespace option, the creation and management of containers is handled automatically by the database manager. If it is not created with automatic storage tablespace option, you need to define and manage the containers yourself.

    Default tablespaces

    When you create a new database, the database manager creates some default tablespaces for database. These tablespace is used as a storage for user and temporary data. Each database must contain at least three tablespaces as given here:

    1. Catalog tablespace
    2. User tablespace
    3. Temporary tablespace

    Catalog tablespace: It contains system catalog tables for the database. It is named as SYSCATSPACE and it cannot be dropped.

    User tablespace: This tablespace contains user-defined tables. In a database, we have one default user tablespace, named as USERSPACE1. If you do not specify user-defined tablespace for a table at the time you create it, then the database manager chooses default user tablespace for you.

    Temporary tablespace: A temporary tablespace contains temporary table data. This tablespace contains system temporary tablespaces or user temporary tablespace.

    System temporary tablespace holds temporary data required by the database manager while performing operation such as sorts or joins. A database must have at least one system temporary tablespace and it is named as TEMPSPACE1. It is created at the time of creating the database. User temporary tablespace holds temporary data from tables. It is created with DECLARE GLOBAL TEMPORARY TABLE or CREATE GLOBAL TEMPORARY TABLE statement. This temporary tablespace is not created by default at the time of database creation.

    Tablespaces and storage management:

    Tablespaces can be setup in different ways, depending on how you want to use them. You can setup the operating system to manage tablespace allocation, you can let the database manager allocate space or you can choose automatic allocation of tablespace for your data.

    The following three types of managed spaces are available:

    System Managed Space (SMS): The operating system’s file system manager allocates and manages the space where the table is stored. Storage space is allocated on demand. This model consists of files representing database objects. This tablespace type has been deprecated in Version 10.1 for user-defined tablespaces, and it is not deprecated for catalog and temporary tablespaces.

    Database Managed Space (DMS): The Database Server controls the storage space. Storage space is pre- allocated on the file system based on container definition that you specify when you create the DMS table space. It is deprecated from version 10.1 fix pack 1 for user-defined tablespaces, but it is not deprecated for system tablespace and temporary tablespace.

    Automatic Storage Tablespace: Database server can be managed automatically. Database server creates and extends containers depend on data on database. With automatic storage management, it is not required to provide container definitions. The database server looks after creating and extending containers to make use of the storage allocated to the database. If you add storage space to a storage group, new containers are automatically created when the existing container reach their maximum capacity. If you want to use the newly-added storage immediately, you can rebalance the tablespace.

    Page, table and tablespace size:

    Temporary DMS and automatic storage tablespaces, the page size you choose for your database determines the maximum limit for the tablespace size. For table SMS and temporary automatic storage tablespaces, the page size constrains the size of table itself. The page sizes can be 4kb, 8kb, 16kb or 32kb.

    Tablespace type 4K page size limit 8K page size limit 16K page size limit 32K page size limit
    DMS, non-temporary automatic storage tablespace regular 64G 128G 256G 512G
    DMS, temporary DMS and non- temporary automatic storage table space large 1892G 16384G 32768G 65536G

    Khóa học lập trình tại Toidayhoc vừa học vừa làm dự án vừa nhận lương: Khóa học lập trình nhận lương tại trung tâm Toidayhoc

  • Khóa học miễn phí DB2 – Server Installation nhận dự án làm có lương

    DB2 – Server Installation


    This chapter describes installation steps of DB2 server.

    Introduction

    You can download the DB2 Server trial version or purchase the product license from . There are two separate DB2 servers available for downloading, depending upon the size of operating system, on which it is intended to execute. For example, if you want to download a DB2 server for 32bit Linux or UNIX operating system, then you need to download a 32 bit DB2 server. The same applies for 64bit DB2 server.

    Hardware requirements

    Processor : Minimum Core 2Duo

    Ram : 1GB minimum

    Hard disk : 30GB minimum

    Software requirements

    Before installing the DB2 server, your system needs to get ready with the required software on it. For Linux, you need to install “libstdc++6.0”.

    Checking system compatibility

    Before installing DB2 Server, you need to verify if your system is compatible with the DB2 server. For confirming the compatibility, you need to call ”db2prereqcheck” command on command console.

    Installing DB2 on Linux operating system

    Open the Terminal and set the db2 installation image folder path on console using “CD <DB2 installation folder>” command. Then type “./db2prereqcheck” command, which confirms the compatibility of your system with DB2 server.

    ./db2prereqcheck
    

    Figure-1 shows the compatibility requirements of Linux operating system and hardware system.

    Follow the given steps for installing DB2 on your Linux system:

    • Open the terminal.
    • Login as root user.
    • Open DB2 Installation folder.
    • Type “./db2setup” and press Enter.

    This process will start execution of DB2 server setup.

    DB2 Server Setup

    Type “./db2setup” and press Enter on root terminal to start setup process of DB2 Server.

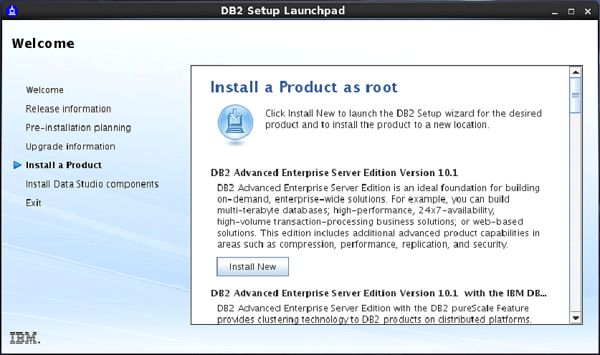
    On doing so, the “Set up Launch Pad” screen appears. [Figure-2]

    Set up Launch Pad

    On Setup Launch pad page, select “Install a Product” option from left side menu. Select option “DB2 Advanced Enterprise Server Edition”. Select “Install New” Button.

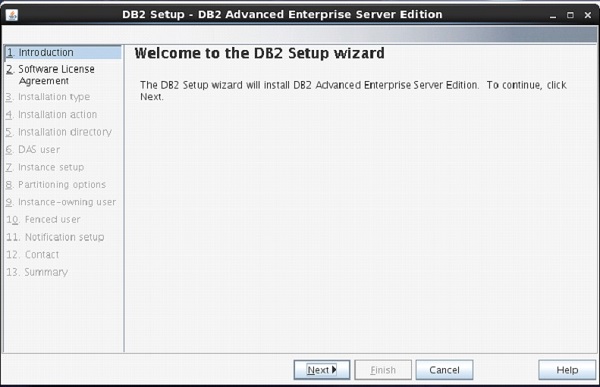
    A new frame appears with name “DB2 setup wizard”. Click “Next”. [Figure-3]

    DB2 setup wizard

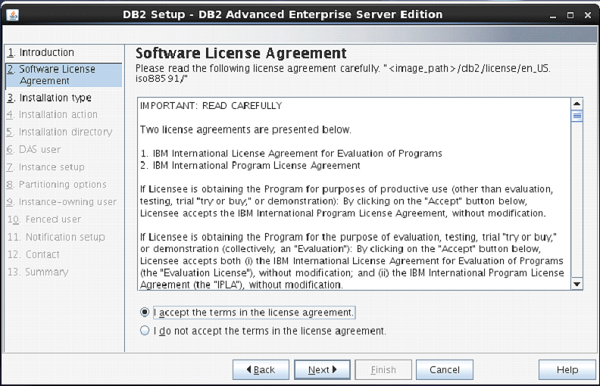
    The next screen appears with DB2 license agreement. Select “I accept the terms…” Click “Next”. [Figure-4]

    DB2 license agreement

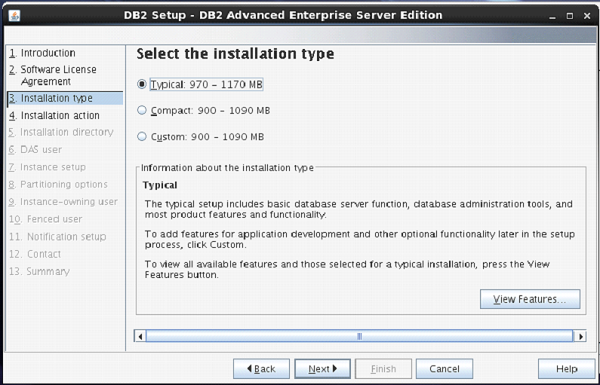
    Next screen comes up with offer of Installation type, which is set to “Typical” by default.

    Keep the same selection. Click “Next”. [Figure-5]

    Installation Action

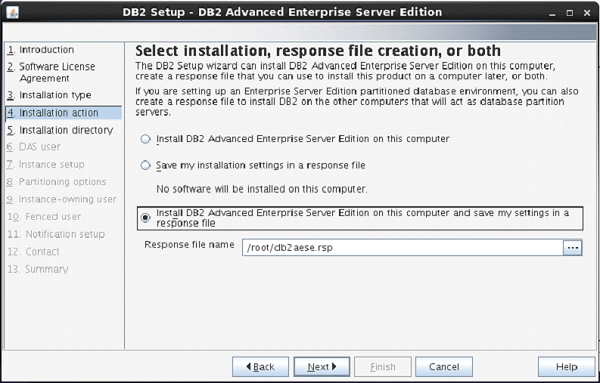
    The next screen appears with installation action.

    Select “Install DB2 Advanced Enterprise Server Edition…”

    Click “Next”. [Figure-6]

    Installation Directory

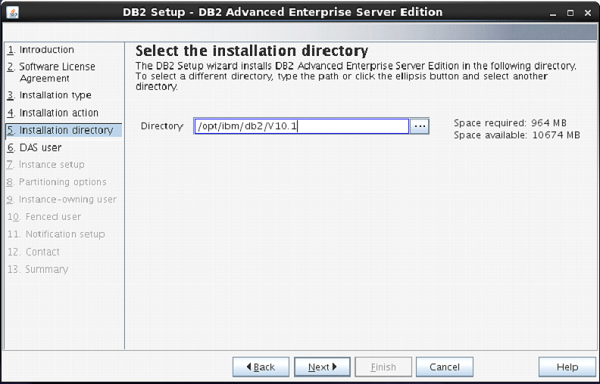
    On the next screen, the setup program asks for selection of installation directory.

    Keep the default and click “Next”.

    Server Info

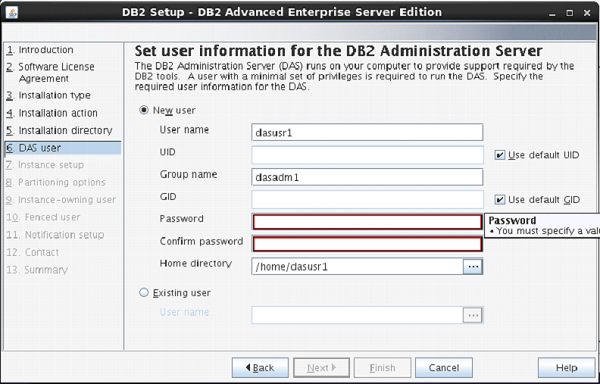
    The next screen comes up with the user authentication. Enter your password for “dasusr1” user.

    (Your password can be identical to username so that it is convenient to remember.)

    DB2 Instance

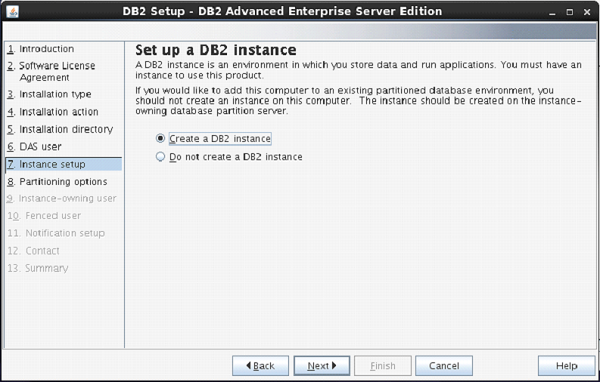
    On the following screen, the setup asks you for creation of DB2 Server Instance.

    Here, it is creating a DB2 instance with name “db2inst1”.

    DB2 Instance Name

    The next screen asks you the number of partitions you require for your default instance.

    You have a choice of “single or Multiple” partitions.

    Select “single partition instance”. Click “next”.

    DB2 Partition

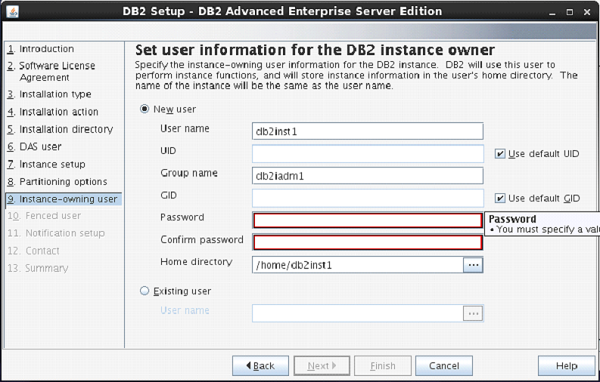
    On the next screen, the setup asks you for authentication for DB2 instance being created.

    Here, by default username is created as “db2inst1”. You can enter password same as username.

    Click “Next”.

    Authentication

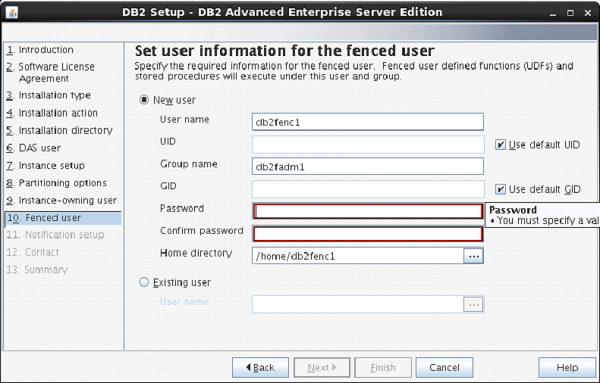
    On the next screen, the setup asks to enter authentication information for “db2fenc” user.

    Here, you can enter password same as username.

    Click “Next”.

    Authentication Information

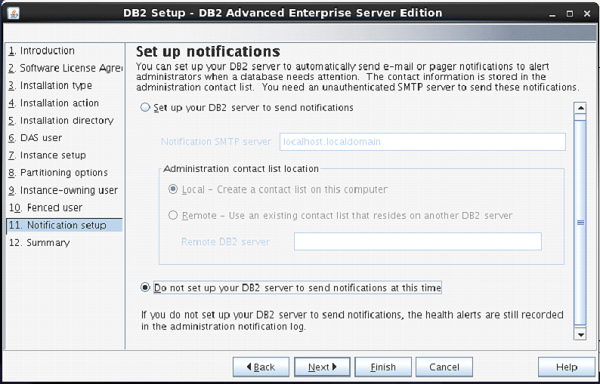
    On the next screen, you can select “Do not setup your db2 server to send notifications at this time” option.

    Click ”Next”.

    Notification

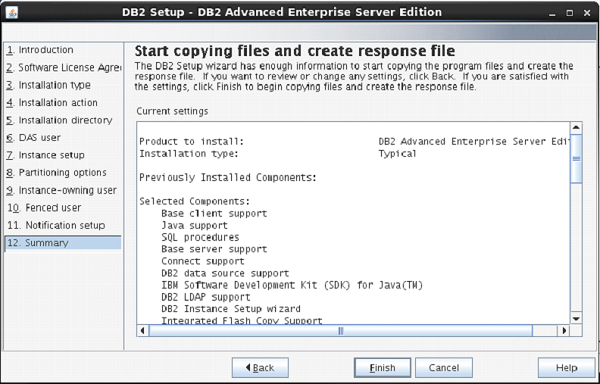
    The next screen shows you the information about db2 setup.

    Click “Finish”.

    The DB2 Installation procedure is complete at this stage.

    Verifying DB2 installation

    You need to verify the installation of DB2 server for its usefulness. On completing the DB2 Server installation, logout from current user mode and login to “db2inst1” user. In “db2inst1” user environment, you can open terminal and execute the following commands to verify if your db2 product is installed properly or not.

    db2level

    This command shows the current version and service level of the installed DB2 product for current instance.

    Syntax:

    db2level
    

    Example:

    db2level
    

    Output:

    DB21085I Instance "db2inst2" uses "64" bits
    And DB2 code release "SQL10010" with level
    identifier "0201010E". Informational tokens
    are "DB2 v10.1.0.0", "s120403",
    "LINUXAMD64101", and Fix Pack "0".
    Product is installed at "/home/db2inst2/sqllib".
    

    db2licm

    This command shows all the license related information of our DB2 Product.

    Syntax:

    db2licm <parameter>
    

    Example:

    db2licm -l
    

    Output:

    Product name:                     "DB2 Advanced Enterprise Server Edition"
    License type:                     "Trial"
    Expiry date:                      "10/02/2014"
    Product identifier:               "db2aese"
    Version information:              "10.1"
    Product name:                     "DB2 Connect Server"
    License type:                     "Trial"
    Expiry date:                      "10/02/2014"
    Product identifier:               "db2consv"
    Version information:              "10.1"
    

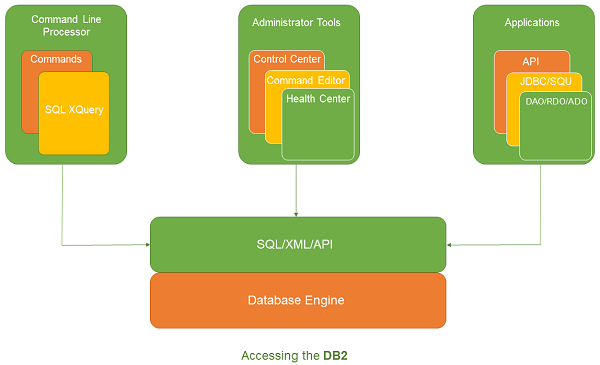
    Command Line Processor (CLP)

    The CLP can be started in one of the three modes:

    • Command mode: In this mode, each command and SQL statement must be prefixed by “db2”. For example, query “db2 activate database sample”.

    • Interactive input mode: you can launch this mode by using the “db2” command. Here, you can pass SQL statements without prefix. For example, “activate database sample”.

    • Batch mode: Here, you need to create a script file, which contains all SQL queries of requirements and save the file with “.db2” extension. You can call this in command line using syntax “db2 –tf <filename.db2>”.

    Accessing DB22

    Khóa học lập trình tại Toidayhoc vừa học vừa làm dự án vừa nhận lương: Khóa học lập trình nhận lương tại trung tâm Toidayhoc

  • Khóa học miễn phí DB2 – Storagegroups nhận dự án làm có lương

    DB2 – Storagegroups


    This chapter describes the Database Storagegroups.

    Storage

    Introduction

    A set of Storage paths to store database table or objects, is a storage group. You can assign the tablespaces to the storage group. When you create a database, all the tablespaces take default storagegorup. The default storage group for a database is ‘IBMSTOGROUP’. When you create a new database, the default storage group is active, if you pass the “AUTOMATIC STOGROUP NO” parameter at the end of “CREATE DATABASE” command. The database does not have any default storage groups.

    Listing storagegroups

    You can list all the storagegroups in the database.

    Syntax: [To see the list of available storagegroups in current database]

    db2 select * from syscat.stogroups
    

    Example: [To see the list of available storagegorups in current database]

    db2 select * from syscat.stogroups
    

    Creating a storagegroup

    Here is a syntax to create a storagegroup in the database:

    Syntax: [To create a new stogroup. The ‘stogropu_name’ indicates name of new storage group and ‘path’ indicates the location where data (tables) are stored]

    db2 create stogroup  on ‘path’
    

    Example: [To create a new stogroup ‘stg1’ on the path ‘data1’ folder]

    db2 create stogroup stg1 on ‘/data1’
    

    Output:

    DB20000I The SQL command completed succesfully
    

    Creating tablespace with stogroup

    Here is how you can create a tablespace with storegroup:

    Syntax: [To create a new tablespace using existed storage group]

    db2 create tablespace <tablespace_name>  using stogroup <stogroup_name>
    

    Example: [To create a new tablespace named ‘ts1’ using existed storage group ‘stg1’]

    db2 create tablespace ts1 using stogroup stg1
    

    Output:

    DB20000I The SQL command completed succesfully
    

    Altering a storagegroup

    You can alter the location of a storegroup by using following syntax:

    Syntax: [To shift a storage group from old location to new location]

    db2 alter stogroup  add ‘location’, ‘location’
    

    Example: [To modify location path from old location to new location for storage group named ‘sg1’]

    db2 alter stogroup sg1 add ‘/path/data3’, ‘/path/data4’
    

    Dropping folder path of storagegroup

    Before dropping folder path of storagegroup, you can add new location for the storagegroup by using alter command.

    Syntax: [To drop old path from storage group location]

    db2 alter stogroup  drop ‘/path’
    

    Example: [To drop storage group location from ‘stg1’]

    db2 alter stogroup stg1 drop ‘/path/data1’
    

    Rebalancing a tablespace

    Rebalancing the tablespace is required when we create a new folder for storagegroup or tablespaces while the transactions are conducted on the database and the tablespace becomes full. Rebalancing updates database configuration files with new storagegroup.

    Syntax: [To rebalance the tablespace from old storage group path to new storage group]

    db2 alter tablspace <ts_name> rebalance
    

    Example: [To rebalance]

    db2 alter tablespace ts1 rebalance
    

    Renaming a storagegroup

    Syntax: [To modify the name of existing storage name]

    db2 rename stogroup <old_stg_name> to <new_stg_name>
    

    Example: [To modify the name of storage group from ‘sg1’ to new name ‘sgroup1’]

    db2 rename stogroup sg1 to sgroup1
    

    Dropping a storage group

    Step 1: Before dropping any storagegroup, you can assign some different storagegroup for tablespaces.

    Syntax: [To assign another storagegroup for table space.]

    db2 alter tablspace <ts_name> using stogroup <another sto_group_name>
    

    Example: [To change from one old stogroup to new stogroup named ‘sg2’ for tablespace ‘ts1’]

    db2 alter tablespace ts1 using stogroup sg2
    

    Step 2:

    Syntax: [To drop the existing stogroup]

    db2 drop stogorup <stogroup_name>
    

    Example: [To drop stogroup ‘stg1’ from database]

    db2 drop stogroup stg1
    

    Khóa học lập trình tại Toidayhoc vừa học vừa làm dự án vừa nhận lương: Khóa học lập trình nhận lương tại trung tâm Toidayhoc

  • Khóa học miễn phí DB2 – Bufferpools nhận dự án làm có lương

    DB2 – Bufferpools


    This chapter introduces you to Bufferpools in the database.

    bufferpool

    Introduction

    The bufferpool is portion of a main memory space which is allocated by the database manager. The purpose of bufferpools is to cache table and index data from disk. All databases have their own bufferpools. A default bufferpool is created at the time of creation of new database. It called as “IBMDEFAULTBP”. Depending on the user requirements, it is possible to create a number of bufferpools. In the bufferpool, the database manager places the table row data as a page. This page stays in the bufferpool until the database is shutdown or until the space is written with new data. The pages in the bufferpool, which are updated with data but are not written onto the disk, are called “Dirty” pages. After the updated data pages in the bufferpool are written on the disk, the bufferpool is ready to take another data.

    Relationship between tablespaces and bufferpools

    Each table space is associated with a specific buffer pool in a database. One tablespace is associated with one bufferpool. The size of bufferpool and tablespace must be same. Multiple bufferpools allow you to configure the memory used by the database to increase its overall performance.

    Bufferpool sizes

    The size of the bufferpool page is set when you use the “CREATE DATABASE” command. If you do not specify the page size, it will take default page size, which is 4KB. Once the bufferpool is created, it is not possible to modify the page size later

    Listing the available bufferpools in the current database directory

    Syntax: [The syntax below shows all available bufferpools in database]

    db2 select * from syscat.bufferpools
    

    Example: [To see available bufferpools in current database]

    db2 select * from syscat.bufferpools
    

    Output:

    BPNAME      BUFFERPOOLID DBPGNAME   NPAGES      PAGESIZE    ESTORE
    NUMBLOCKPAGES BLOCKSIZE   NGNAME
    ------------------------------------------------------------
    IBMDEFAULTBP
     1 -
     -2        4096 N                  0           0 -
    
     1 record(s) selected.
    

    Creating the bufferpool

    To create a new bufferpool for database server, you need two parameters namely, “bufferpool name” and “size of page”. The following query is executed to create a new bufferpool.

    Syntax: [In the syntax below,‘bp_name’ indicates bufferpool name and ‘size’ indicates size for page you need to declare for bufferpools (4K,8K,16K,32K)]

    db2 create bufferpool <bp_name> pagesize <size>
    

    Example: [To create a new bufferpool with name “bpnew” and size “8192”(8Kb).]

    db2 create bufferpool bpnew pagesize 8192
    

    Output

    DB20000I The SQL command completed successfully.
    

    Dropping the bufferpool

    Before dropping the bufferpool, it is required to check if any tablespace is assigned to it.

    Syntax: [To drop the bufferpool]

    drop bufferpool <bp_name>
    

    Example: [To drop ‘bpnew’ named bufferpool]

    db2 drop bufferpool bpnew
    

    Output

    DB20000I The SQL command completed successfully.
    

    Khóa học lập trình tại Toidayhoc vừa học vừa làm dự án vừa nhận lương: Khóa học lập trình nhận lương tại trung tâm Toidayhoc