Category: couchdb

  • Khóa học miễn phí CouchDB – Home nhận dự án làm có lương

    Couchdb

    CouchDB Tutorial


    This tutorial provides a brief knowledge about CouchDB, the procedures to set it up, and the ways to interact with CouchDB server using cURL and Futon. It also tells how to create, update and delete databases and documents.

    Audience

    This tutorial helps the professionals aspiring to make a career in Big Data and NoSQL databases, especially the documents store.

    Prerequisites

    Before you start proceeding with this tutorial, we are assuming that you have a brief knowledge on Big Data, Hadoop, and also have the basic understanding of databases.

    Khóa học lập trình tại Toidayhoc vừa học vừa làm dự án vừa nhận lương: Khóa học lập trình nhận lương tại trung tâm Toidayhoc

  • Khóa học miễn phí CouchDB – Installation nhận dự án làm có lương

    CouchDB – Installation


    This chapter teaches you how to install CouchDB in windows as well as Linux systems.

    Installing CouchDB in Windows

    Download CouchDB

    The official website for CouchDB is . If you click the given link, you can get the home page of the CouchDB official website as shown below.

    Download CouchDB

    If you click on the download button that will lead to a page where download links of CouchDB in various formats are provided. The following snapshot illustrates the same.

    CouchDB Formats

    Choose the download link for windows systems and select one of the provided mirrors to start your download.

    Installing CouchDB

    CouchDB will be downloaded to your system in the form of setup file named setup-couchdb-1.6.1_R16B02.exe. Run the setup file and proceed with the installation.

    After installation, open built-in web interface of CouchDB by visiting the following link: http://127.0.0.1:5984/. If everything goes fine, this will give you a web page, which have the following output.

    {
       "couchdb":"Welcome","uuid":"c8d48ac61bb497f4692b346e0f400d60",
       "version":"1.6.1",
       "vendor":{
          "version":"1.6.1","name":"The Apache Software Foundation"
       }
    }
    

    You can interact with the CouchDB web interface by using the following url −

    http://127.0.0.1:5984/_utils/
    

    This shows you the index page of Futon, which is the web interface of CouchDB.

    Web Interface

    Installing CouchDB in Linux Systems

    For many of the Linux flavored systems, they provide CouchDB internally. To install this CouchDB follow the instructions.

    On Ubuntu and Debian you can use −

    sudo aptitude install couchdb
    

    On Gentoo Linux there is a CouchDB ebuild available −

    sudo emerge couchdb
    

    If your Linux system does not have CouchDB, follow the next section to install CouchDB and its dependencies.

    Installing CouchDB Dependencies

    Following is the list of dependencies that are to be installed to get CouchDB in your system−

    • Erlang OTP
    • ICU
    • OpenSSL
    • Mozilla SpiderMonkey
    • GNU Make
    • GNU Compiler Collection
    • libcurl
    • help2man
    • Python for docs
    • Python Sphinx

    To install these dependencies, type the following commands in the terminal. Here we are using Centos 6.5 and the following commands will install the required softwares compatible to Centos 6.5.

    $sudo yum install autoconf
    $sudo yum install autoconf-archive
    $sudo yum install automake
    $sudo yum install curl-devel
    $sudo yum install erlang-asn1
    $sudo yum install erlang-erts
    $sudo yum install erlang-eunit
    $sudo yum install erlang-os_mon
    $sudo yum install erlang-xmerl
    $sudo yum install help2man
    $sudo yum install js-devel
    $sudo yum install libicu-devel
    $sudo yum install libtool
    $sudo yum install perl-Test-Harness
    

    Note − For all these commands you need to use sudo. The following procedure converts a normal user to a sudoer.

    • Login as root in admin user

    • Open sudo file using the following command −

    visudo
    
    • Then edit as shown below to give your existing user the sudoer privileges −
    Hadoop All=(All) All , and press esc : x to write the changes to the file.
    

    After downloading all the dependencies in your system, download CouchDB following the given instructions.

    Downloading CouchDB

    Apache software foundation will not provide the complete .tar file for CouchDB, so you have to install it from the source.

    Create a new directory to install CouchDB, browse to such created directory and download CouchDB source by executing the following commands −

    $ cd
    $ mkdir CouchDB
    $ cd CouchDB/
    $ wget
    http://www.google.com/url?q=http%3A%2F%2Fwww.apache.org%2Fdist%2Fcouchdb%2Fsource%2F1.6.1%2Fapache-couchdb-1.6.1.tar.gz
    

    This will download CouchDB source file into your system. Now unzip the apache-couchdb-1.6.1.tar.gz as shown below.

    $ tar zxvf apache-couchdb-1.6.1.tar.gz
    

    Configuring CouchDB

    To configure CouchDB, do the following −

    • Browse to the home folder of CouchDB.
    • Login as superuser.
    • Configure using ./configure prompt as shown below −
    $ cd apache-couchdb-1.6.1
    $ su
    Password:
    # ./configure --with-erlang=/usr/lib64/erlang/usr/include/
    

    It gives you the following output similar to that shown below with a concluding line saying − You have configured Apache CouchDB, time to relax.

    # ./configure --with-erlang=/usr/lib64/erlang/usr/include/
    
    checking for a BSD-compatible install... /usr/bin/install -c
    checking whether build environment is sane... yes
    checking for a thread-safe mkdir -p... /bin/mkdir -p
    checking for gawk... gawk
    checking whether make sets $(MAKE)... yes
    checking how to create a ustar tar archive... gnutar
    ………………………………………………………..
    ……………………….
    config.status: creating var/Makefile
    config.status: creating config.h
    config.status: config.h is unchanged
    config.status: creating src/snappy/google-snappy/config.h
    config.status: src/snappy/google-snappy/config.h is unchanged
    config.status: executing depfiles commands
    config.status: executing libtool commands
    
    You have configured Apache CouchDB, time to relax.
    
    Run `make && sudo make install'' to install.
    

    Installing CouchDB

    Now type the following command to install CouchDB in your system.

    # make && sudo make install
    

    It installs CouchDB in your system with a concluding line saying − You have installed Apache CouchDB, time to relax.

    Starting CouchDB

    To start CouchDB, browse to the CouchDB home folder and use the following command −

    $ cd apache-couchdb-1.6.1
    $ cd etc
    $ couchdb start
    

    It starts CouchDB giving the following output: −

    Apache CouchDB 1.6.1 (LogLevel=info) is starting.
    Apache CouchDB has started. Time to relax.
    [info] [lt;0.31.0gt;] Apache CouchDB has started on http://127.0.0.1:5984/
    [info] [lt;0.112.0gt;] 127.0.0.1 - - GET / 200
    [info] [lt;0.112.0gt;] 127.0.0.1 - - GET /favicon.ico 200
    

    Verification

    Since CouchDB is a web interface, try to type the following homepage url in the browser.

    http://127.0.0.1:5984/
    

    It produces the following output −

    {
       "couchdb":"Welcome",
       "uuid":"8f0d59acd0e179f5e9f0075fa1f5e804",
       "version":"1.6.1",
       "vendor":{
          "name":"The Apache Software Foundation",
          "version":"1.6.1"
       }
    }
    

    Khóa học lập trình tại Toidayhoc vừa học vừa làm dự án vừa nhận lương: Khóa học lập trình nhận lương tại trung tâm Toidayhoc

  • Khóa học miễn phí CouchDB – Curl & Futon nhận dự án làm có lương

    CouchDB – Curl & Futon


    cURL Utility

    cURL utility is a way to communicate with CouchDB.

    It is a tool to transfer data from or to a server, using one of the supported protocols (HTTP, HTTPS, FTP, FTPS, TFTP, DICT, TELNET, LDAP or FILE). The command is designed to work without user interaction. cURL offers a busload of useful tricks like proxy support, user authentication, ftp upload, HTTP post, SSL (https:) connections, cookies, file transfer resume and more.

    The cURL utility is available in operating systems such as UNIX, Linux, Mac OS X and Windows. It is a command line utility using which user can access HTTP protocol straight away from the command line. This chapter teaches you how to use cURL utility.

    Using cURL Utility

    You can access any website using cURL utility by simply typing cURL followed by the website address as shown below −

    curl www.tutorialspoint.com/
    

    By default, the cURL utility returns the source code of the requested page. It displays this code on the terminal window.

    cURL Utility Options

    cURL utility provides various options to work with, and you can see them in cURL utility help.

    The following code shows some portion of cURL help.

    $ curl --help
    Usage: curl [options...] <url>
    Options: (H) means HTTP/HTTPS only, (F) means FTP only
          --anyauth Pick "any" authentication method (H)
       -a/--append Append to target file when uploading (F/SFTP)
          --basic Use HTTP Basic Authentication (H)
          --cacert <file> CA certificate to verify peer against (SSL)
    -d/--data <data> HTTP POST data (H)
          --data-ascii <data> HTTP POST ASCII data (H)
          --data-binary <data> HTTP POST binary data (H)
          --data-urlencode <name=data/name@filename> HTTP POST data
    urlencoded (H)
          --delegation STRING GSS-API delegation permission
          --digest Use HTTP Digest Authentication (H)
          --disable-eprt Inhibit using EPRT or LPRT (F)
          --disable-epsv Inhibit using EPSV (F)
    
       -F/--form <name=content> Specify HTTP multipart POST data (H)
          --form-string <name=string> Specify HTTP multipart POST data (H)
          --ftp-account <data> Account data to send when requested by server
    (F)
          --ftp-alternative-to-user <cmd> String to replace "USER [name]" (F)
          --ftp-create-dirs Create the remote dirs if not present (F)
          --ftp-method [multi cwd/no cwd/single cwd] Control CWD usage (F)
          --ftp-pasv Use PASV/EPSV instead of PORT (F)
    
       -G/--get Send the -d data with a HTTP GET (H)
    
       -H/--header <line> Custom header to pass to server (H)
       -I/--head Show document info only
       -h/--help This help text
          --hostpubmd5 <md5> Hex encoded MD5 string of the host public key.
    (SSH)
       -0/--http1.0 Use HTTP 1.0 (H)
          --ignore-content-length Ignore the HTTP Content-Length header
       -i/--include Include protocol headers in the output (H/F)
    
       -M/--manual Display the full manual
    
       -o/--output <file> Write output to <file> instead of stdout
          --pass <pass> Pass phrase for the private key (SSL/SSH)
          --post301 Do not switch to GET after following a 301
    redirect (H)
          --post302 Do not switch to GET after following a 302
    redirect (H)
       -O/--remote-name Write output to a file named as the remote file
          --remote-name-all Use the remote file name for all URLs
       -R/--remote-time Set the remote file''s time on the local output
       -X/--request <command> Specify request command to use
          --retry <num> Retry request <num> times if transient problems
    occur
          --retry-delay <seconds> When retrying, wait this many seconds
    between each
          --retry-max-time <seconds> Retry only within this period
       -T/--upload-file <file> Transfer <file> to remote site
          --url <URL> Set URL to work with
       -B/--use-ascii Use ASCII/text transfer
    

    While communicating with CouchDB, certain options of cURL utility were extensively used. Following are the brief descriptions of some important options of cURL utility including those used by CouchDB.

    -X flag

    (HTTP) Specifies a custom request method used when communicating with the HTTP server. The specified request is used instead of the method otherwise used (which defaults to GET). Read the HTTP 1.1 specification for details and explanations.

    (FTP) Specifies a custom FTP command to use instead of LIST when doing file lists with ftp.

    -H

    (HTTP) Extra header is used when getting a web page. Note that if you add a custom header that has the same name as one of the internal ones cURL would use, your externally set header will be used instead of the internal one. This allows you to make even trickier work than cURL would normally do. You should not replace internally set headers without perfectly knowing what you’re doing. Replacing an internal header with the one without content on the right side of the colon, will prevent that header from appearing.

    cURL assures that each header you add/replace get sent with the proper end of line marker. Neither you should add that as a part of the header content nor add newlines or carriage returns to disorder things.

    See also the -A/–user-agent and -e/–referer options.

    This option can be used multiple times to add/replace/remove multiple headers.

    -d flag

    Using this flag of cURL, you can send data along with the HTTP POST request to the server, as if it was filled by the user in the form and submitted.

    Example

    Suppose there is a website and you want to login into it or send some data to the website using –d flag of cURL utility as shown below.

    curl -X PUT http://mywebsite.com/login.html -d userid=001 -d password=tutorialspoint
    

    It sends a post chunk that looks like “userid=001&password=tutorialspoint”. Likewise you can also send documents (JSON ) using -d flag.

    -o flag

    Using this flag, cURL writes the output of the request to a file.

    Example

    The following example shows the use of -o flag of cURL utility.

    $ curl -o example.html www.tutorialspoint.com/index.htm
    % Total % Received % Xferd Average Speed Time Time Time Current
          Dload Upload Total Spent Left Speed
    100 81193 0 81193 0 0 48168 0 --:--:-- 0:00:01 --:--:--
    58077
    

    This gets the source code of the homepage of tutorialspoint.com, creates a file named example.com and saves the output in the file named example.html.

    Following is the snapshot of the example.html.

    Example Html

    -O

    This flag is similar to –o, the only difference is with this flag, a new file with the same name as the requested url was created, and the source code of the requested url will be copied to it.

    Example

    The following example shows the use of -O flag of cURL utility.

    $ curl -O www.tutorialspoint.com/index.htm
    % Total % Received % Xferd Average Speed Time Time Time Current
          Dload Upload Total Spent Left
    Speed
    100 81285 0 81285 0 0 49794 0 --:--:-- 0:00:01 --:--:--
    60077
    

    It creates a new file with the name index.htm and saves the source code of the index page of tutorialspoint.com in it.

    Hello CouchDB

    You can access the homepage of the CouchDB by sending a GET request to the CouchDB instance installed. First of all make sure you have installed CouchDB in your Linux environment and it is running successfully, and then use the following syntax to send a get request to the CouchDB instance.

    curl http://127.0.0.1:5984/
    

    This gives you a JSON document as shown below where CouchDB specifies the details such as version number, name of the vendor, and version of the software.

    $ curl http://127.0.0.1:5984/
    {
       "couchdb" : "Welcome",
       "uuid" : "8f0d59acd0e179f5e9f0075fa1f5e804",
       "version" : "1.6.1",
       "vendor" : {
          "name":"The Apache Software Foundation",
          "version":"1.6.1"
       }
    }
    

    List of All Databases

    You can get the list of all the databases created, by sending a get request along with the string “_all_dbs string “. Following is the syntax to get the list of all databases in CouchDB.

    curl -X GET http://127.0.0.1:5984/_all_dbs
    

    It gives you the list of all databases in CouchDB as shown below.

    $ curl -X GET http://127.0.0.1:5984/_all_dbs
    [ "_replicator" , "_users" ]
    

    Creating a Database

    You can create a database in CouchDB using cURL with PUT header using the following syntax −

    $ curl -X PUT http://127.0.0.1:5984/database_name
    

    Example

    As an example, using the above given syntax create a database with name my_database as shown below.

    $ curl -X PUT http://127.0.0.1:5984/my_database
    {"ok":true}
    

    Verification

    Verify whether the database is created, by listing out all the databases as shown below. Here you can observe the name of newly created database, “my_database” in the list

    $ curl -X GET http://127.0.0.1:5984/_all_dbs
    
    [ "_replicator " , "_users" , "my_database" ]
    

    Getting Database Info

    You can get the information about database using the get request along with the database name. Following is the syntax to get the database information.

    Example

    As an example let us get the information of the database named my_database as shown below. Here you can get the information about your database as a response.

    $ curl -X GET http://127.0.0.1:5984/my_database
    
    {
       "db_name" : "my_database",
       "doc_count" : 0,
       "doc_del_count" : 0,
       "update_seq" : 0,
       "purge_seq" : 0,
       "compact_running" : false,
       "disk_size" : 79,
       "data_size" : 0,
       "instance_start_time" : "1423628520835029",
       "disk_format_version" : 6,
       "committed_update_seq" : 0
     }
    

    Futon

    Futon is the built-in, web based, administration interface of CouchDB. It provides a simple graphical interface using which you can interact with CouchDB. It is a naive interface and it provides full access to all CouchDB features. Following is the list of those features −

    Databases −
    • Creates databases.
    • Destroys databases.
    Documents −
    • Creates documents.
    • Updates documents.
    • Edits documents.
    • Deletes documents.

    Starting Futon

    Make sure CouchDB is running and then open the following url in browser −

    http://127.0.0.1:5984/_utils/
    

    If you open this url, it displays the Futon home page as shown below −

    Futon Homepage
    • On the left hand side of this page you can observe the list of all the current databases of CouchDB. In this illustration, we have a database named my_database, along with system defined databases _replicator and _user.

    • On the right hand side you can see the following −

      • Tools − In this section you can find Configuration to configure CouchDB, Replicator to perform replications, and Status to verify status of CouchDB and recent modifications done on CouchDB.

      • Documentation − This section contains the complete documentation for the recent version of CouchDB.

      • Diagnostics − Under this you can verify the installation of CouchDB.

      • Recent Databases − Under this you can find the names of recently added databases.


    Khóa học lập trình tại Toidayhoc vừa học vừa làm dự án vừa nhận lương: Khóa học lập trình nhận lương tại trung tâm Toidayhoc

  • Khóa học miễn phí CouchDB – Creating a Document nhận dự án làm có lương

    CouchDB – Creating a Document


    Documents are CouchDB’s central data structure. Contents of the database will be stored in the form of Documents instead of tables. You can create these documents using cURL utility provided by CouchDB, as well as Futon. This chapter covers the ways to create a document in a database.

    Each document in CouchDB has a unique ID. You can choose your own ID that should be in the form of a string. Generally, UUID (Universally Unique IDentifier) is used, which are random numbers that have least chance of creating a duplicate. These are preferred to avoid collisions.

    Creating a Document using cURL Utility

    You can create a document in CouchDB by sending an HTTP request to the server using PUT method through cURL utility. Following is the syntax to create a document.

    $ curl -X PUT http://127.0.0.1:5984/database name/"id" -d '' { document} ''
    

    Using −X, we can specify a custom request method of HTTP we are using, while communicating with the HTTP server. In this case, we are using PUT method. When we use the PUT method, the content of the url specifies the object name we are creating using the HTTP request. Here we have to send the following −

    • The name of the database name in which we are creating the document.

    • The document id.

    • The data of the document. −d option is used to send the data/document through HTTP request. While writing a document simply enter your Field-Value pairs separated by colon, within flower brackets as shown below −

    {
       Name : Raju
       age : 23
       Designation : Designer
    }
    

    Example

    Using the above given syntax if you want to create a document with id 001 in a database with name my_database, you can create it as shown below.

    $ curl -X PUT http://127.0.0.1:5984/my_database/"001" -d
    ''{ " Name " : " Raju " , " age " :" 23 " , " Designation " : " Designer " }''
    
    {"ok":true,"id":"001","rev":"1-1c2fae390fa5475d9b809301bbf3f25e"}
    

    The response of CouchDB to this request contains three fields −

    • “ok”, indicating the operation was successful.

    • “id”, which stores the id of the document and

    • “rev”, this indicates the revision id. Every time you revise (update or modify) a document a _rev value will be generated by CouchDB. If you want to update or delete a document, CouchDB expects you to include the _rev field of the revision you wish to change. When CouchDB accepts the change, it will generate a new revision number. This mechanism ensures concurrency control.

    Verification

    If you want to view the created document you can get it using the document as shown below.

    $ curl -X GET http://127.0.0.1:5984/my_database/001
    {
       "_id": "001",
       "_rev": "1-3fcc78daac7a90803f0a5e383f4f1e1e",
       "Name": "Raju",
       "age": 23,
       "Designation": "Designer"
    }
    

    Creating a Document using Futon

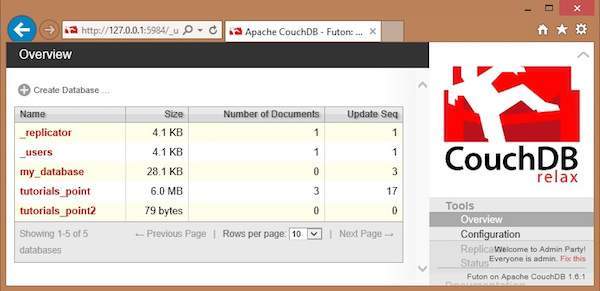
    To Create a document open the http://127.0.0.1:5984/_utils/ url to get an Overview/index page of CouchDB as shown below.

    Create Document

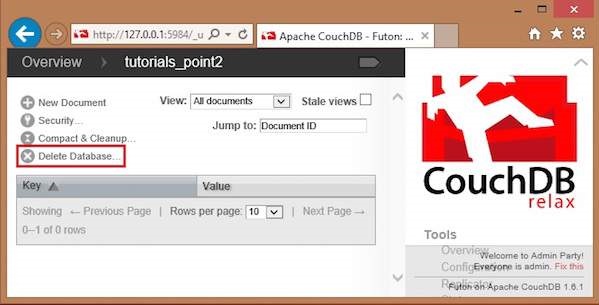
    Select the database in which you want to create the document. Open the Overview page of the database and select New Document option as shown below.

    New Document

    When you select the New Document option, CouchDB creates a new database document, assigning it a new id. You can edit the value of the id and can assign your own value in the form of a string. In the following illustration, we have created a new document with an id 001.

    New Document ID

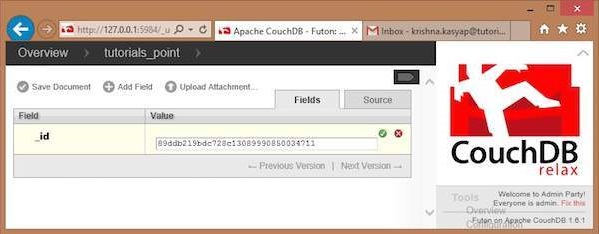
    In this page, you can observe three options − save Document, Add Field and Upload Attachment.

    Add Field to the Document

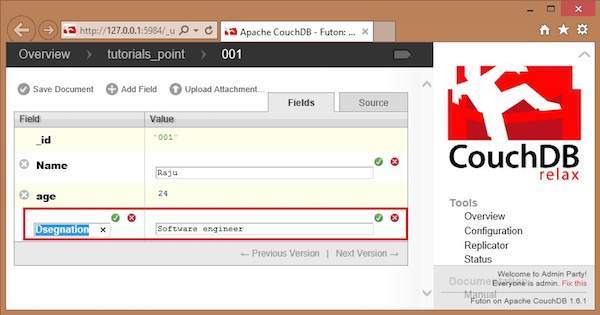
    To add field to the document click on Add Field option. After creating a database, you can add a field to it using this option. Clicking on it will get you a pair of text boxes, namely, Field, value. You can edit these values by clicking on them. Edit those values and type your desired Field-Value pair. Click on the green button to save these values.

    In the following illustration, we have created three fields Name, age and, Designation of the employee.

    Create Field

    Save Document

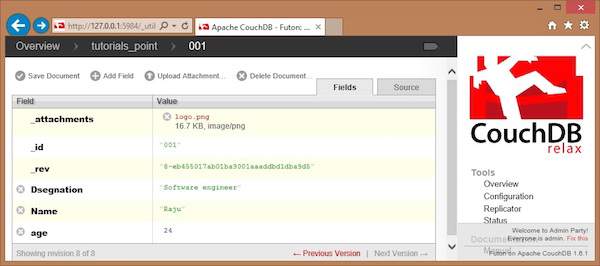
    You can save the changes made to the document by clicking on this option. After saving, a new id _rev will be generated as shown below.

    Save Document

    Khóa học lập trình tại Toidayhoc vừa học vừa làm dự án vừa nhận lương: Khóa học lập trình nhận lương tại trung tâm Toidayhoc