Apache Derby – Quick Guide
Apache Derby – Introduction
Apache Derby is a Relational Database Management System which is fully based on (written/implemented in) Java programming language. It is an open source database developed by Apache Software Foundation.
Oracle released the equivalent of Apache Derby with the name JavaDB.
Features of Apache Derby
Following are the notable features of Derby database −
-
Platform independent − Derby uses on-disc database format where the databases in it are stored in a file in the disc within the directory with the same name as the database.
-
No modifying data − Because of this, you can move derby databases to other machines without modifying the data.
-
Transactional support − Derby provides complete support for transactions ensuring data integrity.
-
Including databases − You can include pre-build/existing databases into your current derby applications.
-
Less space − Derby database has a small footprint, i.e., it occupies less space and
it is easy to use and deploy it.
-
Embed with Java Application − Derby provides an embedded database engine which can be embedded in to Java applications and it will be run in the same JVM as the application. Simply loading the driver starts the database and it stops with the applications.
Limitations of Apache Derby
Following are the limitations of Apache Derby −
-
Derby does not support indexes for datatypes such as BLOB and LONGVARCHAR.
-
If Derby does not have enough disc space, it will shut down immediately.
Data storage
While storing data, Apache Derby follows a concept known as conglomerate. In this, data of a table will be stored in a separate file. In the same way, each index of a table is also stored in a separate file. Thus, there will be a separate file for every table or index in the database.
Apache Derby Library/Components
Apache Derby distribution provides various components. In the lib folder of the apache distribution you have downloaded, you can observe jar files representing various components.
| Jar file |
Component |
Description |
| derby.jar |
Database Engine and JDBC driver |
The Database engine of Apache Derby is an embedded relational database engine which supports JDBC and SQL API’s.
This also acts as embedded Driver, using which you can communicate to Derby using Java applications.
|
| derbynet.jar derbyrun.jar |
Network server |
The Network Sever of Apache Derby provides the client server functionality, where the clients can connect to the Derby server through a network.
|
| derbyclient.jar |
Network client JDBC driver |
|
| derbytools.jar |
Command line tools |
This jar file holds tools such as sysinfo, ij, and dblook. |
| derbyoptionaltools.jar |
Optional command line utilities (tools) |
This jar file provides optional tools: databaseMetaData optional tool, foreignViews optional tool, luceneSupport optional tool, rawDBReader optional tool, simpleJson optional tool, etc
|
| derbyLocale_XX.jar |
Jar files to localize messages |
In addition to the above mentioned jar files, you can see several derbyLocale_XX.jar (es, fr, hu, it, ja, etc.). Using these, you can localize the messages of Apache Derby.
|
Apache Derby – Deployment Modes
You can deploy apache derby in two modes, namely embedded mode and server mode.
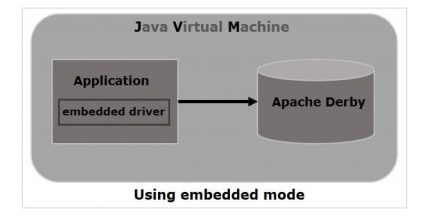
Embedded mode
You can run derby in embedded mode using Java application (using embedded driver). If you deploy Derby in embedded mode, the database engine will run in the same JVM as the Java application. It starts and stops with the application. You can access the database only with this application.
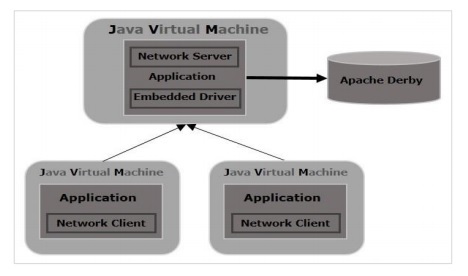
Server mode
In the server mode, derby will be run in the JVM of an application server where you can
send a request to the server to access it. Unlike in embedded mode, multiple applications (java) can send a request to the server and access the database.
Apache Derby – Environment Setup
Following chapter explains how to download and install Apache Derby.
Downloading Apache Derby
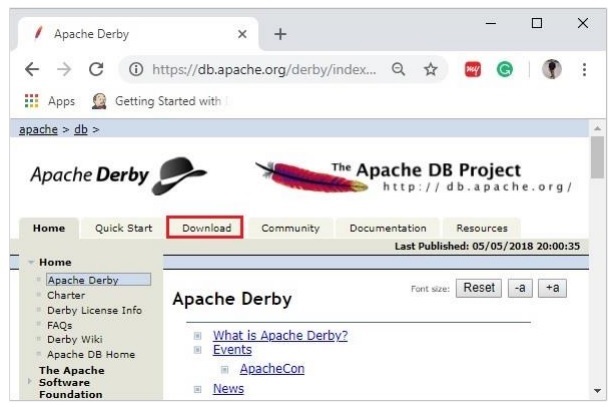
Visit the home page of Apache Derby home page . Click the Download tab.
Select and click on the link of the latest version of Apache Derby.
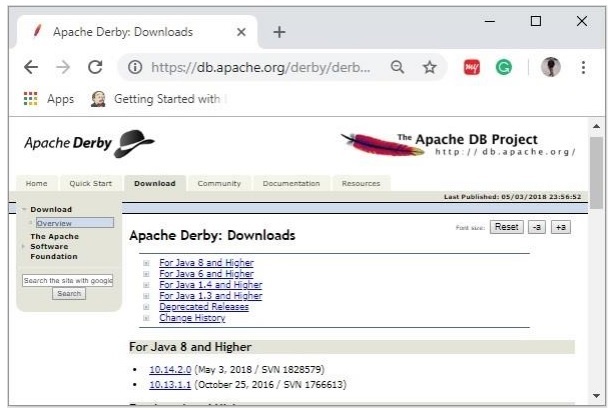
On clicking the selected link, you will be redirected to the Distributions page of apache derby. If you observe here, derby provides distributions namely, db-derby-bin, db-derbylib.zip, db-derby-lib-debug.zip, and db-derby-src.zip.
Download the db-derby-bin folder. Copy its contents to a separate folder where you wanted to install Apache Derby. (for example, say C:Derby)
Now, to work with Derby,
-
Make sure that you already have set the JAVA_HOME variable by passing the location of bin folder of Java Installation folder, and include the JAVA_HOME/bin in the PATH variable.
-
Create a new environment variable, DERBY_HOME with value C:Derby.
-
The bin folder of db-derby-bin distributions (we changed it as C:Derbybin) contains all the required jar files.
As discussed, Apache Derby can be installed/deployed in two ways as follows −
-
Embedded mode − In this, you need to access the database using Embedded Derby JDBC driver. You can start and stop derby through Java application. Both Database engine and your application will run on the same JVM.
-
Network Server mode − In this mode, you can access Derby in a typical clientserver fashion, where Derby is embedded in the server system. Then, the client machines running in different JVM’s (that of the Server) will send requests to the server, and the server responds to those requests.
The client can be another JVM in the same system machine of the server or a Java application from a remote system.
Installing Derby in Embedded Mode
To install Apache Derby in embedded mode, include the jar file derby.jar in your CLASSPATH.
Or, you can set the classpath for required jar files by running the setEmbeddedCP
command. Browse through the bin directory of Apache Derby and run this file as shown
below −
C:UsersMYUSER>cd %DERBY_HOME%/bin
C:Derbybin>setEmbeddedCP.bat
C:Derbybin>SET DERBY_HOME=C:Derby
C:Derbybin>set
CLASSPATH=C:Derbylibderby.jar;C:Derbylibderbytools.jar;C:Derby/lib/derby
optionaltools.jar;C:UsersTutorialspointGoogle
DriveOfficeDerbyderby_zipNew folderdb-derby-10.12.1.1-
binlib;C:EXAMPLES_Taskjars*;C:EXAMPLESjarsmysql-connector-java-5.1.40-
bin.jar;C:UsersTutorialspointGoogle DriveOffice37.Junit
Updatejars;C:Program FilesApache Software FoundationTomcat
8.5lib*;C:Derbylib*;
After setting up Apache Derby, to access it, run Java programs using the embedded driver.
Verification
You can verify the setup using the ij tool as shown below −
C:Derbybin>ij
ij version 10.14
ij> connect ''jdbc:derby:SampleDB;create=true
ij>
Installing Derby in Network Server Mode
To install Apache Derby in network server mode, you need to include derbynet.jar and derbytools.jar files to the CLASSPATH.
Or, you can set the class path for required jar files by running the setNetworkServerCP
command. Browse through the bin directory of Apache Derby and run this file as shown below −
C:UsersMYUSER>cd %DERBY_HOME%/bin
C:Derbybin>setNetworkServerCP.bat
C:Derbybin>SET DERBY_INSTALL=C:Derby
C:Derbybin>set
CLASSPATH=C:Derbylibderbynet.jar;C:Derbylibderbytools.jar;C:Derby/lib/de
rbyoptionaltools.jar;C:UsersTutorialspointGoogle
DriveOfficeDerbyderby_zipNew folderdb-derby-10.12.1.1-
binlib;C:EXAMPLES_Taskjars*;C:EXAMPLESjarsmysql-connector-java-5.1.40-
bin.jar;C:UsersTutorialspointGoogle DriveOffice37.Junit
Updatejars;C:Program FilesApache Software FoundationTomcat
8.5lib*;C:Derbylib*;
Starting Derby in Server Mode
You can start Network Server by running the command startNetworkServer. Browse through the bin directory of Apache Derby and run this command as shown below −
C:Derbybin>startNetworkServer
Fri Jan 04 11:20:30 IST 2019 : Security manager installed using the Basic
server security policy.
Fri Jan 04 11:20:30 IST 2019 : Apache Derby Network Server - 10.14.2.0 -
(1828579) started and ready to accept connections on port 1527
Or, you can start the server using derbyrun.jar as shown below −
C:UsersMYUSER>cd %DERBY_HOME%/lib
C:Derbylib>java -jar derbyrun.jar server start
Fri Jan 04 11:27:20 IST 2019: Security manager installed using the Basic server
security policy.
Fri Jan 04 11:27:21 IST 2019: Apache Derby Network Server - 10.14.2.0 -
(1828579) started and ready to accept connections on port 1527
Network Client
In client, add the jar files derbyclient.jar and derbytools.jar to the CLASSPATH. Or, run the setNetworkClientCP command as shown below −
C:UsersMYUSER>cd %DERBY_HOME%/bin
C:Derbybin>setNetworkClientCP
C:Derbybin>SET DERBY_HOME=C:Derby
C:Derbybin>set
CLASSPATH=C:Derbylibderbyclient.jar;C:Derbylibderbytools.jar;C:Derby/lib
/derbyoptionaltools.jar;C:Derbylibderby.jar;C:Derbylibderbytools.jar;C:D
erby/lib/derbyoptionaltools.jar;C:UsersTutorialspointGoogle
DriveOfficeDerbyderby_zipNew folderdb-derby-10.12.1.1-
binlib;C:EXAMPLES_Taskjars*;C:EXAMPLESjarsmysql-connector-java-5.1.40-
bin.jar;C:UsersTutorialspointGoogle DriveOffice37.Junit
Updatejars;C:Program FilesApache Software FoundationTomcat
8.5lib*;C:Derbylib*;
Then from this client, you can send requests to the server.
Verification
You can verify the setup using the ij tool as shown below −
C:Derbybin>ij
ij version 10.14
ij> connect ''jdbc:derby://localhost:1527/SampleDB;create=true
ij>
Apache Derby Eclipse Environment
While working with Eclipse, you need to set the build path for all the required jar files.
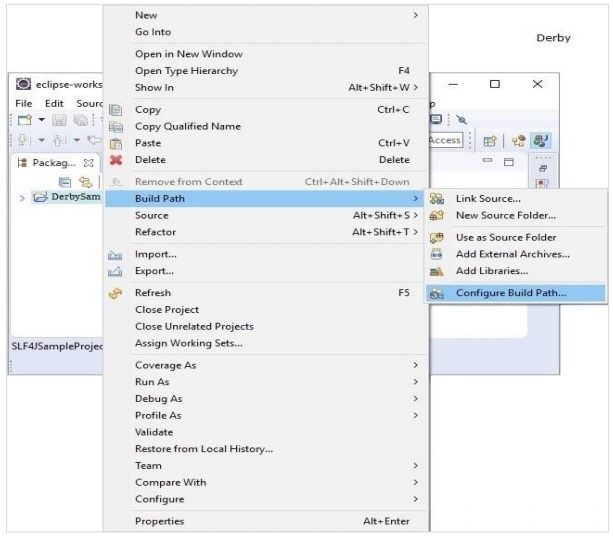
Step 1: Create a project and set build path
Open eclipse and create a sample project. Right click on the project and select the option
Build Path -> Configure Build Path as shown below −
In the Java Build Path frame in the Libraries tab, click on Add External JARs.
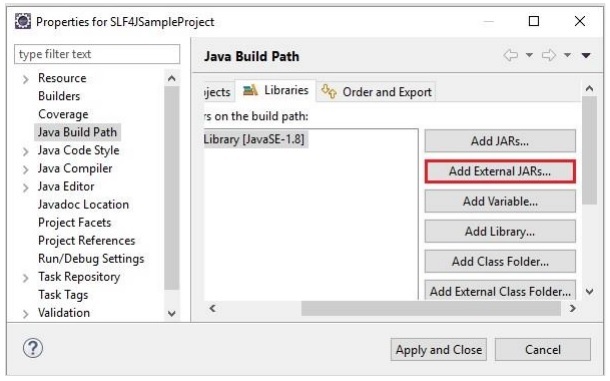
And select the required jar files in the lib folder of the Derby installation folder and click on Apply and Close.
Apache Derby – Tools
Apache Derby provides you tools such as sysinfo, ij and, dblook.
sysinfo tool
Using this tool, you can get information about Java and Derby environment.
Browse through the bin folder of Derby installation directory and execute the sysinfo command as shown below −
C:UsersMY_USER>cd %DERBY_HOME%/bin
C:Derbybin>sysinfo
On executing, it gives you system information about java and derby as given below −
------------------ Java Information ------------------
Java Version: 1.8.0_101
Java Vendor: Oracle Corporation
Java home: C:Program FilesJavajdk1.8.0_101jre
Java classpath: C:UsersTutorialspointGoogle
DriveOfficeDerbyderby_zipNew folderdb-derby-10.12.1.1-
binlib;C:EXAMPLES_Taskjars*;C:EXAMPLESjarsmysql-connector-java-5.1.40-
bin.jar;C:UsersTutorialspointGoogle DriveOffice37.Junit
Updatejars;C:Program FilesApache Software FoundationTomcat
8.5lib*;C:Derbylibderby.jar;C:Derbylibderbyclient.jar;C:Derbylibderb
yLocale_cs.jar;C:DerbylibderbyLocale_de_DE.jar;C:DerbylibderbyLocale_es.j
ar;C:DerbylibderbyLocale_fr.jar;C:DerbylibderbyLocale_hu.jar;C:Derbylib
derbyLocale_it.jar;C:DerbylibderbyLocale_ja_JP.jar;C:DerbylibderbyLocale
_ko_KR.jar;C:DerbylibderbyLocale_pl.jar;C:DerbylibderbyLocale_pt_BR.jar;C
:DerbylibderbyLocale_ru.jar;C:DerbylibderbyLocale_zh_CN.jar;C:Derbylib
derbyLocale_zh_TW.jar;C:Derbylibderbynet.jar;C:Derbylibderbyoptionaltools
.jar;C:Derbylibderbyrun.jar;C:Derbylibderbytools.jar;;C:Derby/lib/derby.
jar;C:Derby/lib/derbynet.jar;C:Derby/lib/derbyclient.jar;C:Derby/lib/derbyto
ols.jar;C:Derby/lib/derbyoptionaltools.jar
OS name: Windows 10
OS architecture: amd64
OS version: 10.0
Java user name: Tutorialspoint
Java user home: C:UsersTutorialspoint
Java user dir: C:Derbybin
java.specification.name: Java Platform API Specification
java.specification.version: 1.8
java.runtime.version: 1.8.0_101-b13
--------- Derby Information --------
[C:Derbylibderby.jar] 10.14.2.0 - (1828579)
[C:Derbylibderbytools.jar] 10.14.2.0 - (1828579)
[C:Derbylibderbynet.jar] 10.14.2.0 - (1828579)
[C:Derbylibderbyclient.jar] 10.14.2.0 - (1828579)
[C:Derbylibderbyoptionaltools.jar] 10.14.2.0 - (1828579)
------------------------------------------------------
----------------- Locale Information -----------------
Current Locale : [English/United States [en_US]]
Found support for locale: [cs]
version: 10.14.2.0 - (1828579)
Found support for locale: [de_DE]
version: 10.14.2.0 - (1828579)
Found support for locale: [es]
version: 10.14.2.0 - (1828579)
Found support for locale: [fr]
version: 10.14.2.0 - (1828579)
Found support for locale: [hu]
version: 10.14.2.0 - (1828579)
Found support for locale: [it]
version: 10.14.2.0 - (1828579)
Found support for locale: [ja_JP]
version: 10.14.2.0 - (1828579)
Found support for locale: [ko_KR]
version: 10.14.2.0 - (1828579)
Found support for locale: [pl]
version: 10.14.2.0 - (1828579)
Found support for locale: [pt_BR]
version: 10.14.2.0 - (1828579)
Found support for locale: [ru]
version: 10.14.2.0 - (1828579)
Found support for locale: [zh_CN]
version: 10.14.2.0 - (1828579)
Found support for locale: [zh_TW]
version: 10.14.2.0 - (1828579)
------------------------------------------------------
------------------------------------------------------
ijtool
Using this tool, you can run scripts and queries of apache Derby.
Browse through the bin folder of Derby installation directory and execute the ij command
as shown below −
C:UsersMY_USER>cd %DERBY_HOME%/bin
C:Derbybin>ij
This will give you ij shell where you can execute derby command and scripts, as shown
below −
ij version 10.14
ij>
Using help command, you can get the list of commands supported by this shell.
C:Derbybin>cd %DERBY_HOME%/bin
C:Derbybin>ij
ij version 10.14
ij> help;
Supported commands include:
PROTOCOL ''JDBC protocol'' [ AS ident ];
-- sets a default or named protocol
DRIVER ''class for driver -- loads the named class
CONNECT ''url for database'' [ PROTOCOL namedProtocol ] [ AS connectionName ];
-- connects to database URL
-- and may assign identifier
SET CONNECTION connectionName; -- switches to the specified connection
SHOW CONNECTIONS; -- lists all connections
AUTOCOMMIT [ ON | OFF ]; -- sets autocommit mode for the connection
DISCONNECT [ CURRENT | connectionName | ALL ];
-- drop current, named, or all connections;
-- the default is CURRENT
SHOW SCHEMAS; -- lists all schemas in the current database
SHOW [ TABLES | VIEWS | PROCEDURES | FUNCTIONS | SYNONYMS ] { IN schema };
-- lists tables, views, procedures, functions or
synonyms
SHOW INDEXES { IN schema | FROM table };
-- lists indexes in a schema, or for a table
SHOW ROLES; -- lists all defined roles in the database,
sorted
SHOW ENABLED_ROLES; -- lists the enabled roles for the current
-- connection (to see current role use
-- VALUES CURRENT_ROLE), sorted
SHOW SETTABLE_ROLES; -- lists the roles which can be set for the
-- current connection, sorted
DESCRIBE name; -- lists columns in the named table
COMMIT; -- commits the current transaction
ROLLBACK; -- rolls back the current transaction
PREPARE name AS ''SQL-J text -- prepares the SQL-J text
EXECUTE { name | ''SQL-J text'' } [ USING { name | ''SQL-J text'' } ] ;
-- executes the statement with parameter
-- values from the USING result set row
REMOVE name; -- removes the named previously prepared
statement
RUN ''filename -- run commands from the named file
ELAPSEDTIME [ ON | OFF ]; -- sets elapsed time mode for ij
MAXIMUMDISPLAYWIDTH integerValue;
-- sets the maximum display width for
-- each column to integerValue
ASYNC name ''SQL-J text -- run the command in another thread
WAIT FOR name; -- wait for result of ASYNC''d command
HOLDFORCONNECTION; -- sets holdability for a connection to HOLD
-- (i.e. ResultSet.HOLD_CURSORS_OVER_COMMIT)
NOHOLDFORCONNECTION; -- sets holdability for a connection to NO HOLD
-- (i.e. ResultSet.CLOSE_CURSORS_AT_COMMIT)
GET [SCROLL INSENSITIVE] [WITH { HOLD | NOHOLD }] CURSOR name AS ''SQL-J
query
-- gets a cursor (JDBC result set) on the query
-- the default is a forward-only cursor with
holdability
NEXT name; -- gets the next row from the named cursor
FIRST name; -- gets the first row from the named scroll
cursor
LAST name; -- gets the last row from the named scroll
cursor
PREVIOUS name; -- gets the previous row from the named scroll
cursor
ABSOLUTE integer name; -- positions the named scroll cursor at the
absolute row number
-- (A negative number denotes position from the
last row.)
RELATIVE integer name; -- positions the named scroll cursor relative to
the current row
-- (integer is number of rows)
AFTER LAST name; -- positions the named scroll cursor after the
last row
BEFORE FIRST name; -- positions the named scroll cursor before the
first row
GETCURRENTROWNUMBER name; -- returns the row number for the current
position of the named scroll cursor
-- (0 is returned when the cursor is not
positioned on a row.)
CLOSE name; -- closes the named cursor
LOCALIZEDDISPLAY [ ON | OFF ];
-- controls locale sensitive data representation
EXIT; -- exits ij
HELP; -- shows this message
Any unrecognized commands are treated as potential SQL-J commands and executed
directly.
dblooktool
This tool is used to generate Data Definition Language.
Browse through the bin folder of Derby installation directory and execute the dblook command as shown below −
C:UsersMY_USER>cd %DERBY_HOME%/bin
C:Derbybin>dblook -d myURL
Where, myURL is the connection URL of the database for which you need to generate DDL.
Apache Derby – Syntax
This chapter gives you the syntax of all the Apache Derby SQL statements.
All the statements start with any of the keywords like SELECT, INSERT, UPDATE, DELETE, ALTER, DROP, CREATE, USE, SHOW and all the statements end with a semicolon (;).
The SQL statements of Apache Derby are case in sensitives including table names.
CREATE Statement
CREATE TABLE table_name (
column_name1 column_data_type1 constraint (optional),
column_name2 column_data_type2 constraint (optional),
column_name3 column_data_type3 constraint (optional)
);
DROP TABLE
DROP TABLE table_name;
INSERT Statement
INSERT INTO table_name VALUES (column_name1, column_name2, ...);
SELECT Statement
SELECT column_name, column_name, ... FROM table_name;
UPDATE Statement
UPDATE table_name
SET column_name = value, column_name = value, ...
WHERE conditions;
DELETE Statement
DELETE FROM table_name WHERE condition;
DESCRIBE Statement
Describe table_name
SQL TRUNCATE TABLE Statement
TRUNCATE TABLE table_name;
ALTER Statement – Adding column
ALTER TABLE table_name ADD COLUMN column_name column_type;
ALTER Statement – Adding constraint
ALTER TABLE table_name ADD CONSTRAINT constraint_name constraint (column_name);
ALTER Statement – Dropping column
ALTER TABLE table_name DROP COLUMN column_name;
ALTER Statement – Dropping constraint
ALTER TABLE table_name DROP CONSTRAINT constraint_name;
WHERE Clause
SELECT * from table_name WHERE condition;
or,
DELETE from table_name WHERE condition;
or,
UPDATE table_name SET column_name = value WHERE condition;
GROUP BY Clause
SELECT column1, column2, . . . table_name GROUP BY column1, column2, . . .;
ORDER BY Clause
SELECT * FROM table_name ORDER BY column_name ASC|DESC.
Having Clause
SELECT column1, column2 . . . from table_name GROUP BY column having
condition;
Creating Index
CTREATE INDEX index_name on table_name (column_name);
Creating an UNIQUE index
CREATE UNIQUE INDEX index_name on table_name (column_name);
Creating a COMPOSITE index
CREATE INDEX index_name on table_name (column_name1, column_name2);
Displaying the Indexes
SHOW INDEXES FROM table_name;
Dropping Indexes
DROP INDEX index_name;
Apache Derby – Data Types
Data Type is an attribute that specifies the type of data of any object. Each column, variable and expression has a related data type. You can use these data types while creating your tables. You can choose a data type for a table column based on your requirement.
Derby Server offers several categories of data types for your use as listed below −
Integer Numeric Data Types
Following is the list of integer numeric data types −
| DATA TYPE |
SIZE |
FROM |
TO |
| SMALLINT |
2 bytes |
-32768 |
32767 |
| INTEGER |
4 bytes |
-2,147,483,648 |
2,147,483,647 |
| BIGINT |
8 bytes |
-9223372036854775808 |
9223372036854775808 |
Approximate Numeric Data Types
Following is the list of approximate numeric data types −
| DATA TYPE |
SIZE |
FROM |
TO |
| REAL |
4 bytes |
-3.40E + 38 |
3.40E + 38 |
| DOUBLE PRECISION |
8 bytes |
-1.79E + 308 |
1.79E + 308 |
| FLOAT |
|
-1.79E + 308 |
1.79E + 308 |
Exact Numeric Data Types
Following is the list of exact numeric data types −
| DATA TYPE |
FROM |
TO |
| DECIMAL |
-10^38 +1 |
10^38 -1 |
| NUMERIC |
-10^38 +1 |
10^38 -1 |
Apache Derby – Create Table
The CREATE TABLE statement is used for creating a new table in Derby database.
Syntax
Following is the syntax of the CREATE statement.
CREATE TABLE table_name (
column_name1 column_data_type1 constraint (optional),
column_name2 column_data_type2 constraint (optional),
column_name3 column_data_type3 constraint (optional)
);
Another way to create a table in Apache Derby is that you can specify the column names and data types using a query. The syntax for this is given below −
CREATE TABLE table_name AS SELECT * FROM desired_table WITH NO DATA;
Example
The following SQL statement creates a table named Student with four columns, where id is the primary key and it is auto generated.
ij> CREATE TABLE Student (
Id INT NOT NULL GENERATED ALWAYS AS IDENTITY,
Age INT NOT NULL,
First_Name VARCHAR(255),
last_name VARCHAR(255),
PRIMARY KEY (Id)
);
> > > > > > > 0 rows inserted/updated/deleted
The DESCRIBE command describes specified table by listing the columns and their details, if the table exists. You can use this command to verify if the table is created.
ij> DESCRIBE Student;
COLUMN_NAME |TYPE_NAME |DEC&|NUM&|COLUM&|COLUMN_DEF|CHAR_OCTE&|IS_NULL&
------------------------------------------------------------------------------
ID |INTEGER |0 |10 |10 |AUTOINCRE&|NULL |NO
AGE |INTEGER |0 |10 |10 |NULL |NULL |NO
FIRST_NAME |VARCHAR |NULL|NULL|255 |NULL |510 |YES
LAST_NAME |VARCHAR |NULL|NULL|255 |NULL |510 |YES
4 rows selected
Create a Table using JDBC Program
This section teaches you how to create a table in Apache Derby database using JDBC application.
If you want to request the Derby network server using network client, make sure that the server is up and running. The class name for the Network client driver is org.apache.derby.jdbc.ClientDriver and the URL is jdbc:derby://localhost:1527/DATABASE_NAME;create=true;user=USER_NAME;passw
ord=PASSWORD”.
Follow the steps given below to create a table in Apache Derby −
Step 1: Register the driver
To communicate with the database, first of all, you need to register the driver. The forName() method of the class, Class accepts a String value representing a class name loads it in to the memory, which automatically registers it. Register the driver using this method.
Step 2: Get the connection
In general, the first step we do to communicate to the database is to connect with it. The Connection class represents the physical connection with a database server. You can create a connection object by invoking the getConnection() method of the DriverManager class. Create a connection using this method.
Step 3: Create a statement object
You need to create a Statement or PreparedStatement or, CallableStatement objects to send SQL statements to the database. You can create these using the methods createStatement(), prepareStatement() and, prepareCall() respectively. Create either of these objects using the appropriate method.
Step 4: Execute the query
After creating a statement, you need to execute it. The Statement class provides various methods to execute a query like the execute() method to execute a statement that returns more than one result set. The executeUpdate() method executes queries like INSERT, UPDATE, DELETE. The executeQuery() method to results that returns data etc. Use either of these methods and execute the statement created previously.
Example
Following JDBC example demonstrates how to create a table in Apache Derby using JDBC program. Here, we are connecting to a database named sampleDB (will create if it does not exist) using the embedded driver.
import java.sql.Connection;
import java.sql.DriverManager;
import java.sql.SQLException;
import java.sql.Statement;
public class CreateTable {
public static void main(String args[]) throws Exception {
//Registering the driver
Class.forName("org.apache.derby.jdbc.EmbeddedDriver");
//Getting the Connection object
String URL = "jdbc:derby:sampleDB;create=true";
Connection conn = DriverManager.getConnection(URL);
//Creating the Statement object
Statement stmt = conn.createStatement();
//Executing the query
String query = "CREATE TABLE Employees( "
+ "Id INT NOT NULL GENERATED ALWAYS AS IDENTITY, "
+ "Name VARCHAR(255), "
+ "Salary INT NOT NULL, "
+ "Location VARCHAR(255), "
+ "PRIMARY KEY (Id))";
stmt.execute(query);
System.out.println("Table created");
}
}
Output
On executing the above program, you will get the following output
Table created
Apache Derby – Drop Table
The DROP TABLE statement is used to remove an existing table including all its triggers, constraints, permissions.
Syntax
Following is the Syntax of the DROP TABLE statement.
ij> DROP TABLE table_name;
Example
Suppose you have a table named Student in the database. The following SQL statement deletes a table named Student.
ij> DROP TABLE Student;
0 rows inserted/updated/deleted
Since we have removed the table if we try to describe it, we will get an error as follows
ij> DESCRIBE Student;
IJ ERROR: No table exists with the name STUDENT
Drop Table using JDBC program
This section teaches you how to drop a table in Apache Derby database using JDBC application.
If you want to request the Derby network server using network client, make sure that the server is up and running. The class name for the Network client driver is org.apache.derby.jdbc.ClientDriver and the URL is jdbc:derby://localhost:1527/DATABASE_NAME;create=true;user=USER_NAME;passw
ord=PASSWORD“
Follow the steps given below to drop a table in Apache Derby
Step 1: Register the driver
To communicate with the database, first of all, you need to register the driver. The forName() method of the class Class accepts a String value representing a class name loads it in to the memory, which automatically registers it. Register the driver using this method.
Step 2: Get the connection
In general, the first step we do to communicate to the database is to connect with it. The Connection class represents the physical connection with a database server. You can create a connection object by invoking the getConnection() method of the DriverManager class. Create a connection using this method.
Step 3: Create a statement object
You need to create a Statement or PreparedStatement or, CallableStatement objects to send SQL statements to the database. You can create these using the methods createStatement(), prepareStatement() and, prepareCall() respectively. Create either of these objects using the appropriate method.
Step 4: Execute the query
After creating a statement, you need to execute it. The Statement class provides various methods to execute a query like the execute() method to execute a statement that returns more than one result set. The executeUpdate() method execute queries like INSERT, UPDATE, DELETE. The executeQuery() method to results that returns data etc. Use either of these methods and execute the statement created previously.
Example
Following JDBC example demonstrates how to drop a table in Apache Derby using JDBC program. Here, we are connecting to a database named sampleDB (will create if it does not exist) using the embedded driver.
import java.sql.Connection;
import java.sql.DriverManager;
import java.sql.Statement;
public class DropTable {
public static void main(String args[]) throws Exception {
//Registering the driver
Class.forName("org.apache.derby.jdbc.EmbeddedDriver");
//Getting the Connection object
String URL = "jdbc:derby:sampleDB;create=true";
Connection conn = DriverManager.getConnection(URL);
//Creating the Statement object
Statement stmt = conn.createStatement();
//Executing the query
String query = "DROP TABLE Employees";
stmt.execute(query);
System.out.println("Table dropped");
}
}
Output
On executing the above program, you will get the following output −
Table dropped
Apache Derby – Insert Data
The insert query inserts data: new records, into the table.
Syntax
Following is the basic syntax of the INSERT statement −
ij>INSERT INTO table_name VALUES (column_name1, column_name2, ...);
where column1, column2 are the column values in the row that is to be inserted.
Example
The following SQL INSERT statement inserts a new row in the Student table, where it inserts values in the columns id, age, first name and, last name.
SQL> INSERT INTO Student VALUES (101, 20, ''Zara'', ''Ali'');
Syntax 2
Or, you can insert two specific columns by mentioning the column names, as given below −
ij>INSERT INTO table_name VALUES (column_name1, column_name2, ...) VALUES
(value1, value2, ...);
Note − Apache Derby automatically calculates values for generated columns. For example, there is no need to pass values for the id column in the student table created earlier in this tutorial. In case your table has generated columns, use syntax2.
Example
ij> INSERT INTO Student(Age, First_Name, Last_Name) VALUES (21, ''Sucharitha'' , ''Tyagi'');
1 row inserted/updated/deleted
And, you can also insert two rows using one statement as follows −
ij>INSERT INTO Student(Age, First_Name, Last_Name) VALUES (20, ''Amit'',
''Bhattacharya''), (22, ''Rahul'', ''Desai'');
2 rows inserted/updated/deleted
You can verify the contents of the table using the SELECT command (we will discuss this command later in this tutorial).
Syntax 3
You can use another query in the insert statement as −
INSERT INTO table_Name Query
Example
Suppose, we have a table named First_Year in the database as shown below with similar columns as in Student table −
ID |AGE |FIRST_NAME |LAST_NAME
-----------------------------------------------------------------
1 |20 |Raju |Pendyala
2 |21 |Bhargav |Prayaga
3 |22 |Deepthi |Yerramilli
You can insert values in this table to the student table using the above syntax as −
ij> INSERT INTO Student (Age, First_Name, Last_Name)
SELECT Age, First_Name, Last_Name FROM First_Year;
> 3 rows inserted/updated/deleted
After executing all the above insert statements, the Student table will be as follows −
ID |AGE |FIRST_NAME |LAST_NAME
-------------------------------------------------------------
1 |21 |Sucharitha |Tyagi
2 |20 |Amit |Bhattacharya
3 |22 |Rahul |Desai
4 |20 |Raju |Pendyala
5 |21 |Bhargav |Prayaga
6 |22 |Deepthi |Yerramilli
Insert Data using JDBC program
This section teaches you how to insert data in to a table in Apache Derby database using JDBC application.
If you want to request the Derby network server using network client, make sure that the server is up and running. The class name for the Network client driver is org.apache.derby.jdbc.ClientDriver and the URL is jdbc:derby://localhost:1527/DATABASE_NAME;create=true;user=USER_NAME;passw
ord=PASSWORD“
Follow the steps given below to insert data into a table in Apache Derby −
Step 1: Register the driver
To communicate with the database, first of all, you need to register the driver. The forName() method of the class, Class accepts a String value representing a class name loads it in to the memory, which automatically registers it. Register the driver using this method.
Step 2: Get the connection
In general, the first step we do to communicate to the database is to connect with it. The Connection class represents the physical connection with a database server. You can create a connection object by invoking the getConnection() method of the DriverManager class. Create a connection using this method.
Step 3: Create a statement object
You need to create a Statement or PreparedStatement or, CallableStatement objects to send SQL statements to the database. You can create these using the methods createStatement(), prepareStatement() and, prepareCall() respectively. Create any of these objects using the appropriate method.
Step 4: Execute the query
After creating a statement, you need to execute it. The Statement class provides various methods to execute a query like the execute() method to execute a statement that returns more than one result set.
The executeUpdate() method executes queries like INSERT, UPDATE, DELETE. The executeQuery() method to results that returns data etc. Use either of these methods and execute the statement created previously.
Example
Following JDBC example demonstrates how to insert data into a table in Apache Derby using JDBC program. Here, we are connecting to a database named sampleDB (will create if it does not exist) using the embedded driver.
import java.sql.Connection;
import java.sql.DriverManager;
import java.sql.SQLException;
import java.sql.Statement;
public class InsertData {
public static void main(String args[]) throws Exception {
//Registering the driver
Class.forName("org.apache.derby.jdbc.EmbeddedDriver");
//Getting the Connection object
String URL = "jdbc:derby:SampleDB;create=true";
Connection conn = DriverManager.getConnection(URL);
//Creating the Statement object
Statement stmt = conn.createStatement();
//Creating a table and populating
String query = "CREATE TABLE Employees("
+ "Id INT NOT NULL GENERATED ALWAYS AS IDENTITY, "
+ "Name VARCHAR(255), Salary INT NOT NULL, "
+ "Location VARCHAR(255), "
+ "PRIMARY KEY (Id))";
//Executing the query
String query = "INSERT INTO Employees("
+ "Name, Salary, Location) VALUES "
+ "(''Amit'', 30000, ''Hyderabad''), "
+ "(''Kalyan'', 40000, ''Vishakhapatnam''), "
+ "(''Renuka'', 50000, ''Delhi''), "
+ "(''Archana'', 15000, ''Mumbai''), "
+ "(''Trupthi'', 45000, ''Kochin''), "
+ "(''Suchatra'', 33000, ''Pune''), "
+ "(''Rahul'', 39000, ''Lucknow''), "
+ "(''Trupti'', 45000, ''Kochin'')";
stmt.execute(query);
System.out.println("Values inserted");
}
}
Output
On executing the above program, you will get the following output −
Values inserted
Apache Derby – Retrieve Data
The SELECT statement is used to retrieve data from a table. This returns the data in the form of a table known as result set.
Syntax
Following is the syntax of the SELECT statement −
ij> SELECT column_name, column_name, ... FROM table_name;
Or,
Ij>SELECT * from table_name
Example
Let us suppose we have a table named Employees in the database as shown below −
ij> CREATE TABLE Employees (
Id INT NOT NULL GENERATED ALWAYS AS IDENTITY,
Name VARCHAR(255),
Salary INT NOT NULL,
Location VARCHAR(255),
PRIMARY KEY (Id)
);
> > > > > > > 0 rows inserted/updated/deleted
And, inserted four records in it as shown below −
ij> INSERT INTO Employees (Name, Salary, Location) VALUES
(''Amit'', 30000, ''Hyderabad''),
(''Kalyan'', 40000, ''Vishakhapatnam''),
(''Renuka'', 50000, ''Delhi''),
(''Archana'', 15000, ''Mumbai'');
> > > > 4 rows inserted/updated/deleted
The following SQL statement retrieves the name, age and salary details of all the employees in the table;
ij> SELECT Id, Name, Salary FROM Employees;
The output of this query is −
ID |NAME |SALARY
------------------------------------------------------------------------
1 |Amit |30000
2 |Kalyan |40000
3 |Renuka |50000
4 |Archana|15000
4 rows selected
If you want to get all the records of this table at once, use * instead of the names of the columns.
ij> select * from Employees;
This will produce the following result −
ID |NAME |SALARY |LOCATION
------------------------------------------------------------------
1 |Amit |30000 |Hyderabad
2 |Kalyan |40000 |Vishakhapatnam
3 |Renuka |50000 |Delhi
4 |Archana|15000 |Mumbai
4 rows selected
Retrieve Data using JDBC program
This section teaches you how to Retrieve data from a table in Apache Derby database using JDBC application.
If you want to request the Derby network server using network client, make sure that the server is up and running. The class name for the Network client driver is org.apache.derby.jdbc.ClientDriver and the URL is jdbc:derby://localhost:1527/DATABASE_NAME;create=true;user=USER_NAME;passw ord=PASSWORD“
Follow the steps given below to Retrieve data from a table in Apache Derby −
Step 1: Register the driver
To communicate with the database, first of all, you need to register the driver. The forName() method of the class Class accepts a String value representing a class name loads it in to the memory, which automatically registers it. Register the driver using this method.
Step 2: Get the connection
In general, the first step we do to communicate to the database is to connect with it. The Connection class represents the physical connection with a database server. You can create a connection object by invoking the getConnection() method of the DriverManager class. Create a connection using this method.
Step 3: Create a statement object
You need to create a Statement or PreparedStatement or, CallableStatement objects to send SQL statements to the database. You can create these using the methods createStatement(), prepareStatement() and, prepareCall() respectively. Create either of these objects using the appropriate method.
Step 4: Execute the query
After creating a statement, you need to execute it. The Statement class provides various methods to execute a query like the execute() method to execute a statement that returns more than one result set. The executeUpdate() method executes queries like INSERT, UPDATE, DELETE. The executeQuery() method to results that returns data etc. Use either of these methods and execute the statement created previously.
Example
Following JDBC example demonstrates how to Retrieve data from a table in Apache Derby using JDBC program. Here, we are connecting to a database named sampleDB (will create if it does not exist) using the embedded driver.
The executeQuery() method returns a ResultSet object which holds the result of the statement. Initially the result set pointer will be at the first record, you can print the contents of the ResultSet object using its next() and getXXX() methods.
import java.sql.Connection;
import java.sql.DriverManager;
import java.sql.ResultSet;
import java.sql.SQLException;
import java.sql.Statement;
public class RetrieveData {
public static void main(String args[]) throws SQLException,
ClassNotFoundException {
//Registering the driver
Class.forName("org.apache.derby.jdbc.EmbeddedDriver");
//Getting the Connection object
String URL = "jdbc:derby:sampleDB;create=true";
Connection conn = DriverManager.getConnection(URL);
//Creating the Statement object
4Statement stmt = conn.createStatement();
//Creating a table and populating it
String query = "CREATE TABLE Employees("
+ "Id INT NOT NULL GENERATED ALWAYS AS IDENTITY, "
+ "Name VARCHAR(255), Salary INT NOT NULL, "
+ "Location VARCHAR(255), "
+ "PRIMARY KEY (Id))";
String query = "INSERT INTO Employees("
+ "Name, Salary, Location) VALUES "
+ "(''Amit'', 30000, ''Hyderabad''), "
+ "(''Kalyan'', 40000, ''Vishakhapatnam''), "
+ "(''Renuka'', 50000, ''Delhi''), "
+ "(''Archana'', 15000, ''Mumbai''), "
+ "(''Trupthi'', 45000, ''Kochin''), "
+ "(''Suchatra'', 33000, ''Pune''), "
+ "(''Rahul'', 39000, ''Lucknow''), "
+ "(''Trupti'', 45000, ''Kochin'')";
//Executing the query
String query = "SELECT Id, Name, Salary FROM Employees";
ResultSet rs = stmt.executeQuery(query);
while(rs.next()) {
System.out.println("Id: "+rs.getString("Id"));
System.out.println("Name: "+rs.getString("Name"));
System.out.println("Salary: "+rs.getString("Salary"));
System.out.println(" ");
}
}
}
Output
On executing the above program, you will get the following output
Id: 1
Name: Amit
Salary: 30000
Id: 2
Name: Kalyan
Salary: 43000
Id: 3
Name: Renuka
Salary: 50000
Id: 4
Name: Archana
Salary: 15000
Id: 5
Name: Trupthi
Salary: 45000
Id: 6
Name: Suchatra
Salary: 33000
Id: 7
Name: Rahul
Salary: 39000
Apache Derby – Update Data
The UPDATE statement is used to update data in a table. Apache Derby provides two types of updates (syntax) namely searched update and positioned update.
The searched UPDATE statement updates all the specified columns of a table.
Syntax
Following is the syntax of the UPDATE query −
ij> UPDATE table_name
SET column_name = value, column_name = value, ...
WHERE conditions;
The WHERE clause can use the comparison operators such as =, !=, <, >, <=, and >=, as well as the BETWEEN and LIKE operators.
Example
Suppose you have a table Employee in the database with the 4 records as shown below −
ID |NAME |SALARY |LOCATION
----------------------------------------------------------
1 |Amit |30000 |Hyderabad
2 |Kalyan |40000 |Vishakhapatnam
3 |Renuka |50000 |Delhi
4 |Archana|15000 |Mumbai
The following SQL UPDATE statement updates the location and salary of an employee whose name is Kaylan.
ij> UPDATE Employees SET Location = ''Chennai'', Salary = 43000 WHERE Name =
''Kalyan
1 rows inserted/updated/deleted
If you get the contents of the Employees table, you can observe the changes done by the UPDATE query.
ij> select * from Employees;
ID |NAME |SALARY |LOCATION
----------------------------------------------------------
1 |Amit |30000 |Hyderabad
2 |Kalyan |43000 |Chennai
3 |Renuka |50000 |Delhi
4 |Archana|15000 |Mumbai
4 rows selected
Update Data using JDBC program
This section explains how to update the existing records of a table in the Apache Derby database using JDBC application.
If you want to request the Derby network server using network client, make sure that the server is up and running. The class name for the Network client driver is org.apache.derby.jdbc.ClientDriver and the URL is jdbc:derby://localhost:1527/DATABASE_NAME;create=true;user=USER_NAME;passw
ord=PASSWORD“
Follow the steps given below to update the existing records of a table in Apache Derby.
Step 1: Register the driver
To communicate with the database, first of all, you need to register the driver. The forName() method of the class Class accepts a String value representing a class name loads it in to the memory, which automatically registers it. Register the driver using this method.
Step 2: Get the connection
In general, the first step we do to communicate to the database is to connect with it. The Connection class represents the physical connection with a database server. You can create a connection object by invoking the getConnection() method of the DriverManager class. Create a connection using this method.
Step 3: Create a statement object
You need to create a Statement or PreparedStatement or, CallableStatement objects to send SQL statements to the database. You can create these using the methods createStatement(), prepareStatement() and, prepareCall() respectively. Create either of these objects using the appropriate method.
Step 4: Execute the query
After creating a statement, you need to execute it. The Statement class provides various methods to execute a query like the execute() method to execute a statement that returns more than one result set. The executeUpdate() method executes queries like INSERT, UPDATE, DELETE. The executeQuery() method returns data. Use either of these methods and execute the statement created previously.
Example
Following JDBC example demonstrates how to update the existing records of a table in Apache Derby using JDBC program. Here, we are connecting to a database named sampleDB (will create if it does not exist) using the embedded driver.
import java.sql.Connection;
import java.sql.DriverManager;
import java.sql.SQLException;
import java.sql.Statement;
public class UpdateData {
public static void main(String args[]) throws Exception {
//Registering the driver
Class.forName("org.apache.derby.jdbc.EmbeddedDriver");
//Getting the Connection object
String URL = "jdbc:derby:sampleDB;create=true";
Connection conn = DriverManager.getConnection(URL);
//Creating the Statement object
Statement stmt = conn.createStatement();
//Creating a table and populating it
String query = "CREATE TABLE Employees("
+ "Id INT NOT NULL GENERATED ALWAYS AS IDENTITY, "
+ "Name VARCHAR(255), Salary INT NOT NULL, "
+ "Location VARCHAR(255), "
+ "PRIMARY KEY (Id))";
String query = "INSERT INTO Employees("
+ "Name, Salary, Location) VALUES "
+ "(''Amit'', 30000, ''Hyderabad''), "
+ "(''Kalyan'', 40000, ''Vishakhapatnam''), "
+ "(''Renuka'', 50000, ''Delhi''), "
+ "(''Archana'', 15000, ''Mumbai''), "
+ "(''Trupthi'', 45000, ''Kochin''), "
+ "(''Suchatra'', 33000, ''Pune''), "
+ "(''Rahul'', 39000, ''Lucknow''), "
+ "(''Trupti'', 45000, ''Kochin'')";
//Executing the query
String query = "UPDATE Employees SET Location = ''Chennai'', Salary = 43000 WHERE
Name = ''Kalyan''";
int num = stmt.executeUpdate(query);
System.out.println("Number of records updated are: "+num);
}
}
Output
On executing the above program, you will get the following output −
Number of records updated are: 1
Apache Derby – Delete Data
The DELETE statement is used to delete rows of a table. Just like the UPDATE statement, Apache Derby provides two types of Delete (syntax): searched delete and positioned delete.
The searched delete statement deletes all the specified columns of a table.
Syntax
The syntax of the DELETE statement is as follows −
ij> DELETE FROM table_name WHERE condition;
Example
Let us suppose we have a table named employee with 5 records as shown below −
ID |NAME |SALARY |LOCATION
----------------------------------------------------------------------------
1 |Amit |30000 |Hyderabad
2 |Kalyan |40000 |Vishakhapatnam
3 |Renuka |50000 |Delhi
4 |Archana|15000 |Mumbai
5 |Trupti |45000 |Kochin
5 rows selected
The following SQL DELETE statement deletes the record with name Trupti.
ij> DELETE FROM Employees WHERE Name = ''Trupti
1 row inserted/updated/deleted
If you get the contents of the Employees table, you can see only four records as shown below −
ID |NAME |SALARY |LOCATION
----------------------------------------------------------------------------
1 |Amit |30000 |Hyderabad
2 |Kalyan |40000 |Vishakhapatnam
3 |Renuka |50000 |Delhi
4 |Archana|15000 |Mumbai
4 rows selected
To delete all the records in the table, execute the same query without where clause.
ij> DELETE FROM Employees;
4 rows inserted/updated/deleted
Now, if you try to get the contents of the Employee table, you will get an empty table as given below −
ij> select * from employees;
ID |NAME |SALARY |LOCATION
--------------------------------------------------------
0 rows selected
Delete Data using JDBC program
This section explains how to delete the existing records of a table in Apache Derby database using JDBC application.
If you want to request the Derby network server using network client, make sure that the server is up and running. The class name for the Network client driver is org.apache.derby.jdbc.ClientDriver and the URL is jdbc:derby://localhost:1527/DATABASE_NAME;create=true;user=USER_NAME;passw
ord=PASSWORD“.
Follow the steps given below to delete the existing records of a table in Apache Derby:/p>
Step 1: Register the driver
Firstly, you need to register the driver to communicate with the database. The forName() method of the class Class accepts a String value representing a class name loads it in to the memory, which automatically registers it. Register the driver using this method.
Step 2: Get the connection
In general, the first step we do to communicate to the database is to connect with it. The Connection class represents physical connection with a database server. You can create a connection object by invoking the getConnection() method of the DriverManager class. Create a connection using this method.
Step 3: Create a statement object
You need to create a Statement or PreparedStatement or, CallableStatement objects to send SQL statements to the database. You can create these using the methods createStatement(), prepareStatement() and, prepareCall() respectively. Create either of these objects using the appropriate method.
Step 4: Execute the query
After creating a statement, you need to execute it. The Statement class provides various methods to execute a query like the execute() method to execute a statement that returns more than one result set. The executeUpdate() method executes queries like INSERT, UPDATE, DELETE. The executeQuery() method results that returns data. Use either of these methods and execute the statement created previously.
Example
Following JDBC example demonstrates how to delete the existing records of a table in Apache Derby using JDBC program. Here, we are connecting to a database named sampleDB (will create if it does not exist) using the embedded driver.
import java.sql.Connection;
import java.sql.DriverManager;
import java.sql.SQLException;
import java.sql.Statement;
public class DeleteData {
public static void main(String args[]) throws Exception {
//Registering the driver
Class.forName("org.apache.derby.jdbc.EmbeddedDriver");
//Getting the Connection object
String URL = "jdbc:derby:sampleDB;create=true";
Connection conn = DriverManager.getConnection(URL);
//Creating the Statement object
Statement stmt = conn.createStatement();
//Creating a table and populating it
String query = "CREATE TABLE Employees("
+ "Id INT NOT NULL GENERATED ALWAYS AS IDENTITY, "
+ "Name VARCHAR(255), Salary INT NOT NULL, "
+ "Location VARCHAR(255), "
+ "PRIMARY KEY (Id))";
String query = "INSERT INTO Employees("
+ "Name, Salary, Location) VALUES "
+ "(''Amit'', 30000, ''Hyderabad''), "
+ "(''Kalyan'', 40000, ''Vishakhapatnam''), "
+ "(''Renuka'', 50000, ''Delhi''), "
+ "(''Archana'', 15000, ''Mumbai''), "
+ "(''Trupthi'', 45000, ''Kochin''), "
+ "(''Suchatra'', 33000, ''Pune''), "
+ "(''Rahul'', 39000, ''Lucknow''), "
+ "(''Trupthi'', 45000, ''Kochin'')";
//Executing the query
String query = "DELETE FROM Employees WHERE Name = ''Trupthi''";
int num = stmt.executeUpdate(query);
System.out.println("Number of records deleted are: "+num);
}
}
Output
On executing the above program, you will get the following output −
Number of records deleted are: 1
Apache Derby – Where Clause
The WHERE clause is used in the SELECT, DELETE or, UPDATE statements to specify the rows on which the operation needs to be carried out. Usually, this clause is followed by a condition or expression which returns a Boolean value, the Select, delete or, update operations are performed only on the rows which satisfy the given condition.
ij> SELECT * from table_name WHERE condition;
or,
ij> DELETE from table_name WHERE condition;
or,
ij> UPDATE table_name SET column_name = value WHERE condition;
The WHERE clause can use the comparison operators such as =,!=, <, >, <=, and >=, as well as the BETWEEN and LIKE operators.
Example
Let us assume we have a table named Employees in the database with 7 records as shown below −
ID |NAME |SALARY |LOCATION
-----------------------------------------------------------------------------
1 |Amit |30000 |Hyderabad
2 |Kalyan |40000 |Vishakhapatnam
3 |Renuka |50000 |Delhi
4 |Archana |15000 |Mumbai
5 |Trupthi |45000 |Kochin
6 |Suchatra |33000 |Pune
7 |Rahul |39000 |Lucknow
The following SQL DELETE statement fetches the records of the employees whose salary is more than 35000 −
ij> SELECT * FROM Employees WHERE Salary>35000;
This will produce the following output −
ID |NAME   |SALARY |LOCATION
---------------------------------------------------
2  |Kalyan |40000  |Vishakhapatnam
3  |Renuka |50000  |Delhi
5  |Trupthi|45000  |Kochin
7  |Rahul  |39000  |Lucknow
4 rows selected
Similarly, you can also delete and update records using this clause.
Following example updates the location of those whose salary is less than 30000.
ij> UPDATE Employees SET Location = ''Vijayawada'' WHERE Salary<35000;
3 rows inserted/updated/deleted
If you verify the contents of the table, you can see the updated table as shown below −
ij> SELECT * FROM Employees;
ID |NAME    |SALARY |LOCATION
------------------------------------------------------------------------------
1  |Amit    |30000  |Vijayawada
2  |Kalyan  |40000  |Vishakhapatnam
3  |Renuka  |50000  |Delhi
4  |Archana |15000  |Vijayawada
5  |Trupthi |45000  |Kochin
6  |Suchatra|33000  |Vijayawada
7  |Rahul   |39000  |Lucknow
7 rows selected
Where clause JDBC example
This section teaches you how to use WHERE clause and perform CURD operations on a table in Apache Derby database using JDBC application.
If you want to request the Derby network server using network client, make sure that the server is up and running. The class name for the Network client driver is org.apache.derby.jdbc.ClientDriver and the URL is jdbc:derby://localhost:1527/DATABASE_NAME;create=true;user=USER_NAME;passw
ord=PASSWORD“.
Follow the steps given below to use WHERE clause and perform CURD operations on a table in Apache Derby
Step 1: Register the driver
To communicate with the database, first of all, you need to register the driver. The forName() method of the class Class accepts a String value representing a class name loads it in to the memory, which automatically registers it. Register the driver using this method
Step 2: Get the connection
In general, the first step we do to communicate to the database is to connect with it. The Connection class represents the physical connection with a database server. You can create a connection object by invoking the getConnection() method of the DriverManager class. Create a connection using this method.
Step 3: Create a statement object
You need to create a Statement or PreparedStatement or, CallableStatement objects to send SQL statements to the database. You can create these using the methods createStatement(), prepareStatement() and, prepareCall() respectively. Create either of these objects using the appropriate method.
Step 4: Execute the query
After creating a statement, you need to execute it. The Statement class provides various methods to execute a query like the execute() method to execute a statement that returns more than one result set. The executeUpdate() method executes queries like INSERT, UPDATE, DELETE. The executeQuery() method results that returns data. Use either of these methods and execute the statement created previously.
Example
Following JDBC example demonstrates how to use WHERE clause and perform CURD operations on a table in Apache Derby using JDBC program. Here, we are connecting to a database named sampleDB (will create if it does not exist) using the embedded driver.
import java.sql.Connection;
import java.sql.DriverManager;
import java.sql.Statement;
import java.sql.ResultSet;
public class WhereClauseExample {
   public static void main(String args[]) throws Exception {
      //Registering the driver
      Class.forName("org.apache.derby.jdbc.EmbeddedDriver");
      //Getting the Connection object
      String URL = "jdbc:derby:sampleDB;create=true";
      Connection conn = DriverManager.getConnection(URL);

      //Creating the Statement object
      Statement stmt = conn.createStatement();

      //Creating a table and populating it
      String query = "CREATE TABLE Employees("
         + "Id INT NOT NULL GENERATED ALWAYS AS IDENTITY, "
         + "Name VARCHAR(255), Salary INT NOT NULL, "
         + "Location VARCHAR(255), "
         + "PRIMARY KEY (Id))";
      String query = "INSERT INTO Employees("
         + "Name, Salary, Location) VALUES "
         + "(''Amit'', 30000, ''Hyderabad''), "
         + "(''Kalyan'', 40000, ''Vishakhapatnam''), "
         + "(''Renuka'', 50000, ''Delhi''), "
         + "(''Archana'', 15000, ''Mumbai''), "
         + "(''Trupthi'', 45000, ''Kochin''), "
         + "(''Suchatra'', 33000, ''Pune''), "
         + "(''Rahul'', 39000, ''Lucknow''), "
         + "(''Trupti'', 45000, ''Kochin'')";
      //Executing the query
      String query = "SELECT * FROM Employees WHERE Salary>35000";
      ResultSet rs = stmt.executeQuery(query);
      while(rs.next()) {
         System.out.println("Id: "+rs.getString("Id"));
         System.out.println("Name: "+rs.getString("Name"));
         System.out.println("Salary: "+rs.getString("Salary"));
         System.out.println("Location: "+rs.getString("Location"));
         System.out.println(" ");
      }
   }
}
Output
On executing the above program, you will get the following output −
Id: 2
Name: Kalyan
Salary: 43000
Location: Chennai

Id: 3
Name: Renuka
Salary: 50000
Location: Delhi

Id: 5
Name: Trupthi
Salary: 45000
Location: Kochin

Id: 7
Name: Rahul
Salary: 39000
Location: Lucknow
Apache Derby – GROUP BY Clause
The GROUP BY clause is used with SELECT statements. It is used to form subsets in case of identical data. Usually, this clause is followed by ORDER BY clause and placed after the WHERE clause.
Syntax
Following is the syntax of GROUP BY clause −
ij>SELECT column1, column2, . . . table_name GROUP BY column1, column2, . . .;
Example
Suppose we have a table named Employees in the database with the following records −
ID |NAME |SALARY |LOCATION
------------------------------------------------------------------
1 |Amit |30000 |Hyderabad
2 |Rahul |39000 |Lucknow
3 |Renuka |50000 |Hyderabad
4 |Archana |15000 |Vishakhapatnam
5 |Kalyan |40000 |Hyderabad
6 |Trupthi |45000 |Vishakhapatnam
7 |Raghav |12000 |Lucknow
8 |Suchatra|33000 |Vishakhapatnam
9 |Rizwan |20000 |Lucknow
The following SELECT statement with GROUP BY clause groups the table based on location. It displays the total amount of salary given to employees at a location.
ij> SELECT Location, SUM(Salary) from Employees GROUP BY Location;
This will generate the following output −
LOCATION |2
-------------------------------------------------------
Hyderabad |120000
Lucknow |71000
Vishakhapatnam |93000
3 rows selected
In the same way, following query finds the average amount spent on the employees as salary in a location.
ij> SELECT Location, AVG(Salary) from Employees GROUP BY Location;
This will generate the following output −
LOCATION |2
-----------------------------------------------------
Hyderabad |40000
Lucknow |23666
Vishakhapatnam |31000
3 rows selected
Group By clause JDBC example
This section teaches you how to use Group By clause and perform CURD operations on a table in Apache Derby database using JDBC application.
If you want to request the Derby network server using network client, make sure that the server is up and running. The class name for the Network client driver is org.apache.derby.jdbc.ClientDriver and the URL is jdbc:derby://localhost:1527/DATABASE_NAME;create=true;user=USER_NAME;passw
ord=PASSWORD“
Follow the steps given below to use Group By clause and perform CURD operations on a table in Apache Derby
Step 1: Register the driver
To communicate with the database, first of all, you need to register the driver. The forName() method of the class Class accepts a String value representing a class name loads it in to the memory, which automatically registers it. Register the driver using this method.
Step 2: Get the connection
In general, the first step we do to communicate to the database is to connect with it. The Connection class represents the physical connection with a database server. You can create a connection object by invoking the getConnection() method of the DriverManager class. Create a connection using this method.
Step 3: Create a statement object
You need to create a Statement or PreparedStatement or, CallableStatement objects to send SQL statements to the database. You can create these using the methods createStatement(), prepareStatement() and, prepareCall() respectively. Create either of these objects using the appropriate method.
Step 4: Execute the query
After creating a statement, you need to execute it. The Statement class provides various methods to execute a query like the execute() method to execute a statement that returns more than one result set. The executeUpdate() method is used to execute queries like INSERT, UPDATE, DELETE. The executeQuery() method returns data. Use either of these methods and execute the statement created previously.
Example
Following JDBC example demonstrates how to use Group By clause and perform CURD operations on a table in Apache Derby using JDBC program. Here, we are connecting to a database named sampleDB (will create if it does not exist) using the embedded driver.
import java.sql.Connection;
import java.sql.DriverManager;
import java.sql.Statement;
import java.sql.ResultSet;
public class GroupByClauseExample {
public static void main(String args[]) throws Exception {
//Registering the driver
Class.forName("org.apache.derby.jdbc.EmbeddedDriver");
//Getting the Connection object
String URL = "jdbc:derby:sampleDB;create=true";
Connection conn = DriverManager.getConnection(URL);
//Creating the Statement object
Statement stmt = conn.createStatement();
//Creating a table and populating it
stmt.execute("CREATE TABLE EmployeesData( "
+ "Id INT NOT NULL GENERATED ALWAYS AS IDENTITY, "
+ "Name VARCHAR(255), "
+ "Salary INT NOT NULL, "
+ "Location VARCHAR(255), "
+ "PRIMARY KEY (Id))");
stmt.execute("INSERT INTO EmployeesData(Name, Salary, Location) "
+ "VALUES (''Amit'', 30000, ''Hyderabad''), "
+ "(''Rahul'', 39000, ''Lucknow''), "
+ "(''Renuka'', 50000, ''Hyderabad''), "
+ "(''Archana'', 15000, ''Vishakhapatnam''), "
+ "(''Kalyan'', 40000, ''Hyderabad''), "
+ "(''Trupthi'', 45000, ''Vishakhapatnam''), "
+ "(''Raghav'', 12000, ''Lucknow''), "
+ "(''Suchatra'', 33000, ''Vishakhapatnam''), "
+ "(''Rizwan'', 20000, ''Lucknow'')");
//Executing the query
String query = "SELECT Location, SUM(Salary) from EmployeesData GROUP BY Location";
ResultSet rs = stmt.executeQuery(query);
while(rs.next()) {
System.out.println("Location: "+rs.getString(1));
System.out.println("Sum of salary: "+rs.getString(2));
System.out.println(" ");
}
}
}
Output
On executing the above program, you will get the following output −
Location: Hyderabad
Sum of salary: 120000
Location: Lucknow
Sum of salary: 71000
Location: Vishakhapatnam
Sum of salary: 93000
Apache Derby – Order By Clause
The ORDER BY clause is used to arrange the contents of the result set in the order it uses the keywords, ASC representing ascending order and DESC representing descending order. If you do not mention either of these, the contents will be arranged in ascending order by default.
Syntax
Following is the syntax of the ORDER BY clause −
SELECT * FROM table_name ORDER BY column_name ASC|DESC.
Example
Suppose we have a table named Employees in the database with the following records −
ID |NAME |SALARY |LOCATION
------------------------------------------------------------------------------
1 |Amit |30000 |Vijayawada
2 |Kalyan |40000 |Vishakhapatnam
3 |Renuka |50000 |Delhi
4 |Archana |15000 |Vijayawada
5 |Trupthi |45000 |Kochin
6 |Suchatra|33000 |Vijayawada
7 |Rahul |39000 |Lucknow
The following query arranges the contents of the table in ascending order based on the name of the Employee.
ij> SELECT * FROM Employees ORDER BY Name;
This will generate the following output −
ID |NAME |SALARY |LOCATION
---------------------------------------------------------------
1 |Amit |30000 |Hyderabad
4 |Archana |15000 |Mumbai
2 |Kalyan |40000 |Vishakhapatnam
7 |Rahul |39000 |Lucknow
3 |Renuka |50000 |Delhi
6 |Suchatra|33000 |Pune
5 |Trupthi |45000 |Kochin
7 rows selected
Similarly, following query arranges the contents of the table in descending order based on the salary of the Employee −
ij> SELECT * FROM Employees ORDER BY Salary DESC;
This will generate the following output −
ID |NAME |SALARY |LOCATION
---------------------------------------------------------------
3 |Renuka |50000 |Delhi
5 |Trupthi |45000 |Kochin
2 |Kalyan |40000 |Vishakhapatnam
7 |Rahul |39000 |Lucknow
6 |Suchatra |33000 |Pune
1 |Amit |30000 |Hyderabad
4 |Archana |15000 |Mumbai
7 rows selected
Sorting Data using JDBC program
This section teaches you how to sort the contents of a table in Derby using JDBC. You can arrange records in order using the ORDER BY clause and the keywords ASC (denoting ascending order), and DSC (denoting descending order).
If you want to request the Derby network server using network client, make sure that the server is up and running. The class name for the Network client driver is org.apache.derby.jdbc.ClientDriver and the URL is jdbc:derby://localhost:1527/DATABASE_NAME;create=true;user=USER_NAME;passw
ord=PASSWORD“.
Follow the steps given below to sort the records of a table in Apache Derby −
Step 1: Register the driver
To communicate with the database, first of all, you need to register the driver. The forName() method of the class Class accepts a String value representing a class name loads it in to the memory, which automatically registers it. Register the driver using this method.
Step 2: Get the connection
In general, the first step we do to communicate to the database is to connect with it. The
Connection class represents the physical connection with a database server. You can create a connection object by invoking the
getConnection() method of the
DriverManager class. Create a connection using this method.
Step 3: Create a statement object
You need to create a Statement or PreparedStatement or, CallableStatement objects to send SQL statements to the database. You can create these using the methods createStatement(), prepareStatement() and, prepareCall() respectively. Create either of these objects using the appropriate method.
Step 4: Execute the query
After creating a statement, you need to execute it. The Statement class provides various methods to execute a query like the execute() method to execute a statement that returns more than one result set. The executeUpdate() method executes queries like INSERT, UPDATE, DELETE. The executeQuery() method returns data. Use either of these methods and execute the statement created previously.
Example
Following JDBC example demonstrates how to sort the records of a table in Apache Derby using JDBC program. Here, we are connecting to a database named sampleDB (will create if it does not exist) using the embedded driver.
import java.sql.Connection;
import java.sql.DriverManager;
import java.sql.ResultSet;
import java.sql.SQLException;
import java.sql.Statement;
public class SortData {
public static void main(String args[]) throws SQLException, ClassNotFoundException {
//Registering the driver
Class.forName("org.apache.derby.jdbc.EmbeddedDriver");
//Getting the Connection object
String URL = "jdbc:derby:SampleDB;create=true";
Connection conn = DriverManager.getConnection(URL);
//Creating the Statement object
Statement stmt = conn.createStatement();
//Creating a table and populating it
String query = "CREATE TABLE Employees("
+ "Id INT NOT NULL GENERATED ALWAYS AS IDENTITY, "
+ "Name VARCHAR(255), Salary INT NOT NULL, "
+ "Location VARCHAR(255), "
+ "PRIMARY KEY (Id))";
String query = "INSERT INTO Employees("
+ "Name, Salary, Location) VALUES "
+ "(''Amit'', 30000, ''Hyderabad''), "
+ "(''Kalyan'', 40000, ''Vishakhapatnam''), "
+ "(''Renuka'', 50000, ''Delhi''), "
+ "(''Archana'', 15000, ''Mumbai''), "
+ "(''Trupthi'', 45000, ''Kochin''), "
+ "(''Suchatra'', 33000, ''Pune''), "
+ "(''Rahul'', 39000, ''Lucknow''), "
+ "(''Trupti'', 45000, ''Kochin'')";
//Executing the query
String query = "SELECT Location, SUM(Salary) " + "from Employees GROUP BY Location";
ResultSet rs = stmt.executeQuery(query);
while(rs.next()) {
System.out.println("Salary: "+rs.getString(1));
System.out.println("Location: "+rs.getString(2));
System.out.println(" ");
}
}
}
Output
On executing the above program, you will get the following output −
Salary: Chennai
Location: 43000
Salary: Delhi
Location: 50000
Salary: Hyderabad
Location: 30000
Salary: Kochin
Location: 45000
Salary: Lucknow
Location: 39000
Salary: Mumbai
Location: 15000
Salary: Pune
Location: 33000
Apache Derby – Having Clause
The HAVING Clause enables you to specify conditions that filter which group results appear in the results.
The WHERE clause places conditions on the selected columns, whereas the HAVING clause places conditions on groups created by the GROUP BY clause.
Syntax
Following is the syntax of the HAVING clause −
ij> SELECT column1, column2 . . . from table_name GROUP BY column having
condition;
Example
Suppose, we have a table named Employees in the database with the 13 records as shown below −
ID |NAME |SALARY |LOCATION
------------------------------------------------------------------
1 |Amit |30000 |Hyderabad
2 |Rahul |39000 |Lucknow
3 |Kalyan |40000 |Vishakhapatnam
4 |Renuka |50000 |Hyderabad
5 |Archana |15000 |Vishakhapatnam
6 |Krishna |40000 |Hyderabad
7 |Trupthi |45000 |Vishakhapatnam
8 |Raghav |12000 |Lucknow
9 |Radha |50000 |Delhi
10 |Anirudh |15000 |Mumbai
11 |Tara |45000 |Kochin
12 |Sucharita|44000 |Kochin
13 |Rizwan |20000 |Lucknow
The following query displays maximum salaries of the employees in the location which have at least 3 employees −
ij> SELECT Location, MAX(Salary) from Employees GROUP BY Location having
count(Location)>=3;
This generates the following output −
LOCATION |2
------------------------------------------------------------
Hyderabad |50000
Lucknow |39000
Vishakhapatnam |45000
3 rows selected
Sorting Data using JDBC program
This section teaches you how to use Having a clause in the Apache Derby database using JDBC application.
If you want to request the Derby network server using network client, make sure that the server is up and running. The class name for the Network client driver is org.apache.derby.jdbc.ClientDriver and the URL is jdbc:derby://localhost:1527/DATABASE_NAME;create=true;user=USER_NAME;passw ord=PASSWORD“
Follow the steps given below to sort the records of a table in Apache Derby
Step 1: Register the driver
To communicate with the database, first of all, you need to register the driver. The forName() method of the class Class accepts a String value representing a class name, and loads it in to the memory, which automatically registers it. Register the driver using this method.
Step 2: Get the connection
In general, the first step we do to communicate to the database is to connect with it. The Connection class represents the physical connection with a database server. You can create a connection object by invoking the getConnection() method of the DriverManager class. Create a connection using this method.
Step 3: Create a statement object
You need to create a Statement or PreparedStatement or, CallableStatement objects to send SQL statements to the database. You can create these using the methods createStatement(), prepareStatement() and, prepareCall() respectively. Create either of these objects using the appropriate method.
Step 4: Execute the query
After creating a statement, you need to execute it. The Statement class provides various methods to execute a query like the execute() method to execute a statement that returns more than one result set. The executeUpdate() method executes queries like INSERT, UPDATE, DELETE. The executeQuery() method returns data. Use either of these methods and execute the statement created previously.
Example
Following JDBC example demonstrates how to use Group By clause and perform CURD operations on a table in Apache Derby using JDBC program. Here, we are connecting to a database named sampleDB (will create if it does not exist) using the embedded driver.
import java.sql.Connection;
import java.sql.DriverManager;
import java.sql.Statement;
import java.sql.ResultSet;
public class HavingClauseExample {
public static void main(String args[]) throws Exception {
//Registering the driver
Class.forName("org.apache.derby.jdbc.EmbeddedDriver");
//Getting the Connection object
String URL = "jdbc:derby:sampleDB;create=true";
Connection conn = DriverManager.getConnection(URL);
//Creating the Statement object
Statement stmt = conn.createStatement();
//Creating a table and populating it
stmt.execute("CREATE TABLE EmployeesData( "
+ "Id INT NOT NULL GENERATED ALWAYS AS IDENTITY, "
+ "Name VARCHAR(255), "
+ "Salary INT NOT NULL, "
+ "Location VARCHAR(255), "
+ "PRIMARY KEY (Id))");
stmt.execute("INSERT INTO EmployeesData(Name, Salary, Location) "
+ "VALUES (''Amit'', 30000, ''Hyderabad''), "
+ "(''Rahul'', 39000, ''Lucknow''), "
+ "(''Renuka'', 50000, ''Hyderabad''), "
+ "(''Archana'', 15000, ''Vishakhapatnam''), "
+ "(''Kalyan'', 40000, ''Hyderabad''), "
+ "(''Trupthi'', 45000, ''Vishakhapatnam''), "
+ "(''Raghav'', 12000, ''Lucknow''), "
+ "(''Suchatra'', 33000, ''Vishakhapatnam''), "
+ "(''Rizwan'', 20000, ''Lucknow'')");
//Executing the query
String query = "SELECT Location, MAX(Salary) "
+ "from EmployeesData GROUP BY Location having "
+ "count(Location)>=3";
ResultSet rs = stmt.executeQuery(query);
while(rs.next()) {
System.out.println(rs.getString(1));
System.out.println(rs.getString(2));
System.out.println(" ");
}
}
}
Output
On executing the above program, you will get the following output −
Hyderabad
50000
Lucknow
39000
Vishakhapatnam
45000
Apache Derby – Alter Table Statement
The ALTER TABLE statement, allows you to alter an existing table. Using this you can do the following −
-
Add a column, add a constraint
-
Drop a column, drop a constraint
-
Change the row level locking of a table
Let us assume we have created a table named Employees as shown below −
ij> CREATE TABLE Employees (
Id INT NOT NULL GENERATED ALWAYS AS IDENTITY,
Name VARCHAR(255),
Salary INT NOT NULL,
Location VARCHAR(255),
PRIMARY KEY (Id)
);
And, inserted four records using the insert statement as −
ij> INSERT INTO Employees (Name, Salary, Location) VALUES
(''Amit'', 30000, ''Hyderabad''),
(''Kalyan'', 40000, ''Vishakhapatnam''),
(''Renuka'', 50000, ''Delhi''),
(''Archana'', 15000, ''Mumbai'');
Adding a column to a Table
Following is the syntax to add a column to a table using ALTER statement.
ALTER TABLE table_name ADD COLUMN column_name column_type;
Example
Using ALTER statement, we are trying to add a new column named Age with the type integer.
ALTER TABLE Employees ADD COLUMN Age INT;
0 rows inserted/updated/deleted
Add another column named Phone_No with the type integer.
ALTER TABLE Employees ADD COLUMN Phone_No BIGINT;
0 rows inserted/updated/deleted
The DESCRIBE command describes specified table by listing the columns and their details, if the table exists. If you DESCRIBE, the table Employees you can observe the newly added columns as shown below −
ij> DESCRIBE Employees;
COLUMN_NAME |TYPE_NAME|DEC&|NUM&|COLUM&|COLUMN_DEF|CHAR_OCTE&|IS_NULL&
------------------------------------------------------------------------------
ID |INTEGER |0 |10 |10 |AUTOINCRE&|NULL |NO
NAME |VARCHAR |NULL|NULL |255 |NULL | 510 |YES
SALARY |INTEGER |0 |10 |10 |NULL |NULL |NO
LOCATION |VARCHAR |NULL|NULL |255 |NULL | 510 |YES
AGE |INTEGER |0 |10 |10 |NULL |NULL |YES
PHONE_NO |INTEGER |0 |10 |10 |NULL |NULL |YES
6 rows selected
Adding a constraint to a table
Following is the syntax to add a constraint to a column of a table using ALTER statement.
ALTER TABLE table_name ADD CONSTRAINT constraint_name constraint (column_name);
Where constraint can be NOT NULL, NULL, PRIMARY KEY, UNIQUE, FOREIGN KEY, CHECK.
Example
Using ALTER statement, we are trying to add constraint UNIQUE to the Phone_No column.
ij> ALTER TABLE Employees ADD CONSTRAINT New_Constraint UNIQUE(Phone_No);
0 rows inserted/updated/deleted
Once, you add a UNIQUE constraint to a column, it cannot have the same values for two rows, i.e., phone number should be unique for each employee.
If you try to add two columns with a same phone number, you will get an exception as shown below.
ij> INSERT INTO Employees (Name, Salary, Location, Age, Phone_No) VALUES
(''Amit'', 30000, ''Hyderabad'', 30, 9848022338);
1 row inserted/updated/deleted
ij> INSERT INTO Employees (Name, Salary, Location, Age, Phone_No) VALUES
(''Sumit'', 35000, ''Chennai'', 25, 9848022338);
ERROR 23505: The statement was aborted because it would have caused a duplicate
key value in a unique or primary key constraint or unique index identified by
''NEW_CONSTRAINT'' defined on ''EMPLOYEES''.
Dropping a constraint from a table
Following is the syntax to drop a constraint of a column −
ALTER TABLE table_name DROP CONSTRAINT constraint_name;
Example
The following query deletes the constraint name New_Constraint on the column Phone_No created above.
ij> ALTER TABLE Employees DROP CONSTRAINT New_Constraint;
0 rows inserted/updated/deleted
Since we have removed the UNIQUE constraint on the column Phone_No, you can add columns with the same phone number.
ij> INSERT INTO Employees (Name, Salary, Location, Age, Phone_No) VALUES
(''Sumit'', 35000, ''Chennai'', 25, 9848022338);
1 row inserted/updated/deleted
You can verify the contents of the table ij> select * from Employees as follows −
ID |NAME |SALARY |LOCATION |AGE |PHONE_NO
-------------------------------------------------------------------------
1 |Amit |30000 |Hyderabad|30 |9848022338
2 |Sumit|35000 |Chennai |25 |9848022338
2 rows selected
Dropping a column from a table
Following is the syntax to drop a column of a column.
ALTER TABLE table_name DROP COLUMN column_name;
Example
Following query deletes the column named age of the employee −
ij> ALTER TABLE Employees DROP COLUMN Age;
0 rows inserted/updated/deleted
If you describe the table, you can see only 4 columns.
ij> DESCRIBE Employees;
COLUMN_NAME |TYPE_NAME|DEC&|NUM&|COLUM&|COLUMN_DEF|CHAR_OCTE&|IS_NULL&
------------------------------------------------------------------------------
ID |INTEGER |0 |10 |10 |AUTOINCRE&|NULL |NO
NAME |VARCHAR |NULL|NULL|255 |NULL |510 |YES
SALARY |INTEGER |0 |10 |10 |NULL |NULL |NO
LOCATION |VARCHAR |NULL|NULL|255 |NULL |510 |YES
PHONE_NO |BIGINT |0 |10 |19 |NULL |NULL |YES
Altering table using JDBC program
Following is the JDBC program to alter a table using the ALTER query −
import java.sql.Connection;
import java.sql.DriverManager;
import java.sql.ResultSet;
import java.sql.SQLException;
import java.sql.Statement;
public class AlterTableExample {
public static void main(String args[]) throws Exception {
//Registering the driver
Class.forName("org.apache.derby.jdbc.EmbeddedDriver");
//Getting the Connection object
String URL = "jdbc:derby:sampleDB;create=true";
Connection conn = DriverManager.getConnection(URL);
//Creating the Statement object
Statement stmt = conn.createStatement();
//Executing the query
String createQuery = "CREATE TABLE Employees( "
+ "Id INT NOT NULL GENERATED ALWAYS AS IDENTITY, "
+ "Name VARCHAR(255), "
+ "Salary INT NOT NULL, "
+ "Location VARCHAR(255), "
+ "PRIMARY KEY (Id))";
stmt.execute(createQuery);
System.out.println("Table created");
System.out.println(" ");
//Executing the query
String insertQuery = "INSERT INTO Employees("
+ "Name, Salary, Location) VALUES "
+ "(''Amit'', 30000, ''Hyderabad''), "
+ "(''Kalyan'', 40000, ''Vishakhapatnam''), "
+ "(''Renuka'', 50000, ''Delhi''), "
+ "(''Archana'', 15000, ''Mumbai''), "
+ "(''Trupti'', 45000, ''Kochin'')";
stmt.execute(insertQuery);
System.out.println("Values inserted");
System.out.println(" ");
//Executing the query
String selectQuery = "SELECT * FROM Employees";
ResultSet rs = stmt.executeQuery(selectQuery);
System.out.println("Contents of the table after inserting the table");
while(rs.next()) {
System.out.println("Id: "+rs.getString("Id"));
System.out.println("Name: "+rs.getString("Name"));
System.out.println("Salary: "+rs.getString("Salary"));
System.out.println("Location: "+rs.getString("Location"));
}
System.out.println(" ");
//Altering the table
stmt.execute("ALTER TABLE Employees ADD COLUMN Age INT");
stmt.execute("ALTER TABLE Employees ADD COLUMN Phone_No BigINT");
stmt.execute("ALTER TABLE Employees " + "ADD CONSTRAINT New_Constraint UNIQUE(Phone_No)");
stmt.execute("INSERT INTO Employees "
+ "(Name, Salary, Location, Age, Phone_No) "
+ "VALUES (''Amit'', 30000, ''Hyderabad'', 30, 9848022338)");
ResultSet alterResult = stmt.executeQuery("Select * from Employees");
System.out.println("Contents of the table after altering "
+ "the table and inserting values to it: ");
while(alterResult.next()) {
System.out.println("Id: "+alterResult.getString("Id"));
System.out.println("Name: "+alterResult.getString("Name"));
System.out.println("Salary: "+alterResult.getString("Salary"));
System.out.println("Location: "+alterResult.getString("Location"));
System.out.println("Age: "+alterResult.getString("Age"));
System.out.println("Phone_No: "+alterResult.getString("Phone_No"));
}
}
}
Output
On executing the above program, the following output will be generated −
Table created
Values inserted
Contents of the table after inserting the table
Id: 1
Name: Amit
Salary: 30000
Location: Hyderabad
Id: 2
Name: Kalyan
Salary: 40000
Location: Vishakhapatnam
Id: 3
Name: Renuka
Salary: 50000
Location: Delhi
Id: 4
Name: Archana
Salary: 15000
Location: Mumbai
Id: 5
Name: Trupti
Salary: 45000
Location: Kochin
Contents of the table after altering the table and inserting values to it:
Id: 1
Name: Amit
Salary: 30000
Location: Hyderabad
Age: null
Phone_No: null
Id: 2
Name: Kalyan
Salary: 40000
Location: Vishakhapatnam
Age: null
Phone_No: null
Id: 3
Name: Renuka
Salary: 50000
Location: Delhi
Age: null
Phone_No: null
Id: 4
Name: Archana
Salary: 15000
Location: Mumbai
Age: null
Phone_No: null
Id: 5
Name: Trupti
Salary: 45000
Location: Kochin
Age: null
Phone_No: null
Id: 6
Name: Amit
Salary: 30000
Location: Hyderabad
Age: 30
Phone_No: 9848022338
Apache Derby – Derby Indexes
An index in a table is nothing but a pointer to its data. These are used to speed up the data retrieval from a table.
If we use indexes, the INSERT and UPDATE statements get executed in a slower phase. Whereas SELECT and WHERE get executed with in lesser time.
Creating an Index
The CREATE INDEX statement is used for creating a new Index in a table in Derby database.
Syntax
Following is the syntax of the CREATE INDEX statement −
CTREATE INDEX index_name on table_name (column_name);
Example
Suppose we have created a table named Employees in Apache Derby as shown below.
CREATE TABLE Emp ( Id INT NOT NULL GENERATED ALWAYS AS IDENTITY,
Name VARCHAR(255),
Salary INT NOT NULL,
Location VARCHAR(255),
Phone_Number BIGINT
);
The following SQL statement creates an index on the column named Salary in the table Employees.
ij> CREATE INDEX example_index on Emp (Salary);
0 rows inserted/updated/deleted
Creating a UNIQUE index
In Apache Derby, UNIQUE indexes are used for data integration. Once you create a UNIQUE index on a column in a table, it does not allow duplicate values.
Syntax
Following is the syntax of creating a unique index.
CREATE UNIQUE INDEX index_name on table_name (column_name);
Example
Following example creates a UNIQUE index on the column Id of the table Employee.
ij> CREATE UNIQUE INDEX unique_index on Emp (Phone_Number);
0 rows inserted/updated/deleted
Once you have created a unique index on a column, you cannot enter same values for that column in another row. In short, a column which is has a UNIQE index will not allow duplicate values.
Insert a row in the Emp table as shown below
ij> INSERT INTO Emp(Name, Salary, Location, Phone_Number) VALUES (''Amit'',
45000, ''Hyderabad'', 9848022338);
1 row inserted/updated/deleted
Since we have created a unique index on the column Phone_No, if you ty to enter the same value as in the previous record, it shows an error.
ij> INSERT INTO Emp(Name, Salary, Location, Phone_Number) VALUES (''Sumit'',
35000, ''Chennai'', 9848022338);
ERROR 23505: The statement was aborted because it would have caused a duplicate
key value in a unique or primary key constraint or unique index identified by
''UNIQUE_INDEX'' defined on ''EMP''.
Creating a COMPOSITE index
You can create a single index on two rows and it is called Composite index.
Syntax
Following is the syntax of the composite index.
CREATE INDEX index_name on table_name (column_name1, column_name2);
Example
Following index creates a composite index on the columns Name and Location.
ij> CREATE INDEX composite_index on Emp (Name, Location);
0 rows inserted/updated/deleted
Displaying the Indexes
The SHOW INDEXES query displays the list of indexes on a table.
Syntax
Following is the syntax of the SHOW INDEXES statement −
SHOW INDEXES FROM table_name;
Example
Following example, i displays the indexes on the table Employees.
ij> SHOW INDEXES FROM Emp;
This produces the following result.
ij> SHOW INDEXES FROM Emp;
TABLE_NAME |COLUMN_NAME |NON_U&|TYPE|ASC&|CARDINA&|PAGES
----------------------------------------------------------------------------
EMP |PHONE_NUMBER|false |3 |A |NULL |NULL
EMP |NAME |true |3 |A |NULL |NULL
EMP |LOCATION |true |3 |A |NULL |NULL
EMP |SALARY |true |3 |A |NULL |NULL
4 rows selected
Dropping Indexes
The Drop Index statement deletes/drops the given index on a column.
Syntax
Following is the syntax of the DROP INDEX statement.
DROP INDEX index_name;
Example
Following example drops an indexes named composite_index and unique_index created above.
ij> DROP INDEX composite_index;
0 rows inserted/updated/deleted
ij>Drop INDEX unique_index;
0 rows inserted/updated/deleted
Now, if you verify the list of indexes you can see index on one column since we have deleted the remaining.
ij> SHOW INDEXES FROM Emp;
TABLE_NAME |COLUMN_NAME |NON_U&|TYPE|ASC&|CARDINA&|PAGES
----------------------------------------------------------------------------
EMP |SALARY |true |3 |A |NULL |NULL
1 row selected
Handling Indexes using JDBC program
Following JDBC program demonstrates how to create drop indexes on a column in a table.
import java.sql.Connection;
import java.sql.DriverManager;
import java.sql.SQLException;
import java.sql.Statement;
public class IndexesExample {
public static void main(String args[]) throws Exception {
//Registering the driver
Class.forName("org.apache.derby.jdbc.EmbeddedDriver");
//Getting the Connection object
String URL = "jdbc:derby:MYDATABASE;create=true";
Connection conn = DriverManager.getConnection(URL);
//Creating the Statement object
Statement stmt = conn.createStatement();
//Creating the Emp table
String createQuery = "CREATE TABLE Emp( "
+ "Id INT NOT NULL GENERATED ALWAYS AS IDENTITY, "
+ "Name VARCHAR(255), "
+ "Salary INT NOT NULL, "
+ "Location VARCHAR(255), "
+ "Phone_Number BIGINT )";
stmt.execute(createQuery);
System.out.println("Table created");
System.out.println(" ");
//Creating an Index on the column Salary
stmt.execute("CREATE INDEX example_index on Emp (Salary)");
System.out.println("Index example_index inserted");
System.out.println(" ");
//Creating an Unique index on the column Phone_Number
stmt.execute("CREATE UNIQUE INDEX unique_index on Emp (Phone_Number)");
System.out.println("Index unique_index inserted");
System.out.println(" ");
//Creating a Composite Index on the columns Name and Location
stmt.execute("CREATE INDEX composite_index on Emp (Name, Location)");
System.out.println("Index composite_index inserted");
System.out.println(" ");
//listing all the indexes
System.out.println("Listing all the columns with indexes");
//Dropping indexes
System.out.println("Dropping indexes unique_index and, composite_index ");
stmt.execute("Drop INDEX unique_index");
stmt.execute("DROP INDEX composite_index");
}
}
Output
On executing, this generates the following result
Table created
Index example_index inserted
Index unique_index inserted
Index composite_index inserted
Listing all the columns with indexes
Dropping indexes unique_index and, composite_index
Apache Derby – Procedures
This chapter teaches you how to create and drop procedures in Derby.
Creating a procedure
You can create a procedure using the CREATE PROCEDURE statement.
Syntax
Following is the syntax of the CREATE PROCEDURE statement.
CREATE PROCEDURE procedure_name (parameter_type parameter_name1, parameter_type
parameter_name2 . . . .) parameter_style;
Example
Suppose, we have created a table in Derby as shown below.
CREATE TABLE Emp ( Id INT NOT NULL GENERATED ALWAYS AS IDENTITY,
Name VARCHAR(255),
Salary INT NOT NULL,
Location VARCHAR(255),
Phone_Number BIGINT
);
And inserted values in it as follows −
INSERT INTO Employees(Name, Salary, Location) VALUES
(''Amit'', 30000, ''Hyderabad''),
(''Kalyan'', 40000, ''Vishakhapatnam''),
(''Renuka'', 50000, ''Delhi''),
(''Archana'', 15000, ''Mumbai''),
(''Trupthi'', 45000, ''Kochin'')";
Following example creates a procedure named Update_Procedure which accepts JAVA parameters.
ij> CREATE PROCEDURE Update_Procedure(IN id INTEGER, IN name VARCHAR(10))
PARAMETER STYLE JAVA READS SQL DATA LANGUAGE JAVA EXTERNAL NAME
''ProcedureExample.testProc
> 0 rows inserted/updated/deleted
Where ProcedureExample class looks like −
import java.sql.Connection;
import java.sql.DriverManager;
import java.sql.PreparedStatement;
public class ProcedureExample {
public static void testProc(int salary, String name) throws Exception {
String connectionURL = "jdbc:derby:MYDATABASE;create=true";
Connection conn = DriverManager.getConnection(connectionURL);
String query = "UPDATE Employees SET SALARY = ? WHERE NAME = ?";
PreparedStatement pstmt = conn.prepareStatement(query);
pstmt.setInt(1, salary);
pstmt.setString (2, name);
pstmt.executeUpdate();
}
}
You can verify the list of procedures using SHOW PROCEDURES query.
ij> SHOW PROCEDURES;
PROCEDURE_SCHEM |PROCEDURE_NAME |REMARKS
------------------------------------------------------------------------
APP |UPDATE_PROCEDURE |ProcedureExample.te&
SALES |EXAMPLE_ PROCEDURE |com.example.sales.c&
SQLJ |INSTALL_JAR |org.apache.derby.ca&
SQLJ |REMOVE_JAR |org.apache.derby.ca&
SQLJ |REPLACE_JAR |org.apache.derby.ca&
SYSCS_UTIL |SYSCS_BACKUP_DATABASE |org.apache.derby.ca&
. . . . . . . . . . . . . . . . . . . . . . . . . . . . . . . . . . .
. . . . . . . . . . . . . . . . . . . . . . . . . . . . . . . . . . .
. . . . . . . . . . . . . . . . . . . . . . . . . . . . . . . . . . .
Here you can observe the newly created procedure.
Dropping a procedure
You can drop a procedure using the DROP PROCEDURE statement.
Syntax
Following is the syntax of the DROP PROCEDURE statement.
DROP PROCEDURE procedure_name;
Example
Following example drops a procedure named Update_Procedure created above.
ij> DROP PROCEDURE Update_Procedure;
> 0 rows inserted/updated/deleted
Apache Derby – Schemas
A database schema is the skeleton structure that represents the logical view of the entire database. It defines how the data is organized and how the relations among them are associated. It formulates all the constraints that are to be applied to the data.
Creating a Schema
You can create a schema in Apache Derby using the CREATE SCHEMA statement.
Syntax
Following is the syntax to the CREATE SCHEMA statement.
CREATE SCHEMA schema_name AUTHORIZATION id
Example
Following example creates a schema named my_schema in Derby database.
ij> CREATE SCHEMA AUTHORIZATION my_schema;
0 rows inserted/updated/deleted
Then, you can create a table in this schema as shown below.
ij> CREATE TABLE my_schema.Emp ( Id INT NOT NULL GENERATED ALWAYS AS IDENTITY,
   Name VARCHAR(255),
   Salary INT NOT NULL,
   Location VARCHAR(255),
   Phone_Number BIGINT
);
> > > > > 0 rows inserted/updated/deleted
You can verify the list of schemas using the SHOW SCHEMAS query here you can find the list of schemas created.
ij> show schemas;
TABLE_SCHEM
------------------------------
APP
MY_SCHEMA
NULLID
SQLJ
SYS
SYSCAT
SYSCS_DIAG
SYSCS_UTIL
SYSFUN
SYSIBM
SYSPROC
SYSSTAT
12 rows selected
Dropping a Schema
You can drop an existing schema using the DROP SCHEMA statement.
Syntax
Following is the syntax of DROPS SCHEMA statement.
DROP SCHEMA my_schema RESTRICT;
Example
You can delete a schema only if does not have any objects in it. To delete the schema, delete all the tables in it and delete the schema.
ij> DROP TABLE my_schema.Emp;
0 rows inserted/updated/deleted
Following example drops the above created schema.
ij> DROP SCHEMA my_schema RESTRICT;
0 rows inserted/updated/deleted
JDBC Example
Following JDBC example creates and drops a schema named my_schema.
import java.sql.Connection;
import java.sql.DriverManager;
import java.sql.SQLException;
import java.sql.Statement;
public class CreateSchemaExample {
   public static void main(String args[]) throws Exception {
      //Registering the driver
      Class.forName("org.apache.derby.jdbc.EmbeddedDriver");
      //Getting the Connection object
      String URL = "jdbc:derby:sampleDB;create=true";
      Connection conn = DriverManager.getConnection(URL);

      //Creating the Statement object
      Statement stmt = conn.createStatement();

      stmt.execute("CREATE SCHEMA AUTHORIZATION my_schema");
      //Executing the query
      String query = "CREATE TABLE my_schema.Employees( "
         + "Id INT NOT NULL GENERATED ALWAYS AS IDENTITY, "
         + "Name VARCHAR(255), "
         + "Salary INT NOT NULL, "
         + "Location VARCHAR(255), "
         + "PRIMARY KEY (Id))";
      stmt.execute(query);
      System.out.println("Table created in schema");
      stmt.execute("DROP TABLE my_schema.Employees");
      stmt.execute("DROP SCHEMA my_schema RESTRICT");
      System.out.println("Schema dropped");
   }
}
Output
On executing, the above program generates the following example.
Table created in schema
Schema dropped
Apache Derby – Triggers
In databases, triggers are the statements/code which gets executed whenever an event occurred. Once you create a trigger to a particular event on a table, the code specified in the trigger gets executed each time the event occurs. You can create multiple triggers on a single table.
This chapter teaches you how to create and drop triggers using Apache Derby.
Creating a trigger
You can create a trigger in Derby using the CREATE TRIGGER statement.
Syntax
Following is the syntax of the CREATE TRIGGER query.
CREATE TRIGGER trigger_name
{ NO CASCADE BEFORE | AFTER }
{INSERT [OR] | UPDATE [OR] | DELETE}[OF col_name]
ON table_name
[REFERENCING OLD AS o NEW AS n]
[FOR EACH ROW]
Statement
Example
Suppose, we have created a table named Emp in Derby as shown below.
CREATE TABLE Emp (
   Id INT NOT NULL,
   Name VARCHAR(255),
   Salary INT NOT NULL,
   Location VARCHAR(255)
);
And inserted 5 rows in it.
INSERT INTO Emp(Id, Name, Salary, Location) VALUES
   (1, ''Amit'', 30000, ''Hyderabad''),
   (2, ''Kalyan'', 40000, ''Vishakhapatnam''),
   (3,''Renuka'', 50000, ''Delhi''),
   (4, ''Archana'', 15000, ''Mumbai''),
   (5, ''Trupthi'', 45000, ''Kochin'');
If we have another table named BackUp and our intention is to store deleted rows from Emp table in this.
CREATE TABLE BackUp (
   Id INT NOT NULL,
   Name VARCHAR(255),
   Salary INT NOT NULL,
   Location VARCHAR(255)
);
The following query creates a trigger on the DELETE query table named Emp. It stores the deleted rows of Emp to the table Backup.
ij> CREATE TRIGGER my_trigger
AFTER DELETE ON Emp
REFERENCING OLD AS oldRow
FOR EACH ROW MODE DB2SQL
INSERT INTO BackUp
VALUES (oldRow.Id, oldRow.Name, oldRow.Salary, oldRow.Location);
Now, delete a row from Emp table as −
ij> Delete From Emp where Name = ''Kalyan
1 row inserted/updated/deleted
ij> Delete From Emp where Name = ''Amit
1 row inserted/updated/deleted
If you verify the BackUp table, you can observe the deleted rows in it.
ij> select * from BackUp;
ID |NAME   |SALARY |LOCATION
-------------------------------------------------------------------------
2  |Kalyan |40000  |Vishakhapatnam
1  |Amit   |30000  |Hyderabad

2 rows selected
Deleting a trigger
You can delete a trigger in Derby using the DROP TRIGGER statement.
Syntax
Following is the syntax of the DROP TRIGGER query −
ij> Drop trigger tigger_name;
Example
Following example deletes the trigger my_trigger created above −
ij> Drop trigger my_trigger;
0 rows inserted/updated/deleted
JDBC example
Following JDBC program creates and deletes triggers in Derby.
import java.sql.Connection;
import java.sql.DriverManager;
import java.sql.ResultSet;
import java.sql.SQLException;
import java.sql.Statement;
public class Triggers_Example {
   public static void main(String args[]) throws SQLException, ClassNotFoundException {
      //Registering the driver
      Class.forName("org.apache.derby.jdbc.EmbeddedDriver");
      //Getting the Connection object
      String URL = "jdbc:derby:TestDataBase;create=true";
      Connection conn = DriverManager.getConnection(URL);

      //Creating the Statement object
      Statement stmt = conn.createStatement();

      //Creating the Emp table
      stmt.execute("CREATE TABLE Emp ( "
         + "Id INT NOT NULL, "
         + "Name VARCHAR(255), "
         + "Salary INT NOT NULL, "
         + "Location VARCHAR(255))");

      //Insert values in to the EMp table
      String query = "INSERT INTO Emp(Id, Name, Salary, Location) VALUES rn"
         +"(1, ''Amit'', 30000, ''Hyderabad''), "
         + "(2, ''Kalyan'', 40000, ''Vishakhapatnam''), "
         + "(3,''Renuka'', 50000, ''Delhi''), "
         + "(4, ''Archana'', 15000, ''Mumbai''), "
         + "(5, ''Trupthi'', 45000, ''Kochin'')";
         stmt.execute(query);

      //Creating the BackUp table
      stmt.execute("CREATE TABLE BackUp ( "
         + "Id INT NOT NULL, "
         + "Name VARCHAR(255), "
         + "Salary INT NOT NULL, "
         + "Location VARCHAR(255))");

      //Creating a trigger
      String createTrigger = "CREATE TRIGGER my_trigger "
         + "AFTER DELETE ON Emp "
         + "REFERENCING OLD AS oldRow "
         + "FOR EACH ROW MODE DB2SQL "
         + "INSERT INTO BackUp "
         + "VALUES (oldRow.Id, oldRow.Name, oldRow.Salary, oldRow.Location)";
      stmt.execute(createTrigger);
      System.out.println("Trigger created");

      //Deleting records from Emp table
      stmt.executeUpdate("Delete From Emp where Name = ''Kalyan''");
      stmt.executeUpdate("Delete From Emp where Name = ''Amit''");
      //Getting the contents of BackUp table
      ResultSet rs = stmt.executeQuery("SELECT * from BackUp");
      while(rs.next()){
         System.out.println(rs.getInt("Id"));
         System.out.println(rs.getString("Name"));
         System.out.println(rs.getString("Salary"));
         System.out.println(rs.getString("Location"));
         System.out.println(" ");
      }
   }
}
Output
On executing the above program, the following output is generated −
Trigger created
2
Kalyan
40000
Vishakhapatnam
1
Amit
30000
Hyderabad