Author: alien

  • Khóa học miễn phí MySQL – Installation nhận dự án làm có lương

    MySQL – Installation

    Table of content


    All downloads for MySQL are located at . Pick the version number of MySQL Community Server which is required along with the platform you will be running it on.

    Installing MySQL on Windows

    In this tutorial, we are installing the latest version of MySQL (8.0.34) on Windows 11. Follow the given steps to do so −

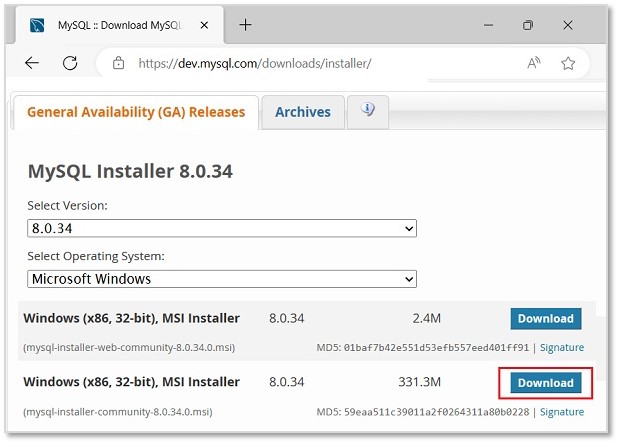
    Step 1: Firstly, choose the MySQL version and operating system. Then, we download the desired MSI installer on your system by clicking the ”Download” button shown in the image below. This installer is suitable for both 32-bit and 64-bit systems.

    MySQL Installation Page

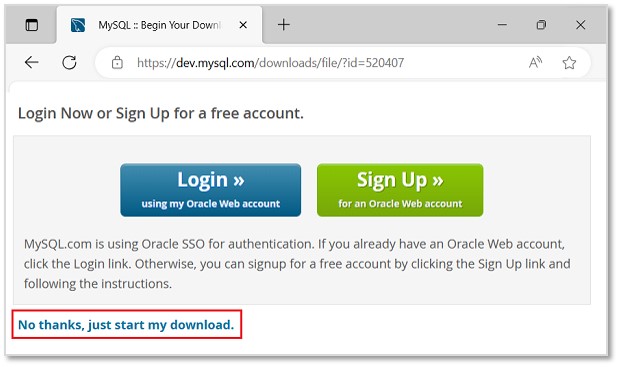
    Step 2: Then, we will be redirected to another file download page. Here, ignore the prompts asking to log in or sign up and directly start downloading by clicking on the link as shown in the image.

    MySQL Begin Installation

    Step 3: Once the installer is downloaded, run it to start the MySQL installation.

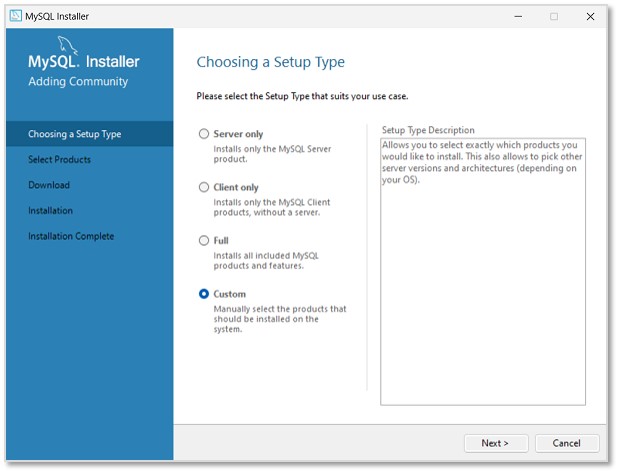
    Step 4: Now, we can see the installer community window, asking to choose a Setup type for our MySQL products. Choose Custom and click Next to decide what products we want to actually install.

    MySQL Setup Type

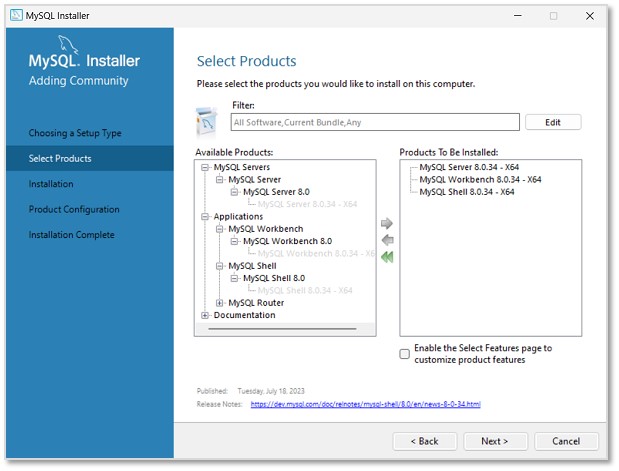
    Step 5: In the next step, select MySQL Server, MySQL Workbench, MySQL Shell (all latest versions) to be installed. We can also choose more products available as per necessity. Click Next.

    MySQL Select Products

    Step 6: The installation process will now begin. However, path conflicts might arise if there exists a path directory with the same name. After the installation is done, click Next.

    MySQL Installation

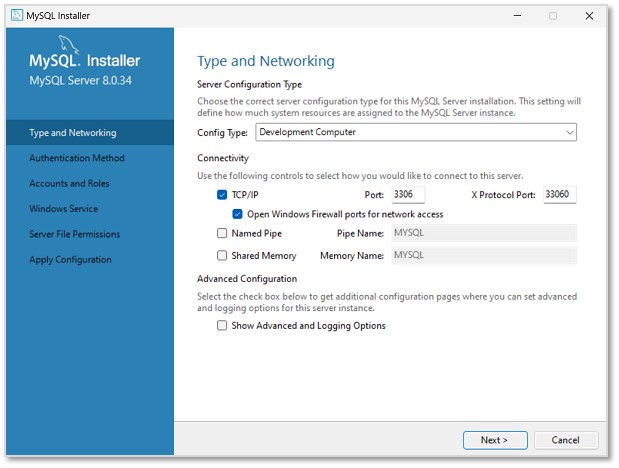
    Step 7: In this step, we will be asked to set Type and Networking of MySQL. Unless there is any particular change we want to make, it is recommended to keep the settings as they are, and click Next.

    MySQL Type and Networking

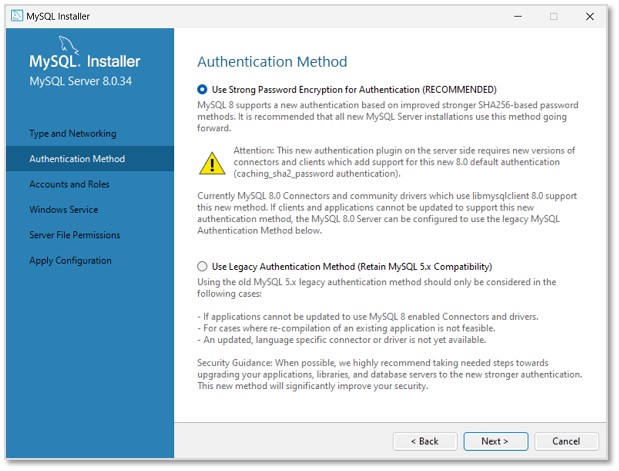
    Step 8: Then, we need to set the Authentication method to access MySQL root user. So, choose the strong password encryption method (as it is recommended) and click Next.

    MySQL Authentication Method

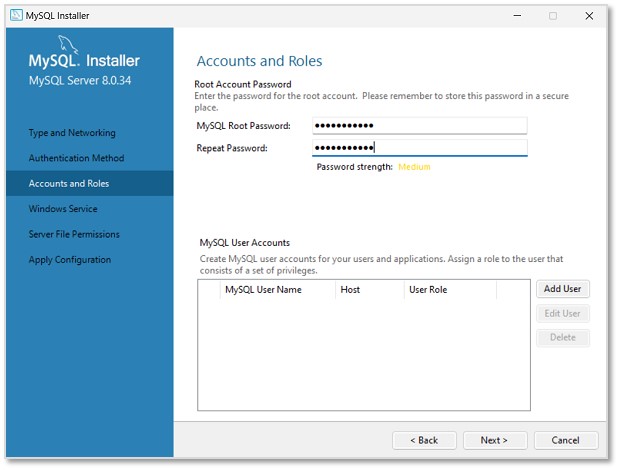
    Step 9: Set a password for the root account. This password must always be used to log into the root account in every session. After setting password, click Next.

    MySQL Root Password

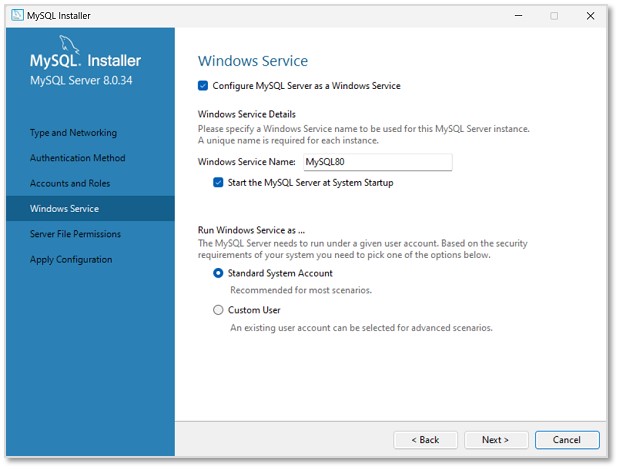
    Step 10: In this step, MySQL Server Instance will be configured as a Windows Service. The default name will be set as “MySQL80”, which can be changed if needed. Click Next.

    MySQL Windows Service

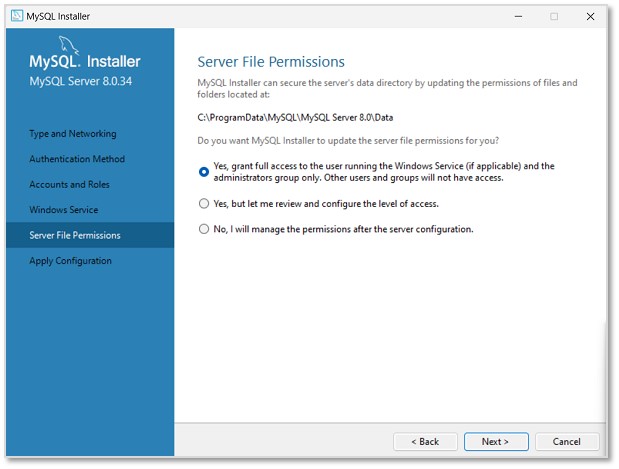
    Step 11: Now, set the file permissions as required and click Next.

    MySQL Server File Permissions

    Step 12: As shown in the image below, the specified configuration steps will be applied on clicking Execute.

    MySQL Apply Configuration

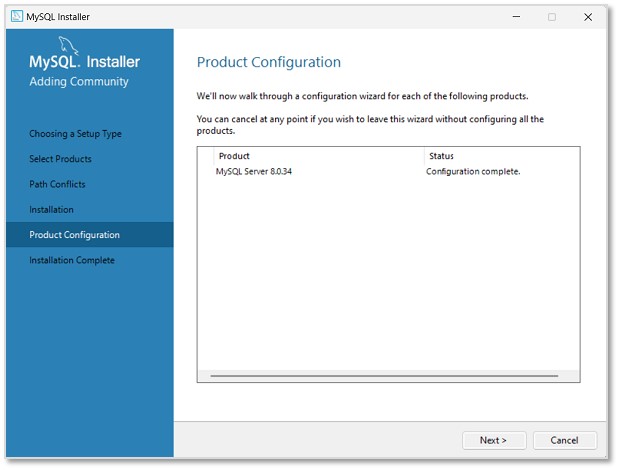
    Once it is completed, click Finish. The next window will display the products on which the configuration is applied. Click Next to finish the installation.

    MySQL Product Configuration

    Step 12: The installation is now complete. Uncheck the options asking to start MySQL Workbench and Shell after setup, so that they will not run after setup. Click Finish.

    MySQL Installation Complete

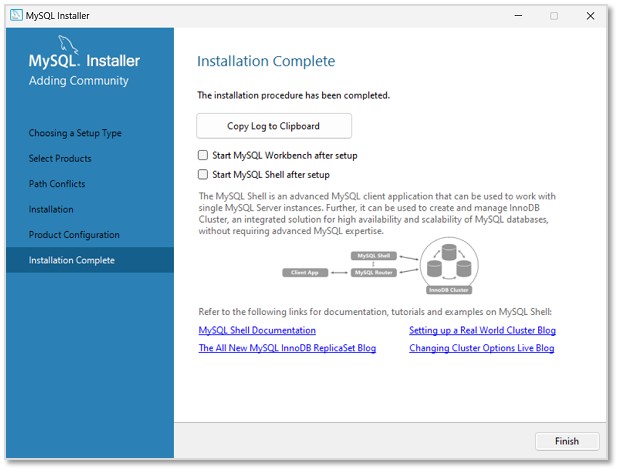
    The MySQL Server is now installed in the Windows Operating System. We can now access it via the Command Prompt or the UI products we installed with it (Shell and Workbench).

    Installing MySQL on Linux/UNIX

    The recommended way to install MySQL on a Linux system is via RPM. MySQL AB makes the following RPMs available for download on its website −

    • MySQL − The MySQL database server manages the databases and tables, controls user access and processes the SQL queries.

    • MySQL-client − MySQL client programs, which make it possible to connect to and interact with the server.

    • MySQL-devel − Libraries and header files that come in handy when compiling other programs that use MySQL.

    • MySQL-shared − Shared libraries for the MySQL client.

    • MySQL-bench − Benchmark and performance testing tools for the MySQL database server.

    The MySQL RPMs listed here are all built on a SuSE Linux system, but they will usually work on other Linux variants with no difficulty.

    Now, you will need to adhere to the steps given below, to proceed with the installation −

    • Login to the system using the root user.

    • Switch to the directory containing the RPMs.

    • Install the MySQL database server by executing the following command. Remember to replace the filename in italics with the file name of your RPM.

    [root@host]# rpm -i MySQL-5.0.9-0.i386.rpm
    

    The above command takes care of installing the MySQL server, creating a user of MySQL, creating necessary configuration and starting the MySQL server automatically.

    You can find all the MySQL related binaries in /usr/bin and /usr/sbin. All the tables and databases will be created in the /var/lib/mysql directory.

    The following code box has an optional but recommended step to install the remaining RPMs in the same manner −

    [root@host]# rpm -i MySQL-client-5.0.9-0.i386.rpm
    [root@host]# rpm -i MySQL-devel-5.0.9-0.i386.rpm
    [root@host]# rpm -i MySQL-shared-5.0.9-0.i386.rpm
    [root@host]# rpm -i MySQL-bench-5.0.9-0.i386.rpm
    

    Khóa học lập trình tại Toidayhoc vừa học vừa làm dự án vừa nhận lương: Khóa học lập trình nhận lương tại trung tâm Toidayhoc

  • Khóa học miễn phí MySQL – Node.js Syntax nhận dự án làm có lương

    MySQL – Node.js Syntax

    Table of content


    Node.js is a JavaScript runtime environment that allows developers to run JavaScript code outside of a web browser, enabling server-side scripting.

    When we talk about a Node.js MySQL connector, we are referring to a specific library that facilitates communication between a Node.js application and a MySQL database. This connector enables developers to interact with a MySQL database by providing methods and functionalities that simplify tasks like querying, updating, and managing data within the database using JavaScript code. Essentially, it acts as a bridge, allowing Node.js applications to seamlessly connect with and manipulate data stored in a MySQL database.

    Installation “mysql” package

    To use MySQL with Node.js, you can use the “mysql” package, which is a popular MySQL driver for Node.js. Here are the steps to install Node.js and the MySQL package −

    Step 1: Install Node.js

    Visit the official Node.js website (https://nodejs.org/) and download the latest version of Node.js for your operating system. Follow the installation instructions provided on the website.

    Step 2: Create a Node.js Project

    Create a new directory for your Node.js project and navigate to it using your terminal or command prompt.

    mkdir mynodeproject
    cd mynodeproject
    

    Step 3: Initialize a Node.js Project

    Run the following command to initialize a new Node.js project. This will create a ”package.json” file.

    npm init -y
    

    Step 4: Install the MySQL Package

    Install the “mysql” package using the following command:

    npm install mysql
    

    Step 5: Create a JavaScript File

    Create a JavaScript file (e.g., app.js) in your project directory.

    Step 6: Run the Node.js Script

    Run your Node.js script using the following command:

    node app.js
    

    Now, you have successfully installed the MySQL Node.js connector (mysql package) for your Node.js project.

    NodeJS Functions to Access MySQL

    In Node.js, the “mysql” package provides a set of functions to interact with MySQL databases. Here are some of the major functions you can use−

    S.No Function & Description
    1

    createConnection(config)

    Creates a new MySQL connection.

    2

    connect(callback)

    Establishes a connection to the MySQL server.

    3

    query(sql, values, callback)

    Executes a SQL query on the connected MySQL database. You can provide placeholders in the SQL query and pass values as an array to replace the placeholders.

    4

    execute(sql, values, callback)

    Similar to the query function, but specifically designed for executing non-select queries (e.g., INSERT, UPDATE, DELETE).

    5

    beginTransaction(callback)

    Starts a new transaction.

    6

    commit(callback)

    Commits the current transaction.

    7

    rollback(callback)

    Rolls back the current transaction.

    8

    end()

    Closes the MySQL connection.

    Basic Example

    Following are the steps to connect and communicate with a MySQL database using Node.js −

    • Download and install Node.js
    • Create a new directory, navigate to it, and run ”npm init -y”.
    • Run ”npm install mysql”.
    • Create a JavaScript file (e.g., app.js) and use the “mysql” package to connect to the MySQL database.
    • Use the query or execute functions to perform SQL queries on the database.
    • Implement error handling for database operations. Close the database connection when finished.
    • Execute your Node.js script with node app.js.

    The following example shows a generic syntax of NodeJS to call any MySQL query.

    const mysql = require("mysql2");
    
    // Create a connection to the MySQL database
    const connection = mysql.createConnection({
      host: ''your-mysql-hostname'',
      user: ''your-mysql-username'',
      password: ''your-mysql-password'',
      database: ''your-mysql-database'',
    });
    
    // Connect to the database
    connection.connect((err) => {
      if (err) {
        console.error(''Error connecting to MySQL:'', err);
        return;
      }
      console.log(''Connected to MySQL database'');
    
      // Perform MySQL operations here
      connection.query("SELECT * FROM your_table", (err, results) => {
        if (err) throw err;
        console.log(''Query result:'', results);
      });
    
      // Close the connection when done
      connection.end((err) => {
        if (err) console.error(''Error closing MySQL connection:'', err);
        else console.log(''Connection closed'');
      });
    });
    

    Khóa học lập trình tại Toidayhoc vừa học vừa làm dự án vừa nhận lương: Khóa học lập trình nhận lương tại trung tâm Toidayhoc

  • Khóa học miễn phí MySQL – Variables nhận dự án làm có lương

    MySQL – Variables

    Table of content


    In general, variables are the containers that store some information in a program. The value of a variable can be changed as many times as required. Each variable has a datatype specifying the type of data we can store in it such as integer, string, float etc.

    • In some programming languages such as Java, C, C++ etc., we need to declare the datatype of a variable before assigning values to it.

    • In languages like python the datatype of a variable is presumed based on the values assigned to it. There is no need of declaring the datatype separately.

    • In MySQL there is no need to declare the datatype we can simply define a variable with a value using the SET statement.

    Variables in MySQL

    The main purpose of a variable is to label a memory location(s) and store data in it so that it can be used throughout the program.

    The characters we use to declare and define a variables are called literals and a literal can be anything other than special characters, numbers and, reserved keywords.

    In MySQL, there are three types of variables. The same is described below −

    • User-Defined Variable

    • Local Variable

    • System Variable

    User-Defined Variables

    The User-Defined variable allows us to store a value in one statement and subsequently refer to it in another. To do so, MySQL provides SET and SELECT commands to declare a variable. These variable names will have the symbol “@” as a prefix. We can use either = or := symbols depending on the situation. The user-defined data type can be any of the following: integer, decimal, Boolean, etc.

    Syntax

    Following is the syntax to declare a user-defined variable in MySQL using the SET statement −

    SELECT @variable_name = value
    

    Example

    In the following query, we are assigning a value to a variable using the SET statement as follows −

    SET @Name = ''Michael
    

    Using the SELECT statement, we can display the value of @name variable −

    SELECT @Name;
    

    Output

    The output for the query above is produced as given below −

    @Name
    Michael

    Example

    Here, we are assigning a value to a variable using the SELECT statement −

    SELECT @test := 10;
    

    Output

    On executing the given query, the output is displayed as follows −

    @test := 10
    10

    Example

    Let us create table with the name CUSTOMERS using the following query −

    CREATE TABLE CUSTOMERS(
       ID INT AUTO_INCREMENT PRIMARY KEY,
       NAME VARCHAR(20) NOT NULL,
       AGE INT NOT NULL,
       ADDRESS CHAR (25),
       SALARY DECIMAL (18, 2)
    );
    

    Now, let us insert values into the above-created table using the INSERT INTO statement −

    INSERT INTO CUSTOMERS (NAME, AGE, ADDRESS, SALARY) VALUES
    (''Ramesh'', 32, ''Ahmedabad'', 2000.00),
    (''Khilan'', 25, ''Delhi'', 1500.00),
    (''Kaushik'', 23, ''Kota'', 2000.00),
    (''Chaitali'', 25, ''Mumbai'', 6500.00),
    (''Hardik'', 27, ''Bhopal'', 8500.00),
    (''Komal'', 22, ''Hyderabad'', 4500.00),
    (''Muffy'', 24, ''Indore'', 10000.00);
    

    The CUSTOMERS table is created as follows −

    ID NAME AGE ADDRESS SALARY
    1 Ramesh 32 Ahmedabad 2000.00
    2 Khilan 25 Delhi 1500.00
    3 Kaushik 23 Kota 2000.00
    4 Chaitali 25 Mumbai 6500.00
    5 Hardik 27 Bhopal 8500.00
    6 Komal 22 Hyderabad 4500.00
    7 Muffy 24 Indore 10000.00

    Now, let us declare a variable with the name @max_salary using the SELECT statement to display the maximum salary value from the CUSTOMERS table −

    SELECT @max_salary := MAX(salary) FROM CUSTOMERS;
    

    Then, we will select records from the table where the salary is equal to @max_salary variable −

    SELECT * FROM CUSTOMERS WHERE SALARY = @max_salary;
    

    Output

    The output for the query above is produced as given below −

    ID NAME AGE ADDRESS SALARY
    7 Muffy 24 Indore 10000.00

    Local Variables

    The MySQL local variable can be declared using the DECLARE keyword. When we declare the local variable, the @ symbol is not used as prefix. This variable is a strongly typed variable, which means that we definitely need to declare a data type.

    The MySQL DEFAULT keyword can be used while declaring a variable to set the default value of the variable. This is an optional parameter, if we do not define this, the initial value will be NULL.

    Syntax

    Following is the syntax to declare a local variable in MySQL −

    DECLARE variable_name1, variabale_name2, ...
    
    data_type [DEFAULT default_value];
    

    Example

    In the following example, we are using the DECLARE statement in a stored procedure.

    DELIMITER //
    CREATE PROCEDURE salaries()
    BEGIN
       DECLARE Ramesh INT;
       DECLARE Khilan INT DEFAULT 30000;
       DECLARE Kaushik INT;
       DECLARE Chaitali INT;
       DECLARE Total INT;
       SET Ramesh = 20000;
       SET Kaushik = 25000;
       SET Chaitali = 29000;
       SET Total = Ramesh+Khilan+Kaushik+Chaitali;
       SELECT Total,Ramesh,Khilan,Kaushik,Chaitali;
    END //
    

    Now, let us call the stored procedure using the following query −

    CALL salaries() //;
    

    Output

    Following is the output −

    Total Ramesh Khilan Kaushik Chaitali
    104000 20000 30000 25000 29000

    System Variables

    The system variables are predefined by the MySQL. These contains the data we need, to work with the database. Each MySQL system variable has a default value.

    The SET command in MySQL can be used at the runtime to dynamically change the values of the system variables.

    There are two variable scope modifiers available for the SHOW VARIABLES command. They are GLOBAL and SESSION.

    • The GLOBAL variables are active throughout the lifecycle.

    • The SESSION variables can be available only in the current session.

    Following is the command to display all the system variables in MySQL −

    SHOW [GLOBAL | SESSION] VARIABLES;
    

    Example

    In the following example, let us display the existing global system variables using the SHOW VARIABLES query −

    SHOW VARIABLES LIKE ''%table%
    

    The variables are displayed in the table format as follows −

    Variable_name Value
    big_tables OFF
    default_table_encryption OFF
    innodb_file_per_table ON
    innodb_ft_aux_table
    innodb_ft_server_stopword_table
    innodb_ft_user_stopword_table
    innodb_table_locks ON
    innodb_temp_tablespaces_dir .#innodb_temp
    innodb_undo_tablespaces 2
    innodb_validate_tablespace_paths ON
    lower_case_table_names 1
    max_heap_table_size 16777216
    old_alter_table OFF
    performance_schema_max_table_handles -1
    performance_schema_max_table_instances -1
    performance_schema_max_table_lock_stat -1
    show_create_table_skip_secondary_engine OFF
    show_create_table_verbosity OFF
    table_definition_cache 2000
    table_encryption_privilege_check OFF
    table_open_cache 4000
    table_open_cache_instances 16
    tablespace_definition_cache 256
    temptable_max_mmap 1073741824
    temptable_max_ram 1073741824
    temptable_use_mmap ON
    tmp_table_size 99614720
    updatable_views_with_limit YES

    Now, using the query below, we will fetch the current value of the MySQL “key_buffer_size” variable −

    SELECT @@key_buffer_size;
    

    Output

    Following is the output of the above query −

    @@key_buffer_size
    8388608

    Khóa học lập trình tại Toidayhoc vừa học vừa làm dự án vừa nhận lương: Khóa học lập trình nhận lương tại trung tâm Toidayhoc

  • Khóa học miễn phí MySQL – Versions nhận dự án làm có lương

    MySQL – Versions

    Table of content


    Versions are introduced in any product to upgrade by adding extra features and removing unnecessary ones, fixing the bugs etc. The process of versioning is actually important to make the product more efficient with growing technology.

    A product is generally released after performing phases of testing: alpha testing, beta testing, gamma testing, and then it is produced once all these tests are passed.

    Whenever MySQL is installed, we must choose the version to install along with its distribution format. The latest version of MySQL is 8.0 with its minor version being 8.0.34. To install the MySQL server, there are two methods: Development release and General Availability.

    The Development Release contains all the latest features but it is not recommended to be used in production. The General Availability Release is more of a production release which can be stably used in production.

    MySQL Versions

    MySQL is a fast, easy-to-use RDBMS being used for many small and big businesses. It is developed, marketed and supported by MySQL AB, which is a Swedish company. MySQL was first internally released on 23rd May, 1995, and until Oracle acquired Sun Microsystems, version 3.19 to version 5.1 were released.

    Version 5.1

    The version 5.1 of MySQL had its production release on 27th November, 2008 by adding extra features like event scheduler, partitioning, plugin API, row-based replication, server log tables.

    But, version 5.1 contained 20 known bugs that gave out wrong results, along with the 35 bugs from version 5.0. However, almost all of them are fixed as of release 5.1.51. Also, MySQL 5.1 and 6.0 (in alpha test phase) showed poor performance in data warehousing, which could partially be due to its inability to utilize multiple CPU cores for processing a single query.

    Version 5.5

    MySQL Server 5.5 was a General Availability Release as of December 2010. The improved features in this version include −

    • The default storage engine is InnoDB with improved I/O subsystem, which supports transactions and referential integrity constraints.

    • Improved SMP support

    • Semi-synchronous replication.

    • SIGNAL and RESIGNAL statement was added in compliance with the SQL standard.

    • Support for supplementary Unicode character sets utf16, utf32, and utf8mb4.

    • New options for user-defined partitioning.

    Version 5.6

    The General Availability of MySQL 5.6 was released in February 2013. New features of this version included:

    • Query optimizer has more efficient performance.

    • Higher transactional throughput in InnoDB.

    • New NoSQL-style memcached APIs.

    • Improvements to partitioning for querying large tables.

    • Better management of very large tables.

    • TIMESTAMP column type that correctly stores milliseconds.

    • Improvements to replication.

    • Better performance monitoring by expanding the data available through the PERFORMANCE_SCHEMA.

    • The InnoDB storage engine also provides support for full-text search and improved group commit performance.

    Version 5.7

    MySQL 5.7 was made generally available in October 2015. For the minor versions of MySQL 5.7, MySQL 5.7.8 and later, a support for a native JSON data type defined by RFC 7159 by August 2015.

    Version 8.0

    MySQL Server 8.0 was announced in April 2018, with new improved features. Currently, the minor versions in MySQL 8.0 start from 8.0.0 to 8.0.34. Previous MySQL Server 8.0.0-dmr (as a Development Milestone Release) was announced on 12th September, 2016.

    Features Added in MySQL 8.0

    The latest version of MySQL is 8.0. The following features are some of the newly added features to it:

    • Data dictionary − In previous MySQL releases, dictionary data was stored in metadata files and non-transactional tables. MySQL now incorporates a transactional data dictionary that stores information about database objects.

    • Atomic Data Definition Language(Atomic DDL) statements − An Atomic DDL statement combines the data dictionary updates, storage engine operations, and binary log writes associated with a DDL operation into a single, atomic transaction.

    • Upgrade procedure − Previously, after installation of a new version of MySQL, the MySQL server automatically upgrades the data dictionary tables at the next startup, after which the DBA is expected to invoke mysql_upgrade manually to upgrade the system tables in the mysql schema, as well as objects in other schemas such as the ”sys” schema and user schemas.

      As of MySQL 8.0.16, the server also performs the tasks previously handled by mysql_upgrade. In addition, the server updates the contents of the help tables as well. A new –upgrade server option provides control over how the server performs automatic data dictionary and server upgrade operations.

    • Session Reuse − MySQL Server now supports SSL session reuse by default with a timeout setting to control how long the server maintains a session cache that establishes the period during which a client is permitted to request session reuse for new connections. All MySQL client programs support session reuse. In addition, C applications now can use the C API capabilities to enable session reuse for encrypted connections.

    • Security and account management − The security is improved greatly and greater DBA flexibility in account management is also enabled.

    • Resource management − MySQL now supports creation and management of resource groups, and permits assigning threads running within the server to particular groups so that threads execute according to the resources available to the group.

    • Table encryption management − Table encryption can now be managed globally by defining and enforcing encryption defaults.

    • InnoDB enhancements − Several InnoDB enhancements were added, like, auto-increment counter value, index tree corruption, mem-cached plug-in, InnoDB_deadlock_detect, tablespace encryption feature, storage engine, InnoDB_dedicated_server, creating temporary tables in temporary tablespace, zlib library etc.

    • Character set support − The default character set has changed from latin1 to utf8mb4. The utf8mb4 character set has several new collations, including utf8mb4_ja_0900_as_cs, the first Japanese language-specific collation available for Unicode in MySQL.

    • JSON enhancements − Several enhancements and additions were made to MySQL”s JSON functionality.

    • Data type support − MySQL now supports use of expressions as default values in data type specifications. This includes the use of expressions as default values for the BLOB, TEXT, GEOMETRY, and JSON data types, which previously could not be assigned default values at all.

    • Optimizer − Optimizer is enhanced in various ways as well.

    • Improved hash join performance − MySQL 8.0.23 reimplements the hash table used for hash joins, resulting in several improvements in hash join performance.

    • Common table expressions − MySQL now supports common table expressions, both non-recursive and recursive.

    • Window functions − MySQL now supports window functions that, for each row from a query, perform a calculation using rows related to that row.

    • Lateral derived tables − A derived table now may be preceded by the LATERAL keyword to specify that it is permitted to refer to (depend on) columns of preceding tables in the same FROM clause.

    • Aliases in single-table DELETE statements − In MySQL 8.0.16 and later, single-table DELETE statements support the use of table aliases.

    • Regular expression support − Previously, MySQL used the Henry Spencer regular expression library to support regular expression operators.

    • Internal temporary tables − The TempTable storage engine replaces the MEMORY storage engine as the default engine for in-memory internal temporary tables.

    • Logging − Logging process is also improved in the newer versions.

    In addition to all these, there are many other features added to the new versions of MySQL as well.

    Features Deprecated in MySQL 8.0

    The following are some of the many features that are deprecated in MySQL 8.0 and may be removed in the future series. Several alternatives mentioned can be used by applications.

    • The utf8mb3 character set is deprecated. Please use utf8mb4 instead.

    • ucs2, macroman and macce, dec, hp8 are also deprecated. You should use utf8mb4 instead.

    • User-defined collations are deprecated.

    • sha256_password is deprecated.

    • The plugin form of validate_password is still available, but deprecated.

    • The ENGINE clause for the ALTER TABLESPACE and DROP TABLESPACE statements is deprecated.

    • The PAD_CHAR_TO_FULL_LENGTH SQL mode is deprecated.

    • AUTO_INCREMENT support is deprecated for columns of type FLOAT and DOUBLE (and any synonyms).

    • The UNSIGNED attribute is deprecated for columns of type FLOAT, DOUBLE, and DECIMAL (and any synonyms)

    • FLOAT(M,D) and DOUBLE(M,D) syntax is deprecated.

    • The ZEROFILL attribute for numeric data types and the display width attribute for integer data types are deprecated.

    • The BINARY attribute is deprecated. However, the use of BINARY to specify a data type or character set remains unchanged.

    • ASCII and UNICODE are deprecated (MySQL 8.0.28 and later). Use CHARACTER SET instead, in both cases.


    Khóa học lập trình tại Toidayhoc vừa học vừa làm dự án vừa nhận lương: Khóa học lập trình nhận lương tại trung tâm Toidayhoc

  • Khóa học miễn phí MySQL – Home nhận dự án làm có lương

    MySQL tutorial

    MySQL Tutorial

    Table of content


    MySQL Tutorial

    MySQL is the most popular and a free Open Source Relational Database Management System (RDBMS). An RDBMS system stores the data in the form of tables that might be related to each other. MySQL uses Structured Query Language (SQL) to store, manage and retrieve data, and control the accessibility to the data. It is one of the best RDBMS being used for developing web-based software applications.

    MySQL is written in C and C++. Its SQL parser is written in yacc, but it uses a home-brewed lexical analyzer.

    MySQL works on many system platforms, such as, Linux, macOS, Microsoft Windows, AIX, BSDi, FreeBSD, HP-UX, ArcaOS, eComStation, IBM i, IRIX, NetBSD, Novell NetWare, OpenBSD, OpenSolaris, OS/2 Warp, QNX, Oracle Solaris, Symbian, SunOS, SCO OpenServer, SCO UnixWare, Sanos and Tru64.

    This tutorial will give you quick start with MySQL and make you comfortable with MySQL programming.

    MySQL Examples

    Consider an example table CUSTOMERS created in the MySQL database. This table contains the details of customers like ID, NAME, AGE, ADDRESS, SALARY.

    ID NAME AGE ADDRESS SALARY
    1 Ramesh 32 Ahmedabad 2000.00
    2 Khilan 25 Delhi 1500.00
    3 Kaushik 23 Kota 2000.00
    4 Chaitali 25 Mumbai 6500.00
    5 Hardik 27 Bhopal 8500.00
    6 Komal 22 Hyderabad 4500.00
    7 Muffy 24 Indore 10000.00

    Since MySQL uses SQL to manage data, it also uses almost all DDL, DML and DCL statements. For instance, the following DML statement lists the records of all customers who are 25 years old.

    SELECT * FROM CUSTOMERS WHERE AGE = 25;
    

    Following records are displayed as a result-set −

    ID NAME AGE ADDRESS SALARY
    2 Khilan 25 Delhi 1500.00
    4 Chaitali 25 Mumbai 6500.00

    MySQL Online Editor

    In this tutorial, we provide a MySQL Online Editor which helps you to Edit and Execute the MySQL code directly from your browser. Click on the run button icon to run the following MySQL code to be executed on the CUSTOMERS table and retrieve the records matching with the given condition.

    SELECT * FROM CUSTOMERS WHERE NAME = ''Chaitali
    

    This Online Editor will save you the time to install the MySQL setup in order to execute any query. Try our now.

    Why to Learn MySQL?

    MySQL is generally faster, more secure and efficient than other relational databases. Some of world”s fastest growing organizations make use of MySQL to efficiently power their high-volume web sites, business-critical systems and packaged software.

    However, whether you choose MySQL for your application or not, totally depends on your organization”s resources and aim. Usually, MySQL is used by smaller businesses that do not have large data sets, because of its cost efficiency and simple setup.

    MySQL Jobs and Opportunities

    MySQL professionals are in high demand as more and more organizations are using this open-source database system for efficient data management. If you have the skills, you could earn an average salary of around $150,000 per year, but it can vary depending on your location, experience, and job role.

    Here are some of the top companies actively looking for MySQL experts for roles like Database Administrator, Database Developer, Database Tester, Data Scientist, ETL Developer, Database Migration Expert, Cloud Database Expert, and more. They need people who can manage and optimize their databases, build data-driven applications, and extract insights from large datasets −

    • Google
    • Amazon
    • Netflix
    • Infosys
    • Tata Consultancy Services (TCS)
    • Tech Mahindra
    • Wipro
    • Pinterest
    • Uber
    • Wipro
    • Trello
    • And many more…

    To get started, you can use our user-friendly tutorials, which are designed to help you learn MySQL and prepare for technical interviews or certification exams. You can learn at your own pace, anytime and anywhere.

    With the right MySQL skills and knowledge, you can kickstart a rewarding career in the ever-expanding field of data management and analytics. You could be the part of the professionals who are driving innovation and data-driven decision-making in some of the world”s most renowned companies.

    Who Should Learn MySQL

    This MySQL tutorial has been prepared for beginners to help them understand the basics to advanced concepts related to MySQL database.

    Prerequisites to Learn MySQL

    Before you start doing practice with various types of examples given in this reference, I”m making an assumption that you are already aware about what is database, especially RDBMS and what is a computer programming language.

    Frequently Asked Questions about MySQL

    Following are very Frequently Asked Questions(FAQ) about MySQL, and this section tries to answer them briefly.

    MySQL is a popular open-source relational database management system (RDBMS). It organizes data into tables with rows and columns. Users can interact with MySQL using SQL (Structured Query Language) to perform operations like inserting, updating, and querying data. The system works by processing SQL commands to manage and retrieve data efficiently.

    MySQL was developed by Swedish company MySQL AB, founded by David Axmark, Allan Larsson, and Michael “Monty” Widenius. It was later bought by Sun Microsystems in 2008, which was subsequently acquired by Oracle Corporation in 2010.

    You can install MySQL from the MySQL Installer Community, along with other MySQL products you require. The MySQL Installer will allow you to install a certain version of MySQL or you can customize the installation as per your requirements. For more detailed information on how to install MySQL, .

    Since MySQL uses SQL to store and manage the data, the data types used in MySQL are also the same as data types in SQL. Following are three categories of SQL data types.

    • String Data types.
    • Numeric Data types.
    • Date and time Data types.

    Here are the summarized list of tips which you can follow to start learning MySQL.

    • Install MySQL database on your computer system.
    • Follow our tutorial step by step from the very beginning.
    • Read more articles, watch online courses or buy a book on MySQL to enhance your knowledge.
    • Try to develop a small software using PHP or Python which makes use of the MySQL database.

    The time it takes to learn MySQL varies, but basic proficiency can be gained in a few weeks with consistent practice. Mastering more advanced features may take a few months of dedicated learning and hands-on experience. Regular practice and real-world application contribute to the speed of learning MySQL.

    The latest version of MySQL was 8.0. Upgrading to the latest version is recommended for security and feature enhancements.

    To check the MySQL version in Linux, you can use the following command in the terminal:

    • mysql –version

    This command will display the MySQL client version. If you want to check the server version, you can use:

    • mysql -u your_username -p -e “SELECT version();”

    Replace “your_username” with your MySQL username, and you will be prompted to enter your password. After entering the password, the command will display the MySQL server version.

    To access your MySQL database, you can use the MySQL command-line client or a graphical user interface (GUI) tool. Here are the basic steps for both:

    Using MySQL Command-Line Client

    • Open terminal/command prompt.
    • Enter: mysql -u your_username -p.
    • Enter your password when prompted.

    Using GUI Tool (e.g., MySQL Workbench)

    • Download and install the tool.
    • Create a new connection with your details.
    • Test the connection.
    • Use the GUI to manage your MySQL database.

    MySQL is a popular open-source relational database management system (RDBMS) known for its ease of use and scalability. Its main features include support for SQL queries, efficient data storage and retrieval, and robust transaction management, making it suitable for a wide range of applications, from small websites to large enterprise systems. Additionally, MySQL offers strong security measures and a vibrant community for support and development.

    To start, stop, or restart the MySQL server, you can use the command-line interface. The exact commands may vary depending on your operating system. Here are instructions for different operating systems:

    Windows:

    • To Start MySQL Server: Open a command prompt with administrator privileges and run the following command: net start mysql.
    • To Stop MySQL Server: Open a command prompt with administrator privileges and run the following command: net stop mysql.
    • To Restart MySQL Server: You can stop and start the MySQL service using the commands mentioned above. Alternatively, you can use the MySQL Notifier or the Services application to restart the MySQL service.

    Linux (Ubuntu/Debian):

    • To Start MySQL Server: sudo service mysql start.
    • To Stop MySQL Server: sudo service mysql stop.
    • To Restart MySQL Server: sudo service mysql restart.

    macOS:

    • To Start MySQL Server: sudo brew services start mysql.
    • To Stop MySQL Server: sudo brew services stop mysql.
    • To Restart MySQL Server: sudo brew services restart mysql.

    These are general commands, and depending on your specific setup, you might need to adjust them. Also, note that on Linux, the service management commands may vary depending on the distribution (e.g., Ubuntu, CentOS).

    Remember to replace “mysql” with the actual service name if it”s different in your system.

    A MySQL schema can simply be defined as a blueprint of the database. It stores all the information of the tables, its attributes and entities. As MySQL is a relational database management system, it is important to have schema as it also represents the relationship between the attributes and entities of multiple tables.

    As a beginner, you can use our simple and the best MySQL tutorial to learn MySQL. We have removed all the unnecessary complexity while teaching you these MySQL concepts. You can start learning it now: .

    Khóa học lập trình tại Toidayhoc vừa học vừa làm dự án vừa nhận lương: Khóa học lập trình nhận lương tại trung tâm Toidayhoc

  • Khóa học miễn phí MySQL – Features nhận dự án làm có lương

    MySQL – Features

    Table of content


    MySQL is a type of relational database that stores and manages the data based on Structured Query Language (SQL) queries. Thus, making it a structured database, i.e., the data stored in this relational databases is in the form of tables.

    It is a fast, easy-to-use RDBMS being used for many small and big businesses, it is developed, marketed and supported by a Swedish Company called MySQL AB.

    Features of MySQL

    One of the major reasons MySQL is considered one of the most popular relational databases is because of its abundant features. Let us look at them one by one −

    Open-Source

    MySQL is open-source, which means this software can be downloaded, used and modified by anyone. It is free-to-use and easy-to-understand. The source code of MySQL can be studied, and changed based on the requirements. It uses GPL, i.e. GNU General Public license which defines rules and regulations regarding what can and can”t be done using the application.

    Quick and Reliable

    MySQL stores data efficiently in the memory ensuring that data is consistent, and not redundant. Hence, data access and manipulation using MySQL is quick. It is considered one of the fastest relational databases with higher productivity as well.

    High Performance

    MySQL provides comparatively higher performance without affecting its functionality. It also has a very little memory leakage making it memory efficient as well.

    Scalable

    Scalability refers to the ability of systems to work easily with small amounts of data, large amounts of data, clusters of machines, and so on. MySQL server was developed to work with large databases.

    Data Types

    It contains multiple data types such as unsigned integers, signed integers, float (FLOAT), double (DOUBLE), character (CHAR), variable character (VARCHAR), text, blob, date, time, datetime, timestamp, year, and so on.

    Character Sets

    It supports different character sets, and this includes latin1 (cp1252 character encoding), German, Ujis, other Unicode character sets and so on.

    Secure

    It provides a secure interface since it has a password system which is flexible, and ensures that it is verified based on the host before accessing the database. The password is encrypted while connecting to the server.

    Support for large databases

    It comes with support for large databases, which could contain about 40 to 50 million records, 150,000 to 200,000 tables and up to 5,000,000,000 rows.

    Platform Independent

    MySQL can be run on various operating systems including Windows, Linux, macOS etc. in several programming languages like C, C++, Java, Python, Perl, PHP etc.

    Client and Utility Programs

    MySQL server also comes with many client and utility programs. This includes Command line programs such as ”mysqladmin” and graphical programs such as ”MySQL Workbench”. MySQL client programs are written in a variety of languages. Client library (code encapsulated in a module) can be written in C or C++ and would be available for clients that have C bindings.


    Khóa học lập trình tại Toidayhoc vừa học vừa làm dự án vừa nhận lương: Khóa học lập trình nhận lương tại trung tâm Toidayhoc

  • Khóa học miễn phí MySQL – PHP Syntax nhận dự án làm có lương

    MySQL – PHP Syntax

    Table of content


    Various programming languages like PERL, C, C++, JAVA, PHP, etc. are used as client programs to request query executions on a MySQL Server. Out of these languages, PHP is the most popular one because of its web application development capabilities.

    A PHP library is like a toolbox for web developers, providing pre-built functions and code snippets to simplify common tasks. It saves time and effort by offering ready-made solutions for tasks such as handling databases, processing forms, and managing files. Developers can easily include these libraries in their PHP projects to boost efficiency and create robust web applications.

    PHP MySQLi Library

    The MySQL PHP connector, often referred to as MySQLi, enables communication between PHP scripts and MySQL databases. It provides a set of functions and methods that allow PHP applications to connect, query, and manipulate data in MySQL databases, providing efficient and secure database interactions in PHP web development.

    This tutorial focuses on using MySQL in a various environments. If you are interested in MySQL with PERL, then you can consider reading the Tutorial.

    How to Install MySQLi

    To install MySQLi on Windows, you can follow these general steps −

    Download PHP:

    • Download the latest version of PHP from the official PHP website (https://www.php.net/downloads.php).
    • Choose the Windows version that matches your system architecture (e.g., 32-bit or 64-bit).
    • Download the ZIP file for the Thread Safe or Non-Thread Safe version, depending on your needs.

    Extract the ZIP File:

    • Extract the contents of the downloaded ZIP file to a location on your computer (e.g., C:php).

    Configure PHP:

    • In the extracted PHP folder, find the “php.ini-development” file.
    • Copy and rename it to “php.ini”.
    • Open “php.ini” in a text editor (e.g., Notepad) and find the line: “;extension=mysqli”. Remove the semicolon (;) at the beginning of the line to uncomment it: “extension=mysqli”.
    • Save the php.ini file.

    Set Environment Variables:

    • Add the PHP installation directory to the system”s PATH environment variable. This allows you to run PHP from any command prompt.
    • To do this, right-click on “This PC” or “Computer” on your desktop or in File Explorer, select “Properties,” and click on “Advanced system settings.” Then, click on the “Environment Variables” button. In the “System variables” section, select the “Path” variable and click “Edit.” Add the path to your PHP installation directory (e.g., C:php).

    Restart your Web Server:

    • If you are using a web server like Apache or Nginx, restart it to apply the changes.

    Verify Installation:

    • Create a PHP file with the following content and save it in your web server”s document root (e.g., C:Apache24htdocs for Apache):
    <?php
    phpinfo();
    ?>
    
  • Open the file in your web browser and search for “mysqli” to verify that the MySQLi extension is now enabled.
  • PHP Functions to Access MySQL

    PHP provides various functions to access the MySQL database and to manipulate the data records inside the MySQL database −

    S.No Function & Description
    1

    mysqli_connect()

    Establishes a connection to the MySQL server.

    2

    mysqli_query()

    Performs a query on the database.

    3

    mysqli_fetch_assoc()

    Fetches a result row as an associative array.

    4

    mysqli_fetch_array()

    Fetches a result row as an associative array, a numeric array, or both.

    5

    mysqli_close()

    Closes a previously opened database connection.

    6

    mysqli_num_rows()

    Gets the number of rows in a result.

    7

    mysqli_error()

    Returns a string description of the last error.

    8

    mysqli_prepare()

    Used for prepared statements to help prevent SQL injection.

    9

    mysqli_fetch_row()

    Fetches a result row as an enumerated array.

    10

    mysqli_insert_id()

    Gets the ID generated in the last query.

    Basic Example

    Following are the steps to connect to a MySQL database, execute a query, process the results, and close the connection using PHP and MySQLi −

    • Define the parameters needed to connect to your MySQL database, such as ”$dbhost” (host name), ”$dbuser” (username), ”$dbpass” (password), and ”$dbname” (database name).
    • Create a new instance of the ”mysqli” class to establish a connection to the MySQL database.
    • Use the ”query” method of the ”mysqli” object to execute a MySQL query.
    • Fetch and process the results returned by the query.
    • Close the connection to the MySQL database when you are done.

    The following example shows a generic syntax of PHP to call any MySQL query.

    <html>
       <head>
          <title>PHP with MySQL</title>
       </head>
    
       <body>
          <?php
             // Include database connection parameters
             $dbhost = "localhost";
             $dbuser = "your_username";
             $dbpass = "your_password";
             $dbname = "your_database";
    
             // Establish a connection to MySQL
             $mysqli = new mysqli($dbhost, $dbuser, $dbpass, $dbname);
             if ($mysqli->connect_error) {
                 die("Connection failed: " . $mysqli->connect_error);
             }
    
             // Execute a MySQL query
             $sql = "SELECT * FROM your_table";
             $result = $mysqli->query($sql);
    
             if (!$result) {
                 die("Error: " . $mysqli->error);
             }
    
             // Process the query results
             while ($row = $result->fetch_assoc()) {
                 // Process each row of data
                 echo "ID: " . $row["id"] . " Name: " . $row["name"] . "<br>";
             }
    
             // Close the database connection
             $mysqli->close();
          ?>
       </body>
    </html>
    

    Khóa học lập trình tại Toidayhoc vừa học vừa làm dự án vừa nhận lương: Khóa học lập trình nhận lương tại trung tâm Toidayhoc

  • Khóa học miễn phí MySQL – Introduction nhận dự án làm có lương

    MySQL – Introduction

    Table of content


    What is a Database?

    A database is used to store a collection of data (which can either be structured or unstructured). Each database has one or more distinct APIs for creating, accessing, managing, searching and replicating the data it holds.

    Other kinds of data storages can also be used to manage data, such as files on the file system or large hash tables in memory, but data fetching and writing would not be so fast and easy with those type of systems.

    Nowadays, we use relational database management systems (RDBMS) to store and manage huge volume of data. In such a database, the data is stored in a structured way with the help of different tables. Relations are established among these tables using primary keys or other keys known as Foreign Keys.

    A Relational DataBase Management System (RDBMS) is a software that −

    • Enables you to implement a database with tables, columns and indexes.

    • Guarantees the Referential Integrity between rows of various tables.

    • Updates the indexes automatically.

    • Interprets an SQL query and combines information from various tables.

    RDBMS Terminology

    Before we proceed to explain the MySQL database system, let us revise a few definitions related to the database.

    • Database − A database is a collection of tables, with related data.

    • Table − A table is a matrix with data. A table in a database looks like a simple spreadsheet.

    • Column − One column (data element) contains data of one and the same kind, for example the column postcode.

    • Row − A row (= tuple, entry or record) is a group of related data, for example the data of one subscription.

    • Redundancy − Storing data twice, redundantly to make the system faster.

    • Primary Key − A primary key is unique. A key value can not occur twice in one table. With a key, you can only find one row.

    • Foreign Key − A foreign key is the linking pin between two tables.

    • Compound Key − A compound key (composite key) is a key that consists of multiple columns, because one column is not sufficiently unique.

    • Index − An index in a database resembles an index at the back of a book.

    • Referential Integrity − Referential Integrity makes sure that a foreign key value always points to an existing row.

    MySQL Database

    MySQL is a fast, easy-to-use RDBMS being used for many small and big businesses. It is developed, marketed and supported by MySQL AB, which is a Swedish company. MySQL is becoming so popular because of many good reasons −

    • MySQL is released under an open-source license. So you have nothing to pay to use it.

    • MySQL is a very powerful program in its own right. It handles a large subset of the functionality of the most expensive and powerful database packages.

    • MySQL uses a standard form of the well-known SQL data language.

    • MySQL works on many operating systems and with many languages including PHP, PERL, C, C++, JAVA, etc.

    • MySQL works very quickly and works well even with large data sets.

    • MySQL is very friendly to PHP, the most appreciated language for web development.

    • MySQL supports large databases, up to 50 million rows or more in a table. The default file size limit for a table is 4GB, but you can increase this (if your operating system can handle it) to a theoretical limit of 8 million terabytes (TB).

    • MySQL is customizable. The open-source GPL license allows programmers to modify the MySQL software to fit their own specific environments.

    History of MySQL

    • Development of MySQL by Michael Widenius & David Axmark beginning in 1994.

    • First internal release on 23rd May 1995.

    • Windows Version was released on the 8th January 1998 for Windows 95 and NT.

    • Version 3.23: beta from June 2000, production release January 2001.

    • Version 4.0: beta from August 2002, production release March 2003 (unions).

    • Version 4.1: beta from June 2004, production release October 2004.

    • Version 5.0: beta from March 2005, production release October 2005.

    • Sun Microsystems acquired MySQL AB on the 26th February 2008.

    • Version 5.1: production release 27th November 2008.

    • Oracle acquired Sun Microsystems on 27th January 2010.

    • Version 5.5: general availability on 3rd December 2010

    • Version 5.6: general availability on 5th February 2013

    • Version 5.7: general availability on 21st October 2015

    • Version 8.0: general availability on 19th April 2018

    Before You Begin

    Before you begin this tutorial, you should have a basic knowledge of the information covered in our PHP and HTML tutorials.

    This tutorial focuses heavily on using MySQL in a PHP environment. Many examples given in this tutorial will be useful for PHP Programmers.

    We recommend you check our for your reference.


    Khóa học lập trình tại Toidayhoc vừa học vừa làm dự án vừa nhận lương: Khóa học lập trình nhận lương tại trung tâm Toidayhoc

  • Khóa học miễn phí MongoDB – Discussion nhận dự án làm có lương

    Discuss MongoDB


    MongoDB is an open-source document database and leading NoSQL database. MongoDB is written in C++. This tutorial will give you great understanding on MongoDB concepts needed to create and deploy a highly scalable and performance-oriented database.


    Khóa học lập trình tại Toidayhoc vừa học vừa làm dự án vừa nhận lương: Khóa học lập trình nhận lương tại trung tâm Toidayhoc

  • Khóa học miễn phí MongoDB – Useful Resources nhận dự án làm có lương

    MongoDB – Useful Resources


    The following resources contain additional information on MongoDB. Please use them to get more in-depth knowledge on this topic.

    Useful Video Courses

    Best Seller

    45 Lectures 3 hours

    Best Seller

    55 Lectures 5.5 hours

    Best Seller

    41 Lectures 2.5 hours

    Best Seller

    71 Lectures 2.5 hours

    Featured

    41 Lectures 4.5 hours

    155 Lectures 10.5 hours


    Khóa học lập trình tại Toidayhoc vừa học vừa làm dự án vừa nhận lương: Khóa học lập trình nhận lương tại trung tâm Toidayhoc