Author: alien

  • Khóa học miễn phí MySQL – Limit Clause nhận dự án làm có lương

    MySQL – Limit

    Table of content


    MySQL Limit Clause

    The LIMIT clause in MySQL can be used to specify the number of records to return. This clause is mostly used when dealing with tables that have thousands of records. It accepts one or two arguments (offset or count). The values of both arguments should be either be positive integers or zero.

    The offset of the first row starts from 0, not from 1 and the count of the first row starts from 1. Let us understand it better using the following picture:

    Mysql-Limit

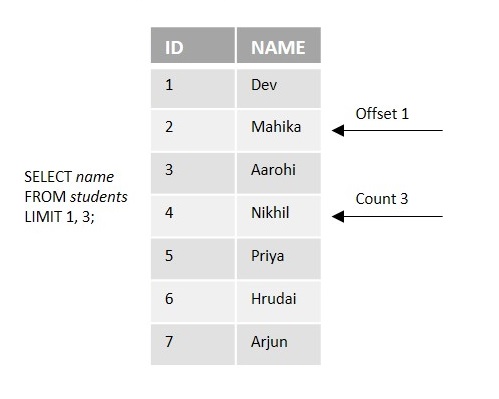
    Assume the name of the above table is students. If we execute the above-mentioned query, we will get the output as Mahika, Aarohi, and Nikhil.

    Syntax

    Following is the generic syntax of MySQL Limit clause −

    SELECT column1, column2, ... FROM table_name
    LIMIT number;
    
    Where, the LIMIT clause specifies the maximum number of rows from the table to return.

    Example

    The following example demonstrates the usage of the MySQL Limit query.

    First of all, let us create a table named CUSTOMERS using the following query −

    CREATE TABLE CUSTOMERS (
       ID INT NOT NULL,
       NAME VARCHAR (20) NOT NULL,
       AGE INT NOT NULL,
       ADDRESS CHAR (25),
       SALARY DECIMAL (18, 2),
       PRIMARY KEY (ID)
    );
    

    Here, we are inserting 7 records into the above-created table using the following INSERT INTO statement −

    INSERT INTO CUSTOMERS (ID,NAME,AGE,ADDRESS,SALARY) VALUES
    (1, ''Ramesh'', 32, ''Ahmedabad'', 2000.00 ),
    (2, ''Khilan'', 25, ''Delhi'', 1500.00 ),
    (3, ''Kaushik'', 23, ''Kota'', 2000.00 ),
    (4, ''Chaitali'', 25, ''Mumbai'', 6500.00 ),
    (5, ''Hardik'', 27, ''Bhopal'', 8500.00 ),
    (6, ''Komal'', 22, ''Hyderabad'', 4500.00 ),
    (7, ''Muffy'', 24, ''Indore'', 10000.00 );
    

    Execute the following query to fetch all the records present in the CUSTOMERS table −

    SELECT * FROM CUSTOMERS;
    

    Following is the CUSTOMERS table −

    ID NAME AGE ADDRESS SALARY
    1 Ramesh 32 Ahmedabad 2000.00
    2 Khilan 25 Delhi 1500.00
    3 Kaushik 23 Kota 2000.00
    4 Chaitali 25 Mumbai 6500.00
    5 Hardik 27 Bhopal 8500.00
    6 Komal 22 Hyderabad 4500.00
    7 Muffy 24 Indore 10000.00

    Now, we are selecting the first four records from the CUSTOMERS table using the MySQL LIMIT clause in conjunct with SELECT statement −

    SELECT * FROM CUSTOMERS LIMIT 4;
    

    Output

    As we can see the output below, it returned the first four rows from the CUSTOMERS table −

    ID NAME AGE ADDRESS SALARY
    1 Ramesh 32 Ahmedabad 2000.00
    2 Khilan 25 Delhi 1500.00
    3 Kaushik 23 Kota 2000.00
    4 Chaitali 25 Mumbai 6500.00

    Example

    In the following query, we are selecting rows from the CUSTOMERS table starting from the third row (offset 2) from then four rows −

    SELECT * FROM CUSTOMERS LIMIT 2,4;
    

    Output

    When we execute the above query, the output is obtained as follows −

    ID NAME AGE ADDRESS SALARY
    3 Kaushik 23 Kota 2000.00
    4 Chaitali 25 Mumbai 6500.00
    5 Hardik 27 Bhopal 8500.00
    6 Komal 22 Hyderabad 4500.00

    LIMIT with WHERE Clause

    In MySQL, we can use the LIMIT clause along with the WHERE clause in a SELECT statement to specify the number of rows returned from the query based on the conditions.

    Syntax

    Following is the generic syntax −

    SELECT column1, column2, ... FROM table_name
    WHERE condition
    LIMIT number;
    

    Example

    In the query below, we are selecting the first two rows from the CUSTOMERS table where the AGE is greater than 21 −

    SELECT * FROM CUSTOMERS WHERE AGE > 21 LIMIT 2;
    

    Output

    On executing the above query, the output is displayed as follows −

    ID NAME AGE ADDRESS SALARY
    1 Ramesh 32 Ahmedabad 2000.00
    2 Khilan 25 Delhi 1500.00

    Example

    In the following query, we are selecting the next 3 records from the CUSTOMERS table starting from the 2nd record (off set) where the value of the AGE column is greater than 21:

    SELECT * FROM CUSTOMERS WHERE AGE > 21 LIMIT 1,3;
    

    Output

    The output for the above query is produced as given below −

    ID NAME AGE ADDRESS SALARY
    2 Khilan 25 Delhi 1500.00
    3 Kaushik 23 Kota 2000.00
    4 Chaitali 25 Mumbai 6500.00

    LIMIT with ORDER BY clause

    The ORDER BY clause will sort the rows of a column in the specified order (ASC or DESC). In MySQL, we can use the LIMIT clause along with the ORDER BY clause to limit the number of rows returned in the sorted result set.

    Syntax

    Following is the syntax of LIMIT clause with WHERE clause in MySQL −

    SELECT column1, column2, ... FROM table_name
    ORDER BY column_name [ASC|DESC]
    LIMIT number;
    

    Example

    In the below query, we are fetching all the records from the CUSTOMERS table and sorting the SALARY column in descending order. Then we are fetching 5 rows from the sorted result set.

    SELECT * FROM CUSTOMERS
    ORDER BY SALARY DESC
    LIMIT 5;
    

    Output

    If we compile and run the above query, the result is produced as follows −

    ID NAME AGE ADDRESS SALARY
    7 Muffy 24 Indore 10000.00
    5 Hardik 27 Bhopal 8500.00
    4 Chaitali 25 Mumbai 6500.00
    6 Komal 22 Hyderabad 4500.00
    1 Ramesh 32 Ahmedabad 2000.00

    Example

    Here, we are selecting all the records from the table and sorting the SALARY column in ascending order. Then we are fetching rows from the sorted result set starting from the second row (offset 1) from then three rows −

    SELECT * FROM CUSTOMERS
    ORDER BY SALARY ASC
    LIMIT 1,3;
    

    Output

    On executing the given query, the output is displayed as follows −

    ID NAME AGE ADDRESS SALARY
    1 Ramesh 32 Ahmedabad 2000.00
    3 Kaushik 23 Kota 2000.00
    6 Komal 22 Hyderabad 4500.00

    Limit Clause Using a Client Program

    In addition to limiting the number of records returned from a table with a MySQL query, we can also use a client program to perform the LIMIT operation.

    Syntax

    Following are the syntaxes of this operation in various programming languages −

    To limit the number of records returned from a table through a PHP program, we need to execute the ”SELECT” statement with ”LIMIT” clause using the mysqli function query() as follows −

    $sql = "SELECT * FROM tutorials_tbl WHERE tutorial_title = ''Java Tutorial'' LIMIT 3";
    $mysqli->query($sql);
    

    To limit the number of records returned from a table through a Node.js program, we need to execute the ”SELECT” statement with ”LIMIT” clause using the query() function of the mysql2 library as follows −

    sql = "SELECT * FROM CUSTOMERS LIMIT 4";
    con.query(sql);
    

    To limit the number of records returned from a table through a Java program, we need to execute the ”SELECT” statement with ”LIMIT” clause using the JDBC function executeUpdate() as follows −

    String sql = "SELECT * FROM CUSTOMERS LIMIT 4";
    statement.executeQuery(sql);
    

    To limit the number of records returned from a table through a Python program, we need to execute the ”SELECT” statement with ”LIMIT” clause using the execute() function of the MySQL Connector/Python as follows −

    limit_query = "SELECT * FROM tutorials_tbl LIMIT {limit_value}"
    cursorObj.execute(limit_query)
    

    Example

    Following are the programs −

    $dbhost = ''localhost
    $dbuser = ''root
    $dbpass = ''password
    $dbname = ''TUTORIALS
    $mysqli = new mysqli($dbhost, $dbuser, $dbpass, $dbname);
    if($mysqli->connect_errno ) {
       printf("Connect failed: %s
    ", $mysqli->connect_error); exit(); } //printf(''Connected successfully.
    ''); $sql = "SELECT * FROM tutorials_tbl WHERE tutorial_title = ''Java Tutorial'' LIMIT 3"; if($result = $mysqli->query($sql)){ printf("SELECT LIMIT statement executed successfully..! "); printf("Records are(limit 3): "); while($row = mysqli_fetch_row($result)){ print_r ($row); } } if($mysqli->error){ printf("Failed..!" , $mysqli->error); } $mysqli->close();

    Output

    The output obtained is as follows −

    SELECT LIMIT statement executed successfully..!  Records are(limit 3): Array
    (
        [0] => 1
        [1] => Java Tutorial
        [2] => new_author
        [3] =>
    )
    Array
    (
        [0] => 3
        [1] => Java Tutorial
        [2] => newauther1
        [3] => 2023-12-20
    )
    Array
    (
        [0] => 4
        [1] => Java Tutorial
        [2] => newauther2
        [3] => 2022-06-10
    )
    
    var mysql = require(''mysql2'');
    var con = mysql.createConnection({
        host: "localhost",
        user: "root",
        password: "Nr5a0204@123"
    });
    
      //Connecting to MySQL
      con.connect(function (err) {
      if (err) throw err;
      console.log("Connected!");
    
      //Selecting a Database
      sql = "USE TUTORIALS"
      con.query(sql);
    
      //Creating a table
      sql = "CREATE TABLE CUSTOMERS (ID INT NOT NULL,NAME VARCHAR (20) NOT NULL,AGE INT NOT NULL,ADDRESS CHAR (25),SALARY DECIMAL (18, 2),PRIMARY KEY (ID));"
      con.query(sql);
    
      //Inserting Records
      sql = "INSERT INTO CUSTOMERS (ID,NAME,AGE,ADDRESS,SALARY) VALUES (1, ''Ramesh'',32, ''Ahmedabad'', 2000.00 ), (2, ''Khilan'',25, ''Delhi'', 1500.00 ),(3, ''kaushik'',23, ''Kota'', 2000.00 ), (4,''Chaitali'', 25, ''Mumbai'', 6500.00 ), (5, ''Hardik'',27, ''Bhopal'', 8500.00 ), (6, ''Komal'',22, ''MP'', 4500.00 ), (7, ''Muffy'',24, ''Indore'', 10000.00 );"
      con.query(sql);
    
      sql = "SELECT * FROM CUSTOMERS LIMIT 4"
      con.query(sql, function (err, result) {
          if (err) throw err;
          console.log(result);
      });
    });
    

    Output

    The output produced is as follows −

    Connected!
    [
      {
        ID: 1,
        NAME: ''Ramesh'',
        AGE: 32,
        ADDRESS: ''Ahmedabad'',
        SALARY: ''2000.00''
      },
      {
        ID: 2,
        NAME: ''Khilan'',
        AGE: 25,
        ADDRESS: ''Delhi'',
        SALARY: ''1500.00''
      },
      {
        ID: 3,
        NAME: ''kaushik'',
        AGE: 23,
        ADDRESS: ''Kota'',
        SALARY: ''2000.00''
      },
      {
        ID: 4,
        NAME: ''Chaitali'',
        AGE: 25,
        ADDRESS: ''Mumbai'',
        SALARY: ''6500.00''
      }
    ]


    import java.sql.Connection;
    import java.sql.DriverManager;
    import java.sql.ResultSet;
    import java.sql.Statement;
    public class LimitQuery {
      public static void main(String[] args) {
        String url = "jdbc:mysql://localhost:3306/TUTORIALS";
        String user = "root";
        String password = "password";
        ResultSet rs;
        try {
          Class.forName("com.mysql.cj.jdbc.Driver");
                Connection con = DriverManager.getConnection(url, user, password);
                Statement st = con.createStatement();
                //System.out.println("Database connected successfully...!");
                String sql = "SELECT * FROM CUSTOMERS LIMIT 4";
                rs = st.executeQuery(sql);
                System.out.println("Table records: ");
                while(rs.next()) {
                  String Id = rs.getString("Id");
                  String Name = rs.getString("Name");
                  String Age = rs.getString("Age");
                  String Address = rs.getString("Address");
                  String Salary = rs.getString("Salary");
                  System.out.println("Id: " + Id + ", Name: " + Name + ", Age: " +  Age + ", Address: " + Address + ", Salary: " + Salary);
                }
        }catch(Exception e) {
          e.printStackTrace();
        }
      }
    }
    

    Output

    The output obtained is as shown below −

    Table records:
    Id: 1, Name: Ramesh, Age: 32, Address: Ahmedabad, Salary: 2000.00
    Id: 2, Name: Khilan, Age: 25, Address: Delhi, Salary: 1500.00
    Id: 3, Name: kaushik, Age: 23, Address: Kota, Salary: 2000.00
    Id: 4, Name: Chaitali, Age: 25, Address: Mumbai, Salary: 6500.00
    
    import mysql.connector
    #establishing the connection
    connection = mysql.connector.connect(
        host=''localhost'',
        user=''root'',
        password=''password'',
        database=''tut''
    )
    cursorObj = connection.cursor()
    limit_value = 3
    limit_query = f"SELECT * FROM tutorials_tbl LIMIT {limit_value}"
    cursorObj.execute(limit_query)
    result = cursorObj.fetchall()
    print(f"First {limit_value} rows from Tutorial Table:")
    for row in result:
        print(row)
    cursorObj.close()
    connection.close()
    

    Output

    Following is the output of the above code −

    First 3 rows from Tutorial Table:
    (1, ''Learn PHP'', ''John Paul'', datetime.date(2023, 3, 28))
    (2, ''Learn MySQL'', ''Abdul S'', datetime.date(2023, 3, 28))
    (3, ''JAVA Tutorial'', ''Sanjay'', datetime.date(2007, 5, 6))
    

    Khóa học lập trình tại Toidayhoc vừa học vừa làm dự án vừa nhận lương: Khóa học lập trình nhận lương tại trung tâm Toidayhoc

  • Khóa học miễn phí MySQL – Where Clause nhận dự án làm có lương

    MySQL – WHERE Clause

    Table of content


    MySQL WHERE Clause

    We know that the SQL SELECT command is used to fetch records from a MySQL table. In addition to that, we can also use a conditional clause called the WHERE Clause in conjunction with the SELECT statement to filter out the results. Using this WHERE clause, we can specify a selection criteria to select the required records from a table.

    The WHERE clause works like an if condition in any programming language. This clause is used to compare the given value with the field value available in a MySQL table. If the given value from outside is equal to the available field value in the MySQL table, then it returns that row.

    Operators Used in WHERE Clause

    Here is the list of comparison operators, which can be used with the WHERE clause.

    • =: Checks if the values of the two operands are equal or not, if yes, then the condition becomes true.

    • !=: Checks if the values of the two operands are equal or not, if the values are not equal then the condition becomes true.

    • >: Checks if the value of the left operand is greater than the value of the right operand, if yes, then the condition becomes true.

    • <: Checks if the value of the left operand is less than the value of the right operand, if yes then the condition becomes true.

    • >=: Checks if the value of the left operand is greater than or equal to the value of the right operand, if yes, then the condition becomes true.

    • <=: Checks if the value of the left operand is less than or equal to the value of the right operand, if yes, then the condition becomes true.

    Along with these, the WHERE clause can also contain logical operators, like AND, OR and NOT.

    • AND: If an AND operator is used in WHERE Clause with two conditions, the query will return true only if both the conditions are satisfied.

    • OR: If an OR operator is used in WHERE Clause with two conditions, the query will return true only if either of the conditions are satisfied.

    • NOT: If a NOT operator is used in WHERE Clause with a condition, the query will return true only if the table records does not satisfy the condition.

    Fetching Data Using Where Clause

    The WHERE clause is very useful when you want to fetch the selected rows from a table, especially when you use the MySQL Join. Joins are discussed in another chapter.

    If the given condition does not match any record in the table, then the query would not return any row.

    Syntax

    Following is the generic SQL syntax of the SELECT command with the WHERE clause to fetch data from the MySQL table −

    SELECT field1, field2,...fieldN table_name1, table_name2...
    [WHERE condition1 [AND [OR]] condition2.....
    
    • You can use one or more tables separated by a comma to include various conditions using a WHERE clause, but the WHERE clause is an optional part of the SELECT command.

    • You can specify any condition using the WHERE clause.

    • You can specify more than one condition using the AND or the OR operators.

    • A WHERE clause can be used along with DELETE or UPDATE SQL command also to specify a condition.

    Example

    Firstly, let us create a table named CUSTOMERS using the following query −

    CREATE TABLE CUSTOMERS (
       ID INT NOT NULL,
       NAME VARCHAR (20) NOT NULL,
       AGE INT NOT NULL,
       ADDRESS CHAR (25),
       SALARY DECIMAL (18, 2),
       PRIMARY KEY (ID)
    );
    

    The following query inserts 7 records into the above-created table −

    INSERT INTO CUSTOMERS (ID,NAME,AGE,ADDRESS,SALARY) VALUES
    (1, ''Ramesh'', 32, ''Ahmedabad'', 2000.00 ),
    (2, ''Khilan'', 25, ''Delhi'', 1500.00 ),
    (3, ''Kaushik'', 23, ''Kota'', 2000.00 ),
    (4, ''Chaitali'', 25, ''Mumbai'', 6500.00 ),
    (5, ''Hardik'', 27, ''Bhopal'', 8500.00 ),
    (6, ''Komal'', 22, ''Hyderabad'', 4500.00 ),
    (7, ''Muffy'', 24, ''Indore'', 10000.00 );
    

    Execute the below query to fetch all the records of CUSTOMERS table −

    Select * From CUSTOMERS;
    

    Following is the CUSTOMERS table −

    ID NAME AGE ADDRESS SALARY
    1 Ramesh 32 Ahmedabad 2000.00
    2 Khilan 25 Delhi 1500.00
    3 Kaushik 23 Kota 2000.00
    4 Chaitali 25 Mumbai 6500.00
    5 Hardik 27 Bhopal 8500.00
    6 Komal 22 Hyderabad 4500.00
    7 Muffy 24 Indore 10000.00

    Now, let us fetch the CUSTOMERS whose AGE is greater than 23 using the MySQL WHERE clause in conjunction with SELECT statement −

    Select * From CUSTOMERS Where AGE > 23;
    

    Output

    Following are the records −

    ID NAME AGE ADDRESS SALARY
    1 Ramesh 32 Ahmedabad 2000.00
    2 Khilan 25 Delhi 1500.00
    4 Chaitali 25 Mumbai 6500.00
    5 Hardik 27 Bhopal 8500.00
    7 Muffy 24 Indore 10000.00

    WHERE Clause Using a Client Program

    Besides using MySQL Where clause to fetch the selected rows from a table, we can also use client programs like PHP, Node.js, Java, and Python to achieve the same result.

    Syntax

    Following are the syntaxes of this operation in various programming languages −

    To fetch selective records from a table through PHP program, we need to execute the SELECT statement using the mysqli function query() as −

    $sql = "SELECT COLUMN_NAME1, COLUMN_NAME2,.. FROM TABLE_NAME WHERE CONDITION";
    $mysqli->query($sql,$resultmode)
    

    To fetch selective records from a table through Node.js program, we need to execute the SELECT statement using the query() function of the mysql2 library as −

    sql= "SELECT field1, field2,...fieldN table_name1, table_name2...
    [WHERE condition1 [AND [OR]] condition2....." ;
    Con.query(sql);
    

    To fetch selective records from a table through Java program, we need to execute the SELECT statement using the JDBC function executeUpdate() as −

    String sql = "SELECT field1, field2,...fieldN table_name1, table_name2...
    [WHERE condition1 [AND [OR]] condition2....";
    statement.executeQuery(sql);
    

    To fetch selective records from a table through Python program, we need to execute the SELECT statement using the execute() function of the MySQL Connector/Python as −

    where_clause_query = SELECT column1, column2, ...
       FROM table_name WHERE condition;
    cursorObj.execute(where_clause_query)
    

    Example

    Following are the programs −

    $dbhost = ''localhost
    $dbuser = ''root
    $dbpass = ''password
    $dbname = ''TUTORIALS
    $mysqli = new mysqli($dbhost, $dbuser, $dbpass, $dbname);
    
    if($mysqli->connect_errno ) {
       printf("Connect failed: %s
    ", $mysqli->connect_error); exit(); } //printf(''Connected successfully.
    ''); $sql = "SELECT * FROM tutorials_tbl where tutorial_author = ''Sanjay''"; $result = $mysqli->query($sql); if ($result->num_rows > 0) { while($row = $result->fetch_assoc()) { printf("Id: %s, Title: %s, Author: %s, Date: %d
    ", $row["tutorial_id"], $row["tutorial_title"], $row["tutorial_author"], $row["submission_date"]); } } else { printf(''No record found.
    ''); } mysqli_free_result($result); $mysqli->close();

    Output

    The output obtained is as follows −

    Id: 3, Title: JAVA Tutorial, Author: Sanjay, Date: 2007
    
    $dbhost = ''localhost
    $dbuser = ''root
    $dbpass = ''password
    $dbname = ''TUTORIALS
    $mysqli = new mysqli($dbhost, $dbuser, $dbpass, $dbname);
    
    if($mysqli->connect_errno ) {
       printf("Connect failed: %s
    ", $mysqli->connect_error); exit(); } //printf(''Connected successfully.
    ''); $sql = "SELECT * FROM tutorials_tbl where tutorial_author = ''Sanjay''"; $result = $mysqli->query($sql); if ($result->num_rows > 0) { while($row = $result->fetch_assoc()) { printf("Id: %s, Title: %s, Author: %s, Date: %d
    ", $row["tutorial_id"], $row["tutorial_title"], $row["tutorial_author"], $row["submission_date"]); } } else { printf(''No record found.
    ''); } mysqli_free_result($result); $mysqli->close();

    Output

    The output produced is as follows −

    Connected!
    --------------------------
    [
      {
        tutorial_id: 3,
        tutorial_title: ''JAVA Tutorial'',
        tutorial_author: ''Sanjay'',
        submission_date: 2007-05-20T18:30:00.000Z
      }
    ]
    
    import java.sql.Connection;
    import java.sql.DriverManager;
    import java.sql.ResultSet;
    import java.sql.Statement;
    public class WhereClause {
    	public static void main(String[] args) {
    		String url = "jdbc:mysql://localhost:3306/TUTORIALS";
    		String user = "root";
    		String password = "password";
    		ResultSet rs;
    		try {
    			Class.forName("com.mysql.cj.jdbc.Driver");
                Connection con = DriverManager.getConnection(url, user, password);
                Statement st = con.createStatement();
                //System.out.println("Database connected successfully...!");
                String sql = "SELECT * from tutorials_tbl WHERE tutorial_author = ''Sanjay''";
                rs = st.executeQuery(sql);
                System.out.println("Table records: ");
                while(rs.next()){
                	String Id = rs.getString("tutorial_id");
                	String Title = rs.getString("tutorial_title");
                	String Author = rs.getString("tutorial_author");
                	String Date = rs.getString("submission_date");
                	System.out.println("Id: " + Id + ", Title: " + Title + ", Author: " + Author + ", Submission-date: " + Date);
                }
    		}catch(Exception e) {
    			e.printStackTrace();
    		}
    	}
    }
    

    Output

    The output obtained is as shown below −

    Table records:
    Id: 3, Title: Learning Java, Author: Sanjay, Submission-date: 2007-05-06
    
    import mysql.connector
    #establishing the connection
    connection = mysql.connector.connect(
        host=''localhost'',
        user=''root'',
        password=''password'',
        database=''tut''
    )
    cursorObj = connection.cursor()
    where_clause_query = """SELECT tutorial_id, tutorial_title, tutorial_author, submission_date
    FROM tutorials_tbl
    WHERE tutorial_author = ''John Paul''
    """
    cursorObj.execute(where_clause_query)
    # Fetch all the matching rows
    matching_rows = cursorObj.fetchall()
    # Printing the matching rows
    for row in matching_rows:
        print(row)
    cursorObj.close()
    connection.close()
    

    Output

    Following is the output of the above code −

    (1, ''Learn PHP'', ''John Paul'', datetime.date(2023, 3, 28))
    

    Khóa học lập trình tại Toidayhoc vừa học vừa làm dự án vừa nhận lương: Khóa học lập trình nhận lương tại trung tâm Toidayhoc

  • Khóa học miễn phí MySQL – Non-Clustered Index nhận dự án làm có lương

    MySQL – Non-Clustered Index

    Table of content


    Indexes in MySQL are used to retrieve the data much faster from the database tables or views. Users cannot see the indexes on the application level, but they work behind to speed up searches and queries.

    There are two types of Indexes in MySQL −

    • Clustered Index

    • Non-Clustered Index

    A clustered index in MySQL can sort the data in a table manually by ordering all the rows in the table based on the key columns used to create it. On the other hand, a non-clustered index stores data in one location and indexes containing pointers to this data in another location.

    MySQL Non-Clustered Indexes

    Non-Clustered indexes store data in one location and its indexes in another location. These indexes contain pointers to the actual data.

    However, MySQL does not provide ways to explicitly create clustered and non-clustered indexes. A PRIMARY KEY is treated as a clustered index. And when the PRIMARY KEY is not defined, the first UNIQUE NOT NULL key is a clustered index. All the other indexes on a table are non-clustered indexes.

    Syntax

    Following is the basic syntax to create a non-clustered index on a MySQL table −

    CREATE INDEX index_name ON table_name(column_name(s));
    

    Example

    Let us see an example to create a non-clustered index on a table named ”Students”. This table contains details of students like their Roll Number, Name, Age, and Department. Here, we are trying to apply the non-clustered index on columns Roll Number and Department, using the following query −

    Let us first create the table Students using CREATE TABLE statement shown below −

    CREATE TABLE CUSTOMERS(
       ID INT NOT NULL,
       NAME VARCHAR (20) NOT NULL,
       AGE  INT NOT NULL,
       ADDRESS CHAR (25),
       SALARY DECIMAL (20, 2),
       PRIMARY KEY(ID)
    );
    

    Using the following query, create a non-clustered index on the NAME column −

    CREATE INDEX nc_index ON CUSTOMERS(NAME);
    

    Note − As MySQL does not have specific provision for Non-Clustered Index, we are using the usual CREATE INDEX statement.

    Verification

    To verify whether the INDEX is created on the table CUSTOMERS or not, display the table definition using DESC command −

    DESC CUSTOMERS;
    

    As we can see below, there are two indexes created on the CUSTOMERS table. The PRIMARY KEY index is a clustered index and the multi-index is a non-clustered index −

    Field Type Null Key Default Extra
    ID int NO PRI NULL
    NAME varchar(20) NO MUL NULL
    AGE int NO NULL
    ADDRESS char(25) YES NULL
    SALARY decimal(18, 2) YES NULL

    Creating a Non-Clustered Index Using NodeJS

    In addition to using SQL queries to create non-clustered indexes, we can also create them on a MySQL database using a client program.

    The MySQL NodeJS connector mysql2 provides a function named query() to execute the CREATE INDEX query in the MySQL database.

    Syntax

    Following is the syntax to create a non-clustered index in MySQL database using NodeJS −

    sql = "CREATE INDEX index_name ON table_name(column_name(s))";
    con.query(sql);
    

    Example

    Following are the implementation of this operation using NodeJS −

    var mysql = require(''mysql2'');
    var con = mysql.createConnection({
        host: "localhost",
        user: "root",
        password: "Nr5a0204@123"
    });
    
      //Connecting to MySQL
      con.connect(function (err) {
      if (err) throw err;
      console.log("Connected!");
      console.log("--------------------------");
    
      //Creating a Database
      sql = "create database TUTORIALS"
      con.query(sql);
    
      //Select database
      sql = "USE TUTORIALS"
      con.query(sql);
    
      //Creating table
      sql = "CREATE TABLE STUDENTS(RNO INT NOT NULL,NAME VARCHAR(50),AGE INT,DEPT VARCHAR(50));"
      con.query(sql);
    
      //Creating Index
      sql = "CREATE INDEX nc_index ON STUDENTS(RNO, DEPT);"
      con.query(sql);
    
      //Describing the Table
      sql = "DESC STUDENTS;"
      con.query(sql, function(err, result){
        if (err) throw err
        console.log(result)
      });
    });
    

    Output

    The output produced is as follows −

    Connected!
    --------------------------
    [
      {Field: ''RNO'',Type: ''int'',Null: ''NO'',Key: ''MUL'',Default: null,Extra: ''''},
      {Field: ''NAME'',Type: ''varchar(50)'',Null: ''YES'',Key: '''',Default: null,Extra: ''''},
      {Field: ''AGE'',Type: ''int'',Null: ''YES'',Key: '''',Default: null,Extra: ''''},
      {Field: ''DEPT'',Type: ''varchar(50)'',Null: ''YES'',Key: '''',Default: null,Extra: ''''}
    ]
    

    Khóa học lập trình tại Toidayhoc vừa học vừa làm dự án vừa nhận lương: Khóa học lập trình nhận lương tại trung tâm Toidayhoc

  • Khóa học miễn phí MySQL – Clustered Index nhận dự án làm có lương

    MySQL – Clustered Index


    Indexes in MySQL are used to retrieve the data much faster from the database. We (users) cannot see the indexes, but they work behind to speed up searches and queries. They are categorized into two types: clustered and non-clustered indexes.

    A clustered index can sort the data in a table manually. When data is inserted into the column with clustered index, the records are automatically sorted in a specified order. So, each table can only have one clustered index since it determines the sort order of the data.

    MySQL Clustered Indexes

    MySQL database does not have separate provisions for Clustered indexes. They are automatically created when PRIMARY KEY is defined on a table. And when the PRIMARY KEY is not defined, the first UNIQUE NOT NULL key is treated as a Clustered index.

    If a table has no Primary Key or UNIQUE index, MySQL will internally create a hidden clustered index named GEN_CLUST_INDEX on a column that contains the row ID values.

    The rows of a table are ordered using row ID values generated by InnoDB.

    Example

    Let us create a table named CUSTOMERS using the following query −

    CREATE TABLE CUSTOMERS(
       ID INT NOT NULL,
       NAME VARCHAR (20) NOT NULL,
       AGE  INT NOT NULL,
       ADDRESS CHAR (25),
       SALARY DECIMAL (20, 2),
       PRIMARY KEY(ID)
    );
    

    Now, we will insert some values in to the above created table using the INSERT statement −

    INSERT INTO CUSTOMERS VALUES
    (1, ''Ramesh'', ''32'', ''Ahmedabad'', 2000),
    (2, ''Khilan'', ''25'', ''Delhi'', 1500),
    (3, ''Kaushik'', ''23'', ''Kota'', 2500),
    (4, ''Chaitali'', ''26'', ''Mumbai'', 6500),
    (5, ''Hardik'',''27'', ''Bhopal'', 8500),
    (6, ''Komal'', ''22'', ''MP'', 9000),
    (7, ''Muffy'', ''24'', ''Indore'', 5500);
    

    The table will be created as follows −

    ID NAME AGE ADDRESS SALARY
    1 Ramesh 32 Ahmedabad 2000.00
    2 Khilan 25 Delhi 1500.00
    3 Kaushik 23 Kota 2000.00
    4 Chaitali 25 Mumbai 6500.00
    5 Hardik 27 Bhopal 8500.00
    6 Komal 22 Hyderabad 4500.00
    7 Muffy 24 Indore 10000.00

    Using the following query, we can list all the indexes created on the CUSTOMERS table −

    SHOW INDEX FROM CUSTOMERSG
    

    Output

    As we can see in the output below, the PRIMARY KEY is created on the ID column of CUSTOMERS table.

    *************************** 1. row ***************************
            Table: customers
       Non_unique: 0
         Key_name: PRIMARY
     Seq_in_index: 1
      Column_name: ID
        Collation: A
      Cardinality: 7
         Sub_part: NULL
           Packed: NULL
             Null:
       Index_type: BTREE
          Comment:
    Index_comment:
          Visible: YES
       Expression: NULL
    1 row in set (0.01 sec)
    

    Khóa học lập trình tại Toidayhoc vừa học vừa làm dự án vừa nhận lương: Khóa học lập trình nhận lương tại trung tâm Toidayhoc

  • Khóa học miễn phí MySQL – Show Indexes nhận dự án làm có lương

    MySQL – Show Indexes

    Table of content


    A MySQL Index is a type of special lookup table that is used to make data retrieval easier in a database. It points to the actual data in the database.

    MySQL allows various types of indexes to be created on one or more columns in a table. They are:

    • Primary Key Index

    • Unique Index

    • Simple Index

    • Composite Index

    • Implicit Index

    To check if any of these indexes are defined on a table or not, MySQL provides the SHOW INDEX statement.

    The MySQL SHOW INDEX Statement

    The SHOW INDEX Statement of MySQL is used to list out the information about table index.

    The vertical-format output (specified by G) in MySQL often is used with this statement, to avoid a long line wraparound.

    Syntax

    Following is the basic syntax of the SHOW INDEX Statement −

    SHOW INDEX FROM table_name;
    

    Example

    In this example, we are create a new table CUSTOMERS and adding a PRIMARY KEY index to one of its columns using the following CREATE TABLE query −

    CREATE TABLE CUSTOMERS (
       ID INT NOT NULL,
       NAME VARCHAR (20) NOT NULL,
       AGE INT NOT NULL,
       ADDRESS CHAR (25),
       SALARY DECIMAL (18, 2),
       PRIMARY KEY(ID),
       INDEX(NAME)
    );
    

    Now, we can display the indexes present on the CUSTOMERS table using the following SHOW INDEX query −

    SHOW INDEX FROM CUSTOMERSG
    

    Output

    The vertical-output will be displayed as −

    *************************** 1. row ************************
            Table: customers
       Non_unique: 0
         Key_name: PRIMARY
     Seq_in_index: 1
      Column_name: ID
        Collation: A
      Cardinality: 0
         Sub_part: NULL
           Packed: NULL
             Null:
       Index_type: BTREE
          Comment:
    Index_comment:
          Visible: YES
       Expression: NULL
    *************************** 2. row ************************
            Table: customers
       Non_unique: 1
         Key_name: NAME
     Seq_in_index: 1
      Column_name: NAME
        Collation: A
      Cardinality: 0
         Sub_part: NULL
           Packed: NULL
             Null:
       Index_type: BTREE
          Comment:
    Index_comment:
          Visible: YES
       Expression: NULL
    2 rows in set (0.01 sec)
    

    With IN Clause

    In this example, let us first create an index on the AGE column of CUSTOMERS table using the following CREATE INDEX query −

    CREATE INDEX AGE_INDEX ON CUSTOMERS (AGE);
    

    You can also retrieve the information by specifying the database name as −

    SHOW INDEX IN CUSTOMERS FROM sampleG
    

    Output

    The output will be the same as above −

    *************************** 1. row ***************************
            Table: customers
       Non_unique: 0
         Key_name: PRIMARY
     Seq_in_index: 1
      Column_name: ID
        Collation: A
      Cardinality: 0
         Sub_part: NULL
           Packed: NULL
             Null:
       Index_type: BTREE
          Comment:
    Index_comment:
          Visible: YES
       Expression: NULL
    *************************** 2. row ***************************
            Table: customers
       Non_unique: 1
         Key_name: NAME
     Seq_in_index: 1
      Column_name: NAME
        Collation: A
      Cardinality: 0
         Sub_part: NULL
           Packed: NULL
             Null:
       Index_type: BTREE
          Comment:
    Index_comment:
          Visible: YES
       Expression: NULL
    2 rows in set (0.01 sec)
    

    With WHERE Clause

    As the indexes are displayed in a table format, we can use a WHERE clause with SHOW INDEX statement to retrieve specified indexes matching a given condition.

    SHOW INDEX IN CUSTOMERS WHERE Column_name = ''NAME''G
    

    Output

    The index created on NAME column is displayed −

    *************************** 1. row ************************
            Table: customers
       Non_unique: 1
         Key_name: NAME
     Seq_in_index: 1
      Column_name: NAME
        Collation: A
      Cardinality: 0
         Sub_part: NULL
           Packed: NULL
             Null:
       Index_type: BTREE
          Comment:
    Index_comment:
          Visible: YES
       Expression: NULL
    1 row in set (0.00 sec)
    

    Show Indexes Using Client Program

    We can also display index information on a MySQL table using a client program.

    Syntax

    Following are the syntaxes to show indexes on a MySQL table using various programming languages −

    To show an index from MySQL table through a PHP program, we need to execute the SHOW INDEX statement using the query() function provided by mysqli connector as follows −

    $sql = "SHOW INDEX FROM tutorials_table";
    $mysqli->query($sql);
    

    To show an index from MySQL table through a JavaScript program, we need to execute the SHOW INDEX statement using the query() function of mysql2 library as follows −

    sql = "SHOW INDEXES FROM temp";
    con.query(sql);
    

    To show an index from MySQL table through a Java program, we need to execute the SHOW INDEX statement using the executeQuery() function of JDBC as follows −

    String sql = "SHOW INDEXES FROM tutorials_tbl";
    st.executeQuery(sql);
    

    To show an index from MySQL table through a Python program, we need to execute the SHOW INDEX statement using the execute() function of the MySQL Connector/Python as follows −

    rename_view_query = "SHOW INDEXES FROM tutorials_tbl"
    cursorObj.execute(rename_view_query)
    

    Example

    Following are the programs −

    $dbhost = ''localhost
    $dbuser = ''root
    $dbpass = ''password
    $dbname = ''TUTORIALS
    $mysqli = new mysqli($dbhost, $dbuser, $dbpass, $dbname);
    
    if ($mysqli->connect_errno) {
        printf("Connect failed: %s
    ", $mysqli->connect_error); exit(); } // printf(''Connected successfully.
    ''); // SHOW INDEX $sql = "SHOW INDEX FROM tutorials_table"; if ($index = $mysqli->query($sql)) { printf("Index shown successfully!.
    "); while ($indx = mysqli_fetch_row($index)) { print_r($indx); } } if ($mysqli->errno) { printf("Index could not be shown!.
    ", $mysqli->error); } $mysqli->close();

    Output

    The output obtained is as follows −

    Index shown successfully!.
    Array
    (
       [0] => tutorials_tbl
       [1] => 0
       [2] => PRIMARY
       [3] => 1
       [4] => tutorial_id
       [5] => A
       [6] => 3
       [7] =>
       [8] =>
       [9] =>
       [10] => BTREE
       [11] =>
       [12] =>
       [13] => YES
       [14] =>
    )
    Array
    (
       [0] => tutorials_tbl
       [1] => 0
       [2] => UIID
       [3] => 1
       [4] => tutorial_id
       [5] => A
       [6] => 3
       [7] =>
       [8] =>
       [9] =>
       [10] => BTREE
       [11] =>
       [12] =>
       [13] => YES
       [14] =>
    )
    
    var mysql = require(''mysql2'');
    var con = mysql.createConnection({
        host: "localhost",
        user: "root",
        password: "Nr5a0204@123"
    });
    
      //Connecting to MySQL
      con.connect(function (err) {
      if (err) throw err;
      console.log("Connected!");
      console.log("--------------------------");
    
      sql = "create database TUTORIALS"
      con.query(sql);
    
      sql = "USE TUTORIALS"
      con.query(sql);
    
      sql = "CREATE TABLE temp (ID INT, Name VARCHAR(100), Age INT, City VARCHAR(100));"
      con.query(sql);
    
      sql = "INSERT INTO temp values(1, ''Radha'', 29, ''Vishakhapatnam''), (2, ''Dev'', 30, ''Hyderabad'');"
      con.query(sql);
    
      //Creating Indexes
      sql = "CREATE INDEX sample_index ON temp (name) USING BTREE;"
      con.query(sql);
    
      sql = "CREATE INDEX composite_index on temp (ID, Name);"
      con.query(sql);
    
      //Displaying Indexes
      sql = "SHOW INDEXES FROM temp;"
      con.query(sql, function(err, result){
        if (err) throw err
        console.log(result);
      });
    
    });
    

    Output

    The output produced is as follows −

    Connected!
    --------------------------
    [
      {
        Table: ''temp'',
        Non_unique: 1,
        Key_name: ''sample_index'',
        Seq_in_index: 1,
        Column_name: ''Name'',
        Collation: ''A'',
        Cardinality: 2,
        Sub_part: null,
        Packed: null,
        Null: ''YES'',
        Index_type: ''BTREE'',
        Comment: '''',
        Index_comment: '''',
        Visible: ''YES'',
        Expression: null
      },
      {
        Table: ''temp'',
        Non_unique: 1,
        Key_name: ''composite_index'',
        Seq_in_index: 1,
        Column_name: ''ID'',
        Collation: ''A'',
        Cardinality: 2,
        Sub_part: null,
        Packed: null,
        Null: ''YES'',
        Index_type: ''BTREE'',
        Comment: '''',
        Index_comment: '''',
        Visible: ''YES'',
        Expression: null
      },
      {
        Table: ''temp'',
        Non_unique: 1,
        Key_name: ''composite_index'',
        Seq_in_index: 2,
        Column_name: ''Name'',
        Collation: ''A'',
        Cardinality: 2,
        Sub_part: null,
        Packed: null,
        Null: ''YES'',
        Index_type: ''BTREE'',
        Comment: '''',
        Index_comment: '''',
        Visible: ''YES'',
        Expression: null
      }
    ]
    
    import java.sql.Connection;
    import java.sql.DriverManager;
    import java.sql.ResultSet;
    import java.sql.Statement;
    
    public class ShowIndex {
       public static void main(String[] args) {
          String url = "jdbc:mysql://localhost:3306/TUTORIALS";
          String username = "root";
          String password = "password";
          try {
             Class.forName("com.mysql.cj.jdbc.Driver");
             Connection connection = DriverManager.getConnection(url, username, password);
             Statement statement = connection.createStatement();
             System.out.println("Connected successfully...!");
    
             //Show index...!;
             String sql = "SHOW INDEXES FROM tutorials_tbl";
             ResultSet resultSet = statement.executeQuery(sql);
             System.out.println("Following are the indexes in tutorials_tbl");
             while (resultSet.next()){
                System.out.println(resultSet.getString(1)+ " "+ resultSet.getString(2)
                        +" "+resultSet.getString(3)+" " + resultSet.getString(4));
             }
             connection.close();
          } catch (Exception e) {
             System.out.println(e);
          }
       }
    }
    

    Output

    The output obtained is as shown below −

    Connected successfully...!
    Following are the indexes in tutorials_tbl
    tutorials_tbl 0 PRIMARY 1
    tutorials_tbl 1 tid 1
    
    import mysql.connector
    #establishing the connection
    connection = mysql.connector.connect(
        host=''localhost'',
        user=''root'',
        password=''password'',
        database=''tut''
    )
    table_name = ''tutorials_tbl''
    cursorObj = connection.cursor()
    show_indexes_query = f"SHOW INDEXES FROM {table_name}"
    cursorObj.execute(show_indexes_query)
    indexes = cursorObj.fetchall()
    for index in indexes:
        print(f"Table: {index[2]}, Index Name: {index[3]}, Column Name: {index[4]}, Non-unique: {index[1]}")
    cursorObj.close()
    connection.close()
    

    Output

    Following is the output of the above code −

    Table: PRIMARY, Index Name: 1, Column Name: tutorial_id, Non-unique: 0
    Table: idx_submission_date, Index Name: 1, Column Name: submission_date, Non-unique: 1
    
    mysql_statements_reference.htm

    Khóa học lập trình tại Toidayhoc vừa học vừa làm dự án vừa nhận lương: Khóa học lập trình nhận lương tại trung tâm Toidayhoc

  • Khóa học miễn phí MySQL – Unique Index nhận dự án làm có lương

    MySQL – Unique Index

    Table of content


    MySQL Indexes are used to return the data from the database real quick. The users cannot see the indexes performing, instead they are just used to speed up the queries.

    However a unique index, in addition to speeding up data retrieval queries, is also used to maintain data integrity in a table. When a unique index is defined on a table column, we cannot add any duplicate values into that column.

    MySQL Unique Index

    A unique index can be created on one or more columns of a table using the CREATE UNIQUE INDEX statement in MySQL.

    • If we are creating unique index on only a single column, all the rows in that column must be unique.
    • We cannot create a unique index where NULL values are present in multiple rows in a single column.
    • If we are creating unique index on multiple columns, the combination of rows in those columns must be unique.
    • We cannot create a unique index on multiple columns if the combination of columns contains NULL values in more than one row.

    Syntax

    Following is the syntax for creating a unique index in MySQL −

    CREATE UNIQUE INDEX index_name
    ON table_name (column1, column2, ..., columnN);
    

    Example

    Let us first create a table named CUSTOMERS using the following query −

    CREATE TABLE CUSTOMERS (
       ID INT NOT NULL,
       NAME VARCHAR(15) NOT NULL,
       AGE INT NOT NULL,
       ADDRESS VARCHAR(25),
       SALARY DECIMAL(10, 2),
       PRIMARY KEY(ID)
    );
    

    In the following query, we are inserting some values in to the above created table using the INSERT statement −

    INSERT INTO CUSTOMERS VALUES
    (1, ''Ramesh'', ''32'', ''Ahmedabad'', 2000),
    (2, ''Khilan'', ''25'', ''Delhi'', 1500),
    (3, ''Kaushik'', ''23'', ''Kota'', 2500),
    (4, ''Chaitali'', ''26'', ''Mumbai'', 6500),
    (5, ''Hardik'',''27'', ''Bhopal'', 8500),
    (6, ''Komal'', ''22'', ''MP'', 9000),
    (7, ''Muffy'', ''24'', ''Indore'', 5500);
    

    The table will be created as follows −

    ID NAME AGE ADDRESS SALARY
    1 Ramesh 32 Ahmedabad 2000.00
    2 Khilan 25 Delhi 1500.00
    3 Kaushik 23 Kota 2000.00
    4 Chaitali 25 Mumbai 6500.00
    5 Hardik 27 Bhopal 8500.00
    6 Komal 22 Hyderabad 4500.00
    7 Muffy 24 Indore 10000.00

    Now, create a unique index for the column named SALARY in the CUSTOMERS table using the following query −

    CREATE UNIQUE INDEX unique_ind ON CUSTOMERS (SALARY);
    

    Inserting Duplicate Values

    Now, let us try to update the value in the SALARY column with a duplicate (already existing data) value using the following query −

    UPDATE CUSTOMERS SET SALARY = 2000 WHERE ID = 2;
    

    Error

    The above query results in an error because a column that has unique index cannot contain duplicate values in it.

    ERROR 1062 (23000): Duplicate entry ''2000.00'' for key ''customers.unique_ind''
    

    Creating Unique Index on Multiple Columns

    In MySQL, we can also create a unique index on multiple columns of a table using the CREATE UNIQUE INDEX statement. To do so, you just need to pass the name of the columns (you need to create the index on) to the query.

    Example

    Assume the previously created CUSTOMERS table and create a unique index on the columns named NAME and AGE using the following query −

    CREATE UNIQUE INDEX mul_unique_index ON CUSTOMERS(NAME, AGE);
    

    Verification

    Using the following query, we can list all the indexes that are created on the CUSTOMERS table −

    SHOW INDEX FROM CUSTOMERSG
    

    The table of index information is displayed as −

    *************************** 1. row ***********************
            Table: customers
       Non_unique: 0
         Key_name: PRIMARY
     Seq_in_index: 1
      Column_name: ID
        Collation: A
      Cardinality: 7
         Sub_part: NULL
           Packed: NULL
             Null:
       Index_type: BTREE
          Comment:
    Index_comment:
          Visible: YES
       Expression: NULL
    *************************** 2. row ***********************
            Table: customers
       Non_unique: 0
         Key_name: mul_unique_index
     Seq_in_index: 1
      Column_name: NAME
        Collation: A
      Cardinality: 7
         Sub_part: NULL
           Packed: NULL
             Null:
       Index_type: BTREE
          Comment:
    Index_comment:
          Visible: YES
       Expression: NULL
    *************************** 3. row ***********************
            Table: customers
       Non_unique: 0
         Key_name: mul_unique_index
     Seq_in_index: 2
      Column_name: AGE
        Collation: A
      Cardinality: 7
         Sub_part: NULL
           Packed: NULL
             Null:
       Index_type: BTREE
          Comment:
    Index_comment:
          Visible: YES
       Expression: NULL
    *************************** 4. row ***********************
            Table: customers
       Non_unique: 0
         Key_name: unique_ind
     Seq_in_index: 1
      Column_name: SALARY
        Collation: A
      Cardinality: 7
         Sub_part: NULL
           Packed: NULL
             Null: YES
       Index_type: BTREE
          Comment:
    Index_comment:
          Visible: YES
       Expression: NULL
    

    Creating Unique Index Using a Client Program

    In addition to creating an index using a MySQL query, we can also create the unique index using a client program.

    Syntax

    To create an unique index into MySQL table through a PHP program, we need to execute the CREATE UNIQUE INDEX statement using the query() function of mysqli as follows −

    $sql = "CREATE UNIQUE INDEX uidx_tid ON tutorials_table (tutorial_id)";
    $mysqli->query($sql);
    

    To create an unique index into MySQL table through a JavaScript program, we need to execute the CREATE UNIQUE INDEX statement using the query() function of mysql2 library as follows −

    sql = "CREATE UNIQUE INDEX unique_ind ON CUSTOMERS (SALARY)";
    con.query(sql);
    

    To create an unique index into MySQL table through a Java program, we need to execute the CREATE UNIQUE INDEX statement using the executeUpdate() function of JDBC as follows −

    String sql = "CREATE UNIQUE INDEX UIID ON tutorials_tbl (tutorial_id)";
    st.executeUpdate(sql);
    

    To create an unique index into MySQL table through a Python program, we need to execute the CREATE UNIQUE INDEX statement using the execute() function of the MySQL Connector/Python as follows −

    create_unique_index_query = "CREATE UNIQUE INDEX idx_unique_tutorial_id ON tutorials_tbl (tutorial_id)"
    cursorObj.execute(create_unique_index_query)
    

    Example

    Following are the programs −

    $dbhost = ''localhost
    $dbuser = ''root
    $dbpass = ''password
    $dbname = ''TUTORIALS
    $mysqli = new mysqli($dbhost, $dbuser, $dbpass, $dbname);
    
    if ($mysqli->connect_errno) {
        printf("Connect failed: %s
    ", $mysqli->connect_error); exit(); } // printf(''Connected successfully.
    ''); // UNIQUE INDEX $sql = "CREATE UNIQUE INDEX uidx_tid ON tutorials_table (tutorial_id)"; if ($mysqli->query($sql)) { printf("Unique Index created successfully!.
    "); } if ($mysqli->errno) { printf("Index could not be created!.
    ", $mysqli->error); } $mysqli->close();

    Output

    The output obtained is as follows −

    Unique Index created successfully!.
    
    var mysql = require(''mysql2'');
    var con = mysql.createConnection({
        host: "localhost",
        user: "root",
        password: "Nr5a0204@123"
    });
    
      //Connecting to MySQL
      con.connect(function (err) {
      if (err) throw err;
      console.log("Connected!");
      console.log("--------------------------");
    
      //Creating a Database
      sql = "create database TUTORIALS"
      con.query(sql);
    
      //Select database
      sql = "USE TUTORIALS"
      con.query(sql);
    
      //Creating table
      sql = "CREATE TABLE CUSTOMERS (ID INT NOT NULL,NAME VARCHAR(15) NOT NULL,AGE INT NOT NULL,ADDRESS VARCHAR(25),SALARY DECIMAL(10, 2),PRIMARY KEY(ID));"
      con.query(sql);
    
      //Inserting records
      sql = "INSERT INTO CUSTOMERS (ID, NAME, AGE, ADDRESS, SALARY) VALUES (1, ''Ramesh'', ''32'', ''Ahmedabad'', 2000),(2, ''Khilan'', ''25'', ''Delhi'', 1500),(3, ''kaushik'', ''23'', ''Kota'', 2500),(4, ''Chaitali'', ''26'', ''Mumbai'', 6500),(5, ''Hardik'',''27'', ''Bhopal'', 8500),(6, ''Komal'', ''22'', ''MP'', 9000),(7, ''Muffy'', ''24'', ''Indore'', 5500);"
      con.query(sql);
    
      //Creating Unique Indexes
      sql = "CREATE UNIQUE INDEX unique_ind ON CUSTOMERS (SALARY)";
      con.query(sql);
    
      //Displaying list of indexes
      sql = "SHOW INDEX FROM CUSTOMERS;"
      con.query(sql, function(err, result){
        if (err) throw err
        console.log("**List of indexes:**")
        console.log(result)
      });
    });
    

    Output

    The output produced is as follows −

    Connected!
    --------------------------
    **List of indexes:**
    [
      {
        Table: ''customers'',
        Non_unique: 0,
        Key_name: ''PRIMARY'',
        Seq_in_index: 1,
        Column_name: ''ID'',
        Collation: ''A'',
        Cardinality: 7,
        Sub_part: null,
        Packed: null,
        Null: '''',
        Index_type: ''BTREE'',
        Comment: '''',
        Index_comment: '''',
        Visible: ''YES'',
        Expression: null
      },
      {
        Table: ''customers'',
        Non_unique: 0,
        Key_name: ''unique_ind'',
        Seq_in_index: 1,
        Column_name: ''SALARY'',
        Collation: ''A'',
        Cardinality: 7,
        Sub_part: null,
        Packed: null,
        Null: ''YES'',
        Index_type: ''BTREE'',
        Comment: '''',
        Index_comment: '''',
        Visible: ''YES'',
        Expression: null
      }
    ]
    
    import java.sql.Connection;
    import java.sql.DriverManager;
    import java.sql.ResultSet;
    import java.sql.Statement;
    
    public class UniqueIndex {
       public static void main(String[] args) {
          String url = "jdbc:mysql://localhost:3306/TUTORIALS";
          String username = "root";
          String password = "password";
          try {
             Class.forName("com.mysql.cj.jdbc.Driver");
             Connection connection = DriverManager.getConnection(url, username, password);
             Statement statement = connection.createStatement();
             System.out.println("Connected successfully...!");
    
             //Create a unique index on the tutorials_tbl...!;
             String sql = "CREATE UNIQUE INDEX UIID ON tutorials_tbl (tutorial_id)";
             statement.executeUpdate(sql);
             System.out.println("Unique Index created Successfully...!");
    
             //showing the indexes...!
             ResultSet resultSet = statement.executeQuery("SHOW INDEXES FROM tutorials_tbl");
             System.out.println("Following are the indexes in tutorials_tbl");
             while (resultSet.next()){
                System.out.println(resultSet.getString(1)+ " "+ resultSet.getString(2)
                        +" "+resultSet.getString(3)+" " + resultSet.getString(4)
                        +" " + resultSet.getString(4));
             }
             connection.close();
          } catch (Exception e) {
             System.out.println(e);
          }
       }
    }
    

    Output

    The output obtained is as shown below −

    Connected successfully...!
    Unique Index created Successfully...!
    Following are the indexes in tutorials_tbl
    tutorials_tbl 0 PRIMARY 1 1
    tutorials_tbl 0 UIID 1 1
    
    import mysql.connector
    #establishing the connection
    connection = mysql.connector.connect(
        host=''localhost'',
        user=''root'',
        password=''password'',
        database=''tut''
    )
    cursorObj = connection.cursor()
    create_unique_index_query = "CREATE UNIQUE INDEX idx_unique_tutorial_id ON tutorials_tbl (tutorial_id)"
    cursorObj.execute(create_unique_index_query)
    connection.commit()
    print(''unique index created successfully.'')
    cursorObj.close()
    connection.close()
    

    Output

    Following is the output of the above code −

    unique index created successfully.
    

    Khóa học lập trình tại Toidayhoc vừa học vừa làm dự án vừa nhận lương: Khóa học lập trình nhận lương tại trung tâm Toidayhoc

  • Khóa học miễn phí MySQL – Drop Index nhận dự án làm có lương

    MySQL – Drop Index

    Table of content


    The DROP statement in MySQL database is used to remove or delete an existing database object such as a table, index, view, or procedure. Whenever we use DROP statement with any of the database objects, like indexes, it will remove them permanently along with their associated data.

    Therefore, we can drop any index from a database table using two different SQL DROP queries.

    It is important to understand that dropping an index can have a significant impact on the performance of your database queries. Therefore, only try to remove an index if you are sure that it is no longer required.

    The MySQL DROP INDEX Statement

    The DROP INDEX statement in MySQL is used to delete an index from a table.

    Syntax

    Following is the syntax to drop an index using DROP INDEX statement −

    DROP INDEX index_name ON table_name;
    

    Example

    In this example, we first create a new table CUSTOMERS and adding an index to one of its columns (AGE) using the following CREATE TABLE query −

    CREATE TABLE CUSTOMERS (
       ID INT NOT NULL,
       NAME VARCHAR (20) NOT NULL,
       AGE INT NOT NULL,
       ADDRESS CHAR (25),
       SALARY DECIMAL (18, 2),
       PRIMARY KEY(ID),
       INDEX(AGE)
    );
    

    Now, create another index on CUSTOMERS table. We are using CREATE INDEX statement here −

    CREATE INDEX NAME_INDEX ON CUSTOMERS (Name);
    

    DROP INDEX Query −

    Then, use the following query to drop the index created above.

    DROP INDEX NAME_INDEX ON CUSTOMERS;
    

    Verification

    To verify if the index has been dropped, display the table definition using DESC query below −

    DESC CUSTOMERS;
    

    As we can see in the following table, the index on NAME column is dropped.

    Field Type Null Key Default Extra
    ID int NO PRI NULL
    NAME varchar(20) NO NULL
    AGE int NO MUL NULL
    ADDRESS char(25) YES NULL
    SALARY decimal(18, 2) YES NULL

    The MySQL ALTER… DROP Statement

    The ALTER DROP statement can also be used to drop an index in a MySQL table. This is just an alternative to the DROP INDEX statement, so it only works with the index that exists on a table.

    Syntax

    Following is the syntax of the DROP INDEX IF EXISTS in SQL −

    ALTER TABLE table_name DROP INDEX index_name;
    

    Example

    Let us see another example to drop the index from the CUSTOMERS table using the ALTER… DROP command as shown below −

    ALTER TABLE CUSTOMERS DROP INDEX AGE;
    

    Verification

    To verify if the index on AGE column has been dropped, display the table definition using DESC query below −

    DESC CUSTOMERS;
    

    As we can see in the following table, the index on NAME column is dropped.

    Field Type Null Key Default Extra
    ID int NO PRI NULL
    NAME varchar(20) NO NULL
    AGE int NO NULL
    ADDRESS char(25) YES NULL
    SALARY decimal(18, 2) YES NULL

    Dropping PRIMARY KEY or UNIQUE Constraint

    The DROP INDEX statement in MySQL does not usually drop indexes like PRIMARY KEY or UNIQUE constraints. To drop indexes associated with these constraints, we need to use the ALTER TABLE DROP command.

    Syntax

    Following is the syntax −

    ALTER TABLE table_name DROP constraint_name;
    

    Example

    In this example, we are using the following query to drop the PRIMARY KEY constraint present on the ID column of CUSTOMERS table −

    ALTER TABLE CUSTOMERS DROP PRIMARY KEY;
    

    Verification

    To verify whether the primary key constraint is dropped from the table, describe the ”temp” table using DESC command as follows −

    DESC CUSTOMERS;
    

    The PRIMARY KEY constraint is finally dropped! Look at the table below −

    Field Type Null Key Default Extra
    ID int NO NULL
    NAME varchar(20) NO NULL
    AGE int NO NULL
    ADDRESS char(25) YES NULL
    SALARY decimal(18, 2) YES NULL

    Dropping an Index Using a Client Program

    We have seen how to drop an index from a MySQL database using SQL queries. In addition to it, we can also use other client programs to perform the drop index operation in the MySQL database.

    Syntax

    Following are the syntaxes to drop an index from a MySQL database using various programming languages −

    The MySQL PHP connector mysqli provides a function named query() to execute the DROP INDEX query in the MySQL database.

    $sql = "DROP INDEX index_name ON tbl_name";
    $mysqli->query($sql);
    

    The MySQL NodeJS connector mysql2 provides a function named query() to execute the DROP INDEX query in the MySQL database.

    sql= "DROP INDEX index_name ON tbl_name";
    con.query(sql);
    

    We can use the JDBC type 4 driver to communicate to MySQL using Java. It provides a function named executeUpdate() to execute the DROP INDEX query in the MySQL database.

    String sql = "DROP INDEX index_name ON table_name";
    statement.executeQuery(sql);
    

    The MySQL Connector/Python provides a function named execute() to execute the DROP INDEX query in the MySQL database.

    drop_index_query = "DROP INDEX index_name ON tbl_name"
    cursorObj.execute(drop_index_query);
    

    Example

    Following are the implementations of this operation in various programming languages −

    $dbhost = ''localhost
    $dbuser = ''root
    $dbpass = ''password
    $dbname = ''TUTORIALS
    $mysqli = new mysqli($dbhost, $dbuser, $dbpass, $dbname);
    if ($mysqli->connect_errno) {
        printf("Connect failed: %s
    ", $mysqli->connect_error); exit(); } // printf(''Connected successfully.
    ''); // CREATE INDEX $sql = "DROP INDEX tid ON tutorials_table"; if ($mysqli->query($sql)) { printf("Index droped successfully!.
    "); } if ($mysqli->errno) { printf("Index could not be droped!.
    ", $mysqli->error); } $mysqli->close();

    Output

    The output obtained is as follows −

    Index droped successfully!.
    
    var mysql = require(''mysql2'');
    var con = mysql.createConnection({
        host: "localhost",
        user: "root",
        password: "Nr5a0204@123"
    });
    
      //Connecting to MySQL
      con.connect(function (err) {
      if (err) throw err;
      console.log("Connected!");
      console.log("--------------------------");
    
      sql = "create database TUTORIALS"
      con.query(sql);
    
      sql = "USE TUTORIALS"
      con.query(sql);
    
      sql = "CREATE TABLE temp(ID INT, Name VARCHAR(255), age INT, Location VARCHAR(255));"
      con.query(sql);
    
      sql = "INSERT INTO temp values(1, ''Radha'', 29, ''Vishakhapatnam''),(2, ''Dev'', 30, ''Hyderabad'');"
      con.query(sql);
    
      //Creating Indexes
      sql = "CREATE INDEX sample_index ON temp (name) USING BTREE;"
      con.query(sql);
    
      sql = "CREATE INDEX composite_index on temp (ID, Name);"
      con.query(sql);
    
      //Displaying Indexes
      sql = "SHOW INDEXES FROM temp;"
      con.query(sql, function(err, result){
        if (err) throw err
        console.log(result);
        console.log("--------------------------");
      });
    
      //Dropping Indexes
      sql = "DROP INDEX sample_index ON temp;"
      con.query(sql);
    
      sql = "DROP INDEX composite_index ON temp;"
      con.query(sql);
    
      //Displaying Indexes after deleting
      sql = "SHOW INDEXES FROM temp;"
      con.query(sql, function(err, result){
        if (err) throw err
        console.log(result);
      });
    });
    

    Output

    The output produced is as follows −

    Connected!
    --------------------------
    [
      {
        Table: ''temp'',
        Non_unique: 1,
        Key_name: ''sample_index'',
        Seq_in_index: 1,
        Column_name: ''Name'',
        Collation: ''A'',
        Cardinality: 2,
        Sub_part: null,
        Packed: null,
        Null: ''YES'',
        Index_type: ''BTREE'',
        Comment: '''',
        Index_comment: '''',
        Visible: ''YES'',
        Expression: null
      },
      {
        Table: ''temp'',
        Non_unique: 1,
        Key_name: ''composite_index'',
        Seq_in_index: 1,
        Column_name: ''ID'',
        Collation: ''A'',
        Cardinality: 2,
        Sub_part: null,
        Packed: null,
        Null: ''YES'',
        Index_type: ''BTREE'',
        Comment: '''',
        Index_comment: '''',
        Visible: ''YES'',
        Expression: null
      },
      {
        Table: ''temp'',
        Non_unique: 1,
        Key_name: ''composite_index'',
        Seq_in_index: 2,
        Column_name: ''Name'',
        Collation: ''A'',
        Cardinality: 2,
        Sub_part: null,
        Packed: null,
        Null: ''YES'',
        Index_type: ''BTREE'',
        Comment: '''',
        Index_comment: '''',
        Visible: ''YES'',
        Expression: null
      }
    ]
    --------------------------
    []
    
    import java.sql.Connection;
    import java.sql.DriverManager;
    import java.sql.Statement;
    
    public class DropIndex {
       public static void main(String[] args) {
          String url = "jdbc:mysql://localhost:3306/TUTORIALS";
          String username = "root";
          String password = "password";
          try {
             Class.forName("com.mysql.cj.jdbc.Driver");
             Connection connection = DriverManager.getConnection(url, username, password);
             Statement statement = connection.createStatement();
             System.out.println("Connected successfully...!");
    
             //Drop index;
             String sql = "DROP INDEX tid ON tutorials_tbl";
             statement.executeUpdate(sql);
             System.out.println("Index has been dropped Successfully...!");
             connection.close();
          } catch (Exception e) {
             System.out.println(e);
          }
       }
    }
    

    Output

    The output obtained is as shown below −

    Connected successfully...!
    Index has been dropped Successfully...!
    
    import mysql.connector
    #establishing the connection
    connection = mysql.connector.connect(
        host=''localhost'',
        user=''root'',
        password=''password'',
        database=''tut''
    )
    cursorObj = connection.cursor()
    drop_index_query = "DROP INDEX idx_submission_date ON tutorials_tbl"
    cursorObj.execute(drop_index_query)
    connection.commit()
    print("Index dropped successfully.")
    cursorObj.close()
    connection.close()
    

    Output

    Following is the output of the above code −

    Index dropped successfully.
    

    Khóa học lập trình tại Toidayhoc vừa học vừa làm dự án vừa nhận lương: Khóa học lập trình nhận lương tại trung tâm Toidayhoc

  • Khóa học miễn phí MySQL – Create Index nhận dự án làm có lương

    MySQL – Create Index

    Table of content


    A database index improves the speed of operations in a database table. They can be created on one or more columns, providing the basis for both rapid random lookups and efficient ordering of access to records.

    Practically, indexes are a special type of lookup tables, that hold a pointer to each record into the actual table.

    We can create indexes on a MySQL table in two scenarios: while creating a new table and on an existing table.

    Creating Indexes on New Table

    If we want to define an index on a new table, we use the CREATE TABLE statement.

    Syntax

    Following is the syntax to create an index on a new table −

    CREATE TABLE(
     column1 datatype PRIMARY KEY,
     column2 datatype,
     column3 datatype,
     ...
     INDEX(column_name)
    );
    

    Example

    In this example, we are create a new table CUSTOMERS and adding an index to one of its columns using the following CREATE TABLE query −

    CREATE TABLE CUSTOMERS (
       ID INT NOT NULL,
       NAME VARCHAR (20) NOT NULL,
       AGE INT NOT NULL,
       ADDRESS CHAR (25),
       SALARY DECIMAL (18, 2),
       INDEX(ID)
    );
    

    To verify whether the index has been defined or not, we check the table definition using the following DESC statement.

    DESC CUSTOMERS;
    

    Output

    The table structure displayed will contain a MUL index on the ID column as shown −

    Field Type Null Key Default Extra
    ID int NO MUL NULL
    NAME varchar(20) NO NULL
    AGE int NO NULL
    ADDRESS char(25) YES NULL
    SALARY decimal(18, 2) YES NULL

    Creating Indexes on Existing Table

    To create an index on existing table, we use the following SQL statements −

    • With CREATE INDEX Statement
    • With ALTER Command

    CREATE INDEX Statement

    The basic syntax of the CREATE INDEX statement is as follows −

    CREATE INDEX index_name ON table_name;
    

    In the following example, let us create an index on CUSTOMERS table. We are using CREATE INDEX statement here −

    CREATE INDEX NAME_INDEX ON CUSTOMERS (Name);
    

    To check if the index is created on the table or not, let us display the table structure using DESC statement as shown below −

    DESC CUSTOMERS;
    

    Output

    As we can see in the table below, a composite index is created on the ”NAME” column of CUSTOMERS table.

    Field Type Null Key Default Extra
    ID int NO MUL NULL
    NAME varchar(20) NO MUL NULL
    AGE int NO NULL
    ADDRESS char(25) YES NULL
    SALARY decimal(18, 2) YES NULL

    ALTER… ADD Command

    Following is the basic syntax of ALTER statement −

    ALTER TABLE tbl_name ADD INDEX index_name (column_list);
    

    Let us use ALTER TABLE… ADD INDEX statement in the following example to add an index to the CUSTOMERS table −

    ALTER TABLE CUSTOMERS ADD INDEX AGE_INDEX (AGE);
    

    Output

    As we can see in the table below, another composite index is created on the ”AGE” column of CUSTOMERS table.

    Field Type Null Key Default Extra
    ID int NO MUL NULL
    NAME varchar(20) NO MUL NULL
    AGE int NO MUL NULL
    ADDRESS char(25) YES NULL
    SALARY decimal(18, 2) YES NULL

    Simple and Unique Index

    A unique index is the one which cannot be created on two rows at once. Following is the syntax to create a unique index −

    CREATE UNIQUE INDEX index_name ON table_name ( column1, column2,...);
    

    Example

    Following example creates a unique index on the table temp −

    CREATE UNIQUE INDEX UNIQUE_INDEX ON CUSTOMERS (Name);
    

    Composite Indexes

    We can also create an index on more than one column and it is called a composite index the basic syntax to create a composite index is as follows −

    CREATE INDEX index_name
    on table_name (column1, column2);
    

    Example

    Following query creates a composite index on the ID and Name columns of the above created table −

    CREATE INDEX composite_index on CUSTOMERS (ID, Name);
    

    Creating an Index Using Client Program

    In addition to using SQL queries, we can also create an index on a table in a MySQL database using a client program.

    Syntax

    Following are the syntaxes to create an index in a MySQL database using various programming languages −

    The MySQL PHP connector mysqli provides a function named query() to execute the CREATE INDEX query in the MySQL database.

    $sql=" CREATE INDEX index_name
       ON table_name (column_name)";
    $mysqli->query($sql);
    

    The MySQL NodeJS connector mysql2 provides a function named query() to execute the CREATE INDEX query in the MySQL database.

    sql = "CREATE INDEX index_name
       ON table_name (column1, column2, ...)";
    con.query(sql);
    

    We can use the JDBC type 4 driver to communicate to MySQL using Java. It provides a function named executeUpdate() to execute the CREATE INDEX query in the MySQL database.

    String sql = " CREATE INDEX index_name
       ON table_name (column_name)";
    statement.executeUpdate(sql);
    

    The MySQL Connector/Python provides a function named execute() to execute the CREATE INDEX query in the MySQL database.

    create_index_query = CREATE INDEX index_name
       ON table_name (column_name [ASC|DESC], ...);
    cursorObj.execute(create_index_query);
    

    Example

    Following are the implementations of this operation in various programming languages −

    $dbhost = ''localhost
    $dbuser = ''root
    $dbpass = ''password
    $dbname = ''TUTORIALS
    $mysqli = new mysqli($dbhost, $dbuser, $dbpass, $dbname);
    
    if ($mysqli->connect_errno) {
        printf("Connect failed: %s
    ", $mysqli->connect_error); exit(); } // printf(''Connected successfully.
    ''); // CREATE INDEX $sql = "CREATE INDEX tid ON tutorials_table (tutorial_id)"; if ($mysqli->query($sql)) { printf("Index created successfully!.
    "); } if ($mysqli->errno) { printf("Index could not be created!.
    ", $mysqli->error); } $mysqli->close();

    Output

    The output obtained is as follows −

    Index created successfully!.
    
    var mysql = require(''mysql2'');
    var con = mysql.createConnection({
        host: "localhost",
        user: "root",
        password: "Nr5a0204@123"
    });
      //Connecting to MySQL
      con.connect(function (err) {
      if (err) throw err;
      console.log("Connected!");
      console.log("--------------------------");
    
      sql = "create database TUTORIALS"
      con.query(sql);
    
      sql = "USE TUTORIALS"
      con.query(sql);
    
      sql = "CREATE TABLE temp(Name VARCHAR(255), age INT, Location VARCHAR(255));"
      con.query(sql);
    
      sql = "INSERT INTO temp values(''Radha'', 29, ''Vishakhapatnam''), (''Dev'', 30, ''Hyderabad'');"
      con.query(sql);
    
      //Creating an Index
      sql = "CREATE INDEX sample_index ON temp (name);"
      con.query(sql);
    
      //Describing the table
      sql = "DESC temp;"
      con.query(sql, function(err, result){
        if (err) throw err
        console.log(result);
      });
    });
    

    Output

    The output produced is as follows −

    Connected!
    --------------------------
    [
      {Field: ''Name'',Type: ''varchar(255)'',Null: ''YES'',Key: ''MUL'',Default: null,Extra: ''''},
      {Field: ''age'',Type: ''int'',Null: ''YES'',Key: '''',Default: null,Extra: ''''},
      {Field: ''Location'',Type: ''varchar(255)'',Null: ''YES'',Key: '''',Default: null,Extra: ''''}
    ]
    
    import java.sql.Connection;
    import java.sql.DriverManager;
    import java.sql.ResultSet;
    import java.sql.Statement;
    
    public class CreateIndex {
       public static void main(String[] args) {
          String url = "jdbc:mysql://localhost:3306/TUTORIALS";
          String username = "root";
          String password = "password";
          try {
             Class.forName("com.mysql.cj.jdbc.Driver");
             Connection connection = DriverManager.getConnection(url, username, password);
             Statement statement = connection.createStatement();
             System.out.println("Connected successfully...!");
    
             //Create an index on the tutorials_tbl...!;
             String sql = "CREATE INDEX tid ON tutorials_tbl (tutorial_id)";
             statement.executeUpdate(sql);
             System.out.println("Index created Successfully...!");
             connection.close();
          } catch (Exception e) {
             System.out.println(e);
          }
       }
    }
    

    Output

    The output obtained is as shown below −

    Connected successfully...!
    Index created Successfully...!
    
    import mysql.connector
    #establishing the connection
    connection = mysql.connector.connect(
        host=''localhost'',
        user=''root'',
        password=''password'',
        database=''tut''
    )
    cursorObj = connection.cursor()
    create_index_query = "CREATE INDEX idx_submission_date ON tutorials_tbl (submission_date)"
    cursorObj.execute(create_index_query)
    connection.commit()
    print("Index created successfully.")
    cursorObj.close()
    connection.close()
    

    Output

    Following is the output of the above code −

    Index created successfully.
    

    Khóa học lập trình tại Toidayhoc vừa học vừa làm dự án vừa nhận lương: Khóa học lập trình nhận lương tại trung tâm Toidayhoc

  • Khóa học miễn phí MySQL – Drop Views nhận dự án làm có lương

    MySQL – Drop View

    Table of content


    A MySQL View is a virtual table which is generated from a predefined SQL query. It contains (all or selective) records from one or more database tables.

    Views are not stored in a database physically, but they can still be dropped whenever not necessary. Even though they are used to see and modify the data in a database table, the data in that table remains unchanged when views are dropped.

    The MySQL DROP VIEW Statement

    The DROP VIEW statement in MySQL is used to delete an existing view, along with its definition and other information. Once the view is dropped, all the permissions for it will also be removed. We can also use this statement to drop indexed views.

    Suppose a table is dropped using the DROP TABLE command and it has a view associated to it, this view must also be dropped explicitly using the DROP VIEW command.

    NOTE

    • While trying to perform queries, the database engine checks all the objects referenced in that statement are valid and exist. So, if a view does not exist in the database, the DROP VIEW statement will throw an error.

    • To drop a table in a database, one must require ALTER permission on the said table and CONTROL permissions on the table schema.

    Syntax

    Following is the syntax of the DROP VIEW Statement −

    DROP VIEW view_name;
    

    Where, view_name is the name of the view to be deleted.

    Example

    Suppose we have created a table named CUSTOMERS using the following CREATE TABLE query −

    CREATE TABLE CUSTOMERS (
       ID INT NOT NULL,
       NAME VARCHAR(15) NOT NULL,
       AGE INT NOT NULL,
       ADDRESS VARCHAR(25),
       SALARY DECIMAL(10, 2),
       PRIMARY KEY(ID)
    );
    

    Let us insert records in the above created table using the following INSERT query −

    INSERT INTO CUSTOMERS VALUES
    (1, ''Ramesh'', ''32'', ''Ahmedabad'', 2000),
    (2, ''Khilan'', ''25'', ''Delhi'', 1500),
    (3, ''Kaushik'', ''23'', ''Kota'', 2500),
    (4, ''Chaitali'', ''26'', ''Mumbai'', 6500),
    (5, ''Hardik'',''27'', ''Bhopal'', 8500),
    (6, ''Komal'', ''22'', ''MP'', 9000),
    (7, ''Muffy'', ''24'', ''Indore'', 5500);
    

    Creating a View −

    Now, let us create a view on this table using the CREATE VIEW statement as shown below −

    CREATE VIEW testView AS SELECT * FROM CUSTOMERS;
    

    You can verify the list of all the views using the following query −

    SHOW FULL TABLES WHERE table_type = ''VIEW
    

    The view will be created as follows −

    Tables_in_sample Table_type
    testview VIEW

    Dropping a View −

    Following query drops the view created above −

    DROP VIEW testView;
    

    Verification

    To verify if we have deleted the view or not, display the list of views using the query below −

    SHOW FULL TABLES WHERE table_type = ''VIEW
    

    As the view is dropped, an empty set is returned.

    Empty set (0.12 sec)
    

    The IF EXISTS clause

    If you try to drop a view that doesn”t exist, an error will be generated. Let us see an example where we are dropping a view named NEW using the following query −

    DROP VIEW NEW;
    

    The following error is displayed (where ”tutorialspoint” is the database name) −

    ERROR 1051 (42S02): Unknown table ''tutorialspoint.new''
    

    However, if you use the IF EXISTS clause along with the DROP VIEW statement as shown below, the query will be ignored even if a VIEW with the given name does not exist.

    DROP VIEW IF EXISTS NEW;
    

    Deleting Rows from a View

    Instead of removing an entire view, we can also drop selected rows of a view using the DELETE statement with a WHERE clause.

    Syntax

    Following is the syntax of the DELETE statement −

    DELETE FROM view_name WHERE condition;
    

    Example

    In this example, let us first create a testView on the CUSTOMERS table using the following query −

    CREATE VIEW testView AS SELECT * FROM CUSTOMERS;
    

    Now, using the following query, you can delete a record from the testView created on the CUSTOMERS table. The changes made to the data in view will finally be reflected in the base table CUSTOMERS.

    DELETE FROM testView WHERE Location = ''Indore
    

    The associated table CUSTOMERS will have the following records −

    ID NAME AGE ADDRESS SALARY
    1 Ramesh 32 Ahmedabad 2000.00
    2 Khilan 25 Delhi 1500.00
    3 Kaushik 23 Kota 2000.00
    4 Chaitali 25 Mumbai 6500.00
    5 Hardik 27 Bhopal 8500.00
    6 Komal 22 Hyderabad 4500.00

    Dropping View Using Client Program

    In addition to drop a view from the MySQL database using the MySQL query, we can also perform the another operation on a table using a client program.

    Syntax

    Following are the syntaxes of the Drop View from MySQL in various programming languages −

    The MySQL PHP connector mysqli provides a function named query() to execute the DROP VIEW query in the MySQL database.

    $sql="DROP VIEW view_name";
    $mysqli->query($sql);
    

    The MySQL NodeJS connector mysql2 provides a function named query() to execute the DROP VIEW query in the MySQL database.

    sql="DROP VIEW view_name";
    con.query(sql);
    

    We can use the JDBC type 4 driver to communicate to MySQL using Java. It provides a function named execute() to execute the DROP VIEW query in the MySQL database.

    String sql = "DROP VIEW view_name";
    statement.execute(sql);
    

    The MySQL Connector/Python provides a function named execute() to execute the DROP VIEW query in the MySQL database.

    drop_view_query = "DROP VIEW view_name"
    cursorObj.execute(drop_view_query);
    

    Example

    Following are the implementations of this operation in various programming languages −

    $dbhost = ''localhost
    $dbuser = ''root
    $dbpass = ''password
    $dbname = ''TUTORIALS
    $mysqli = new mysqli($dbhost, $dbuser, $dbpass, $dbname);
    
    if ($mysqli->connect_errno) {
        printf("Connect failed: %s
    ", $mysqli->connect_error); exit(); } // printf(''Connected successfully.
    ''); // drop a view; $sql = "DROP VIEW first_view"; if ($mysqli->query($sql)) { printf("View dropped successfully!.
    "); } if ($mysqli->errno) { printf("View could not be dropped!.
    ", $mysqli->error); } $mysqli->close();

    Output

    The output obtained is as follows −

    View dropped successfully!.
    
    var mysql = require(''mysql2'');
    var con = mysql.createConnection({
        host: "localhost",
        user: "root",
        password: "Nr5a0204@123"
    });
    
      //Connecting to MySQL
      con.connect(function (err) {
      if (err) throw err;
      console.log("Connected!");
      console.log("--------------------------");
    
      sql = "create database TUTORIALS"
      con.query(sql);
    
      sql = "USE TUTORIALS"
      con.query(sql);
    
      sql = "CREATE TABLE dispatches_data(ProductName VARCHAR(255),CustomerName VARCHAR(255),DispatchTimeStamp timestamp,Price INT,Location VARCHAR(255));"
      con.query(sql);
    
      sql = "insert into dispatches_data values(''Key-Board'', ''Raja'', TIMESTAMP(''2019-05-04'', ''15:02:45''), 7000, ''Hyderabad''),(''Earphones'', ''Roja'', TIMESTAMP(''2019-06-26'', ''14:13:12''), 2000, ''Vishakhapatnam''),(''Mouse'', ''Puja'', TIMESTAMP(''2019-12-07'', ''07:50:37''), 3000, ''Vijayawada''),(''Mobile'', ''Vanaja'' , TIMESTAMP (''2018-03-21'', ''16:00:45''), 9000, ''Chennai''),(''Headset'', ''Jalaja'' , TIMESTAMP(''2018-12-30'', ''10:49:27''), 6000, ''Goa'');"
      con.query(sql);
    
      //Creating Views
      sql = "CREATE VIEW testView AS SELECT * FROM dispatches_data;"
      con.query(sql);
    
      sql = "CREATE VIEW sample AS SELECT ProductName, Price FROM dispatches_data;"
      con.query(sql);
    
      sql = "CREATE VIEW demo AS SELECT * FROM dispatches_data WHERE Price>3000;"
      con.query(sql);
    
      //Displaying list of all views
      sql = "SHOW FULL TABLES WHERE table_type = ''VIEW"
      con.query(sql, function(err, result){
        if (err) throw err
        console.log("**Views before deleting:**");
        console.log(result);
        console.log("--------------------------");
      });
    
      //Dropping views
      sql = "DROP VIEW demo;"
      con.query(sql);
    
      sql = "DROP VIEW sample;"
      con.query(sql);
    
      sql = "DROP VIEW testview;"
      con.query(sql);
    
      //retrieve the list of views
      sql = "SHOW FULL TABLES WHERE table_type = ''VIEW"
      con.query(sql, function(err, result){
        if (err) throw err
        console.log("**Views after deleting:**");
        console.log(result);
      });
    });
    

    Output

    The output produced is as follows −

    Connected!
    --------------------------
    **Views before deleting:**
    [
      { Tables_in_tutorials: ''demo'', Table_type: ''VIEW'' },
      { Tables_in_tutorials: ''sample'', Table_type: ''VIEW'' },
      { Tables_in_tutorials: ''testview'', Table_type: ''VIEW'' }
    ]
    --------------------------
    **Views after deleting:**
    []
    
    import java.sql.Connection;
    import java.sql.DriverManager;
    import java.sql.ResultSet;
    import java.sql.Statement;
    
    public class DropView {
       public static void main(String[] args) {
          String url = "jdbc:mysql://localhost:3306/TUTORIALS";
          String username = "root";
          String password = "password";
          try {
             Class.forName("com.mysql.cj.jdbc.Driver");
             Connection connection = DriverManager.getConnection(url, username, password);
             Statement statement = connection.createStatement();
             System.out.println("Connected successfully...!");
    
             //Drop a View.....
             String sql = "DROP VIEW tutorial_view";
             statement.executeUpdate(sql);
             System.out.println("View dropped Successfully...!");
             ResultSet resultSet = statement.executeQuery("SELECT * FROM tutorial_view");
             while (resultSet.next()) {
                System.out.print(resultSet.getString(1));
                System.out.println();
             }
             connection.close();
          } catch (Exception e) {
             System.out.println(e);
          }
       }
    }
    

    Output

    The output obtained is as shown below −

    Connected successfully...!
    View dropped Successfully...!
    java.sql.SQLSyntaxErrorException: Table ''tutorials.tutorial_view'' doesn''t exist
    
    Python Program
    import mysql.connector
    #establishing the connection
    connection = mysql.connector.connect(
        host=''localhost'',
        user=''root'',
        password=''password'',
        database=''tut''
    )
    cursorObj = connection.cursor()
    drop_view_query = "DROP VIEW tutorial_view"
    cursorObj.execute(drop_view_query)
    connection.commit()
    print("View dropped successfully.")
    cursorObj.close()
    connection.close()
    

    Output

    Following is the output of the above code −

    View dropped successfully.
    

    Khóa học lập trình tại Toidayhoc vừa học vừa làm dự án vừa nhận lương: Khóa học lập trình nhận lương tại trung tâm Toidayhoc

  • Khóa học miễn phí MySQL – Rename Views nhận dự án làm có lương

    MySQL – Rename View

    Table of content


    Renaming Views in MySQL

    The MySQL RENAME TABLE statement in MySQL is generally used to rename the name of a table. But this statement can also be used to rename views because views are typically virtual tables created by a query.

    Before renaming a view, we need to ensure that no active transactions are being performed on the view using its old name. It is, however, recommended to delete the existing view and re-create it with a new name instead of renaming it.

    Syntax

    Following is the basic syntax of the RENAME TABLE query to rename a view in MySQL −

    RENAME TABLE original_view_name
    TO new_view_name;
    

    Example

    First of all, let us create a table with the name CUSTOMERS using the following query −

    CREATE TABLE CUSTOMERS(
       ID int NOT NULL,
       NAME varchar(20) NOT NULL,
       AGE int NOT NULL,
       ADDRESS varchar(25),
       SALARY decimal(18, 2),
       PRIMARY KEY (ID)
    );
    

    Here, we are inserting some records into the above-created table using the query below −

    INSERT INTO CUSTOMERS VALUES
    (1, ''Ramesh'', ''32'', ''Ahmedabad'', 2000),
    (2, ''Khilan'', ''25'', ''Delhi'', 1500),
    (3, ''Kaushik'', ''23'', ''Kota'', 2500),
    (4, ''Chaitali'', ''26'', ''Mumbai'', 6500),
    (5, ''Hardik'',''27'', ''Bhopal'', 8500),
    (6, ''Komal'', ''22'', ''MP'', 9000),
    (7, ''Muffy'', ''24'', ''Indore'', 5500);
    

    Creating a view −

    Now, let us create a view based on the above created table using the following query −

    CREATE VIEW CUSTOMERS_VIEW AS SELECT * FROM CUSTOMERS;
    

    The view will be created as follows −

    ID NAME AGE ADDRESS SALARY
    1 Ramesh 32 Ahmedabad 2000.00
    2 Khilan 25 Delhi 1500.00
    3 Kaushik 23 Kota 2000.00
    4 Chaitali 25 Mumbai 6500.00
    5 Hardik 27 Bhopal 8500.00
    6 Komal 22 Hyderabad 4500.00
    7 Muffy 24 Indore 10000.00

    Renaming the view −

    Now, we know that we are having an existing view in our database named “CUSTOMERS_VIEW”. So, we are going to rename this view to VIEW_CUSTOMERS using the below query −

    RENAME TABLE CUSTOMERS_VIEW TO VIEW_CUSTOMERS;
    

    Verification

    Using the following SELECT statement, we can verify whether the view is renamed or not −

    SELECT * FROM VIEW_CUSTOMERS;
    

    The “VIEW_CUSTOMERS” view displayed is as follows −

    ID NAME AGE ADDRESS SALARY
    1 Ramesh 32 Ahmedabad 2000.00
    2 Khilan 25 Delhi 1500.00
    3 Kaushik 23 Kota 2000.00
    4 Chaitali 25 Mumbai 6500.00
    5 Hardik 27 Bhopal 8500.00
    6 Komal 22 Hyderabad 4500.00
    7 Muffy 24 Indore 10000.00

    Rules to be followed while Renaming Views

    There are some rules and practices to ensure that the renaming process goes smoothly and one should follow them while renaming a view in MySQL. They are listed below:

    • Avoid renaming system views: In MySQL, the system views are views that contain all the information about the database management system. It is recommended not to rename these views because it can cause issues with the functioning of the database.

    • Update all references to the view: After renaming a view in MySQL, any stored procedures, triggers, or other database objects that reference the view will need to be updated to use the new name of the view. If we failed to update these references results in errors or issues with the functioning of the database system.

    • Test thoroughly: It is important to test the renaming process thoroughly in the development or testing environment to make sure that all references to the view have been updated correctly.

    • Use a consistent naming convention: While working with views in MySQL, it”s recommended to use a consistent naming convention. If you need to rename a view, follow the same naming convention you”ve used for other views in the database.

    • Backup the database: Before renaming a view, it is recommended to have a backup of the database to make sure that you have a restore point.

    Renaming a View Using a Client Program

    Until now, we used an SQL statement to rename a view directly in the MySQL database. But, we can also perform the same rename operation on a view using another client program.

    Syntax

    To Rename a view into MySQL Database through a PHP program, we need to execute the RENAME statement using the mysqli function named query() as follows −

    $sql = "RENAME TABLE first_view To tutorial_view";
    $mysqli->query($sql);
    

    To Rename a view into MySQL Database through a JavaScript program, we need to execute the RENAME statement using the query() function of mysql2 library as follows −

    sql = "RENAME TABLE CUSTOMERS_VIEW TO VIEW_CUSTOMERS";
    con.query(sql);
    

    To Rename a view into MySQL Database through a Java program, we need to execute the RENAME statement using the JDBC function named executeQuery() as follows −

    String sql = "RENAME TABLE first_view TO tutorial_view";
    st.executeQuery(sql);
    

    To Rename a view into MySQL Database through a python program, we need to execute the RENAME statement using the execute() function of the MySQL Connector/Python as follows −

    rename_view_query = "RENAME TABLE tutorial_view TO new_tutorial_view"
    cursorObj.execute(rename_view_query)
    

    Example

    Following are the programs −

    $dbhost = ''localhost
    $dbuser = ''root
    $dbpass = ''password
    $dbname = ''TUTORIALS
    $mysqli = new mysqli($dbhost, $dbuser, $dbpass, $dbname);
    
    if ($mysqli->connect_errno) {
        printf("Connect failed: %s
    ", $mysqli->connect_error); exit(); } // printf(''Connected successfully.
    ''); // A view can be renamed by using the RENAME TABLE old_view_name TO new_view_name $sql = "RENAME TABLE first_view To tutorial_view"; if ($mysqli->query($sql)) { printf("View renamed successfully!.
    "); } if ($mysqli->errno) { printf("View could not be renamed!.
    ", $mysqli->error); } $mysqli->close();

    Output

    The output obtained is as follows −

    View renamed successfully!.
    
    var mysql = require(''mysql2'');
    var con = mysql.createConnection({
        host: "localhost",
        user: "root",
        password: "Nr5a0204@123"
    });
    
      //Connecting to MySQL
      con.connect(function (err) {
      if (err) throw err;
      console.log("Connected!");
      console.log("--------------------------");
    
      sql = "create database TUTORIALS"
      con.query(sql);
    
      sql = "USE TUTORIALS"
      con.query(sql);
    
      sql = "CREATE TABLE CUSTOMERS (ID INT NOT NULL,NAME VARCHAR (20) NOT NULL,AGE INT NOT NULL,ADDRESS CHAR (25),SALARY DECIMAL (18, 2),PRIMARY KEY (ID));"
      con.query(sql);
    
      sql = "INSERT INTO CUSTOMERS (ID,NAME,AGE,ADDRESS,SALARY) VALUES (1, ''Ramesh'', 32, ''Ahmedabad'', 2000.00 ),(2, ''Khilan'', 25, ''Delhi'', 1500.00 ),(3, ''kaushik'', 23, ''Kota'', 2000.00 ),(4, ''Chaitali'', 25, ''Mumbai'', 6500.00 ),(5, ''Hardik'', 27, ''Bhopal'', 8500.00 ),(6, ''Komal'' ,22, ''MP'', 4500.00 ),(7, ''Muffy'', 24, ''Indore'', 10000.00 );"
      con.query(sql);
    
      //Creating View
      sql = "Create view CUSTOMERS_VIEW AS SELECT * FROM CUSTOMERS";
      con.query(sql);
    
      //Renaming View
      sql = "RENAME TABLE CUSTOMERS_VIEW TO VIEW_CUSTOMERS;"
      con.query(sql);
    
      //Displaying records from view
      sql = "SELECT * FROM VIEW_CUSTOMERS;"
      con.query(sql, function(err, result){
        if (err) throw err
        console.log("**Views after deleting:**");
        console.log(result);
      });
    
    });
    

    Output

    The output produced is as follows −

    Connected!
    --------------------------
    [
      {ID: 1, NAME: ''Ramesh'', AGE: 32, ADDRESS: ''Ahmedabad'', SALARY: ''2000.00''},
      {ID: 2, NAME: ''Khilan'', AGE: 25, ADDRESS: ''Delhi'', SALARY: ''1500.00''},
      {ID: 3, NAME: ''kaushik'', AGE: 23, ADDRESS: ''Kota'', SALARY: ''2000.00''},
      {ID: 4, NAME: ''Chaitali'', AGE: 25, ADDRESS: ''Mumbai'', SALARY: ''6500.00''},
      {ID: 5, NAME: ''Hardik'', AGE: 27, ADDRESS: ''Bhopal'', SALARY: ''8500.00''},
      {ID: 6, NAME: ''Komal'', AGE: 22, ADDRESS: ''MP'', SALARY: ''4500.00'' },
      {ID: 7, NAME: ''Muffy'', AGE: 24, ADDRESS: ''Indore'', SALARY: ''10000.00''}
    ]
    
    import java.sql.Connection;
    import java.sql.DriverManager;
    import java.sql.ResultSet;
    import java.sql.Statement;
    
    public class RenameView {
       public static void main(String[] args) {
          String url = "jdbc:mysql://localhost:3306/TUTORIALS";
          String username = "root";
          String password = "password";
          try {
             Class.forName("com.mysql.cj.jdbc.Driver");
             Connection connection = DriverManager.getConnection(url, username, password);
             Statement statement = connection.createStatement();
             System.out.println("Connected successfully...!");
    
             //Rename Created View.....
             String sql = "RENAME TABLE first_view TO tutorial_view";
             statement.executeUpdate(sql);
             System.out.println("Renamed view Successfully...!");
             ResultSet resultSet = statement.executeQuery("SELECT * FROM tutorial_view");
             while (resultSet.next()) {
                System.out.print(resultSet.getInt(1)+" "+ resultSet.getString(2)+ " "+ resultSet.getString(3));
                System.out.println();
             }
             connection.close();
          } catch (Exception e) {
             System.out.println(e);
          }
       }
    }
    

    Output

    The output obtained is as shown below −

    Connected successfully...!
    Renamed view Successfully...!
    1 Learn PHP John Paul
    
    import mysql.connector
    #establishing the connection
    connection = mysql.connector.connect(
        host=''localhost'',
        user=''root'',
        password=''password'',
        database=''tut''
    )
    cursorObj = connection.cursor()
    rename_view_query = "RENAME TABLE tutorial_view TO new_tutorial_view"
    cursorObj.execute(rename_view_query)
    connection.commit()
    print("View renamed successfully.")
    cursorObj.close()
    connection.close()
    

    Output

    Following is the output of the above code −

    View renamed successfully.
    

    Khóa học lập trình tại Toidayhoc vừa học vừa làm dự án vừa nhận lương: Khóa học lập trình nhận lương tại trung tâm Toidayhoc