Author: alien

  • Khóa học miễn phí MySQL – BOOLEAN nhận dự án làm có lương

    MySQL – Boolean Datatype

    Table of content


    A Boolean data type is used to represent truth values of logic and Boolean algebra. It has two possible values: either true or false.

    For example, if a customer wants to see all the bikes that are black in colour, we can filter them using BOOLEAN operator, as given in the following table −

    Boolean

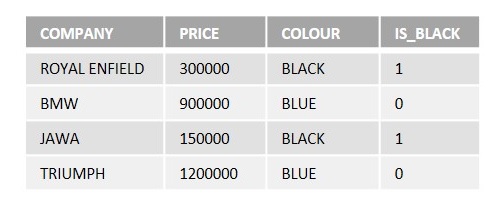
    Here, ”IS_BLACK” is the BOOLEAN column that returns either true or false values based on the colours of the bikes.

    Boolean in MySQL

    In MySQL, there is no built-in Boolean or Bool data type. Instead MySQL provides us with the TINYINT datatype to store the Boolean values.

    MySQL considers the value 0 as FALSE and 1 as TRUE. We can also store NULL values using the TINYINT datatype.

    The Boolean values (such as TRUE and FALSE) are not case-sensitive.

    Syntax

    Following is the syntax of the BOOLEAN operator in MySQL −

    CREATE TABLE table_name (
       Column_name BOOLEAN
    );
    

    Example

    In MySQL, 0 is defined as FALSE and any non-zero values are defined as TRUE −

    SELECT TRUE, FALSE;
    

    Output

    As we can see in the output below, TRUE and FALSE are represented as 1 and 0 −

    TRUE FALSE
    1 0

    Example

    In MySQL, the Boolean values (TRUE and FALSE) are case-insensitive −

    SELECT true, false, TRUE, FALSE, True, False;
    

    Output

    The output produced is as given below −

    true false TRUE FALSE True False
    1 0 1 0 1 0

    Example

    Now, let”s create a table with the name CUSTOMERS using the following query. Here, the AVAILABILITY column specifies whether the customer is available or not. If the bit value is 0 (FALSE), the customer is not available. If it is 1(TRUE), the customer is available −

    CREATE TABLE CUSTOMERS (
       ID INT NOT NULL AUTO_INCREMENT PRIMARY KEY,
       NAME VARCHAR(40),
       AVAILABILITY BOOLEAN
    );
    

    Following is the output produced −

    Query OK, 0 rows affected (0.02 sec)
    

    To get the information about the CUSTOMERS table, use the following query −

    DESCRIBE CUSTOMERS;
    

    If we look at the AVAILABILITY column, which has been set to BOOLEAN while creating the table, it now shows type of TINYINT −

    Field Type Null Key Default Extra
    ID int NO PRI NULL auto_increment
    NAME varchar(40) YES NULL
    AVAILABILITY tinyint(1) YES NULL

    Now, let us insert some records into the CUSTOMERS table using the following INSERT query −

    INSERT INTO CUSTOMERS VALUES
    (1, ''Ramesh'', FALSE),
    (2, ''Khilan'', TRUE),
    (4, ''Kaushik'', NULL);
    

    Using the below query, we can display all the values in the table −

    SELECT * FROM CUSTOMERS;
    

    We can see the values in the AVAILABILITY column are set to 0 and 1 respectively. −

    ID NAME AVAILABILITY
    1 Ramesh 0
    2 Khilan 1
    4 Kaushik NULL

    Replacing BOOLEAN 0,1 with TRUE and FALSE

    As we can see in the above CUSTOMERS table, the BOOLEAN data type shows 0 and 1 values instead of TRUE and FALSE. In MySQL, we can convert BOOLEAN data type to TRUE and FALSE values using the CASE statement.

    The MySQL CASE statement is a conditional statement that goes through conditions and return a values when the first condition is met. Therefore, once a condition is true, it will stop reading the next piece of code and return the result.

    If no conditions are true, it will return the value in the ELSE clause. If no ELSE clause is present and no conditions are true, it returns NULL.

    Syntax

    Following is the syntax of CASE statement in MySQL −

    CASE
       WHEN condition1 THEN result1
       WHEN condition2 THEN result2
       ...
       WHEN conditionN THEN resultN
       ELSE result
    END;
    

    Example

    To get a better understanding, let us consider the BIKES table created using the query below −

    CREATE TABLE BIKES (
       S_NO INT AUTO_INCREMENT PRIMARY KEY,
       COMPANY VARCHAR(40) NOT NULL,
       PRICE INT NOT NULL,
       COLOUR VARCHAR(40) NOT NULL,
       IS_BLACK BOOLEAN
    );
    

    Example

    Output of the above code is as follows −

    Query OK, 0 rows affected (0.03 sec)
    

    Now, let us insert values into the BIKES table using the INSERT statement as shown below −

    INSERT INTO BIKES (COMPANY, PRICE, COLOUR, IS_BLACK)
    VALUES (''Royal Enfield'', 300000, ''Black'', 1);
    INSERT INTO BIKES (COMPANY, PRICE, COLOUR, IS_BLACK)
    VALUES (''BMW'', 900000, ''Blue'', 0);
    INSERT INTO BIKES (COMPANY, PRICE, COLOUR, IS_BLACK)
    VALUES (''Jawa'', 150000, ''Black'', 1);
    INSERT INTO BIKES (COMPANY, PRICE, COLOUR, IS_BLACK)
    VALUES (''Triumph'', 1200000, ''Red'', 0);
    

    The BIKES table obtained is as follows −

    S_NO COMPANY PRICE COLOUR IS_BLACK
    1 Royal Enfield 300000 Black 1
    2 BMW 900000 Blue 0
    3 Jawa 150000 Black 1
    4 Triumph 1200000 Red 0

    Now, let us display all the records from the BIKES table, where the colour BLACK is represented by either TRUE or FALSE −

    SELECT *,
    CASE IS_BLACK
    WHEN 1 THEN ''TRUE''
    WHEN 0 THEN ''FALSE''
    END AS IS_BOOLEAN
    FROM BIKES;
    

    Output

    The output is displayed as follows −

    S_NO COMPANY PRICE COLOUR IS_BLACK IS_BOOLEAN
    1 Royal Enfield 300000 Black 1 TRUE
    2 BMW 900000 Blue 0 FALSE
    3 Jawa 150000 Black 1 TRUE
    4 Triumph 1200000 Red 0 FALSE

    Example

    In the following query, we are filtering the records from the BIKES table where colour black is TRUE −

    SELECT * FROM BIKES WHERE IS_BLACK IS TRUE;
    

    Output

    As we can see the output below, Royal Enfield and Jawa are black in color (true) −

    S_NO COMPANY PRICE COLOUR IS_BLACK
    1 Royal Enfield 300000 Black 1
    3 Jawa 150000 Black 1

    Example

    In here, we are filtering the records from the BIKES table where color black is FALSE −

    SELECT * FROM BIKES WHERE IS_BLACK IS FALSE;
    

    Output

    The output says that BMW and Triumph are not black in colour(false) −

    S_NO COMPANY PRICE COLOUR IS_BLACK
    2 BMW 900000 Blue 0
    4 Triumph 1200000 Red 0

    Boolean Operator Using a Client Program

    In addition to perform the Boolean Operator in MySQL table using MySQL query, we can also perform the another operation on a table using a client program.

    MySQL provides various Connectors and APIs using which you can write programs (in the respective programming languages) to communicate with the MySQL database. The connectors provided are in programming languages such as, Java, PHP, Python, JavaScript, C++ etc. This section provides programs to execute Boolean Operator in MySQL Table.

    Syntax

    Following are the syntaxes of the MySQL Boolean Operator in various programming languages −

    The MySQL PHP connector mysqli provides a function named query() to execute an SQL query in the MySQL database. Depending on the type of query, it retrieves data or performs modifications within the database.

    This function accepts two parameters namely −

    • $sql: This is a string value representing the query.
    • $resultmode: This is an optional parameter which is used to specify the desired format of the result. Which can be MYSQLI_STORE_RESULT (buffered result set object) or, MYSQLI_USE_RESULT (unbuffered result set object) or, MYSQLI_ASYNC.

    To perform the Boolean operation in MySQL table, we need to execute the CREATE TABLE statement using this function as −

    $sql = "CREATE TABLE table_name ( Column_name BOOLEAN )";
    $mysqli->query($sql);
    

    The MySQL NodeJS connector mysql2 provides a function named query() to execute an SQL query in the MySQL database. This function accepts a string value as a parameter representing the query to be executed.

    To perform the Boolean operation in MySQL table, we need to execute the CREATE TABLE statement using this function as −

    sql= "CREATE TABLE table_name ( Column_name BOOLEAN )";
    con.query(sql);
    

    We can use the JDBC type 4 driver to communicate to MySQL using Java. It provides a function named execute() to execute an SQL query in the MySQL database. This function accepts a String value as a parameter representing the query to be executed.

    To perform the Boolean operation in MySQL table, we need to execute the CREATE TABLE statement using this function as −

    String sql = "CREATE TABLE table_name ( Column_name BOOLEAN )";
    statement.execute(sql);
    

    The MySQL Connector/Python provides a function named execute() to execute an SQL query in the MySQL database. This function accepts a string value as a parameter representing the query to be executed.

    To perform the Boolean operation in MySQL table, we need to execute the CREATE TABLE statement using this function as −

    query = "CREATE TABLE table_name (Column_name BOOLEAN)"
    cursorObj.execute(query);
    

    Example

    Following are the implementations of this operation in various programming languages −

    $dbhost = ''localhost
    $dbuser = ''root
    $dbpass = ''password
    $dbname = ''TUTORIALS
    $mysqli = new mysqli($dbhost, $dbuser, $dbpass, $dbname);
    if($mysqli->connect_errno ) {
       printf("Connect failed: %s
    ", $mysqli->connect_error); exit(); } //printf(''Connected successfully.
    ''); //create table with boolean column $sql = ''CREATE TABLE CUSTOMERS ( ID INT NOT NULL AUTO_INCREMENT PRIMARY KEY, NAME VARCHAR(40), AVAILABILITY BOOLEAN); $result = $mysqli->query($sql); if($result){ printf("Table created successfully...!n"); } //insert data into created table $q = "INSERT INTO CUSTOMERS(ID, NAME, AVAILABILITY) VALUES (1, ''Ramesh'', TRUE)"; If($res = $mysqli->query($q)){ printf("Data inserted successfully...!n"); } //now display the table records $s = "SELECT * FROM CUSTOMERS"; If($r = $mysqli->query($s)){ printf("Select query executed successfully...!n"); printf("Table records: n"); while($row = $r->fetch_assoc()) { printf("Id %d, Name: %s, AVAILABILITY: %s", $row["ID"], $row["NAME"], $row["AVAILABILITY"]); printf("n"); } } else { printf(''Failed''); } $mysqli->close();

    Output

    The output obtained is as follows −

    Table created successfully...!
    Data inserted successfully...!
    Select query executed successfully...!
    Table records:
    Id 1, Name: Ramesh, AVAILABILITY: 1
    
    var mysql = require("mysql2");
    var con = mysql.createConnection({
      host: "localhost",
      user: "root",
      password: "Nr5a0204@123",
    });
    
    //Connecting to MySQL
    con.connect(function (err) {
      if (err) throw err;
      console.log("Connected!");
      console.log("--------------------------");
    
      //Select database
      sql = "CREATE DATABASE TUTORIALS";
      con.query(sql);
    
      //Select database
      sql = "USE TUTORIALS";
      con.query(sql);
    
      //Creating CUSTOMERS table
      sql = "CREATE TABLE CUSTOMERS (ID INT NOT NULL AUTO_INCREMENT PRIMARY KEY, NAME VARCHAR(40), AVAILABILITY BOOLEAN);"
      con.query(sql , function(err){
        if (err) throw err;
        console.log("Table created Successfully...");
      });
    
      //Inserting Records
      sql = "INSERT INTO CUSTOMERS(ID, NAME, AVAILABILITY) VALUES (1, ''Ramesh'', 0), (2, ''Khilan'', 1), (4, ''Kaushik'', NULL);"
      con.query(sql);
    
      //Displaying all the records of the CUSTOMERS table
      sql = "SELECT * FROM CUSTOMERS;"
      con.query(sql, function (err, result) {
        if (err) throw err;
        console.log(result);
      });
    });
    

    Output

    The output produced is as follows −

    Connected!
    --------------------------
    Table created Successfully...
    [
      { ID: 1, NAME: ''Ramesh'', AVAILABILITY: 0 },
      { ID: 2, NAME: ''Khilan'', AVAILABILITY: 1 },
      { ID: 4, NAME: ''Kaushik'', AVAILABILITY: null }
    ]
    
    import java.sql.Connection;
    import java.sql.DriverManager;
    import java.sql.ResultSet;
    import java.sql.Statement;
    public class BooleanOperator {
      public static void main(String[] args) {
        String url = "jdbc:mysql://localhost:3306/TUTORIALS";
        String user = "root";
        String password = "password";
        ResultSet rs;
        try {
          Class.forName("com.mysql.cj.jdbc.Driver");
                Connection con = DriverManager.getConnection(url, user, password);
                Statement st = con.createStatement();
                //System.out.println("Database connected successfully...!");
                //create a table(having boolean field/column)
                String sql = "CREATE TABLE CUSTOMERS (ID INT NOT NULL AUTO_INCREMENT PRIMARY KEY,NAME VARCHAR(40),AVAILABILITY BOOLEAN)";
                st.execute(sql);
                System.out.println("Table created successfully...!");
                //now lets insert some records
                String sql1 = "INSERT INTO CUSTOMERS(ID, NAME, AVAILABILITY) VALUES (1, ''Ramesh'', 0), (2, ''Khilan'', 1), (4, ''Kaushik'', NULL)";
                st.executeUpdate(sql1);
                System.out.println("Records inserted successfully...!");
                //lets display the records....
                String sql2 = "SELECT * FROM CUSTOMERS";
                rs = st.executeQuery(sql2);
                System.out.println("Table records are: ");
                while(rs.next()) {
                  String id = rs.getString("Id");
                  String name = rs.getString("Name");
                  String is_available = rs.getString("AVAILABILITY");
                  System.out.println("Id: " + id + ", Name: " + name + ", Is_available: " + is_available);
                }
        }catch(Exception e) {
          e.printStackTrace();
        }
      }
    }
    

    Output

    The output obtained is as shown below −

    Table created successfully...!
    Records inserted successfully...!
    Table records are:
    Id: 1, Name: Ramesh, Is_available: 0
    Id: 2, Name: Khilan, Is_available: 1
    Id: 4, Name: Kaushik, Is_available: null
    
    import mysql.connector
    # Establishing the connection
    connection = mysql.connector.connect(
        host=''localhost'',
        user=''root'',
        password=''password'',
        database=''tut''
    )
    table_name = ''customer''
    # Creating a cursor object
    cursorObj = connection.cursor()
    # Create table with boolean column
    sql = '''''' CREATE TABLE CUSTOMER(
        ID INT NOT NULL AUTO_INCREMENT PRIMARY KEY,
        NAME VARCHAR(40),
        AVAILABILITY BOOLEAN)''''''
    cursorObj.execute(sql)
    print("The table is created successfully!")
    # Insert data into the created table
    insert_query = ''INSERT INTO CUSTOMER(ID, NAME, AVAILABILITY) VALUES (1, "Ramesh", TRUE);''
    cursorObj.execute(insert_query)
    print("Row inserted successfully.")
    # Now display the table records
    select_query = "SELECT * FROM CUSTOMER"
    cursorObj.execute(select_query)
    result = cursorObj.fetchall()
    print("Tutorial Table Data:")
    for row in result:
        print(row)
    cursorObj.close()
    connection.close()
    

    Output

    Following is the output of the above code −

    The table is created successfully!
    Row inserted successfully.
    Tutorial Table Data:
    (1, ''Ramesh'', 1)
    

    Khóa học lập trình tại Toidayhoc vừa học vừa làm dự án vừa nhận lương: Khóa học lập trình nhận lương tại trung tâm Toidayhoc

  • Khóa học miễn phí MySQL – DECIMAL nhận dự án làm có lương

    MySQL – DECIMAL

    Table of content


    The MySQL Decimal Data Type

    The MySQL DECIMAL data type is used to store numeric values with decimal points. It allows for precise calculations and can be configured to store a specified number of digits before and after the decimal point.

    We often use this datatype for the columns that require exact precision such as salaries of employees, employee PF balances, etc.

    Internally, MySQL stores DECIMAL values using a binary format that allocates storage for the integer and fractional parts of the number separately. This binary format efficiently packs 9 digits into 4 bytes of storage.

    Syntax

    Following is the syntax to define a column whose data type is DECIMAL −

    column_name  DECIMAL(P,D);
    

    Where,

    • P is called precision which specifies the total number of significant digits that can be stored in the column, both to the left and right of the decimal point. The range of P is 1 to 65.

    • D is a scale that specifies the maximum number of digits that can be stored after the decimal point. The range of D should be between 0 and 30 and D is less than or equal to (<=) P.

    For instance, if we define a column as DECIMAL(10,2), it can store numbers with up to 10 digits, and up to 2 digits to the right of the decimal point.

    In MySQL, instead of the DECIMAL keyword, we can also use the “DEC”, “FIXED” and “NUMERIC” keywords because they are synonyms for DECIMAL.

    Attributes

    The DECIMAL keyword has two attributes: UNSIGNED and ZEROFILL.

    • UNSIGNED − When used, it indicates that the column does not accept negative values.

    • ZEROFILL − If used, it pads the number with zeros to the specified width.

    Precision and Scale

    In the following query, we define a SALARY column with the DECIMAL data type, specifying a precision of 5 and a scale of 3 −

    SALARY decimal(5,3)
    

    This definition means that the SALARY column can store values with up to 5 digits in total, including 3 digits to the right of the decimal point. The range for this column would be from 99.999 to -99.999.

    No Decimal Places

    In here, the SALARY column contains no fractional part or decimal point. The following two queries are same −

    SALARY DECIMAL(5);
    SALARY DECIMAL(5,0);
    

    Both declarations indicate that the SALARY column can store values as whole numbers without decimal places.

    Default Precision

    If you omit the precision value, the default precision P will be 10 −

    SALARY DECIMAL;
    

    MySQL DECIMAL Storage

    MySQL stores values of the “DECIMAL” data type using a binary format that optimizes storage. Specifically, MySQL packs 9 digits into 4 bytes. Storage is allocated separately for the integer and fractional parts, with 4 bytes used for each set of 9 digits. Any remaining digits require additional storage.

    The storage required for remaining (leftover) digits is demonstrated in the following table:

    Leftover Digits Bytes
    0 0
    1-2 1
    3-4 2
    5-6 3
    7-9 4

    Consider a DECIMAL(30,9) column, which has 9 digits for the fractional part and 30 – 9 = 21 digits for the integer part. In this case, the fractional part takes 4 bytes. The integer part takes 8 bytes for the first 18 digits, and for the leftover 3 digits, it requires an additional 2 bytes. Therefore, the DECIMAL(30,9) column requires a total of 14 bytes.

    Example

    To further understand this, let us create a table named EMPLOYEES using the following query −

    CREATE TABLE EMPLOYEES (
       ID int NOT NULL AUTO_INCREMENT,
       NAME varchar(30) NOT NULL,
       SALARY decimal(14,4) NOT NULL,
       PRIMARY KEY (ID)
     );
    

    Using the following query, we are inserting some records into the above created table −

    INSERT INTO EMPLOYEES (NAME, SALARY) VALUES
    ("Krishna", 150050.34),
    ("Kalyan", 100000.65);
    

    The EMPLOYEES table obtained is as follows −

    ID NAME SALARY
    1 Krishna 150050.3400
    2 Kalyan 100000.6500

    Using the following query, we are including the ZEROFILL attribute in the “SALARY” column −

    ALTER TABLE EMPLOYEES
    MODIFY SALARY decimal(14, 4) zerofill;
    

    Following is the output of the above query −

    Query OK, 2 rows affected, 1 warning (0.03 sec)
    Records: 2  Duplicates: 0  Warnings: 1
    

    Here, we are trying to fetch all the records from the EMPLOYEES tables after including the ZEROFILL attribute on SALARY column −

    SELECT * FROM EMPLOYEES;
    

    The records will display zeros padded based on the range specified in the “SALARY” column −

    ID NAME SALARY
    1 Krishna 0000150050.3400
    2 Kalyan 0000100000.6500

    Decimal Datatype Using a Client Program

    We can also create column of the decimal datatype using the client program.

    Syntax

    To create a column of decimal datatype through a PHP program, we need to execute the “CREATE TABLE” statement using the mysqli function query() as follows −

    $sql = ''CREATE TABLE EMPLOYEES ( ID int NOT NULL AUTO_INCREMENT, NAME varchar(30) NOT NULL, SALARY decimal(14,4) NOT NULL, PRIMARY KEY (ID) )
    $mysqli->query($sql);
    

    To create a column of decimal datatype through a JavaScript program, we need to execute the “CREATE TABLE” statement using the query() function of mysql2 library as follows −

    sql = "CREATE TABLE EMPLOYEES ( ID int NOT NULL AUTO_INCREMENT, NAME varchar(30) NOT NULL, SALARY decimal(14,4) NOT NULL, PRIMARY KEY (ID) )";
    con.query(sql);
    

    To create a column of decimal datatype through a Java program, we need to execute the “CREATE TABLE” statement using the JDBC function execute() as follows −

    String sql = "CREATE TABLE STUDENTS (ID int NOT NULL AUTO_INCREMENT, NAME varchar(30) NOT NULL, BRANCH ENUM ("CSE", "ECE", "MECH"), FEES int NOT NULL, PRIMARY KEY (ID))";
    statement.execute(sql);
    

    To create a column of decimal datatype through a python program, we need to execute the “CREATE TABLE” statement using the execute() function of the MySQL Connector/Python as follows −

    sql = ''CREATE TABLE EMPLOYEES (ID int NOT NULL AUTO_INCREMENT, NAME varchar(30) NOT NULL, SALARY decimal(14,4) NOT NULL, PRIMARY KEY (ID))''
    cursorObj.execute(sql)
    

    Example

    Following are the programs −

    $dbhost = ''localhost
    $dbuser = ''root
    $dbpass = ''password
    $dbname = ''TUTORIALS
    $mysqli = new mysqli($dbhost, $dbuser, $dbpass, $dbname);
    if ($mysqli->connect_errno) {
        printf("Connect failed: %s
    ", $mysqli->connect_error); exit(); } //printf(''Connected successfully.
    ''); //create table with boolean column $sql = ''CREATE TABLE EMPLOYEES ( ID int NOT NULL AUTO_INCREMENT, NAME varchar(30) NOT NULL, SALARY decimal(14,4) NOT NULL, PRIMARY KEY (ID) ) $result = $mysqli->query($sql); if ($result) { printf("Table created successfully...!n"); } //insert data into created table $q = "INSERT INTO EMPLOYEES (NAME, SALARY) VALUES (''Krishna'', 150050.34), (''Kalyan'', 100000.65)"; if ($res = $mysqli->query($q)) { printf("Data inserted successfully...!n"); } //now display the table records $s = "SELECT ID, Salary FROM EMPLOYEES"; if ($r = $mysqli->query($s)) { printf("Table Records: Where Salary is decimal type! n"); while ($row = $r->fetch_assoc()) { printf(" ID: %d, Salary: %s", $row["ID"], $row["Salary"]); printf("n"); } } else { printf(''Failed''); } $mysqli->close();

    Output

    The output obtained is as follows −

    Table created successfully...!
    Data inserted successfully...!
    Table Records: Where Salary is decimal type!
     ID: 1, Salary: 150050.3400
     ID: 2, Salary: 100000.6500
    
    var mysql = require("mysql2");
    var con = mysql.createConnection({
      host: "localhost",
      user: "root",
      password: "password",
    }); //Connecting to MySQL
    
    con.connect(function (err) {
      if (err) throw err;
      //   console.log("Connected successfully...!");
      //   console.log("--------------------------");
      sql = "USE TUTORIALS";
      con.query(sql);
    
      //create a employees table, that accepts one column of decimal type.
      sql = "CREATE TABLE EMPLOYEES ( ID int NOT NULL AUTO_INCREMENT, NAME varchar(30) NOT NULL, SALARY decimal(14,4) NOT NULL, PRIMARY KEY (ID) )";
      con.query(sql);
    
      //insert data into created table
      sql = "INSERT INTO EMPLOYEES (NAME, SALARY) VALUES (''Krishna'', 150050.34), (''Kalyan'', 100000.65)";
      con.query(sql);
    
      //select datatypes of salary
      sql = `SELECT DATA_TYPE FROM INFORMATION_SCHEMA.COLUMNS WHERE table_name = ''EMPLOYEES'' AND COLUMN_NAME = ''SALARY''`;
      con.query(sql, function (err, result) {
        if (err) throw err;
        console.log(result);
      });
    });
    

    Output

    The output produced is as follows −

    [ { DATA_TYPE: ''decimal'' } ]
    
    import java.sql.Connection;
    import java.sql.DriverManager;
    import java.sql.ResultSet;
    import java.sql.Statement;
    
    public class Decimal {
       public static void main(String[] args) {
          String url = "jdbc:mysql://localhost:3306/TUTORIALS";
          String username = "root";
          String password = "password";
          try {
             Class.forName("com.mysql.cj.jdbc.Driver");
             Connection connection = DriverManager.getConnection(url, username, password);
             Statement statement = connection.createStatement();
             System.out.println("Connected successfully...!");
    
             //Decimal data types...!;
             String sql = "CREATE TABLE EMPLOYEES ( ID int NOT NULL AUTO_INCREMENT, NAME varchar(30) NOT NULL, SALARY decimal(14,4) NOT NULL, PRIMARY KEY (ID))";
             statement.execute(sql);
             System.out.println("column of a Decimal type created successfully...!");
             ResultSet resultSet = statement.executeQuery("DESCRIBE EMPLOYEES");
             while (resultSet.next()){
                System.out.println(resultSet.getString(1)+" "+resultSet.getString(2));
             }
             connection.close();
          } catch (Exception e) {
             System.out.println(e);
          }
       }
    }
    

    Output

    The output obtained is as shown below −

    Connected successfully...!
    column of a Decimal type created successfully...!
    ID int
    NAME varchar(30)
    SALARY decimal(14,4)
    
    import mysql.connector
    # Establishing the connection
    connection = mysql.connector.connect(
        host=''localhost'',
        user=''root'',
        password=''password'',
        database=''tut''
    )
    # Creating a cursor object
    cursorObj = connection.cursor()
    # Create table with decimal column
    sql = ''''''
    CREATE TABLE EMPLOYEES (
    ID int NOT NULL AUTO_INCREMENT,
    NAME varchar(30) NOT NULL,
    SALARY decimal(14,4) NOT NULL,
    PRIMARY KEY (ID)
    )''''''
    cursorObj.execute(sql)
    print("The table is created successfully!")
    # Data to be inserted
    data_to_insert = [
        (''Krishna'', 150050.34),
        (''Kalyan'', 100000.65)
    ]
    # Insert data into the created table
    insert_query = "INSERT INTO EMPLOYEES (NAME, SALARY) VALUES (%s, %s)"
    cursorObj.executemany(insert_query, data_to_insert)
    # Commit the changes after the insert operation
    connection.commit()
    print("Rows inserted successfully.")
    # Now display the table records
    select_query = "SELECT * FROM EMPLOYEES"
    cursorObj.execute(select_query)
    result = cursorObj.fetchall()
    print("Table Data:")
    for row in result:
        print(row)
    cursorObj.close()
    connection.close()
    

    Output

    Following is the output of the above code −

    The table is created successfully!
    Rows inserted successfully.
    Table Data:
    (1, ''Krishna'', Decimal(''150050.3400''))
    (2, ''Kalyan'', Decimal(''100000.6500''))
    

    Khóa học lập trình tại Toidayhoc vừa học vừa làm dự án vừa nhận lương: Khóa học lập trình nhận lương tại trung tâm Toidayhoc

  • Khóa học miễn phí MySQL – ENUM nhận dự án làm có lương

    MySQL – ENUM

    Table of content


    ENUM (Enumerator) is a user defined datatype which stores a list of values as strings. These values are specified when you define the ENUM column. The user can choose values from this predefined list while inserting values into this column.

    Each string value defined in an ENUM column is implicitly assigned a numerical value starting from 1. These numerical values are used internally by MySQL to represent the ENUM values.

    The MySQL ENUM Data Type

    The MySQL ENUM data type allow you to select one or more values from a predefined list during insertion or update operations. The selected values are stored as strings in the table, and when you retrieve data from the ENUM column, the values are presented in a human-readable format.

    ENUM columns can accept values of various data types, including integers, floating-point numbers, decimals, and strings. However, internally, MySQL will convert these values to the closest matching ENUM value based on its predefined list.

    Syntax

    Following is the syntax to define the ENUM data type on a column −

    CREATE TABLE table_name (
       Column1,
       Column2 ENUM (''value1'',''value2'',''value3'', ...),
       Column3...
    );
    

    Note: An enum column can have maximum 65,535 values.

    Attributes of ENUM

    The ENUM datatype in MySQL has three attributes. The same is described below −

    • Default − The default value of enum data type is NULL. If no value is provided for the enum field at the time of insertion, Null value will be inserted.

    • NULL − It works the same as the DEFAULT value if this attribute is set for the enum field. If it is set, the index value is always NULL.

    • NOT NULL − MySQL will generate a warning message if this attribute is set for the enum field and no value is provided at the insertion time.

    Example

    First of all, let us create a table named STUDENTS. In this table, we are specifying ENUM string object in the BRANCH column using the following query −

    CREATE TABLE STUDENTS (
       ID int NOT NULL AUTO_INCREMENT,
       NAME varchar(30) NOT NULL,
       BRANCH ENUM (''CSE'', ''ECE'', ''MECH''),
       FEES int NOT NULL,
       PRIMARY KEY (ID)
    );
    

    Following is the output obtained −

    Query OK, 0 rows affected (0.04 sec)
    

    Now, we retrieve the structure of the STUDENTS table, revealing that the “BRANCH” field has an enum data type −

    DESCRIBE STUDENTS;
    

    The output indicates that the BRANCH field”s data type is ENUM, which stores the values (”CSE”, ”ECE”, ”MECH”) −

    Field Type Null Key Default Extra
    ID int NO PRI NULL auto_increment
    NAME varchar(30) NO NULL
    BRANCH enum(”CSE”,”ECE”,”MECH”) YES NULL
    FEES int NO NULL

    Now, let us insert records into the STUDENTS table using the following INSERT query −

    INSERT INTO STUDENTS (NAME, BRANCH, FEES) VALUES
    (''Anirudh'', ''CSE'', 500000),
    (''Yuvan'', ''ECE'', 350000),
    (''Harris'', ''MECH'', 400000);
    

    In these insertion queries, we have used values (”CSE”, ”ECE”, and ”MECH”) for the “BRANCH” field, which are valid enum values. Hence, the queries executed without any errors −

    Query OK, 3 rows affected (0.01 sec)
    Records: 3  Duplicates: 0  Warnings: 0
    

    Using the below query, we can display all the values in the table −

    SELECT * FROM STUDENTS;
    

    Following are the records of STUDENTS table −

    ID NAME BRANCH FEES
    1 Anirudh CSE 500000
    2 Yuvan ECE 350000
    3 Harris MECH 400000

    Inserting Records with Numerical ENUM Values

    We can insert the enum list values to the ENUM column of table using the respective numeric index. The numeric index starts from 1 but not from 0.

    Example

    In the query below, we are inserting the value ”CSE” from the ENUM list into the ”BRANCH” column using its numeric index. Since ”CSE” is located at position 1 in the ENUM list, we use 1 as the numeric index in the query.

    INSERT INTO STUDENTS (NAME, BRANCH, FEES) VALUES
    (''Devi'', 1, 380000);
    

    Output

    The insertion query executes without any errors −

    Query OK, 1 row affected (0.01 sec)
    

    Verification

    Let us verify whether the above insertion is successful or not by retrieving all the records of the table using the below query −

    SELECT * FROM STUDENTS;
    

    The STUDENTS table displayed is as follows −

    ID NAME BRANCH FEES
    1 Anirudh CSE 500000
    2 Yuvan ECE 350000
    3 Harris MECH 400000
    4 Devi CSE 380000

    Inserting Invalid Records

    In MySQL, if we try to insert a value into a column with an ENUM data type that does not match any of the specified enum values, it will result in an error.

    Example

    In the following query, we are referring to the 6th value in enum list, which does not exist. So, the following query will generate an error −

    INSERT INTO STUDENTS (NAME, BRANCH, FEES) VALUES
    (''Thaman'', 6, 200000);
    

    Output

    As we can see the output, an error is generated, and no new record has been inserted −

    ERROR 1265 (01000): Data truncated for column ''BRANCH'' at row 1
    

    Filtering Records by Numeric ENUM Value

    In MySQL, you can retrieve records from an ENUM column based on either the string value or the numeric index. The numeric index starts from 1, not 0.

    Example

    The numeric index of 1 in enum list is ”CSE”. So, the following query will fetch the records where the BRANCH column contains the value as ”CSE”.

    SELECT * FROM STUDENTS WHERE BRANCH = 1;
    

    Output

    The resulting output displays records where the ”BRANCH” column contains the value ”CSE” −

    ID NAME BRANCH FEES
    1 Anirudh CSE 500000
    4 Devi CSE 380000

    Filtering Records by Human-Readable ENUM Value

    There can be some instances where the enum list will have large number of values. It can be difficult to remember the numeric index for every value in the list. In such cases, it is more convenient to use the human-readable string value of the ENUM item in your query to retrieve records based on the ENUM field”s value.

    Example

    In the following query, we are filtering the records where the BRANCH column contains the value “Mech”.

    SELECT * FROM STUDENTS WHERE BRANCH = "MECH";
    

    Output

    Following is the output obtained −

    ID NAME BRANCH FEES
    3 Harris MECH 400000

    Disadvantages of ENUM Data Type

    Following are the disadvantages of ENUM data type in MySQL −

    • If we wish to modify the values in enum list, we need to re-create the complete table using the ALTER TABLE command, which is quite expensive in terms of used resources and time.

    • It is very complex to get the complete enum list because we need to access the inform_schema database.

    • Expressions cannot be used with enumeration values. For instance, the following CREATE statement will return an error because it used the CONCAT() function for creating enumeration value −

    CREATE TABLE Students (
       ID int PRIMARY KEY AUTO_INCREMENT,
       NAME varchar(30),
       BRANCH ENUM(''CSE'', CONCAT(''ME'',''CH''))
    );
    

    User variables cannot be used for an enumeration value. For instance, look at the following query −

    mysql> SET @mybranch = ''EEE
    mysql> CREATE TABLE Students (
       ID int PRIMARY KEY AUTO_INCREMENT,
       NAME varchar(30),
       BRANCH ENUM(''CSE'', ''MECH'', @mybranch)
    );
    

    It is recommended to not use the numeric values as enum values.

    Enum Datatypes Using a Client Program

    We can also create column of the Enum datatypes using the client program.

    Syntax

    To create a column of Enum datatypes through a PHP program, we need to execute the “CREATE TABLE” statement using the mysqli function query() as follows −

    $sql = ''CREATE TABLE STUDENTS (ID int NOT NULL AUTO_INCREMENT, NAME varchar(30) NOT NULL, BRANCH ENUM ("CSE", "ECE", "MECH"), FEES int NOT NULL, PRIMARY KEY (ID))
    $mysqli->query($sql);
    

    To create a column of Enum datatypes through a JavaScript program, we need to execute the “CREATE TABLE” statement using the query() function of mysql2 library as follows −

    sql = "CREATE TABLE STUDENTS (ID int NOT NULL AUTO_INCREMENT, NAME varchar(30) NOT NULL, BRANCH ENUM (''CSE'', ''ECE'', ''MECH''), FEES int NOT NULL, PRIMARY KEY (ID) )";
    con.query(sql);
    

    To create a column of Enum datatypes through a Java program, we need to execute the “CREATE TABLE” statement using the JDBC function execute() as follows −

    String sql = "CREATE TABLE STUDENTS (ID int NOT NULL AUTO_INCREMENT, NAME varchar(30) NOT NULL, BRANCH ENUM ("CSE", "ECE", "MECH"), FEES int NOT NULL, PRIMARY KEY (ID))";
    statement.execute(sql);
    

    To create a column of Enum datatypes through a python program, we need to execute the “CREATE TABLE” statement using the execute() function of the MySQL Connector/Python as follows −

    sql = ''CREATE TABLE STUDENTS( ID int NOT NULL AUTO_INCREMENT,  NAME varchar(30) NOT NULL,  BRANCH ENUM (''CSE'', ''ECE'', ''MECH''),  FEES int NOT NULL,  PRIMARY KEY (ID)  )''
    cursorObj.execute(sql)
    

    Example

    Following are the programs −

    $dbhost = ''localhost
    $dbuser = ''root
    $dbpass = ''password
    $dbname = ''TUTORIALS
    $mysqli = new mysqli($dbhost, $dbuser, $dbpass, $dbname);
    if ($mysqli->connect_errno) {
        printf("Connect failed: %s
    ", $mysqli->connect_error); exit(); } //printf(''Connected successfully.
    ''); //create table with boolean column $sql = ''CREATE TABLE STUDENTS (ID int NOT NULL AUTO_INCREMENT, NAME varchar(30) NOT NULL, BRANCH ENUM ("CSE", "ECE", "MECH"), FEES int NOT NULL, PRIMARY KEY (ID)) $result = $mysqli->query($sql); if ($result) { printf("Table created successfully...!n"); } //insert data into created table $q = "INSERT INTO STUDENTS (NAME, BRANCH, FEES) VALUES (''Anirudh'', ''CSE'', 500000), (''Yuvan'', ''ECE'', 350000)"; if ($res = $mysqli->query($q)) { printf("Data inserted successfully...!n"); } //now display the table records $s = "SELECT BRANCH FROM STUDENTS"; if ($r = $mysqli->query($s)) { printf("Select query executed successfully...!n"); printf("following records belongs to Enum datatypes: n"); while ($row = $r->fetch_assoc()) { printf(" Branch Name: %s", $row["BRANCH"]); printf("n"); } } else { printf(''Failed''); } $mysqli->close();

    Output

    The output obtained is as follows −

    Table created successfully...!
    Data inserted successfully...!
    Select query executed successfully...!
    following records belongs to Enum datatypes:
     Branch Name: CSE
     Branch Name: ECE
    
    var mysql = require("mysql2");
    var con = mysql.createConnection({
      host: "localhost",
      user: "root",
      password: "password",
    }); //Connecting to MySQL
    
    con.connect(function (err) {
      if (err) throw err;
      //   console.log("Connected successfully...!");
      //   console.log("--------------------------");
      sql = "USE TUTORIALS";
      con.query(sql);
    
      //create a customers that accepts one column enum type.
      sql = "CREATE TABLE STUDENTS (ID int NOT NULL AUTO_INCREMENT, NAME varchar(30) NOT NULL, BRANCH ENUM (''CSE'', ''ECE'', ''MECH''), FEES int NOT NULL, PRIMARY KEY (ID) )";
      con.query(sql);
    
      //insert data into created table
      sql ="INSERT INTO STUDENTS (NAME, BRANCH, FEES) VALUES (''Anirudh'', ''CSE'', 500000),  (''Yuvan'', ''ECE'', 350000)";
      con.query(sql);
      //select datatypes of branch
      sql = `SELECT DATA_TYPE FROM INFORMATION_SCHEMA.COLUMNS WHERE table_name = ''STUDENTS'' AND COLUMN_NAME = ''BRANCH''`;
      con.query(sql, function (err, result) {
        if (err) throw err;
        console.log(result);
      });
    });
    

    Output

    The output produced is as follows −

    [ { DATA_TYPE: ''enum'' } ]
    
    import java.sql.Connection;
    import java.sql.DriverManager;
    import java.sql.ResultSet;
    import java.sql.Statement;
    
    public class Enum {
       public static void main(String[] args) {
          String url = "jdbc:mysql://localhost:3306/TUTORIALS";
          String username = "root";
          String password = "password";
          try {
             Class.forName("com.mysql.cj.jdbc.Driver");
             Connection connection = DriverManager.getConnection(url, username, password);
             Statement statement = connection.createStatement();
             System.out.println("Connected successfully...!");
    
             //ENUM data types...!;
             String sql = "CREATE TABLE STUDENTS (ID int NOT NULL AUTO_INCREMENT, NAME varchar(30) NOT NULL, BRANCH ENUM ("CSE", "ECE", "MECH"), FEES int NOT NULL, PRIMARY KEY (ID))";
             statement.execute(sql);
             System.out.println("column of a ENUM type created successfully...!");
             ResultSet resultSet = statement.executeQuery("DESCRIBE STUDENTS");
             while (resultSet.next()){
                System.out.println(resultSet.getString(1)+" "+resultSet.getString(2));
             }
             connection.close();
          } catch (Exception e) {
             System.out.println(e);
          }
       }
    }
    

    Output

    The output obtained is as shown below −

    Connected successfully...!
    column of a ENUM type created successfully...!
    ID int
    NAME varchar(30)
    BRANCH enum(''CSE'',''ECE'',''MECH'')
    FEES int
    
    import mysql.connector
    # Establishing the connection
    connection = mysql.connector.connect(
        host=''localhost'',
        user=''root'',
        password=''password'',
        database=''tut''
    )
    # Creating a cursor object
    cursorObj = connection.cursor()
    # Create table with enum column
    sql = ''''''
    CREATE TABLE STUDENTS (
    ID int NOT NULL AUTO_INCREMENT,
    NAME varchar(30) NOT NULL,
    BRANCH ENUM (''CSE'', ''ECE'', ''MECH''),
    FEES int NOT NULL,
    PRIMARY KEY (ID)
    );
    ''''''
    cursorObj.execute(sql)
    print("The table is created successfully!")
    # Data to be inserted
    data_to_insert = [
        (''Anirudh'', ''CSE'', 500000),
        (''Yuvan'', ''ECE'', 350000),
        (''Harris'', ''MECH'', 400000)
    ]
    # Insert data into the created table
    insert_query = "INSERT INTO STUDENTS (NAME, BRANCH, FEES) VALUES (%s, %s, %s)"
    cursorObj.executemany(insert_query, data_to_insert)
    # Commit the changes after the insert operation
    connection.commit()
    print("Rows inserted successfully.")
    # Now display the table records
    select_query = "SELECT * FROM STUDENTS"
    cursorObj.execute(select_query)
    result = cursorObj.fetchall()
    print("Table Data:")
    for row in result:
        print(row)
    cursorObj.close()
    connection.close()
    

    Output

    Following is the output of the above code −

    The table is created successfully!
    Rows inserted successfully.
    Table Data:
    (1, ''Anirudh'', ''CSE'', 500000)
    (2, ''Yuvan'', ''ECE'', 350000)
    (3, ''Harris'', ''MECH'', 400000)
    

    Khóa học lập trình tại Toidayhoc vừa học vừa làm dự án vừa nhận lương: Khóa học lập trình nhận lương tại trung tâm Toidayhoc

  • Khóa học miễn phí MySQL – VARCHAR nhận dự án làm có lương

    MySQL – VARCHAR

    Table of content


    The MySQL Varchar Data Type

    The MySQL VARCHAR data type is used to store variable-length character strings, having a length up to 65,535 bytes.

    In MySQL, when you store text in a VARCHAR column, it needs a little extra space to keep track of how long the text is. This extra space can be either 1 or 2 bytes, depending on the length of the text. If the text is short (less than 255 characters), it uses 1 byte for length. For longer text, it uses 2 bytes.

    The total size of data plus the length info cannot exceed 65,535 bytes for a row in a table.

    Example

    In the following query, we are creating a new table named test_table that has two columns column1 and column2.

    As we can see in the below code block, the columns (column1 = 32765 and column2 = 32766) makes 65531 bytes. These columns will take 2 bytes each as a length prefix. Therefore, the columns totally make 32765+2+32766+2 = 65535 bytes −

    CREATE TABLE test_table (
       column1 VARCHAR(32765) NOT NULL,
       column2 VARCHAR(32766) NOT NULL
    )CHARACTER SET ''latin1'' COLLATE LATIN1_DANISH_CI;
    

    Output

    Following is the output of the above code −

    Query OK, 0 rows affected (0.03 sec)
    

    Example

    Now, let us create another table test_table2 and provide 32766 and 32766 to both the columns (column1 and column2) −

    CREATE TABLE test_table2 (
       column1 VARCHAR(32766) NOT NULL, --error
       column2 VARCHAR(32766) NOT NULL
    )CHARACTER SET ''latin1'' COLLATE LATIN1_DANISH_CI;
    

    Output

    As we can see in the output below, an error is generated because the row size (32766 +2 +32766 +2 = 65536) exceeds the maximum limit (65,535) −

    ERROR 1118 (42000): Row size too large. The maximum row size for the used
    table type, not counting BLOBs, is 65535. This includes storage overhead,
    check the manual. You have to change some columns to TEXT or BLOBs
    

    Example

    Here, we are creating another table named CUSTOMERS using the following query −

    CREATE TABLE CUSTOMERS (
       ID int PRIMARY KEY AUTO_INCREMENT,
       NAME VARCHAR(3)
    );
    

    Following is the output obtained −

    Query OK, 0 rows affected (0.03 sec)
    

    Now, we are inserting a string into NAME column where the length is greater than the length of VARCHAR column −

    INSERT INTO CUSTOMERS (NAME) VALUES (''Rahul'');
    

    Output

    As a result, MySQL will generate an error given below −

    ERROR 1406 (22001): Data too long for column ''NAME'' at row 1
    

    Example

    MySQL does not count the trailing spaces when inserting a value. Instead it truncates the trailing spaces.

    Let us insert a value into the NAME column that has trailing spaces −

    INSERT INTO CUSTOMERS (NAME) VALUES (''ABC '');
    

    Output

    As we can see in the output below, MySQL issued a warning −

    Query OK, 1 row affected, 1 warning (0.02 sec)
    

    Example

    In the following query, we are trying to check the length of the values in NAME column −

    SELECT ID, NAME, length(NAME) FROM CUSTOMERS;
    

    The result produced is as follows −

    ID NAME length(NAME)
    1 ABC 3

    Now, let us execute the below query to display the warnings that issued on the above insertion operation −

    SHOW warnings;
    

    The result produced is −

    Level Code Message
    Note 1265 Data truncated for column ”NAME” at row 1

    Varchar Datatypes Using a Client Program

    In addition to performing datatypes using mysql query, we can also create column of the Varchar datatypes using the client program.

    Syntax

    To create a column of Varchar datatypes through a PHP program, we need to execute the “CREATE TABLE” statement using the mysqli function query() as follows −

    $sql ="CREATE TABLE customers (cust_Name VARCHAR(30), cust_Address varchar(50)) ";
    $mysqli->query($sql);
    

    To create a column of Varchar datatypes through a JavaScript program, we need to execute the “CREATE TABLE” statement using the query() function of mysql2 library as follows −

    sql = "CREATE TABLE customers (cust_Name VARCHAR(30), cust_Address varchar(50))";
    con.query(sql);
    

    To create a column of Varchar datatypes through a Java program, we need to execute the “CREATE TABLE” statement using the JDBC function execute() as follows −

    String sql = "CREATE TABLE customers (cust_Name VARCHAR(30), cust_Address varchar(50))";
    statement.execute(sql);
    

    To create a column of Varchar datatypes through a python program, we need to execute the “CREATE TABLE” statement using the execute() function of the MySQL Connector/Python as follows −

    sql = ''CREATE TABLE test_table (column1 VARCHAR(32765) NOT NULL,  column2 VARCHAR(32766) NOT NULL)CHARACTER SET ''latin1'' COLLATE LATIN1_DANISH_CI''
    cursorObj.execute(sql)
    

    Example

    Following are the programs −

    $dbhost = ''localhost
    $dbuser = ''root
    $dbpass = ''password
    $dbname = ''TUTORIALS
    $mysqli = new mysqli($dbhost, $dbuser, $dbpass, $dbname);
    if ($mysqli->connect_errno) {
        printf("Connect failed: %s
    ", $mysqli->connect_error); exit(); } // printf(''Connected successfully.
    ''); //create a customer table and use varchar data type with differenet size $sql = "CREATE TABLE customers (cust_Name VARCHAR(30), cust_Address varchar(50)) "; if ($mysqli->query($sql)) { echo "Table created successfully with varchar data!n"; } if ($mysqli->errno) { printf("table could not create table: %s
    ", $mysqli->error); } $mysqli->close();

    Output

    The output obtained is as follows −

    Table created successfully with varchar data!
    
    var mysql = require("mysql2");
    var con = mysql.createConnection({
      host: "localhost",
      user: "root",
      password: "password",
    }); //Connecting to MySQL
    
    con.connect(function (err) {
      if (err) throw err;
      //   console.log("Connected successfully...!");
      //   console.log("--------------------------");
      sql = "USE TUTORIALS";
      con.query(sql);
    
      //create a customer table and use varchar data type with differenet size
      sql = "CREATE TABLE customers (cust_Name VARCHAR(30), cust_Address varchar(50)) ";
      con.query(sql);
    
      sql = `SELECT DATA_TYPE FROM INFORMATION_SCHEMA.COLUMNS WHERE table_name = ''customers'' AND COLUMN_NAME = ''cust_Name''`;
      con.query(sql, function (err, result) {
        if (err) throw err;
        console.log(result);
      });
    });
    

    Output

    The output produced is as follows −

    [ { DATA_TYPE: ''varchar'' } ]
    
    import java.sql.Connection;
    import java.sql.DriverManager;
    import java.sql.ResultSet;
    import java.sql.Statement;
    
    public class Varchar {
       public static void main(String[] args) {
          String url = "jdbc:mysql://localhost:3306/TUTORIALS";
          String username = "root";
          String password = "password";
          try {
             Class.forName("com.mysql.cj.jdbc.Driver");
             Connection connection = DriverManager.getConnection(url, username, password);
             Statement statement = connection.createStatement();
             System.out.println("Connected successfully...!");
    
             //varchar data types...!;
             String sql = "CREATE TABLE customers (cust_Name VARCHAR(30), cust_Address varchar(50))";
             statement.execute(sql);
             System.out.println("column of a varchar type created successfully...!");
             ResultSet resultSet = statement.executeQuery("DESCRIBE customers");
             while (resultSet.next()){
                System.out.println(resultSet.getString(1)+" "+resultSet.getString(2));
             }
             connection.close();
          } catch (Exception e) {
             System.out.println(e);
          }
       }
    }
    

    Output

    The output obtained is as shown below −

    Connected successfully...!
    column of a varchar type created successfully...!
    cust_Name varchar(30)
    cust_Address varchar(50)
    
    import mysql.connector
    # Establishing the connection
    connection = mysql.connector.connect(
        host=''localhost'',
        user=''root'',
        password=''password'',
        database=''tut''
    )
    # Creating a cursor object
    cursorObj = connection.cursor()
    # Create table with varchar column
    sql = ''''''
    CREATE TABLE test_table (
    column1 VARCHAR(32765) NOT NULL,
    column2 VARCHAR(32766) NOT NULL
    )
    CHARACTER SET ''latin1'' COLLATE LATIN1_DANISH_CI
    ''''''
    cursorObj.execute(sql)
    print("The table is created successfully!")
    # Insert data into the created table
    insert_query = "INSERT INTO test_table (column1, column2) VALUES (%s, %s)"
    data_to_insert = ("History", "Geography")
    cursorObj.execute(insert_query, data_to_insert)
    # Commit the changes after the insert operation
    connection.commit()
    print("Rows inserted successfully.")
    # Now display the table records
    select_query = "SELECT * FROM test_table"
    cursorObj.execute(select_query)
    result = cursorObj.fetchall()
    print("Table Data:")
    for row in result:
        print(row)
    cursorObj.close()
    connection.close()
    

    Output

    Following is the output of the above code −

    The table is created successfully!
    Rows inserted successfully.
    Table Data:
    (''History'', ''Geography'')
    

    Khóa học lập trình tại Toidayhoc vừa học vừa làm dự án vừa nhận lương: Khóa học lập trình nhận lương tại trung tâm Toidayhoc

  • Khóa học miễn phí MySQL – Data Types nhận dự án làm có lương

    MySQL – Data Types

    Table of content


    Data types are referred as the type of data, like string, integer, date-time etc., that can be stored in a column (field) of a table. Properly defining the fields in a table is important to the overall optimization of your database. You should use only the type and size of field you really need to use.

    When defining columns in a database, choose a data type that matches the actual size and type of data you wish to store, rather than unnecessarily allocating more space than needed.

    MySQL Data Types

    In MySQL, data types is categorized into three main groups −

    • Numeric
    • Date and Time
    • String Types.

    Let us now discuss them in detail.

    Numeric Data Types

    Numeric data types are used to store numeric values, including integers and decimal numbers. MySQL uses all the standard ANSI SQL numeric data types.

    The following list shows the common MySQL numeric data types and their descriptions −

    • INT − A normal-sized integer that can be signed or unsigned. If signed, the allowable range is from -2147483648 to 2147483647. If unsigned, the allowable range is from 0 to 4294967295. You can specify a width of up to 11 digits.

    • TINYINT − A very small integer that can be signed or unsigned. If signed, the allowable range is from -128 to 127. If unsigned, the allowable range is from 0 to 255. You can specify a width of up to 4 digits.

    • SMALLINT − A small integer that can be signed or unsigned. If signed, the allowable range is from -32768 to 32767. If unsigned, the allowable range is from 0 to 65535. You can specify a width of up to 5 digits.

    • MEDIUMINT − A medium-sized integer that can be signed or unsigned. If signed, the allowable range is from -8388608 to 8388607. If unsigned, the allowable range is from 0 to 16777215. You can specify a width of up to 9 digits.

    • BIGINT − A large integer that can be signed or unsigned. If signed, the allowable range is from -9223372036854775808 to 9223372036854775807. If unsigned, the allowable range is from 0 to 18446744073709551615. You can specify a width of up to 20 digits.

    • FLOAT(M,D) − A floating-point number that cannot be unsigned. You can define the display length (M) and the number of decimals (D). This is not required and will default to 10,2, where 2 is the number of decimals and 10 is the total number of digits (including decimals). Decimal precision can go to 24 places for a FLOAT.

    • DOUBLE(M,D) − A double precision floating-point number that cannot be unsigned. You can define the display length (M) and the number of decimals (D). This is not required and will default to 16,4, where 4 is the number of decimals. Decimal precision can go to 53 places for a DOUBLE. REAL is a synonym for DOUBLE.

    • DECIMAL(M,D) − An unpacked floating-point number that cannot be unsigned. In the unpacked decimals, each decimal corresponds to one byte. Defining the display length (M) and the number of decimals (D) is required. NUMERIC is a synonym for DECIMAL.

    Date and Time Data Types

    Date and time data types in MySQL are used to store temporal data, including dates, times, and combinations of both. These data types are essential for handling date and time-related information accurately.

    The MySQL date and time data types are as follows −

    • DATE − A date in YYYY-MM-DD format, between 1000-01-01 and 9999-12-31. For example, December 30th, 1973 would be stored as 1973-12-30.

    • DATETIME − A date and time combination in YYYY-MM-DD HH:MM:SS format, between 1000-01-01 00:00:00 and 9999-12-31 23:59:59. For example, 3:30 in the afternoon on December 30th, 1973 would be stored as 1973-12-30 15:30:00.

    • TIMESTAMP − A timestamp between midnight, January 1st, 1970 and sometime in 2037. This looks like the previous DATETIME format, only without the hyphens between numbers; 3:30 in the afternoon on December 30th, 1973 would be stored as 19731230153000 ( YYYYMMDDHHMMSS ).

    • TIME − Stores the time in a HH:MM:SS format.

    • YEAR(M) − Stores a year in a 2-digit or a 4-digit format. If the length is specified as 2 (for example YEAR(2)), YEAR can be between 1970 to 2069 (70 to 69). If the length is specified as 4, then YEAR can be 1901 to 2155. The default length is 4.

    String Data Types

    String data types in MySQL are used to store text and character-based information. These data types stores textual data of various lengths and formats.

    The following list describes the common string data types in MySQL −

    • CHAR(M) − A fixed-length string between 1 and 255 characters in length (for example CHAR(5)), right-padded with spaces to the specified length when stored. Defining a length is not required, but the default is 1.

    • VARCHAR(M) − A variable-length string between 1 and 255 characters in length. For example, VARCHAR(25). You must define a length when creating a VARCHAR field.

    • BLOB or TEXT − A field with a maximum length of 65535 characters. BLOBs are “Binary Large Objects” and are used to store large amounts of binary data, such as images or other types of files. Fields defined as TEXT also hold large amounts of data. The difference between the two is that the sorts and comparisons on the stored data are case sensitive on BLOBs and are not case sensitive in TEXT fields. You do not specify a length with BLOB or TEXT.

    • TINYBLOB or TINYTEXT − A BLOB or TEXT column with a maximum length of 255 characters. You do not specify a length with TINYBLOB or TINYTEXT.

    • MEDIUMBLOB or MEDIUMTEXT − A BLOB or TEXT column with a maximum length of 16777215 characters. You do not specify a length with MEDIUMBLOB or MEDIUMTEXT.

    • LONGBLOB or LONGTEXT − A BLOB or TEXT column with a maximum length of 4294967295 characters. You do not specify a length with LONGBLOB or LONGTEXT.

    • ENUM − An enumeration, which is a fancy term for list. When defining an ENUM, you are creating a list of items from which the value must be selected (or it can be NULL). For example, if you wanted your field to contain “A” or “B” or “C”, you would define your ENUM as ENUM (”A”, ”B”, ”C”) and only those values (or NULL) could ever populate that field.


    Khóa học lập trình tại Toidayhoc vừa học vừa làm dự án vừa nhận lương: Khóa học lập trình nhận lương tại trung tâm Toidayhoc

  • Khóa học miễn phí MySQL – After Delete Trigger nhận dự án làm có lương

    MySQL – After Delete Trigger

    Table of content


    In general, a Trigger is defined as a response to an event. In MySQL, a trigger is called a special stored procedure as it does not require to be invoked explicitly like other stored procedures. The trigger acts automatically whenever the desired event is fired. Triggers are categorized into two types: Before Triggers and After Triggers.

    These triggers can be a response to either insertion operation on a table, update operation or deletion operation. Thus, these special stored procedures respond whenever INSERT, UPDATE or DELETE statements are executed.

    MySQL After Delete Trigger

    The After Delete Trigger is a row-level trigger supported by the MySQL database. This trigger is executed right after a value is deleted from a row of a database table.

    A row-level trigger is a type of trigger that is executed every time a row is modified. For every single transaction made in a table (like insertion, deletion, update operation), one trigger acts automatically.

    When a DELETE statement is executed in the database, the trigger is performed first and then the said value is deleted from the table.

    Syntax

    Following is the syntax to create the AFTER DELETE trigger in MySQL −

    CREATE TRIGGER trigger_name
    AFTER DELETE ON table_name FOR EACH ROW
    BEGIN
       -- trigger body
    END;
    

    Example

    In this example, we are creating a table named ”CUSTOMERS”, to demonstrate the AFTER DELETE trigger on, using the following query −

    CREATE TABLE CUSTOMERS(
       ID INT NOT NULL,
       NAME VARCHAR(20) NOT NULL,
       AGE INT NOT NULL,
       ADDRESS VARCHAR(25),
       SALARY DECIMAL(18, 2),
       PRIMARY KEY(ID)
    );
    

    Insert values into this table created using the following INSERT statements −

    INSERT INTO CUSTOMERS VALUES
    (1, ''Ramesh'', 32, ''Ahmedabad'', 2000.00 ),
    (2, ''Khilan'', 25, ''Delhi'', 1500.00 ),
    (3, ''Kaushik'', 23, ''Kota'', 2000.00 ),
    (4, ''Chaitali'', 25, ''Mumbai'', 6500.00 ),
    (5, ''Hardik'', 27, ''Bhopal'', 8500.00 ),
    (6, ''Komal'', 22, ''MP'', 4500.00 ),
    (7, ''Muffy'', 24, ''Indore'', 10000.00 );
    

    Creating Another Table:

    Now, let us create another empty table to store all former customers after being deleted from the main table ”CUSTOMERS” −

    CREATE TABLE OLD_CUSTOMERS (
       ID INT NOT NULL,
       NAME VARCHAR(20) NOT NULL,
       AGE INT NOT NULL,
       ADDRESS VARCHAR(25),
       SALARY DECIMAL(18, 2),
       PRIMARY KEY(ID)
    );
    

    Using the following CREATE TRIGGER statement, create a new trigger ”after_delete_trigger” on the CUSTOMERS table to delete the customer details from CUSTOMERS table and insert them into another table “OLD_CUSTOMERS” −

    DELIMITER //
    CREATE TRIGGER after_delete_trigger
    AFTER DELETE ON CUSTOMERS
    FOR EACH ROW
    BEGIN
     INSERT INTO OLD_CUSTOMERS VALUES
     (OLD.ID, OLD.NAME, OLD.AGE, OLD.ADDRESS, OLD.SALARY);
    END //
    DELIMITER ;
    

    Delete details of ”old” customers from the CUSTOMERS table using the regular DELETE statement as shown below −

    DELETE FROM CUSTOMERS WHERE ID = 3;
    

    Verification

    To verify whether the details are deleted from the CUSTOMERS table and added onto the OLD_CUSTOMERS table, let us try to retrieve both of their result-sets using the SELECT queries.

    The records in CUSTOMERS table are as follows −

    ID NAME AGE ADDRESS SALARY
    1 Ramesh 32 Ahmedabad 2000.00
    2 Khilan 25 Delhi 1500.00
    4 Chaitali 25 Mumbai 6500.00
    5 Hardik 27 Bhopal 8500.00
    6 Komal 22 Hyderabad 4500.00
    7 Muffy 24 Indore 10000.00

    The records in OLD_CUSTOMERS table are as follows −

    ID NAME AGE ADDRESS SALARY
    3 Kaushik 23 Kota 2000.00

    As you can in the tables above, the data has been deleted from the CUSTOMERS table and added to the OLD_CUSTOMERS table. However, the only difference that is not visible on the application level is that the trigger is performed after the deletion is done, in contrast to the BEFORE DELETE trigger.

    After Delete Trigger Using a Client Program

    We can also execute the After Delete trigger statement using a client program, instead of SQL queries.

    Syntax

    To execute the After Delete Trigger through a PHP program, we need to query the CREATE TRIGGER statement using the mysqli function query() as follows −

    $sql = "CREATE TRIGGER after_delete_trigger AFTER DELETE ON CUSTOMERS FOR EACH ROW
    BEGIN
    INSERT INTO OLD_CUSTOMERS VALUES (OLD.ID, OLD.NAME, OLD.AGE, OLD.ADDRESS, OLD.SALARY);
    END";
    $mysqli->query($sql);
    

    To execute the After Delete Trigger through a JavaScript program, we need to query the CREATE TRIGGER statement using the query() function of mysql2 library as follows −

    sql = `CREATE TRIGGER after_delete_trigger AFTER DELETE ON CUSTOMERS FOR EACH ROW
    BEGIN
    INSERT INTO OLD_CUSTOMERS VALUES (OLD.ID, OLD.NAME, OLD.AGE, OLD.ADDRESS, OLD.SALARY);
    END`;
    con.query(sql);
    

    To execute the After Delete Trigger through a Java program, we need to query the CREATE TRIGGER statement using the JDBC function execute() as follows −

    String sql = "CREATE TRIGGER after_delete_trigger AFTER DELETE ON CUSTOMERS FOR EACH ROW BEGIN INSERT INTO OLD_CUSTOMERS VALUES (OLD.ID, OLD.NAME, OLD.AGE, OLD.ADDRESS, OLD.SALARY);
    END";
    statement.execute(sql);
    

    To execute the After Delete Trigger through a python program, we need to query the CREATE TRIGGER statement using the execute() function of the MySQL Connector/Python as follows −

    afterDelete_trigger_query = ''CREATE TRIGGER {trigger_name}
    AFTER DELETE ON {table_name}
    FOR EACH ROW
    BEGIN
    INSERT INTO {another_table} VALUES (OLD.ID, OLD.NAME, OLD.AGE, OLD.ADDRESS, OLD.SALARY);
    END''
    cursorObj.execute(afterDelete_trigger_query)
    

    Example

    Following are the programs −

    $dbhost = ''localhost
    $dbuser = ''root
    $dbpass = ''password
    $db = ''TUTORIALS
    $mysqli = new mysqli($dbhost, $dbuser, $dbpass, $db);
    if ($mysqli->connect_errno) {
        printf("Connect failed: %s
    ", $mysqli->connect_error); exit(); } //printf(''Connected successfully.
    ''); $sql = "CREATE TRIGGER after_delete_trigger AFTER DELETE ON CUSTOMERS FOR EACH ROW BEGIN INSERT INTO OLD_CUSTOMERS VALUES (OLD.ID, OLD.NAME, OLD.AGE, OLD.ADDRESS, OLD.SALARY); END"; if ($mysqli->query($sql)) { printf("Trigger created successfully...!n"); } $q = "DELETE FROM CUSTOMERS WHERE ID = 3"; $result = $mysqli->query($q); if ($result == true) { printf("Delete query executed successfully ...!n"); } $q1 = "SELECT * FROM CUSTOMERS"; $res1 = $mysqli->query($q1); if ($res1->num_rows > 0) { printf("SELECT * FROM CUSTOMERS(verification): n"); while ($r1 = $res1->fetch_assoc()) { printf( "Id %d, Name: %s, Age: %d, Address %s, Salary %f", $r1[''ID''], $r1["NAME"], $r1[''AGE''], $r1["ADDRESS"], $r1["SALARY"], ); printf("n"); } } $q2 = "SELECT * FROM OLD_CUSTOMERS"; $res2 = $mysqli->query($q2); if ($res2->num_rows > 0) { printf("SELECT * FROM OLD_CUSTOMER(verification): n"); while ($r1 = $res2->fetch_assoc()) { printf( "Id %d, Name: %s, Age: %d, Address %s, Salary %f", $r1[''ID''], $r1["NAME"], $r1[''AGE''], $r1["ADDRESS"], $r1["SALARY"], ); printf("n"); } } if ($mysqli->error) { printf("Error message: ", $mysqli->error); } $mysqli->close();

    Output

    The output obtained is as follows −

    Trigger created successfully...!
    Delete query executed successfully ...!
    SELECT * FROM CUSTOMERS(verification):
    Id 1, Name: Ramesh, Age: 32, Address Ahmedabad, Salary 2000.000000
    Id 2, Name: Khilan, Age: 25, Address Delhi, Salary 1500.000000
    Id 4, Name: Chaitali, Age: 25, Address Mumbai, Salary 6500.000000
    Id 5, Name: Hardik, Age: 27, Address Bhopal, Salary 8500.000000
    Id 6, Name: Komal, Age: 22, Address MP, Salary 4500.000000
    Id 7, Name: Muffy, Age: 24, Address Indore, Salary 10000.000000
    SELECT * FROM OLD_CUSTOMER(verification):
    Id 3, Name: Kaushik, Age: 23, Address Kota, Salary 2000.000000
    
    var mysql = require(''mysql2'');
    var con = mysql.createConnection({
    host:"localhost",
    user:"root",
    password:"password"
    });
    
     //Connecting to MySQL
     con.connect(function(err) {
     if (err) throw err;
      //console.log("Connected successfully...!");
      //console.log("--------------------------");
     sql = "USE TUTORIALS";
     con.query(sql);
     sql = `CREATE TRIGGER after_delete_trigger AFTER DELETE ON CUSTOMERS FOR EACH ROW
     BEGIN
     INSERT INTO OLD_CUSTOMERS VALUES (OLD.ID, OLD.NAME, OLD.AGE, OLD.ADDRESS, OLD.SALARY);
     END`;
     con.query(sql);
     console.log("After delete query executed successfully..!");
     sql = "DELETE FROM CUSTOMERS WHERE ID = 3";
     con.query(sql);
     console.log("Customers table records: ")
     sql = "SELECT * FROM CUSTOMERS";
     con.query(sql, function(err, result){
     if (err) throw err;
     console.log(result);
     console.log(''---------------------------------'');
     console.log(''OLD_CUSTOMERS table records: '')
     });
     sql = "SELECT * FROM OLD_CUSTOMERS";
     con.query(sql, function(err, result){
     if (err) throw err;
     console.log(result);
     });
    });
    

    Output

    The output produced is as follows −

    After delete query executed successfully..!
    Customers table records:
    [
      {
        ID: 1,
        NAME: ''Ramesh'',
        AGE: 32,
        ADDRESS: ''Ahmedabad'',
        SALARY: ''2000.00''
      },
      {
        ID: 2,
        NAME: ''Khilan'',
        AGE: 25,
        ADDRESS: ''Delhi'',
        SALARY: ''1500.00''
      },
      {
        ID: 4,
        NAME: ''Chaitali'',
        AGE: 25,
        ADDRESS: ''Mumbai'',
        SALARY: ''6500.00''
      },
      {
        ID: 5,
        NAME: ''Hardik'',
        AGE: 27,
        ADDRESS: ''Bhopal'',
        SALARY: ''8500.00''
      },
      { ID: 6, NAME: ''Komal'', AGE: 22, ADDRESS: ''MP'', SALARY: ''4500.00'' },
      {
        ID: 7,
        NAME: ''Muffy'',
        AGE: 24,
        ADDRESS: ''Indore'',
        SALARY: ''10000.00''
      }
    ]
    ---------------------------------
    OLD_CUSTOMERS table records:
    [
      {
        ID: 3,
        NAME: ''Kaushik'',
        AGE: 23,
        ADDRESS: ''Kota'',
        SALARY: ''2000.00''
      }
    ]
    
    import java.sql.Connection;
    import java.sql.DriverManager;
    import java.sql.ResultSet;
    import java.sql.Statement;
    public class AfterDeleteTrigger {
        public static void main(String[] args) {
            String url = "jdbc:mysql://localhost:3306/TUTORIALS";
            String user = "root";
            String password = "password";
            ResultSet rs;
            try {
                Class.forName("com.mysql.cj.jdbc.Driver");
                Connection con = DriverManager.getConnection(url, user, password);
                Statement st = con.createStatement();
                //System.out.println("Database connected successfully...!");
                 //create table
                String sql = "CREATE TABLE CUSTOMERS (ID INT NOT NULL, NAME VARCHAR(20) NOT NULL, AGE INT NOT NULL, ADDRESS VARCHAR(25), SALARY DECIMAL(18, 2), PRIMARY KEY(ID))";
                st.execute(sql);
                System.out.println("Customers table created successfully...!");
                //lets insert some records into customers table
                String sql1 = "INSERT INTO CUSTOMERS VALUES (1, ''Ramesh'', 32, ''Ahmedabad'', 2000.00 ), (2, ''Khilan'', 25, ''Delhi'', 1500.00 ), (3, ''Kaushik'', 23, ''Kota'', 2000.00 ), (4, ''Chaitali'', 25, ''Mumbai'', 6500.00 ), (5, ''Hardik'', 27, ''Bhopal'', 8500.00 ), (6, ''Komal'', 22, ''MP'', 4500.00 ), (7, ''Muffy'', 24, ''Indore'', 10000.00 )";
                st.execute(sql1);
                System.out.println("Records inserted successfully...!");
                //print table records
                String sql2 = "SELECT * FROM CUSTOMERS";
                rs = st.executeQuery(sql2);
                System.out.println("Customers table records: ");
                while(rs.next()) {
                    String id = rs.getString("id");
                    String name = rs.getString("name");
                    String age = rs.getString("age");
                    String address = rs.getString("address");
                    String salary = rs.getString("salary");
                    System.out.println("Id: " + id + ", Name: " + name + ", Age: " + age + ", Address: " + address + ", Salary: " + salary);
                }
                //let create one more table named Old_customers
                String sql3 = "CREATE TABLE OLD_CUSTOMERS (ID INT NOT NULL, NAME VARCHAR(20) NOT NULL, AGE INT NOT NULL, ADDRESS VARCHAR(25), SALARY DECIMAL(18, 2), PRIMARY KEY(ID))";
                st.execute(sql3);
                System.out.println("OLD_CUSTOMERS table created successully...!");
                //print the records
                String sql4 = "SELECT * FROM OLD_CUSTOMERS";
                rs = st.executeQuery(sql4);
                System.out.println("OLD_CUSTOMERS table records before delete trigger: ");
                while(rs.next()) {
                    String id = rs.getString("id");
                    String name = rs.getString("name");
                    String age = rs.getString("age");
                    String address = rs.getString("address");
                    String salary = rs.getString("salary");
                    System.out.println("Id: " + id + ", Name: " + name + ", Age: " + age + ", Address: " + address + ", Salary: " + salary);
                }
                //lets create trigger on student table
                String sql5 = "CREATE TRIGGER after_delete_trigger AFTER DELETE ON CUSTOMERS FOR EACH ROW BEGIN INSERT INTO OLD_CUSTOMERS VALUES (OLD.ID, OLD.NAME, OLD.AGE, OLD.ADDRESS, OLD.SALARY);
                END";
                st.execute(sql5);
                System.out.println("Triggerd Created successfully...!");
                //lets delete one record from customers table;
                String d_sql = "DELETE FROM CUSTOMERS WHERE ID = 3";
                st.execute(d_sql);
                System.out.println("Record with id = 3 deleted successfully....!");
                //let print OLD_CUSTOMERS table records
                String sql6 = "SELECT * FROM OLD_CUSTOMERS";
                rs = st.executeQuery(sql6);
                System.out.println("OLD_CUSTOMERS records: ");
                while(rs.next()) {
                    String id = rs.getString("id");
                    String name = rs.getString("name");
                    String age = rs.getString("age");
                    String address = rs.getString("address");
                    String salary = rs.getString("salary");
                    System.out.println("Id: " + id + ", Name: " + name + ", Age: " + age + ", Address: " + address + ", Salary: " + salary);
                }
            }catch(Exception e) {
                e.printStackTrace();
            }
        }
    }
    

    Output

    The output obtained is as shown below −

    Customers table created successfully...!
    Records inserted successfully...!
    Customers table records:
    Id: 1, Name: Ramesh, Age: 32, Address: Ahmedabad, Salary: 2000.00
    Id: 2, Name: Khilan, Age: 25, Address: Delhi, Salary: 1500.00
    Id: 3, Name: Kaushik, Age: 23, Address: Kota, Salary: 2000.00
    Id: 4, Name: Chaitali, Age: 25, Address: Mumbai, Salary: 6500.00
    Id: 5, Name: Hardik, Age: 27, Address: Bhopal, Salary: 8500.00
    Id: 6, Name: Komal, Age: 22, Address: MP, Salary: 4500.00
    Id: 7, Name: Muffy, Age: 24, Address: Indore, Salary: 10000.00
    OLD_CUSTOMERS table created successully...!
    OLD_CUSTOMERS table records before delete trigger:
    Triggerd Created successfully...!
    Record with id = 3 deleted successfully....!
    OLD_CUSTOMERS records:
    Id: 3, Name: Kaushik, Age: 23, Address: Kota, Salary: 2000.00
    
    import mysql.connector
    # Establishing the connection
    connection = mysql.connector.connect(
        host=''localhost'',
        user=''root'',
        password=''password'',
        database=''tut''
    )
    # Creating a cursor object
    cursorObj = connection.cursor()
    table_name = ''Customers''
    another_table = ''OLD_CUSTOMERS''
    trigger_name = ''after_delete_trigger''
    afterDelete_trigger_query = f''''''
    CREATE TRIGGER {trigger_name}
    AFTER DELETE ON {table_name}
    FOR EACH ROW
    BEGIN
    INSERT INTO {another_table} VALUES (OLD.ID, OLD.NAME, OLD.AGE, OLD.ADDRESS, OLD.SALARY);
    END
    ''''''
    cursorObj.execute(afterDelete_trigger_query)
    print(f"AFTER DELETE Trigger ''{trigger_name}'' is created successfully.")
    connection.commit()
    # Delete details of old customer
    delete_query = "DELETE FROM Customers WHERE ID = 3;"
    cursorObj.execute(delete_query)
    print("Delete query executed successfully.")
    # close the cursor and connection
    connection.commit()
    cursorObj.close()
    connection.close()
    

    Output

    Following is the output of the above code −

    AFTER DELETE Trigger ''after_delete_trigger'' is created successfully.
    Delete query executed successfully.
    

    Khóa học lập trình tại Toidayhoc vừa học vừa làm dự án vừa nhận lương: Khóa học lập trình nhận lương tại trung tâm Toidayhoc

  • Khóa học miễn phí MySQL – Before Delete Trigger nhận dự án làm có lương

    MySQL – Before Delete Trigger

    Table of content


    In MySQL, a trigger is defined a special stored procedure that resides in the system catalogue, and is executed whenever an event is performed. It is called a special stored procedure as it does not require to be invoked explicitly like other stored procedures. The trigger acts automatically whenever the desired event is fired. Triggers are categorized into two types −

    • Before Triggers

    • After Triggers

    These triggers can be a response to either insertion operation on a table, update operation or deletion operation. Thus, these special stored procedures respond whenever INSERT, UPDATE or DELETE statements are executed.

    MySQL Before Delete Trigger

    The Before Delete Trigger is a row-level trigger supported by the MySQL database. The Before Delete Trigger is executed right before a value is deleted from a row of a database table.

    A row-level trigger is a type of trigger that goes off every time a row is modified. Simply, for every single transaction made in a table (like insertion, deletion, update), one trigger acts automatically.

    With this trigger, whenever a DELETE statement is executed in the database, the value is deleted from a table first followed by execution of the trigger set.

    Syntax

    Following is the syntax to create the BEFORE DELETE trigger in MySQL −

    CREATE TRIGGER trigger_name
    BEFORE DELETE ON table_name FOR EACH ROW
    BEGIN
       -- trigger body
    END;
    

    Example

    In this example, we are creating a table named ”CUSTOMERS”, to demonstrate the BEFORE DELETE trigger on, using the following query −

    CREATE TABLE CUSTOMERS(
       ID INT NOT NULL,
       NAME VARCHAR(20) NOT NULL,
       AGE INT NOT NULL,
       ADDRESS VARCHAR(25),
       SALARY DECIMAL(18, 2),
       PRIMARY KEY(ID)
    );
    

    Insert values into this table created using the following INSERT statements −

    INSERT INTO CUSTOMERS VALUES
    (1, ''Ramesh'', 32, ''Ahmedabad'', 2000.00 ),
    (2, ''Khilan'', 25, ''Delhi'', 1500.00 ),
    (3, ''Kaushik'', 23, ''Kota'', 2000.00 ),
    (4, ''Chaitali'', 25, ''Mumbai'', 6500.00 ),
    (5, ''Hardik'', 27, ''Bhopal'', 8500.00 ),
    (6, ''Komal'', 22, ''MP'', 4500.00 ),
    (7, ''Muffy'', 24, ''Indore'', 10000.00 );
    

    Creating Another Table

    Now, let us create another empty table to store all former customers after being deleted from the main table ”CUSTOMERS” −

    CREATE TABLE OLD_CUSTOMERS (
       ID INT NOT NULL,
       NAME VARCHAR(20) NOT NULL,
       AGE INT NOT NULL,
       ADDRESS VARCHAR(25),
       SALARY DECIMAL(18, 2),
       PRIMARY KEY(ID)
    );
    

    Using the following CREATE TRIGGER statement, create a new trigger ”before_delete_trigger” on the CUSTOMERS table to delete the customer details from CUSTOMERS table and insert them into another table “OLD_CUSTOMERS” −

    DELIMITER //
    CREATE TRIGGER before_delete_trigger
    BEFORE DELETE ON CUSTOMERS
    FOR EACH ROW
    BEGIN
     INSERT INTO OLD_CUSTOMERS VALUES
     (OLD.ID, OLD.NAME, OLD.AGE, OLD.ADDRESS, OLD.SALARY);
    END //
    DELIMITER ;
    

    Delete details of ”old” customers from the CUSTOMERS table using the regular DELETE statement as shown below −

    DELETE FROM CUSTOMERS WHERE ID = 3;
    

    Verification

    To verify whether the details are deleted from the OCUSTOMERS table and added onto the OLD_CUSTOMERS table, let us try to retrieve both of their result-sets using SELECT queries.

    The records in CUSTOMERS table are as follows −

    ID NAME AGE ADDRESS SALARY
    1 Ramesh 32 Ahmedabad 2000.00
    2 Khilan 25 Delhi 1500.00
    4 Chaitali 25 Mumbai 6500.00
    5 Hardik 27 Bhopal 8500.00
    6 Komal 22 Hyderabad 4500.00
    7 Muffy 24 Indore 10000.00

    The records in OLD_CUSTOMERS table are as follows −

    ID NAME AGE ADDRESS SALARY
    3 Kaushik 23 Kota 2000.00

    As you can in the tables above, the data has been deleted from the CUSTOMERS table and added to the OLD_CUSTOMERS table.

    Before Delete Trigger Using Client Program

    We can also execute the Before Delete trigger statement using a client program, instead of SQL queries.

    Syntax

    To execute the Before Delete Trigger through a PHP program, we need to query the CREATE TRIGGER statement using the mysqli function query() as follows −

    $sql = "CREATE TRIGGER before_delete_trigger BEFORE DELETE ON CUSTOMERS FOR EACH ROW
    BEGIN
    INSERT INTO OLD_CUSTOMERS VALUES (OLD.ID, OLD.NAME, OLD.AGE, OLD.ADDRESS, OLD.SALARY);
    END";
    $mysqli->query($sql);
    

    To execute the Before Delete Trigger through a JavaScript program, we need to query the CREATE TRIGGER statement using the query() function of mysql2 library as follows −

    sql = `CREATE TRIGGER before_delete_trigger BEFORE DELETE ON CUSTOMERS FOR EACH ROW
    BEGIN
    INSERT INTO OLD_CUSTOMERS VALUES (OLD.ID, OLD.NAME, OLD.AGE, OLD.ADDRESS, OLD.SALARY);
    END`;
    con.query(sql);
    

    To execute the Before Delete Trigger through a Java program, we need to query the CREATE TRIGGER statement using the JDBC function execute() as follows −

    String sql = "CREATE TRIGGER before_delete_trigger BEFORE DELETE ON CUSTOMERS FOR EACH ROW BEGIN INSERT INTO OLD_CUSTOMERS VALUES (OLD.ID, OLD.NAME, OLD.AGE, OLD.ADDRESS, OLD.SALARY);
    END";
    statement.execute(sql);
    

    To execute the Before Delete Trigger through a python program, we need to query the CREATE TRIGGER statement using the execute() function of the MySQL Connector/Python as follows −

    beforeDelete_trigger_query = ''CREATE TRIGGER {trigger_name}
    BEFORE DELETE ON {table_name}
    FOR EACH ROW
    BEGIN
    INSERT INTO {another_table} VALUES (OLD.ID, OLD.NAME, OLD.AGE, OLD.ADDRESS, OLD.SALARY);
    END''
    cursorObj.execute(beforeDelete_trigger_query)
    

    Example

    Following are the programs −

    $dbhost = ''localhost
    $dbuser = ''root
    $dbpass = ''password
    $db = ''TUTORIALS
    $mysqli = new mysqli($dbhost, $dbuser, $dbpass, $db);
    if ($mysqli->connect_errno) {
        printf("Connect failed: %s
    ", $mysqli->connect_error); exit(); } //printf(''Connected successfully.
    ''); $sql = "CREATE TRIGGER before_delete_trigger BEFORE DELETE ON CUSTOMERS FOR EACH ROW BEGIN INSERT INTO OLD_CUSTOMERS VALUES (OLD.ID, OLD.NAME, OLD.AGE, OLD.ADDRESS, OLD.SALARY); END"; if ($mysqli->query($sql)) { printf("Trigger created successfully...!n"); } $q = "DELETE FROM CUSTOMERS WHERE ID = 3"; $result = $mysqli->query($q); if ($result == true) { printf("Delete query executed successfully ...!n"); } $q1 = "SELECT * FROM CUSTOMERS"; $res1 = $mysqli->query($q1); if ($res1->num_rows > 0) { printf("SELECT * FROM CUSTOMERS(verification): n"); while($r1 = $res1->fetch_assoc()){ printf("Id %d, Name: %s, Age: %d, Address %s, Salary %f", $r1[''ID''], $r1["NAME"], $r1[''AGE''], $r1["ADDRESS"], $r1["SALARY"],); printf("n"); } } $q2 = "SELECT * FROM OLD_CUSTOMERS"; $res2 = $mysqli->query($q2); if ($res2->num_rows > 0) { printf("SELECT * FROM OLD_CUSTOMER(verification): n"); while($r1 = $res2->fetch_assoc()){ printf("Id %d, Name: %s, Age: %d, Address %s, Salary %f", $r1[''ID''], $r1["NAME"], $r1[''AGE''], $r1["ADDRESS"], $r1["SALARY"],); printf("n"); } } if ($mysqli->error) { printf("Error message: ", $mysqli->error); } $mysqli->close();

    Output

    The output obtained is as follows −

    Trigger created successfully...!
    Delete query executed successfully ...!
    SELECT * FROM CUSTOMERS(verification):
    Id 1, Name: Ramesh, Age: 32, Address Ahmedabad, Salary 2000.000000
    Id 2, Name: Khilan, Age: 25, Address Delhi, Salary 1500.000000
    Id 4, Name: Chaitali, Age: 25, Address Mumbai, Salary 6500.000000
    Id 5, Name: Hardik, Age: 27, Address Bhopal, Salary 8500.000000
    Id 6, Name: Komal, Age: 22, Address MP, Salary 4500.000000
    Id 7, Name: Muffy, Age: 24, Address Indore, Salary 10000.000000
    SELECT * FROM OLD_CUSTOMER(verification):
    Id 3, Name: kaushik, Age: 23, Address Kota, Salary 2000.000000
    
    var mysql = require(''mysql2'');
    var con = mysql.createConnection({
    host:"localhost",
    user:"root",
    password:"password"
    });
    
     //Connecting to MySQL
     con.connect(function(err) {
     if (err) throw err;
      //console.log("Connected successfully...!");
      //console.log("--------------------------");
     sql = "USE TUTORIALS";
     con.query(sql);
     sql = `CREATE TRIGGER before_delete_trigger BEFORE DELETE ON CUSTOMERS FOR EACH ROW
     BEGIN
     INSERT INTO OLD_CUSTOMERS VALUES (OLD.ID, OLD.NAME, OLD.AGE, OLD.ADDRESS, OLD.SALARY);
     END`;
     con.query(sql);
     console.log("Before delete query executed successfully..!");
     sql = "DELETE FROM CUSTOMERS WHERE ID = 3";
     console.log("Delete query executed successfully...!");
     con.query(sql);
     console.log("Customers table records: ")
     sql = "SELECT * FROM CUSTOMERS";
     con.query(sql, function(err, result){
     if (err) throw err;
     console.log(result);
     console.log(''---------------------------------'');
     console.log(''OLD_CUSTOMERS table records: '')
     });
     sql = "SELECT * FROM OLD_CUSTOMERS";
     con.query(sql, function(err, result){
     if (err) throw err;
     console.log(result);
     });
    });
    

    Output

    The output produced is as follows −

    After delete query executed successfully..!
    Delete query executed successfully...!
    Customers table records:
    [
      {
        ID: 1,
        NAME: ''Ramesh'',
        AGE: 32,
        ADDRESS: ''Ahmedabad'',
        SALARY: ''2000.00''
      },
      {
        ID: 2,
        NAME: ''Khilan'',
        AGE: 25,
        ADDRESS: ''Delhi'',
        SALARY: ''1500.00''
      },
      {
        ID: 4,
        NAME: ''Chaitali'',
        AGE: 25,
        ADDRESS: ''Mumbai'',
        SALARY: ''6500.00''
      },
      {
        ID: 5,
        NAME: ''Hardik'',
        AGE: 27,
        ADDRESS: ''Bhopal'',
        SALARY: ''8500.00''
      },
      { ID: 6, NAME: ''Komal'', AGE: 22, ADDRESS: ''MP'', SALARY: ''4500.00'' },
      {
        ID: 7,
        NAME: ''Muffy'',
        AGE: 24,
        ADDRESS: ''Indore'',
        SALARY: ''10000.00''
      }
    ]
    ---------------------------------
    OLD_CUSTOMERS table records:
    [
      {
        ID: 3,
        NAME: ''kaushik'',
        AGE: 23,
        ADDRESS: ''Kota'',
        SALARY: ''2000.00''
      }
    ]
    
    import java.sql.Connection;
    import java.sql.DriverManager;
    import java.sql.ResultSet;
    import java.sql.Statement;
    public class BeforeDeleteTrigger {
        public static void main(String[] args) {
            String url = "jdbc:mysql://localhost:3306/TUTORIALS";
            String user = "root";
            String password = "password";
            ResultSet rs;
            try {
                Class.forName("com.mysql.cj.jdbc.Driver");
                Connection con = DriverManager.getConnection(url, user, password);
                Statement st = con.createStatement();
                //System.out.println("Database connected successfully...!");
                 //create table
                String sql = "CREATE TABLE CUSTOMERS (ID INT NOT NULL, NAME VARCHAR(20) NOT NULL, AGE INT NOT NULL, ADDRESS VARCHAR(25), SALARY DECIMAL(18, 2), PRIMARY KEY(ID))";
                st.execute(sql);
                System.out.println("Customers table created successfully...!");
                //lets insert some records into customers table
                String sql1 = "INSERT INTO CUSTOMERS VALUES (1, ''Ramesh'', 32, ''Ahmedabad'', 2000.00 ), (2, ''Khilan'', 25, ''Delhi'', 1500.00 ), (3, ''kaushik'', 23, ''Kota'', 2000.00 ), (4, ''Chaitali'', 25, ''Mumbai'', 6500.00 ), (5, ''Hardik'', 27, ''Bhopal'', 8500.00 ), (6, ''Komal'', 22, ''MP'', 4500.00 ), (7, ''Muffy'', 24, ''Indore'', 10000.00 )";
                st.execute(sql1);
                System.out.println("Records inserted successfully...!");
                //print table records
                String sql2 = "SELECT * FROM CUSTOMERS";
                rs = st.executeQuery(sql2);
                System.out.println("Customers table records: ");
                while(rs.next()) {
                    String id = rs.getString("id");
                    String name = rs.getString("name");
                    String age = rs.getString("age");
                    String address = rs.getString("address");
                    String salary = rs.getString("salary");
                    System.out.println("Id: " + id + ", Name: " + name + ", Age: " + age + ", Address: " + address + ", Salary: " + salary);
                }
                //let create one more table named Old_customers
                String sql3 = "CREATE TABLE OLD_CUSTOMERS (ID INT NOT NULL, NAME VARCHAR(20) NOT NULL, AGE INT NOT NULL, ADDRESS VARCHAR(25), SALARY DECIMAL(18, 2), PRIMARY KEY(ID))";
                st.execute(sql3);
                System.out.println("OLD_CUSTOMERS table created successully...!");
                //print the records
                String sql4 = "SELECT * FROM OLD_CUSTOMERS";
                rs = st.executeQuery(sql4);
                System.out.println("OLD_CUSTOMERS table records before delete trigger: ");
                while(rs.next()) {
                    String id = rs.getString("id");
                    String name = rs.getString("name");
                    String age = rs.getString("age");
                    String address = rs.getString("address");
                    String salary = rs.getString("salary");
                    System.out.println("Id: " + id + ", Name: " + name + ", Age: " + age + ", Address: " + address + ", Salary: " + salary);
                }
                //lets create trigger on student table
                String sql5 = "CREATE TRIGGER before_delete_trigger BEFORE DELETE ON CUSTOMERS FOR EACH ROW BEGIN INSERT INTO OLD_CUSTOMERS VALUES (OLD.ID, OLD.NAME, OLD.AGE, OLD.ADDRESS, OLD.SALARY); END";
                st.execute(sql5);
                System.out.println("Triggerd Created successfully...!");
                //lets delete one record from customers table;
                String d_sql = "DELETE FROM CUSTOMERS WHERE ID = 3";
                st.execute(d_sql);
                System.out.println("Record with id = 3 deleted successfully....!");
                //let print OLD_CUSTOMERS table records
                String sql6 = "SELECT * FROM OLD_CUSTOMERS";
                rs = st.executeQuery(sql6);
                System.out.println("OLD_CUSTOMERS records: ");
                while(rs.next()) {
                    String id = rs.getString("id");
                    String name = rs.getString("name");
                    String age = rs.getString("age");
                    String address = rs.getString("address");
                    String salary = rs.getString("salary");
                    System.out.println("Id: " + id + ", Name: " + name + ", Age: " + age + ", Address: " + address + ", Salary: " + salary);
                }
            }catch(Exception e) {
                e.printStackTrace();
            }
        }
    }
    

    Output

    The output obtained is as shown below −

    Customers table created successfully...!
    Records inserted successfully...!
    Customers table records:
    Id: 1, Name: Ramesh, Age: 32, Address: Ahmedabad, Salary: 2000.00
    Id: 2, Name: Khilan, Age: 25, Address: Delhi, Salary: 1500.00
    Id: 3, Name: kaushik, Age: 23, Address: Kota, Salary: 2000.00
    Id: 4, Name: Chaitali, Age: 25, Address: Mumbai, Salary: 6500.00
    Id: 5, Name: Hardik, Age: 27, Address: Bhopal, Salary: 8500.00
    Id: 6, Name: Komal, Age: 22, Address: MP, Salary: 4500.00
    Id: 7, Name: Muffy, Age: 24, Address: Indore, Salary: 10000.00
    OLD_CUSTOMERS table created successully...!
    OLD_CUSTOMERS table records before delete trigger:
    Triggerd Created successfully...!
    Record with id = 3 deleted successfully....!
    OLD_CUSTOMERS records:
    Id: 3, Name: kaushik, Age: 23, Address: Kota, Salary: 2000.00
    
    import mysql.connector
    # Establishing the connection
    connection = mysql.connector.connect(
        host=''localhost'',
        user=''root'',
        password=''password'',
        database=''tut''
    )
    # Creating a cursor object
    cursorObj = connection.cursor()
    table_name = ''Customers''
    another_table = ''OLD_CUSTOMERS''
    trigger_name = ''before_delete_trigger''
    beforeDelete_trigger_query = f''''''
    CREATE TRIGGER {trigger_name}
    BEFORE DELETE ON {table_name}
    FOR EACH ROW
    BEGIN
    INSERT INTO {another_table} VALUES (OLD.ID, OLD.NAME, OLD.AGE, OLD.ADDRESS, OLD.SALARY);
    END
    ''''''
    cursorObj.execute(beforeDelete_trigger_query)
    print(f"BEFORE DELETE Trigger ''{trigger_name}'' is created successfully.")
    connection.commit()
    # Delete details of old customer
    delete_query = "DELETE FROM Customers WHERE ID = 3;"
    cursorObj.execute(delete_query)
    print("Delete query executed successfully.")
    # close the cursor and connection
    connection.commit()
    cursorObj.close()
    connection.close()
    

    Output

    Following is the output of the above code −

    BEFORE DELETE Trigger ''before_delete_trigger'' is created successfully.
    Delete query executed successfully.
    

    Khóa học lập trình tại Toidayhoc vừa học vừa làm dự án vừa nhận lương: Khóa học lập trình nhận lương tại trung tâm Toidayhoc

  • Khóa học miễn phí MySQL – After Update Trigger nhận dự án làm có lương

    MySQL – After Update Trigger

    Table of content


    A Trigger is simply defined as a response to an event. In MySQL, a trigger is a special stored procedure that resides in the system catalogue, and is executed whenever an event is performed. It is called a special stored procedure as it does not require to be invoked explicitly like other stored procedures. The trigger acts automatically whenever the desired event is fired.

    MySQL After Update Trigger

    The After Update Trigger is a row-level trigger supported by the MySQL database. As its name suggests, the After Update Trigger is executed right after a value is updated in a row of a database table.

    A row-level trigger is a type of trigger that goes off every time a row is modified. Simply, for every single transaction made in a table (like insertion, deletion, update), one trigger acts automatically.

    Once the After Update trigger is defined in MySQL, whenever an UPDATE statement is executed in the database, the value of a table is updated first followed by execution of the trigger set.

    Syntax

    Following is the syntax to create the AFTER UPDATE trigger in MySQL −

    CREATE TRIGGER trigger_name
    AFTER UPDATE ON table_name FOR EACH ROW
    BEGIN
       -- trigger body
    END;
    

    Example

    Let us first create a table named USERS containing the details of users of an application. Use the following CREATE TABLE query to do so −

    CREATE TABLE USERS(
       ID INT AUTO_INCREMENT,
       NAME VARCHAR(100) NOT NULL,
       AGE INT NOT NULL,
       BIRTHDATE VARCHAR(100),
       PRIMARY KEY(ID)
    );
    

    Insert values into the USERS table using the regular INSERT statement as shown below −

    INSERT INTO USERS (NAME, AGE, BIRTHDATE) VALUES
    (''Sasha'', 23, ''24/06/1999'');
    (''Alex'', 21, ''12/01/2001'');
    

    The USERS table is created as follows −

    ID NAME AGE BIRTHDATE
    1 Sasha 23 24/06/1999
    2 Alex 21 12/01/2001

    Creating the trigger:

    Using the following CREATE TRIGGER statement, create a new trigger ”after_update_trigger” on the USERS table to display a customized error using SQLSTATE as follows −

    DELIMITER //
    CREATE TRIGGER after_update_trigger AFTER UPDATE ON USERS FOR EACH ROW
    BEGIN
    IF NEW.AGE < 0
    THEN SIGNAL SQLSTATE ''45000''
    SET MESSAGE_TEXT = ''Age Cannot be Negative
    END IF;
    END //
    DELIMITER ;
    

    Update values of the SAMPLE table using the regular UPDATE statement as shown below −

    UPDATE SAMPLE SET AGE = -1 WHERE NAME = ''Sasha
    

    Output

    An error is displayed as the output for this query −

    ERROR 1644 (45000): Age Cannot be Negative
    

    After Update Trigger Using a Client Program

    We can also execute the After Update Triggers in MySQL database using a client program instead of querying SQL statements directly.

    Syntax

    To execute the After Update Trigger through a PHP program, we need to execute the CREATE TRIGGER statement using the mysqli function query() as follows −

    $sql = "CREATE TRIGGER after_update_trigger AFTER UPDATE ON SAMPLE FOR EACH ROW
    BEGIN
    IF NEW.AGE < 0 THEN SIGNAL SQLSTATE ''45000'' SET MESSAGE_TEXT = ''Age Cannot be Negative
    END IF;
    END ";
    $mysqli->query($sql);
    

    To execute the After Update Trigger through a JavaScript program, we need to execute the CREATE TRIGGER statement using the query() function of mysql2 library as follows −

    sql = `CREATE TRIGGER after_update_trigger AFTER UPDATE ON SAMPLE FOR EACH ROW
    BEGIN
    IF NEW.AGE < 0 THEN SIGNAL SQLSTATE ''45000'' SET MESSAGE_TEXT = ''Age Cannot be Negative
    END IF;
    END`;
    con.query(sql);
    

    To execute the After Update Trigger through a Java program, we need to execute the CREATE TRIGGER statement using the JDBC function execute() as follows −

    String sql = "CREATE TRIGGER after_update_trigger AFTER UPDATE ON SAMPLE FOR EACH ROW BEGIN IF NEW.AGE < 0 THEN SIGNAL SQLSTATE ''45000'' SET MESSAGE_TEXT = ''Age Cannot be Negative
    END IF;
    END";
    statement.execute(sql);
    

    To execute the After Update Trigger through a python program, we need to execute the CREATE TRIGGER statement using the execute() function of the MySQL Connector/Python as follows −

    afterUpdate_trigger_query = ''CREATE TRIGGER {trigger_name}
    AFTER UPDATE ON {table_name}
    FOR EACH ROW
    BEGIN
    IF NEW.AGE < 0
    THEN SIGNAL SQLSTATE ''45000''
    SET MESSAGE_TEXT = ''Age Cannot be Negative
    END IF
    END''
    cursorObj.execute(afterUpdate_trigger_query)
    

    Example

    Following are the programs −

    $dbhost = ''localhost
    $dbuser = ''root
    $dbpass = ''password
    $db = ''TUTORIALS
    $mysqli = new mysqli($dbhost, $dbuser, $dbpass, $db);
    if($mysqli->connect_errno ) {
       printf("Connect failed: %s
    ", $mysqli->connect_error); exit(); } //printf(''Connected successfully.
    ''); $sql = "CREATE TRIGGER after_update_trigger AFTER UPDATE ON SAMPLE FOR EACH ROW BEGIN IF NEW.AGE < 0 THEN SIGNAL SQLSTATE ''45000'' SET MESSAGE_TEXT = ''Age Cannot be Negative END IF; END "; if($mysqli->query($sql)){ printf("Trigger created successfully...!n"); } $q = "UPDATE SAMPLE SET AGE = -1 WHERE NAME = ''Sasha''"; $result = $mysqli->query($q); if ($result == true) { printf("Record updated successfully...!n"); } if($mysqli->error){ printf("Error message: " , $mysqli->error); } $mysqli->close();

    Output

    The output obtained is as follows −

    Trigger created successfully...!
    PHP Fatal error:  Uncaught mysqli_sql_exception: Age Cannot be Negative
    
    var mysql = require(''mysql2'');
    var con = mysql.createConnection({
    host:"localhost",
    user:"root",
    password:"password"
    });
    
     //Connecting to MySQL
     con.connect(function(err) {
     if (err) throw err;
      //console.log("Connected successfully...!");
      //console.log("--------------------------");
     sql = "USE TUTORIALS";
     con.query(sql);
     sql = `CREATE TRIGGER after_update_trigger AFTER UPDATE ON SAMPLE FOR EACH ROW
     BEGIN
     IF NEW.AGE < 0 THEN SIGNAL SQLSTATE ''45000'' SET MESSAGE_TEXT = ''Age Cannot be Negative
     END IF;
     END`;
     con.query(sql);
     console.log("After Update query executed successfully..!");
     sql = "UPDATE SAMPLE SET AGE = -1 WHERE NAME = ''Sasha''";
     con.query(sql);
     console.log("Table records: ")
     sql = "SELECT * FROM Sample";
     con.query(sql, function(err, result){
     if (err) throw err;
     console.log(result);
     });
    });
    

    Output

    The output produced is as follows −

    Error: Age Cannot be Negative
    
    import java.sql.Connection;
    import java.sql.DriverManager;
    import java.sql.ResultSet;
    import java.sql.Statement;
    public class AfterUpdateTrigger {
        public static void main(String[] args) {
            String url = "jdbc:mysql://localhost:3306/TUTORIALS";
            String user = "root";
            String password = "password";
            ResultSet rs;
            try {
                Class.forName("com.mysql.cj.jdbc.Driver");
                Connection con = DriverManager.getConnection(url, user, password);
                Statement st = con.createStatement();
                //System.out.println("Database connected successfully...!");
                String sql = "SELECT * FROM SAMPLE";
                rs = st.executeQuery(sql);
                System.out.println("Sample table records before update: ");
                while(rs.next()) {
                    String id = rs.getString("id");
                    String name = rs.getString("name");
                    String age = rs.getString("age");
                    String birth_date = rs.getString("BIRTHDATE");
                    System.out.println("Id: " + id + ", Name: " + name + ", Age: " + age + ", Birth_date: " + birth_date);
                }
                //lets create trigger on student table
                String sql1 = "CREATE TRIGGER after_update_trigger AFTER UPDATE ON SAMPLE FOR EACH ROW BEGIN IF NEW.AGE < 0 THEN SIGNAL SQLSTATE ''45000'' SET MESSAGE_TEXT = ''Age Cannot be Negative
                END IF;
                END";
                st.execute(sql1);
                System.out.println("Triggerd Created successfully...!");
                //let update the table records
                String sql3 = "UPDATE SAMPLE SET AGE = -1 WHERE NAME = ''Sasha''";
                st.execute(sql3);
                //let print SAMPLE table records
                String sql4 = "SELECT * FROM SAMPLE";
                rs = st.executeQuery(sql4);
                System.out.println("Sample table records after update: ");
                while(rs.next()) {
                    String id = rs.getString("id");
                    String name = rs.getString("name");
                    String age = rs.getString("age");
                    String birth_date = rs.getString("BIRTHDATE");
                    System.out.println("Id: " + id + ", Name: " + name + ", Age: " + age + ", Birth_date: " + birth_date);
                }
            }catch(Exception e) {
                e.printStackTrace();
            }
        }
    }
    

    Output

    The output obtained is as shown below −

    Sample table records before update:
    Id: 1, Name: Sasha, Age: 23, Birth_date: 24/06/1999
    Id: 2, Name: Alex, Age: 21, Birth_date: 12/01/2001
    Triggerd Created successfully...!
    java.sql.SQLException: Age Cannot be Negative
    
    import mysql.connector
    # Establishing the connection
    connection = mysql.connector.connect(
        host=''localhost'',
        user=''root'',
        password=''password'',
        database=''tut''
    )
    # Creating a cursor object
    cursorObj = connection.cursor()
    table_name = ''Sample''
    trigger_name = ''after_update_trigger''
    afterUpdate_trigger_query = f''''''CREATE TRIGGER {trigger_name}
    AFTER UPDATE ON {table_name}
    FOR EACH ROW
    BEGIN
    IF NEW.AGE < 0
    THEN SIGNAL SQLSTATE ''45000''
    SET MESSAGE_TEXT = ''Age Cannot be Negative
    END IF;
    END''''''
    cursorObj.execute(afterUpdate_trigger_query)
    print(f"AFTER UPDATE Trigger ''{trigger_name}'' is created successfully.")
    connection.commit()
    # Update the "AGE" column
    update_query = "UPDATE Sample SET AGE = -1 WHERE NAME = ''Sasha''"
    cursorObj.execute(update_query)
    print("Update query executed successfully.")
    # close the cursor and connection
    connection.commit()
    cursorObj.close()
    connection.close()
    

    Output

    Following is the output of the above code −

    AFTER UPDATE Trigger ''after_update_trigger'' is created successfully.
    Traceback (most recent call last):
      File "C:UsersLenovoAppDataLocalProgramsPythonPython310libsite-packagesmysqlconnectorconnection_cext.py", line 633, in cmd_query
        self._cmysql.query(
    _mysql_connector.MySQLInterfaceError: Age Cannot be Negative
    
    The above exception was the direct cause of the following exception:
    
    Traceback (most recent call last):
      File "C:UsersLenovoDesktopuntitled.py", line 29, in 
        cursorObj.execute(update_query)
      File "C:UsersLenovoAppDataLocalProgramsPythonPython310libsite-packagesmysqlconnectorcursor_cext.py", line 330, in execute
        result = self._cnx.cmd_query(
      File "C:UsersLenovoAppDataLocalProgramsPythonPython310libsite-packagesmysqlconnectoropentelemetrycontext_propagation.py", line 77, in wrapper
        return method(cnx, *args, **kwargs)
      File "C:UsersLenovoAppDataLocalProgramsPythonPython310libsite-packagesmysqlconnectorconnection_cext.py", line 641, in cmd_query
        raise get_mysql_exception(
    mysql.connector.errors.DatabaseError: 1644 (45000): Age Cannot be Negative
    

    Khóa học lập trình tại Toidayhoc vừa học vừa làm dự án vừa nhận lương: Khóa học lập trình nhận lương tại trung tâm Toidayhoc

  • Khóa học miễn phí MySQL – Before Insert Trigger nhận dự án làm có lương

    MySQL – Before Insert Trigger

    Table of content


    As we have already learned, a Trigger is defined as a response to an event performed. In MySQL, a trigger is called a special stored procedure as it does not require to be invoked explicitly like other stored procedures. The trigger acts automatically whenever the desired event is fired. These events include executing SQL statements like INSERT, UPDATE and DELETE etc.

    MySQL Before Insert Trigger

    The Before Insert Trigger is a row-level trigger supported by the MySQL database. As its name suggests, this trigger is executed right before a value is being inserted into a database table.

    A row-level trigger is a type of trigger that goes off every time a row is modified. Simply, for every single transaction made in a table (like insertion, deletion, update), one trigger acts automatically.

    Whenever an INSERT statement is queried in the database, this Trigger is automatically executed first and then only the value is inserted into the table.

    Syntax

    Following is the syntax to create the BEFORE INSERT trigger in MySQL −

    CREATE TRIGGER trigger_name
    BEFORE INSERT ON table_name FOR EACH ROW
    BEGIN
       -- trigger body
    END;
    

    Example

    Let us see an example demonstrating the BEFORE INSERT trigger. In here, we are creating a new table STUDENT which contains the details of students in an institution, using the following query −

    CREATE TABLE STUDENT(
       Name varchar(35),
       Age INT,
       Score INT,
       Grade CHAR(10)
    );
    

    Using the following CREATE TRIGGER statement, create a new trigger sample_trigger on the STUDENT table. Here, we are checking the score of each student and assigning them with a suitable grade.

    DELIMITER //
    CREATE TRIGGER sample_trigger
    BEFORE INSERT ON STUDENT FOR EACH ROW
    BEGIN
    IF NEW.Score < 35 THEN SET NEW.Grade = ''FAIL
    ELSE SET NEW.Grade = ''PASS
    END IF;
    END //
    DELIMITER ;
    

    Insert values into the STUDENT table using the regular INSERT statement as shown below −

    INSERT INTO STUDENT VALUES
    (''John'', 21, 76, NULL),
    (''Jane'', 20, 24, NULL),
    (''Rob'', 21, 57, NULL),
    (''Albert'', 19, 87, NULL);
    

    Verification

    To verify if the trigger has been executed, display the STUDENT table using the SELECT statement −

    Name Age Score Grade
    John 21 76 PASS
    Jane 20 24 FAIL
    Rob 21 57 PASS
    Albert 19 87 PASS

    Before Insert Trigger Using a Client Program

    In addition to create or show a trigger, we can also Perform the “Before Insert trigger” statement using a client program.

    Syntax

    To Perform the Before Insert Trigger through a PHP program, we need to execute the CREATE TRIGGER statement using the mysqli function query() as follows −

    $sql = "Create Trigger sample_trigger BEFORE INSERT ON STUDENT"."
    FOR EACH ROW
    BEGIN
    IF NEW.Score < 35 THEN SET NEW.Grade = ''FAIL
    ELSE SET NEW.Grade = ''PASS
    END IF;
    END";
    $mysqli->query($sql);
    

    To Perform the Before Insert Trigger through a JavaScript program, we need to execute the CREATE TRIGGER statement using the query() function of mysql2 library as follows −

    sql = `Create Trigger sample_trigger BEFORE INSERT ON STUDENT
    FOR EACH ROW
    BEGIN
    IF NEW.Score < 35 THEN SET NEW.Grade = ''FAIL
    ELSE SET NEW.Grade = ''PASS
    END IF;
    END`;
    con.query(sql);
    

    To Perform the Before Insert Trigger through a Java program, we need to execute the CREATE TRIGGER statement using the JDBC function execute() as follows −

    String sql = "Create Trigger sample_trigger BEFORE INSERT ON STUDENT FOR EACH ROW BEGIN IF NEW.Score < 35 THEN SET NEW.Grade = ''FAIL
    ELSE SET NEW.Grade = ''PASS
    END IF;
    END";
    statement.execute(sql);
    

    To Perform the Before Insert Trigger through a python program, we need to execute the CREATE TRIGGER statement using the execute() function of the MySQL Connector/Python as follows −

    beforeInsert_trigger_query = ''CREATE TRIGGER sample_trigger
    BEFORE INSERT ON student
    FOR EACH ROW
    BEGIN
    IF NEW.Score < 35
    THEN SET NEW.Grade = ''FAIL
    ELSE SET NEW.Grade = ''PASS
    END IF;
    END''
    cursorObj.execute(drop_trigger_query)
    

    Example

    Following are the programs −

       $dbhost = ''localhost
       $dbuser = ''root
       $dbpass = ''password
       $db = ''TUTORIALS
       $mysqli = new mysqli($dbhost, $dbuser, $dbpass, $db);
       if($mysqli->connect_errno ) {
          printf("Connect failed: %s
    ", $mysqli->connect_error); exit(); } //printf(''Connected successfully.
    ''); $sql = "Create Trigger sample_trigger BEFORE INSERT ON STUDENT"." FOR EACH ROW BEGIN IF NEW.Score < 35 THEN SET NEW.Grade = ''FAIL ELSE SET NEW.Grade = ''PASS END IF; END"; if($mysqli->query($sql)){ printf("Trigger created successfully...!n"); } $q = "INSERT INTO STUDENT VALUES (''John'', 21, 76, NULL)"; $result = $mysqli->query($q); if ($result == true) { printf("Record inserted successfully...!n"); } $q1 = "SELECT * FROM STUDENT"; if($r = $mysqli->query($q1)){ printf("Select query executed successfully...!"); printf("Table records(Verification): n"); while($row = $r->fetch_assoc()){ printf("Name: %s, Age: %d, Score %d, Grade %s", $row["Name"], $row["Age"], $row["Score"], $row["Grade"]); printf("n"); } } if($mysqli->error){ printf("Failed..!" , $mysqli->error); } $mysqli->close();

    Output

    The output obtained is as follows −

    Trigger created successfully...!
    Record inserted successfully...!
    Select query executed successfully...!Table records(Verification):
    Name: Jane, Age: 20, Score 24, Grade FAIL
    Name: John, Age: 21, Score 76, Grade PASS
    
    var mysql = require(''mysql2'');
    var con = mysql.createConnection({
    host:"localhost",
    user:"root",
    password:"password"
    });
    
     //Connecting to MySQL
     con.connect(function(err) {
     if (err) throw err;
      //console.log("Connected successfully...!");
      //console.log("--------------------------");
     sql = "USE TUTORIALS";
     con.query(sql);
     sql = `Create Trigger sample_trigger BEFORE INSERT ON STUDENT
     FOR EACH ROW
     BEGIN
     IF NEW.Score < 35 THEN SET NEW.Grade = ''FAIL
     ELSE SET NEW.Grade = ''PASS
     END IF;
     END`;
     con.query(sql);
     console.log("Before Insert query executed successfully..!");
     sql = "INSERT INTO STUDENT VALUES (''Aman'', 22, 86, NULL)";
     con.query(sql);
     console.log("Record inserted successfully...!");
     console.log("Table records: ")
     sql = "SELECT * FROM STUDENT";
     con.query(sql, function(err, result){
     if (err) throw err;
     console.log(result);
     });
    });
    

    Output

    The output produced is as follows −

    Before Insert query executed successfully..!
    Record inserted successfully...!
    Table records:
    [
      { Name: ''Jane'', Age: 20, Score: 24, Grade: ''FAIL'' },
      { Name: ''John'', Age: 21, Score: 76, Grade: ''PASS'' },
      { Name: ''John'', Age: 21, Score: 76, Grade: ''PASS'' },
      { Name: ''Aman'', Age: 22, Score: 86, Grade: ''PASS'' },
      { Name: ''Aman'', Age: 22, Score: 86, Grade: ''PASS'' }
    ]
    
    import java.sql.Connection;
    import java.sql.DriverManager;
    import java.sql.ResultSet;
    import java.sql.Statement;
    public class BeforeInsertTrigger {
       public static void main(String[] args) {
          String url = "jdbc:mysql://localhost:3306/TUTORIALS";
          String user = "root";
          String password = "password";
          ResultSet rs;
          try {
             Class.forName("com.mysql.cj.jdbc.Driver");
                Connection con = DriverManager.getConnection(url, user, password);
                Statement st = con.createStatement();
                //System.out.println("Database connected successfully...!");
                //lets create trigger on student table
                String sql = "Create Trigger sample_trigger BEFORE INSERT ON STUDENT FOR EACH ROW BEGIN IF NEW.Score < 35 THEN SET NEW.Grade = ''FAIL
                ELSE SET NEW.Grade = ''PASS
                END IF;
                END";
                st.execute(sql);
                System.out.println("Triggerd Created successfully...!");
                //lets insert some records into student table
                String sql1 = "INSERT INTO STUDENT VALUES (''John'', 21, 76, NULL), (''Jane'', 20, 24, NULL), (''Rob'', 21, 57, NULL), (''Albert'', 19, 87, NULL)";
                st.execute(sql1);
                //let print table records
                String sql2 = "SELECT * FROM STUDENT";
                rs = st.executeQuery(sql2);
                while(rs.next()) {
                   String name = rs.getString("name");
                   String age = rs.getString("age");
                   String score = rs.getString("score");
                   String grade = rs.getString("grade");
                   System.out.println("Name: " + name + ", Age: " + age + ", Score: " + score + ", Grade: " + grade);
                }
          }catch(Exception e) {
             e.printStackTrace();
          }
       }
    }
    

    Output

    The output obtained is as shown below −

    Triggerd Created successfully...!
    Name: John, Age: 21, Score: 76, Grade: PASS
    Name: Jane, Age: 20, Score: 24, Grade: FAIL
    Name: Rob, Age: 21, Score: 57, Grade: PASS
    Name: Albert, Age: 19, Score: 87, Grade: PASS
    
    import mysql.connector
    # Establishing the connection
    connection = mysql.connector.connect(
        host=''localhost'',
        user=''root'',
        password=''password'',
        database=''tut''
    )
    # Creating a cursor object
    cursorObj = connection.cursor()
    trigger_name = ''sample_trigger''
    table_name = ''Student''
    beforeInsert_trigger_query = f''''''CREATE TRIGGER {trigger_name}
    BEFORE INSERT ON {table_name}
    FOR EACH ROW
    BEGIN
    IF NEW.Score < 35
    THEN SET NEW.Grade = ''FAIL
    ELSE SET NEW.Grade = ''PASS
    END IF;
    END''''''
    cursorObj.execute(beforeInsert_trigger_query)
    print(f"BEFORE INSERT Trigger ''{trigger_name}'' is created successfully.")
    # commit the changes and close the cursor and connection
    connection.commit()
    cursorObj.close()
    connection.close()
    

    Output

    Following is the output of the above code −

    BEFORE INSERT Trigger ''sample_trigger'' is created successfully.
    

    Khóa học lập trình tại Toidayhoc vừa học vừa làm dự án vừa nhận lương: Khóa học lập trình nhận lương tại trung tâm Toidayhoc

  • Khóa học miễn phí MySQL – Before Update Trigger nhận dự án làm có lương

    MySQL – Before Update Trigger

    Table of content


    Triggers in MySQL are of two types: Before Triggers and After Triggers for various SQL operations like insertion, deletion and update. As we have already learned in previous chapters, the After Update Trigger is executed immediately after a value is updated in a row of a database table. Here, let us learn more about BEFORE UPDATE trigger.

    MySQL Before Update Trigger

    The Before Update Trigger is a row-level trigger supported by the MySQL database. It is type of special stored procedure which is executed automatically before a value is updated in a row of a database table.

    A row-level trigger is a type of trigger that goes off every time a row is modified. Simply, for every single transaction made in a table (like insertion, deletion, update), one trigger acts automatically.

    Whenever an UPDATE statement is executed in the database, the trigger is set to go off first followed by the updated value.

    Syntax

    Following is the syntax to create the BEFORE UPDATE trigger in MySQL −

    CREATE TRIGGER trigger_name
    BEFORE UPDATE ON table_name FOR EACH ROW
    BEGIN
       -- trigger body
    END;
    

    Example

    Let us first create a table named USERS containing the details of users of an application. Use the following CREATE TABLE query to do so −

    CREATE TABLE USERS(
       ID INT AUTO_INCREMENT,
       NAME VARCHAR(100) NOT NULL,
       AGE INT NOT NULL,
       birthDATE VARCHAR(100),
       PRIMARY KEY(ID)
    );
    

    Insert values into the USERS table using the regular INSERT statement as shown below −

    INSERT INTO USERS (Name, Age, birthDATE) VALUES
    (''Sasha'', 23, ''24/06/1999'');
    (''Alex'', 21, ''12/01/2001'');
    

    The USERS table is created as follows −

    ID Name Age birthDATE
    1 Sasha 23 24/06/1999
    2 Alex 21 12/01/2001

    Creating the trigger:

    Using the following CREATE TRIGGER statement, create a new trigger ”before_update_trigger” on the USERS table to display a customized error using SQLSTATE as follows −

    DELIMITER //
    CREATE TRIGGER before_update_trigger
    BEFORE UPDATE ON USERS FOR EACH ROW
    BEGIN
       IF NEW.AGE < 0
       THEN SIGNAL SQLSTATE ''45000''
       SET MESSAGE_TEXT = ''Age Cannot be Negative
    END IF;
    END //
    DELIMITER ;
    

    Update values of the USERS table using the regular UPDATE statement −

    UPDATE USERS SET AGE = -1 WHERE NAME = ''Sasha
    

    Output

    An error is displayed as the output for this query −

    ERROR 1644 (45000): Age Cannot be Negative
    

    Before Update Trigger Using a Client Program

    We can also execute the Before Update Trigger using a client program instead of SQL queries directly.

    Syntax

    To execute the Before Update Trigger through a PHP program, we need to execute the CREATE TRIGGER statement using the mysqli function query() as follows −

    $sql = "CREATE TRIGGER before_update_trigger BEFORE UPDATE ON SAMPLE FOR EACH ROW
    BEGIN
    IF NEW.AGE < 0 THEN SIGNAL SQLSTATE ''45000'' SET MESSAGE_TEXT = ''Age Cannot be Negative
    END IF;
    END";
    $mysqli->query($sql);
    

    To execute the Before Update Trigger through a JavaScript program, we need to execute the CREATE TRIGGER statement using the query() function of mysql2 library as follows −

    sql = `CREATE TRIGGER before_update_trigger BEFORE UPDATE ON SAMPLE FOR EACH ROW
    BEGIN
    IF NEW.AGE < 0 THEN SIGNAL SQLSTATE ''45000'' SET MESSAGE_TEXT = ''Age Cannot be Negative
    END IF;
    END`;
    con.query(sql);
    

    To execute the Before Update Trigger through a Java program, we need to execute the CREATE TRIGGER statement using the JDBC function execute() as follows −

    String sql = "CREATE TRIGGER before_update_trigger BEFORE UPDATE ON SAMPLE FOR EACH ROW BEGIN IF NEW.AGE < 0 THEN SIGNAL SQLSTATE ''45000'' SET MESSAGE_TEXT = ''Age Cannot be Negative
    END IF;
    END";
    statement.execute(sql);
    

    To execute the Before Update Trigger through a python program, we need to execute the CREATE TRIGGER statement using the execute() function of the MySQL Connector/Python as follows −

    beforeUpdate_trigger_query = ''CREATE TRIGGER {trigger_name}
    BEFORE UPDATE ON {sample}
    FOR EACH ROW
    BEGIN
    IF NEW.AGE < 0
    THEN SIGNAL SQLSTATE ''45000''
    SET MESSAGE_TEXT = ''Age Cannot be Negative''
    END IF
    END''
    cursorObj.execute(beforeUpdate_trigger_query)
    

    Example

    Following are the programs −

    $dbhost = ''localhost
    $dbuser = ''root
    $dbpass = ''password
    $db = ''TUTORIALS
    $mysqli = new mysqli($dbhost, $dbuser, $dbpass, $db);
    if($mysqli->connect_errno ) {
       printf("Connect failed: %s
    ", $mysqli->connect_error); exit(); } //printf(''Connected successfully.
    ''); $sql = "CREATE TRIGGER before_update_trigger BEFORE UPDATE ON SAMPLE FOR EACH ROW BEGIN IF NEW.AGE < 0 THEN SIGNAL SQLSTATE ''45000'' SET MESSAGE_TEXT = ''Age Cannot be Negative END IF; END"; if($mysqli->query($sql)){ printf("Trigger created successfully...!n"); } $q = "UPDATE SAMPLE SET AGE = -1 WHERE NAME = ''Sasha''"; $result = $mysqli->query($q); if ($result == true) { printf("Record updated successfully...!n"); } if($mysqli->error){ printf("Error message: " , $mysqli->error); } $mysqli->close();

    Output

    The output obtained is as follows −

    Trigger created successfully...!
    PHP Fatal error:  Uncaught mysqli_sql_exception: Age Cannot be Negative
    
    var mysql = require(''mysql2'');
    var con = mysql.createConnection({
    host:"localhost",
    user:"root",
    password:"password"
    });
    
    //Connecting to MySQL
    con.connect(function(err) {
       if (err) throw err;
        //console.log("Connected successfully...!");
        //console.log("--------------------------");
       sql = "USE TUTORIALS";
       con.query(sql);
       sql = `CREATE TRIGGER before_update_trigger BEFORE UPDATE ON SAMPLE FOR EACH ROW
       BEGIN
       IF NEW.AGE < 0 THEN SIGNAL SQLSTATE ''45000'' SET MESSAGE_TEXT = ''Age Cannot be Negative
       END IF;
       END`;
       con.query(sql);
       console.log("Before Update query executed successfully..!");
       sql = "UPDATE SAMPLE SET AGE = -1 WHERE NAME = ''Sasha''";
       con.query(sql);
       console.log("Table records: ")
       sql = "SELECT * FROM Sample";
       con.query(sql, function(err, result){
          if (err) throw err;
          console.log(result);
       });
    });
    

    Output

    The output produced is as follows −

    Error: Age Cannot be Negative
    
    import java.sql.Connection;
    import java.sql.DriverManager;
    import java.sql.ResultSet;
    import java.sql.Statement;
    public class BeforeUpdateTrigger {
        public static void main(String[] args) {
            String url = "jdbc:mysql://localhost:3306/TUTORIALS";
            String user = "root";
            String password = "password";
            ResultSet rs;
            try {
                Class.forName("com.mysql.cj.jdbc.Driver");
                Connection con = DriverManager.getConnection(url, user, password);
                Statement st = con.createStatement();
                //System.out.println("Database connected successfully...!");
                String sql = "SELECT * FROM SAMPLE";
                rs = st.executeQuery(sql);
                System.out.println("Sample table records before update: ");
                while(rs.next()) {
                    String id = rs.getString("id");
                    String name = rs.getString("name");
                    String age = rs.getString("age");
                    String birth_date = rs.getString("birthDATE");
                    System.out.println("Id: " + id + ", Name: " + name + ", Age: " + age + ", Birth_date: " + birth_date);
                }
                //lets create trigger on student table
                String sql1 = "CREATE TRIGGER before_update_trigger BEFORE UPDATE ON SAMPLE FOR EACH ROW BEGIN IF NEW.AGE < 0 THEN SIGNAL SQLSTATE ''45000'' SET MESSAGE_TEXT = ''Age Cannot be Negative
                END IF;
                END";
                st.execute(sql1);
                System.out.println("Triggerd Created successfully...!");
                //lets update table records
                String sql3 = "UPDATE SAMPLE SET AGE = -1 WHERE NAME = ''Sasha''";
                st.execute(sql3);
                //let print SAMPLE table records
                String sql4 = "SELECT * FROM SAMPLE";
                rs = st.executeQuery(sql4);
                System.out.println("Sample table records after update: ");
                while(rs.next()) {
                    String id = rs.getString("id");
                    String name = rs.getString("name");
                    String age = rs.getString("age");
                    String birth_date = rs.getString("birthDATE");
                    System.out.println("Id: " + id + ", Name: " + name + ", Age: " + age + ", Birth_date: " + birth_date);
                }
            }catch(Exception e) {
                e.printStackTrace();
            }
        }
    }
    

    Output

    The output obtained is as shown below −

    Sample table records before update:
    Id: 1, Name: Sasha, Age: 23, Birth_date: 24/06/1999
    Id: 2, Name: Alex, Age: 21, Birth_date: 12/01/2001
    
    import mysql.connector
    # Establishing the connection
    connection = mysql.connector.connect(
        host=''localhost'',
        user=''root'',
        password=''password'',
        database=''tut''
    )
    # Creating a cursor object
    cursorObj = connection.cursor()
    table_name = ''Sample''
    trigger_name = ''before_update_trigger''
    beforeUpdate_trigger_query = f''''''
    CREATE TRIGGER {trigger_name}
    BEFORE UPDATE ON {table_name}
    FOR EACH ROW
    BEGIN
    IF NEW.AGE < 0
    THEN SIGNAL SQLSTATE ''45000''
    SET MESSAGE_TEXT = ''Age Cannot be Negative
    END IF;
    END
    ''''''
    cursorObj.execute(beforeUpdate_trigger_query)
    print(f"BEFORE UPDATE Trigger ''{trigger_name}'' is created successfully.")
    connection.commit()
    # Update the "AGE" column
    update_query = "UPDATE Sample SET AGE = -1 WHERE NAME = ''Sasha''"
    cursorObj.execute(update_query)
    print("Update query executed successfully.")
    # close the cursor and connection
    connection.commit()
    cursorObj.close()
    connection.close()
    

    Output

    Following is the output of the above code −

    BEFORE UPDATE Trigger ''before_update_trigger'' is created successfully.
    Traceback (most recent call last):
      File "C:UsersLenovoAppDataLocalProgramsPythonPython310libsite-packagesmysqlconnectorconnection_cext.py", line 633, in cmd_query
        self._cmysql.query(
    _mysql_connector.MySQLInterfaceError: Age Cannot be Negative
    
    The above exception was the direct cause of the following exception:
    
    Traceback (most recent call last):
      File "C:UsersLenovoDesktopuntitled.py", line 29, in 
        cursorObj.execute(update_query)
      File "C:UsersLenovoAppDataLocalProgramsPythonPython310libsite-packagesmysqlconnectorcursor_cext.py", line 330, in execute
        result = self._cnx.cmd_query(
      File "C:UsersLenovoAppDataLocalProgramsPythonPython310libsite-packagesmysqlconnectoropentelemetrycontext_propagation.py", line 77, in wrapper
        return method(cnx, *args, **kwargs)
      File "C:UsersLenovoAppDataLocalProgramsPythonPython310libsite-packagesmysqlconnectorconnection_cext.py", line 641, in cmd_query
        raise get_mysql_exception(
    mysql.connector.errors.DatabaseError: 1644 (45000): Age Cannot be Negative
    

    Khóa học lập trình tại Toidayhoc vừa học vừa làm dự án vừa nhận lương: Khóa học lập trình nhận lương tại trung tâm Toidayhoc