Author: alien

  • Khóa học miễn phí PL/SQL – Loops nhận dự án làm có lương

    PL/SQL – Loops


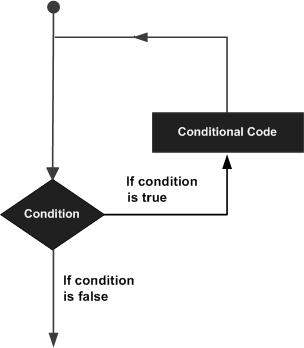
    In this chapter, we will discuss Loops in PL/SQL. There may be a situation when you need to execute a block of code several number of times. In general, statements are executed sequentially: The first statement in a function is executed first, followed by the second, and so on.

    Programming languages provide various control structures that allow for more complicated execution paths.

    A loop statement allows us to execute a statement or group of statements multiple times and following is the general form of a loop statement in most of the programming languages −

    Loop Architecture

    PL/SQL provides the following types of loop to handle the looping requirements. Click the following links to check their detail.

    S.No Loop Type & Description
    1

    In this loop structure, sequence of statements is enclosed between the LOOP and the END LOOP statements. At each iteration, the sequence of statements is executed and then control resumes at the top of the loop.

    2

    Repeats a statement or group of statements while a given condition is true. It tests the condition before executing the loop body.

    3

    Execute a sequence of statements multiple times and abbreviates the code that manages the loop variable.

    4

    You can use one or more loop inside any another basic loop, while, or for loop.

    Labeling a PL/SQL Loop

    PL/SQL loops can be labeled. The label should be enclosed by double angle brackets (<< and >>) and appear at the beginning of the LOOP statement. The label name can also appear at the end of the LOOP statement. You may use the label in the EXIT statement to exit from the loop.

    The following program illustrates the concept −

    DECLARE
       i number(1);
       j number(1);
    BEGIN
       << outer_loop >>
       FOR i IN 1..3 LOOP
          << inner_loop >>
          FOR j IN 1..3 LOOP
             dbms_output.put_line(''i is: ''|| i || '' and j is: '' || j);
          END loop inner_loop;
       END loop outer_loop;
    END;
    /
    

    When the above code is executed at the SQL prompt, it produces the following result −

    i is: 1 and j is: 1
    i is: 1 and j is: 2
    i is: 1 and j is: 3
    i is: 2 and j is: 1
    i is: 2 and j is: 2
    i is: 2 and j is: 3
    i is: 3 and j is: 1
    i is: 3 and j is: 2
    i is: 3 and j is: 3
    
    PL/SQL procedure successfully completed.
    

    The Loop Control Statements

    Loop control statements change execution from its normal sequence. When execution leaves a scope, all automatic objects that were created in that scope are destroyed.

    PL/SQL supports the following control statements. Labeling loops also help in taking the control outside a loop. Click the following links to check their details.

    S.No Control Statement & Description
    1

    The Exit statement completes the loop and control passes to the statement immediately after the END LOOP.

    2

    Causes the loop to skip the remainder of its body and immediately retest its condition prior to reiterating.

    3

    Transfers control to the labeled statement. Though it is not advised to use the GOTO statement in your program.


    Khóa học lập trình tại Toidayhoc vừa học vừa làm dự án vừa nhận lương: Khóa học lập trình nhận lương tại trung tâm Toidayhoc

  • Khóa học miễn phí PL/SQL – Data Types nhận dự án làm có lương

    PL/SQL – Data Types


    In this chapter, we will discuss the Data Types in PL/SQL. The PL/SQL variables, constants and parameters must have a valid data type, which specifies a storage format, constraints, and a valid range of values. We will focus on the SCALAR and the LOB data types in this chapter. The other two data types will be covered in other chapters.

    S.No Category & Description
    1

    Scalar

    Single values with no internal components, such as a NUMBER, DATE, or BOOLEAN.

    2

    Large Object (LOB)

    Pointers to large objects that are stored separately from other data items, such as text, graphic images, video clips, and sound waveforms.

    3

    Composite

    Data items that have internal components that can be accessed individually. For example, collections and records.

    4

    Reference

    Pointers to other data items.

    PL/SQL Scalar Data Types and Subtypes

    PL/SQL Scalar Data Types and Subtypes come under the following categories −

    S.No Date Type & Description
    1

    Numeric

    Numeric values on which arithmetic operations are performed.

    2

    Character

    Alphanumeric values that represent single characters or strings of characters.

    3

    Boolean

    Logical values on which logical operations are performed.

    4

    Datetime

    Dates and times.

    PL/SQL provides subtypes of data types. For example, the data type NUMBER has a subtype called INTEGER. You can use the subtypes in your PL/SQL program to make the data types compatible with data types in other programs while embedding the PL/SQL code in another program, such as a Java program.

    PL/SQL Numeric Data Types and Subtypes

    Following table lists out the PL/SQL pre-defined numeric data types and their sub-types −

    S.No Data Type & Description
    1

    PLS_INTEGER

    Signed integer in range -2,147,483,648 through 2,147,483,647, represented in 32 bits

    2

    BINARY_INTEGER

    Signed integer in range -2,147,483,648 through 2,147,483,647, represented in 32 bits

    3

    BINARY_FLOAT

    Single-precision IEEE 754-format floating-point number

    4

    BINARY_DOUBLE

    Double-precision IEEE 754-format floating-point number

    5

    NUMBER(prec, scale)

    Fixed-point or floating-point number with absolute value in range 1E-130 to (but not including) 1.0E126. A NUMBER variable can also represent 0

    6

    DEC(prec, scale)

    ANSI specific fixed-point type with maximum precision of 38 decimal digits

    7

    DECIMAL(prec, scale)

    IBM specific fixed-point type with maximum precision of 38 decimal digits

    8

    NUMERIC(pre, secale)

    Floating type with maximum precision of 38 decimal digits

    9

    DOUBLE PRECISION

    ANSI specific floating-point type with maximum precision of 126 binary digits (approximately 38 decimal digits)

    10

    FLOAT

    ANSI and IBM specific floating-point type with maximum precision of 126 binary digits (approximately 38 decimal digits)

    11

    INT

    ANSI specific integer type with maximum precision of 38 decimal digits

    12

    INTEGER

    ANSI and IBM specific integer type with maximum precision of 38 decimal digits

    13

    SMALLINT

    ANSI and IBM specific integer type with maximum precision of 38 decimal digits

    14

    REAL

    Floating-point type with maximum precision of 63 binary digits (approximately 18 decimal digits)

    Following is a valid declaration −

    DECLARE
       num1 INTEGER;
       num2 REAL;
       num3 DOUBLE PRECISION;
    BEGIN
       null;
    END;
    /
    

    When the above code is compiled and executed, it produces the following result −

    PL/SQL procedure successfully completed
    

    PL/SQL Character Data Types and Subtypes

    Following is the detail of PL/SQL pre-defined character data types and their sub-types −

    S.No Data Type & Description
    1

    CHAR

    Fixed-length character string with maximum size of 32,767 bytes

    2

    VARCHAR2

    Variable-length character string with maximum size of 32,767 bytes

    3

    RAW

    Variable-length binary or byte string with maximum size of 32,767 bytes, not interpreted by PL/SQL

    4

    NCHAR

    Fixed-length national character string with maximum size of 32,767 bytes

    5

    NVARCHAR2

    Variable-length national character string with maximum size of 32,767 bytes

    6

    LONG

    Variable-length character string with maximum size of 32,760 bytes

    7

    LONG RAW

    Variable-length binary or byte string with maximum size of 32,760 bytes, not interpreted by PL/SQL

    8

    ROWID

    Physical row identifier, the address of a row in an ordinary table

    9

    UROWID

    Universal row identifier (physical, logical, or foreign row identifier)

    PL/SQL Boolean Data Types

    The BOOLEAN data type stores logical values that are used in logical operations. The logical values are the Boolean values TRUE and FALSE and the value NULL.

    However, SQL has no data type equivalent to BOOLEAN. Therefore, Boolean values cannot be used in −

    • SQL statements
    • Built-in SQL functions (such as TO_CHAR)
    • PL/SQL functions invoked from SQL statements

    PL/SQL Datetime and Interval Types

    The DATE datatype is used to store fixed-length datetimes, which include the time of day in seconds since midnight. Valid dates range from January 1, 4712 BC to December 31, 9999 AD.

    The default date format is set by the Oracle initialization parameter NLS_DATE_FORMAT. For example, the default might be ”DD-MON-YY”, which includes a two-digit number for the day of the month, an abbreviation of the month name, and the last two digits of the year. For example, 01-OCT-12.

    Each DATE includes the century, year, month, day, hour, minute, and second. The following table shows the valid values for each field −

    Field Name Valid Datetime Values Valid Interval Values
    YEAR -4712 to 9999 (excluding year 0) Any nonzero integer
    MONTH 01 to 12 0 to 11
    DAY 01 to 31 (limited by the values of MONTH and YEAR, according to the rules of the calendar for the locale) Any nonzero integer
    HOUR 00 to 23 0 to 23
    MINUTE 00 to 59 0 to 59
    SECOND 00 to 59.9(n), where 9(n) is the precision of time fractional seconds 0 to 59.9(n), where 9(n) is the precision of interval fractional seconds
    TIMEZONE_HOUR -12 to 14 (range accommodates daylight savings time changes) Not applicable
    TIMEZONE_MINUTE 00 to 59 Not applicable
    TIMEZONE_REGION Found in the dynamic performance view V$TIMEZONE_NAMES Not applicable
    TIMEZONE_ABBR Found in the dynamic performance view V$TIMEZONE_NAMES Not applicable

    PL/SQL Large Object (LOB) Data Types

    Large Object (LOB) data types refer to large data items such as text, graphic images, video clips, and sound waveforms. LOB data types allow efficient, random, piecewise access to this data. Following are the predefined PL/SQL LOB data types −

    Data Type Description Size
    BFILE Used to store large binary objects in operating system files outside the database. System-dependent. Cannot exceed 4 gigabytes (GB).
    BLOB Used to store large binary objects in the database. 8 to 128 terabytes (TB)
    CLOB Used to store large blocks of character data in the database. 8 to 128 TB
    NCLOB Used to store large blocks of NCHAR data in the database. 8 to 128 TB

    PL/SQL User-Defined Subtypes

    A subtype is a subset of another data type, which is called its base type. A subtype has the same valid operations as its base type, but only a subset of its valid values.

    PL/SQL predefines several subtypes in package STANDARD. For example, PL/SQL predefines the subtypes CHARACTER and INTEGER as follows −

    SUBTYPE CHARACTER IS CHAR;
    SUBTYPE INTEGER IS NUMBER(38,0);
    

    You can define and use your own subtypes. The following program illustrates defining and using a user-defined subtype −

    DECLARE
       SUBTYPE name IS char(20);
       SUBTYPE message IS varchar2(100);
       salutation name;
       greetings message;
    BEGIN
       salutation := ''Reader
       greetings := ''Welcome to the World of PL/SQL
       dbms_output.put_line(''Hello '' || salutation || greetings);
    END;
    /
    

    When the above code is executed at the SQL prompt, it produces the following result −

    Hello Reader Welcome to the World of PL/SQL
    
    PL/SQL procedure successfully completed.
    

    NULLs in PL/SQL

    PL/SQL NULL values represent missing or unknown data and they are not an integer, a character, or any other specific data type. Note that NULL is not the same as an empty data string or the null character value ””. A null can be assigned but it cannot be equated with anything, including itself.


    Khóa học lập trình tại Toidayhoc vừa học vừa làm dự án vừa nhận lương: Khóa học lập trình nhận lương tại trung tâm Toidayhoc

  • Khóa học miễn phí PL/SQL – Home nhận dự án làm có lương

    PL/SQL tutorial

    PL/SQL Tutorial


    PL/SQL Tutorial

    PL/SQL, which stands for Procedural Language extensions to the (SQL). It is a combination of SQL along with the procedural features of programming languages. It was developed by Oracle Corporation in the early 90”s to enhance the capabilities of SQL. PL/SQL is one of three key programming languages embedded in the Oracle Database, along with SQL itself and .

    In this tutorial, we”ll give you a great understanding of PL/SQL to proceed with the Oracle database and other advanced .

    Purpose of PL/SQL

    The purpose of PL/SQL is to merge database commands with procedural programming language. It offers more complete programming solutions for building critical applications that operate on the Oracle database.

    Features of PL/SQL

    PL/SQL has the following features −

    • PL/SQL is tightly integrated with SQL.
    • It offers extensive extensive error checking mechanisms.
    • It supports numerous for flexible data handling.
    • Includes a variety of programming structures, such as and . Includes a variety of programming structures, such as loops and conditionals.
    • It supports structured programming through functions and procedures.
    • It supports object-oriented programming, enabling more complex data handling and manipulation.
    • It supports the web application development and server pages.

    Why to learn PL/SQL?

    Learning PL/SQL is an essential skill for persons who are interested in databases and other advanced RDBMS technologies. PL/SQL offers various benefits, making it an essential skill for database developers −

    • Ease of Use: PL/SQL is straightforward to write and read, featuring block-structured syntax which simplifies programming and debugging.
    • Portability: Programs written in PL/SQL are fully portable across different Oracle databases, ensuring consistency and ease of migration.
    • Tight SQL Integration: PL/SQL is tightly integrated with SQL, allowing for efficient querying, transforming, and updating of data within a database.
    • High Performance: It reduces network traffic by sending entire blocks of statements to the database at once, thus improving performance.
    • Security: It includes robust security features to protect database integrity.
    • Object-Oriented Support: It supports object-oriented programming, and allows you to define object types that can be used in object-oriented designs.

    PL/SQL Block Structured

    PL/SQL follows a block-structured approach, dividing programs into logical blocks of code. Each block consists of three main sections −

    • Declarations: This section, starting with the keyword DECLARE, is optional and used for defining , , subprograms, and other elements required within the block.
    • Executable Commands: Enclosed between the keywords BEGIN and END, this mandatory section contains executable PL/SQL statements. It must include at least one executable line of code, even if it”s just a NULL command indicating no action.
    • Exception Handling: This starts with the keyword EXCEPTION, this optional section deals with handling errors in the program through defined exceptions.

    PL/SQL statements are terminated with a semicolon(;). Additionally, blocks can be nested within each other using BEGIN and END keywords.

    Applications of PL/SQL

    PL/SQL is widely used in various applications, including −

    • Database Security: It implements robust security measures within the database.
    • XML Management: Generating and managing XML documents within the database.
    • Linking Databases to Web Pages: Integrates databases with web applications.
    • Automation: Automating database administration tasks for efficient management.

    Who Should Learn PL/SQL?

    This tutorial is designed for Software Professionals, who are willing to learn PL/SQL Programming Language in simple and easy steps. This tutorial will give you a great understanding of PL/SQL Programming concepts, and after completing this tutorial, you will be at an intermediate level of expertise from where you can take yourself to a higher level of expertise.

    Prerequisites to learn PL/SQL

    Before proceeding with this tutorial, you should have a basic understanding of software concepts like what is database, source code, text editor, and execution of programs, etc. If you already have an understanding of SQL and other computer programming languages, then it will be an added advantage to proceed. Let”s get started!

    PL/SQL Jobs and Opportunities

    Proficiency in PL/SQL opens up various career opportunities, such as −

    • Oracle PL/SQL Programmer
    • PL/SQL Developer
    • Database Developer
    • Data Analyst
    • Database Testers
    • Data Scientist
    • ETL Developer
    • Database Migration Expert
    • Cloud Database Expert etc

    By mastering PL/SQL, you can increase your career opportunities in database management and development, as well as in creating secure and scalable applications.

    Frequently Asked Questions about PL/SQL

    There are some very Frequently Asked Questions(FAQ) about PL/SQL, this section tries to answer them briefly.

    PL/SQL records are data structures designed to hold multiple data items of different types. They consist of various fields, much like a row in a database table.

    SQL (Structured Query Language) is a standard language used for creating, manipulating, and retrieving data from relational databases. SQL is mainly used to write queries, as well as create and execute DDL (Data Definition Language) and DML (Data Manipulation Language) statements.

    Whereas, PL/SQL (Procedural Language/SQL) is an extension of SQL. And it adds procedural capabilities to SQL, enabling the creation of more complex and powerful database applications. PL/SQL supports variables, data types, and control structures such as loops and conditionals, which SQL does not. This makes PL/SQL more efficient for writing program blocks, functions, procedures, triggers, and packages.

    When an exception is raised in PL/SQL, the current PL/SQL block stops its regular execution and transfers control to the exception section. The exception is then handled by an exception handler within the current PL/SQL block or passed to the enclosing block if not handled locally.

    To manage an exception after it is raised, you need to write an exception handler for it. This handler should be placed after all executable statements in your PL/SQL block but before the END statement. The EXCEPTION keyword indicates the start of the exception-handling section.

    The best place to learn PL/SQL is through our comprehensive and user-friendly tutorial. Our PL/SQL tutorial provides an excellent starting point for understanding database programming with PL/SQL. You can explore our simple and effective learning materials at your own pace.

    A PL/SQL table, also known as an associative array or index-by table, is a collection of key-value pairs where each key is a unique index used to access the corresponding value. This table functions similarly to a relational table, storing data in rows and columns. Each column represents a different attribute or value, while each row contains individual records with values for all the columns.

    Following are some tips to learn PL/SQL −

    • The first and most crucial step is to decide to learn PL/SQL and stay committed to your goal.
    • Install the necessary tools like SQL*Plus or Oracle SQL Developer on your computer.
    • Start with our PL/SQL tutorial and progress step by step from the basics.
    • Read more articles, watch online courses, or buy a book on PL/SQL to deepen your understanding.
    • Apply what you’ve learned by developing small projects that incorporate PL/SQL and other technologies.

    SQL*Plus and PL/SQL Developer are commonly used for writing and executing PL/SQL code.

    In PL/SQL, there are two types of parameters −

    • Actual Parameters: Actual parameters are the values or expressions provided in the parameter list when calling a module. In this only the variable is mentioned, not the data types.
    • Formal Parameters: Formal parameters are the names declared in the parameter list of a module”s header.

    Learning PL/SQL is crucial for a person who is interested in databases and advanced RDBMS technologies. It offers numerous benefits, making it an essential skill for database developers. With PL/SQL, you can efficiently manipulate and manage data within Oracle databases, which increases your ability to work with large datasets and complex queries.

    Khóa học lập trình tại Toidayhoc vừa học vừa làm dự án vừa nhận lương: Khóa học lập trình nhận lương tại trung tâm Toidayhoc

  • Khóa học miễn phí PL/SQL – Variables nhận dự án làm có lương

    PL/SQL – Variables


    In this chapter, we will discuss Variables in Pl/SQL. A variable is nothing but a name given to a storage area that our programs can manipulate. Each variable in PL/SQL has a specific data type, which determines the size and the layout of the variable”s memory; the range of values that can be stored within that memory and the set of operations that can be applied to the variable.

    The name of a PL/SQL variable consists of a letter optionally followed by more letters, numerals, dollar signs, underscores, and number signs and should not exceed 30 characters. By default, variable names are not case-sensitive. You cannot use a reserved PL/SQL keyword as a variable name.

    PL/SQL programming language allows to define various types of variables, such as date time data types, records, collections, etc. which we will cover in subsequent chapters. For this chapter, let us study only basic variable types.

    Variable Declaration in PL/SQL

    PL/SQL variables must be declared in the declaration section or in a package as a global variable. When you declare a variable, PL/SQL allocates memory for the variable”s value and the storage location is identified by the variable name.

    The syntax for declaring a variable is −

    variable_name [CONSTANT] datatype [NOT NULL] [:= | DEFAULT initial_value]
    

    Where, variable_name is a valid identifier in PL/SQL, datatype must be a valid PL/SQL data type or any user defined data type which we already have discussed in the last chapter. Some valid variable declarations along with their definition are shown below −

    sales number(10, 2);
    pi CONSTANT double precision := 3.1415;
    name varchar2(25);
    address varchar2(100);
    

    When you provide a size, scale or precision limit with the data type, it is called a constrained declaration. Constrained declarations require less memory than unconstrained declarations. For example −

    sales number(10, 2);
    name varchar2(25);
    address varchar2(100);
    

    Initializing Variables in PL/SQL

    Whenever you declare a variable, PL/SQL assigns it a default value of NULL. If you want to initialize a variable with a value other than the NULL value, you can do so during the declaration, using either of the following −

    • The DEFAULT keyword

    • The assignment operator

    For example −

    counter binary_integer := 0;
    greetings varchar2(20) DEFAULT ''Have a Good Day
    

    You can also specify that a variable should not have a NULL value using the NOT NULL constraint. If you use the NOT NULL constraint, you must explicitly assign an initial value for that variable.

    It is a good programming practice to initialize variables properly otherwise, sometimes programs would produce unexpected results. Try the following example which makes use of various types of variables −

    DECLARE
       a integer := 10;
       b integer := 20;
       c integer;
       f real;
    BEGIN
       c := a + b;
       dbms_output.put_line(''Value of c: '' || c);
       f := 70.0/3.0;
       dbms_output.put_line(''Value of f: '' || f);
    END;
    /
    

    When the above code is executed, it produces the following result −

    Value of c: 30
    Value of f: 23.333333333333333333
    
    PL/SQL procedure successfully completed.
    

    Variable Scope in PL/SQL

    PL/SQL allows the nesting of blocks, i.e., each program block may contain another inner block. If a variable is declared within an inner block, it is not accessible to the outer block. However, if a variable is declared and accessible to an outer block, it is also accessible to all nested inner blocks. There are two types of variable scope −

    • Local variables − Variables declared in an inner block and not accessible to outer blocks.

    • Global variables − Variables declared in the outermost block or a package.

    Following example shows the usage of Local and Global variables in its simple form −

    DECLARE
       -- Global variables
       num1 number := 95;
       num2 number := 85;
    BEGIN
       dbms_output.put_line(''Outer Variable num1: '' || num1);
       dbms_output.put_line(''Outer Variable num2: '' || num2);
       DECLARE
          -- Local variables
          num1 number := 195;
          num2 number := 185;
       BEGIN
          dbms_output.put_line(''Inner Variable num1: '' || num1);
          dbms_output.put_line(''Inner Variable num2: '' || num2);
       END;
    END;
    /
    

    When the above code is executed, it produces the following result −

    Outer Variable num1: 95
    Outer Variable num2: 85
    Inner Variable num1: 195
    Inner Variable num2: 185
    
    PL/SQL procedure successfully completed.
    

    Assigning SQL Query Results to PL/SQL Variables

    You can use the SELECT INTO statement of SQL to assign values to PL/SQL variables. For each item in the SELECT list, there must be a corresponding, type-compatible variable in the INTO list. The following example illustrates the concept. Let us create a table named CUSTOMERS −

    (For SQL statements, please refer to the )

    CREATE TABLE CUSTOMERS(
       ID   INT NOT NULL,
       NAME VARCHAR (20) NOT NULL,
       AGE INT NOT NULL,
       ADDRESS CHAR (25),
       SALARY   DECIMAL (18, 2),
       PRIMARY KEY (ID)
    );
    
    Table Created
    

    Let us now insert some values in the table −

    INSERT INTO CUSTOMERS (ID,NAME,AGE,ADDRESS,SALARY)
    VALUES (1, ''Ramesh'', 32, ''Ahmedabad'', 2000.00 );
    
    INSERT INTO CUSTOMERS (ID,NAME,AGE,ADDRESS,SALARY)
    VALUES (2, ''Khilan'', 25, ''Delhi'', 1500.00 );
    
    INSERT INTO CUSTOMERS (ID,NAME,AGE,ADDRESS,SALARY)
    VALUES (3, ''kaushik'', 23, ''Kota'', 2000.00 );
    
    INSERT INTO CUSTOMERS (ID,NAME,AGE,ADDRESS,SALARY)
    VALUES (4, ''Chaitali'', 25, ''Mumbai'', 6500.00 );
    
    INSERT INTO CUSTOMERS (ID,NAME,AGE,ADDRESS,SALARY)
    VALUES (5, ''Hardik'', 27, ''Bhopal'', 8500.00 );
    
    INSERT INTO CUSTOMERS (ID,NAME,AGE,ADDRESS,SALARY)
    VALUES (6, ''Komal'', 22, ''MP'', 4500.00 );
    

    The following program assigns values from the above table to PL/SQL variables using the SELECT INTO clause of SQL −

    DECLARE
       c_id customers.id%type := 1;
       c_name  customers.name%type;
       c_addr customers.address%type;
       c_sal  customers.salary%type;
    BEGIN
       SELECT name, address, salary INTO c_name, c_addr, c_sal
       FROM customers
       WHERE id = c_id;
       dbms_output.put_line
       (''Customer '' ||c_name || '' from '' || c_addr || '' earns '' || c_sal);
    END;
    /
    

    When the above code is executed, it produces the following result −

    Customer Ramesh from Ahmedabad earns 2000
    
    PL/SQL procedure completed successfully
    

    Khóa học lập trình tại Toidayhoc vừa học vừa làm dự án vừa nhận lương: Khóa học lập trình nhận lương tại trung tâm Toidayhoc

  • Khóa học miễn phí PL/SQL – Overview nhận dự án làm có lương

    PL/SQL – Overview


    The PL/SQL programming language was developed by Oracle Corporation in the late 1980s as procedural extension language for SQL and the Oracle relational database. Following are certain notable facts about PL/SQL −

    • PL/SQL is a completely portable, high-performance transaction-processing language.

    • PL/SQL provides a built-in, interpreted and OS independent programming environment.

    • PL/SQL can also directly be called from the command-line SQL*Plus interface.

    • Direct call can also be made from external programming language calls to database.

    • PL/SQL”s general syntax is based on that of ADA and Pascal programming language.

    • Apart from Oracle, PL/SQL is available in TimesTen in-memory database and IBM DB2.

    Features of PL/SQL

    PL/SQL has the following features −

    • PL/SQL is tightly integrated with SQL.
    • It offers extensive error checking.
    • It offers numerous data types.
    • It offers a variety of programming structures.
    • It supports structured programming through functions and procedures.
    • It supports object-oriented programming.
    • It supports the development of web applications and server pages.

    Advantages of PL/SQL

    PL/SQL has the following advantages −

    • SQL is the standard database language and PL/SQL is strongly integrated with SQL. PL/SQL supports both static and dynamic SQL. Static SQL supports DML operations and transaction control from PL/SQL block. In Dynamic SQL, SQL allows embedding DDL statements in PL/SQL blocks.

    • PL/SQL allows sending an entire block of statements to the database at one time. This reduces network traffic and provides high performance for the applications.

    • PL/SQL gives high productivity to programmers as it can query, transform, and update data in a database.

    • PL/SQL saves time on design and debugging by strong features, such as exception handling, encapsulation, data hiding, and object-oriented data types.

    • Applications written in PL/SQL are fully portable.

    • PL/SQL provides high security level.

    • PL/SQL provides access to predefined SQL packages.

    • PL/SQL provides support for Object-Oriented Programming.

    • PL/SQL provides support for developing Web Applications and Server Pages.


    Khóa học lập trình tại Toidayhoc vừa học vừa làm dự án vừa nhận lương: Khóa học lập trình nhận lương tại trung tâm Toidayhoc

  • Khóa học miễn phí PL/SQL – Basic Syntax nhận dự án làm có lương

    PL/SQL – Basic Syntax


    In this chapter, we will discuss the Basic Syntax of PL/SQL which is a block-structured language; this means that the PL/SQL programs are divided and written in logical blocks of code. Each block consists of three sub-parts −

    S.No Sections & Description
    1

    Declarations

    This section starts with the keyword DECLARE. It is an optional section and defines all variables, cursors, subprograms, and other elements to be used in the program.

    2

    Executable Commands

    This section is enclosed between the keywords BEGIN and END and it is a mandatory section. It consists of the executable PL/SQL statements of the program. It should have at least one executable line of code, which may be just a NULL command to indicate that nothing should be executed.

    3

    Exception Handling

    This section starts with the keyword EXCEPTION. This optional section contains exception(s) that handle errors in the program.

    Every PL/SQL statement ends with a semicolon (;). PL/SQL blocks can be nested within other PL/SQL blocks using BEGIN and END. Following is the basic structure of a PL/SQL block −

    DECLARE
       <declarations section>
    BEGIN
       <executable command(s)>
    EXCEPTION
       <exception handling>
    END;
    

    The ”Hello World” Example

    DECLARE
       message  varchar2(20):= ''Hello, World!
    BEGIN
       dbms_output.put_line(message);
    END;
    /
    

    The end; line signals the end of the PL/SQL block. To run the code from the SQL command line, you may need to type / at the beginning of the first blank line after the last line of the code. When the above code is executed at the SQL prompt, it produces the following result −

    Hello World
    
    PL/SQL procedure successfully completed.
    

    The PL/SQL Identifiers

    PL/SQL identifiers are constants, variables, exceptions, procedures, cursors, and reserved words. The identifiers consist of a letter optionally followed by more letters, numerals, dollar signs, underscores, and number signs and should not exceed 30 characters.

    By default, identifiers are not case-sensitive. So you can use integer or INTEGER to represent a numeric value. You cannot use a reserved keyword as an identifier.

    The PL/SQL Delimiters

    A delimiter is a symbol with a special meaning. Following is the list of delimiters in PL/SQL −

    Delimiter Description
    +, -, *, / Addition, subtraction/negation, multiplication, division
    % Attribute indicator
    Character string delimiter
    . Component selector
    (,) Expression or list delimiter
    : Host variable indicator
    , Item separator
    Quoted identifier delimiter
    = Relational operator
    @ Remote access indicator
    ; Statement terminator
    := Assignment operator
    => Association operator
    || Concatenation operator
    ** Exponentiation operator
    <<, >> Label delimiter (begin and end)
    /*, */ Multi-line comment delimiter (begin and end)
    Single-line comment indicator
    .. Range operator
    <, >, <=, >= Relational operators
    <>, ”=, ~=, ^= Different versions of NOT EQUAL

    The PL/SQL Comments

    Program comments are explanatory statements that can be included in the PL/SQL code that you write and helps anyone reading its source code. All programming languages allow some form of comments.

    The PL/SQL supports single-line and multi-line comments. All characters available inside any comment are ignored by the PL/SQL compiler. The PL/SQL single-line comments start with the delimiter — (double hyphen) and multi-line comments are enclosed by /* and */.

    DECLARE
       -- variable declaration
       message  varchar2(20):= ''Hello, World!
    BEGIN
       /*
       *  PL/SQL executable statement(s)
       */
       dbms_output.put_line(message);
    END;
    /
    

    When the above code is executed at the SQL prompt, it produces the following result −

    Hello World
    
    PL/SQL procedure successfully completed.
    

    PL/SQL Program Units

    A PL/SQL unit is any one of the following −

    • PL/SQL block
    • Function
    • Package
    • Package body
    • Procedure
    • Trigger
    • Type
    • Type body

    Each of these units will be discussed in the following chapters.


    Khóa học lập trình tại Toidayhoc vừa học vừa làm dự án vừa nhận lương: Khóa học lập trình nhận lương tại trung tâm Toidayhoc

  • Khóa học miễn phí phpMyAdmin – Discussion nhận dự án làm có lương

    Discuss phpMyAdmin


    phpMyAdmin is one the most popular, free and open source administration tool which can manage MySQL and MariaDB. It is licensed under GNU GPLv2. It has a web based interface and can be used on any platform easily. It is available in 79 languages. It is PHP based and is provided by almost all the Web hosting solution providers who supports WAMP/LAMP development stack.


    Khóa học lập trình tại Toidayhoc vừa học vừa làm dự án vừa nhận lương: Khóa học lập trình nhận lương tại trung tâm Toidayhoc

  • Khóa học miễn phí phpMyAdmin – Useful Resources nhận dự án làm có lương

    phpMyAdmin – Useful Resources


    The following resources contain additional information on phpMyAdmin. Please use them to get more in-depth knowledge on this.

    Useful Links on phpMyAdmin

    • − Wikipedia Reference for phpMyAdmin.

    • − Official Website of phpMyAdmin.

    Useful Books on phpMyAdmin

    To enlist your site on this page, please drop an email to contact@tutorialspoint.com


    Khóa học lập trình tại Toidayhoc vừa học vừa làm dự án vừa nhận lương: Khóa học lập trình nhận lương tại trung tâm Toidayhoc

  • Khóa học miễn phí phpMyAdmin – Quick Guide nhận dự án làm có lương

    phpMyAdmin – Quick Guide


    phpMyAdmin – Overview

    phpMyAdmin is one the most popular, free and open source administration tool which can manage MySQL and MariaDB. It is licensed under GNU GPLv2. It has a web based interface and can be used on any platform easily. It is available in 79 languages. It is PHP based and is provided by almost all the Web hosting solution providers who supports WAMP/LAMP development stack.

    phpMyAdmin can be used to do useful functions like managing databases, tables, relations, indexes, user permissions etc using its web based user interface. It also support a query interface, where user can type SQL commands and run.

    phpMyAdmin is neatly documented and lots of learning material is available in form of books, blogs and articles for it. phpMyAdmin supports for LTR and RTL languages.

    phpMyAdmin development is community driven and is hosted on . It is also a member of which is not-for-profit organization and helps promote, improve, develop and defends free and open source projects.

    Prerequisites

    Following are the vital components which are required to work with phpMyAdmin.

    • Web Server − Apache, Nginx, IIS.

    • PHP − PHP 7.1.3+ is required to work with phpMyAdmin 5.1.1. mysqli and openssl extensions should be enabled.

    • Database − MySQL 5.5 or MariaDB 5.5 onwards

    • Web Browser − As phpMyAdmin is a web based application, web browser is required to access it like Google Chrome, Edge, Firefox etc.

    phpMyAdmin – Environment Setup

    As phpMyAdmin is PHP based, following four vital components need to be installed on your computer system before installing phpMyAdmin.

    • Web Server − PHP works with virtually all Web Server software, including Microsoft”s Internet Information Server (IIS) but most often used is Apache Server. Download Apache for free here − . Apache 2.4 is used in this tutorial.

    • Database − phpMyAdmin manages MySQL or MariaDB databases. In this tutorial, we can using MySQL database. Download MySQL for free here − . MySQL 8.0 is used in this tutorial.

    • PHP Parser − In order to process PHP script instructions, a parser must be installed to generate HTML output that can be sent to the Web Browser. This tutorial will guide you how to install PHP parser on your computer. Php 7.4 is used in this tutorial.

    • Web Browser − phpMyAdmin is a web based software, so web browser is needed with javascript and cookies enabled. We are using Google Chrome in this tutorial.

    PHP Parser Installation

    Before you proceed, it is important to make sure that you have proper environment setup on your machine to develop your web programs using PHP. Store the following php file in Apache”s htdocs folder.

    phpinfo.php

    Example

    <?php
       phpinfo();
    ?>
    

    Output

    Type the following address into your browser”s address box.

    http://127.0.0.1/phpinfo.php
    

    If this displays a page showing your PHP installation related information, then it means you have PHP and Webserver installed properly. Otherwise, you have to follow the given procedure to install PHP on your computer.

    This section will guide you to install and configure PHP over the following four platforms −

    Apache Configuration

    If you are using Apache as a Web Server, then this section will guide you to edit Apache Configuration Files.

    Check here −

    PHP.INI File Configuration

    The PHP configuration file, php.ini, is the final and immediate way to affect PHP”s functionality.

    Check here −

    Windows IIS Configuration

    To configure IIS on your Windows machine, you can refer your IIS Reference Manual shipped along with IIS.

    Install MySQL Database

    The most important thing you will need, of course is an actual running database with a table that you can query and modify.

    • MySQL DB − MySQL is an open source database. You can download it from . We recommend downloading the full Windows installation.

    In addition, download and install as well as These are GUI based tools that will make your development much easier.

    Finally, download and unzip (the MySQL JDBC driver) in a convenient directory. For the purpose of this tutorial we will assume that you have installed the driver at C:Program FilesMySQLmysql-connector-java-5.1.8.

    Accordingly, set CLASSPATH variable to C:Program FilesMySQLmysql-connector-java-5.1.8mysql-connector-java-5.1.8-bin.jar. Your driver version may vary based on your installation.

    Set Database Credential

    When we install MySQL database, its administrator ID is set to root and it gives provision to set a password of your choice.

    Using root ID and password you can either create another user ID and password, or you can use root ID and password for your JDBC application.

    There are various database operations like database creation and deletion, which would need administrator ID and password.

    We would use MySQL Database with root as ID and root@123 as password.

    If you do not have sufficient privilege to create new users, then you can ask your Database Administrator (DBA) to create a user ID and password for you.

    For a complete understanding on MySQL database, study the .

    phpMyAdmin installation

    Download and unzip phpMyAdmin web application in a convenient directory. Then copy the folder to htdocs directory of Apache Web Server. We”ve renamed the phpMyAdmin-5.1.1-all-languages to phpMyAdmin and placed it inside the htdocs directory.

    Before restarting Apache Server, we need to make changes to Apache Configuration and PHP Configuration to allow phpMyAdmin to work with MySQL and OpenSSL. Please do the following changes.

    Apache Configuration Update

    Locate /conf/httpd.conf file in Apache Web Server directory and update DirectoryIndex > index.html to index.php.

    #
    # DirectoryIndex: sets the file that Apache will serve if a directory
    # is requested.
    #
    <IfModule dir_module>
       DirectoryIndex index.php
    </IfModule>
    

    PHP Configuration Updates

    Locate php.ini in PHP Installation directory and uncomment extensions for mysqli and openssl.

    extension=mysqli
    extension=openssl
    

    Now enable the extension_dir to load extensions for mysqli and openssl.

    ; Directory in which the loadable extensions (modules) reside.
    ; http://php.net/extension-dir
    ;extension_dir = "./"
    ; On windows:
    extension_dir = "ext"
    

    That”s it, now start the Apache Server and open localhost/phpmyadmin phpmyadmin in web browser to open the phpMyAdmin interface.

    phpMyAdmin – Features

    Following is some of the key features of phpMyAdmin.

    • User friendly Web Interface − phpMyAdmin UI is quite intuitive and easy to use.

    • Most of Database Operations are supported − phpMyAdmin supports most of the MySQL/MariaDB features as listed below −

      • Browse databases, tables, view, fields and indexes.

      • Create/Copy/Drop/Rename databases, tables, view, fields and indexes.

      • Server maintenance, database/tables configuration proposal.

      • Execute, Edit and bookmark SQL statements, batch queries.

      • Manage user accounts and privilleges.

      • Manage stored procedures and triggers.

    • Import Data − Data can be imported from from CSV and SQL files.

    • Export Data − Data can be exported to various formats like CSV, SQL, XML, PDF, ISO/IEC 26300 – OpenDocument Text and Spreadsheet, Word, LATEX and others

    • Multiserver support − phpMyAdmin can be used to administrater multiple servers together.

    • Graphics Support − phpMyAdmin can show graphics of database layout in various formats.

    • Query-by-example − phpMyAdmin Query-by-example (QBE) can be used to create complex queries.

    • Search − phpMyAdmin allows to searching globally in a database or a subset of database.

    • Transformation − phpMyAdmin can help in transforming stored data into any format using a set of built-in functions, for example displaying BLOB-data as image or download-link.

    phpMyAdmin – Pros & Cons

    Pros

    Following are some of the key advantages that phpMyAdmin provides −

    • Web Based − Being web based, phpMyAdmin UI is accessible using Web Browser and this interface is available on all the platforms where a web browser can work.

    • Graphical Interface phpMyAdmin provides graphical interface to run SQL commands and do SQL operations and makes it quite easy to use as compared to console based sql editors.

    • Script Interface phpMyAdmin provides script interface to run PHP scripts to connect to databases and do customized operations.

    • Multi-Server phpMyAdmin allows to operate multiple servers at a time.

    • Backup formats phpMyAdmin allows to take database backups in various formats like XML, CSV, SQL, PDF, OpenDocument Text, Excel, Word, and Spreadsheet, etc.

    • Complex Query Made Easy phpMyAdmin”s easy to use interface allows to create and run complex queries, create and edit functions, triggers etc easily.

    Cons

    There are certain disadvantages as well in using phpMyAdmin.

    • Difficult Installation − phpMyAdmin installation is not straight forward. User needs to install Apache Web Server, PHP and MySQL and then configure each softwares seperately. As an alternate solution is to use XAMPP, which bundles them as a package and have phpMyAdmin module as well. In case of fresh installation, XAMPP is the best choice to install WAMP/LAMP stack to use phpMyAdmin.

    • No schema visualization − schema visualization capability is not present in phpMyAdmin.

    • No auto-compilation − Auto-compilation functionality is not available as well.

    • No scheduled backup − Automatic backup scheduling is not feasible.

    • No Encryption − phpMyAdmin exports database in common text files thus needs high storage and poor security.

    phpMyAdmin vs MySQL WorkBench

    MySQL WorkBench is part of MySQL database and it provides a full featured administrative interface to execute SQL queries and MySQL management where as phpMyAdmin is a web based tool to administer the MySQL database. Following are the some of the key differences in both interfaces.

    • Supported Versions − phpMyAdmin supports MySQL 5.5 onwards whereas MySQL Workbench can support any version of MySQL database.

    • Graphical Interface phpMyAdmin provides an easy to understand graphical interface to run SQL commands and do SQL operations and makes it quite easy to use as compared to MySQL workbench which is quite complex for beginners.

    • Script Interface phpMyAdmin provides script interface to run PHP scripts to connect to databases and do customized operations. MySQL workbench has no such option.

    • Web Based phpMyAdmin is web based and may be slow and depends upon web browser heavily where as MySQL workbench is a specilized software to work with databases.

    • Code Highlight phpMyAdmin does not have smart code highlight capabilities or auto-complete functionalities whereas MySQL workbench provides code highlighting and auto-complete features.

    • Pricing phpMyAdmin is completely free to use. It is open source and is provided by almost all hosting service providers whereas MySQL Workbench has a community based version which is free and open source. There are other commercial versions for enterprises which are subscription based. These commercial versions have enterprise level features and support.

    phpMyAdmin – Databases

    Start the Apache Server and open /localhost/phpmyadmin phpmyadmin in web browser to open the phpMyAdmin interface.

    As we have configured a database MySQL during , we”ve root user with password as root@123. Once phpMyAdmin opens up, you need to enter same credential to login to database.

    Login Screen

    Dashboard

    Once logged in, you can see the following sections on the phpMyAdmin page loaded. The left section shows the databases available, it shows system as well user created databases.

    Schema Screen

    On the right side, dashboard shows a tabbed interface to do all the database administration operations as shown below.

    Default Dashboard

    Databases

    Click on Database Tab, to see the list of databases with more details. We can create database, iterate databases and do other operations here.

    Dashboard for databases.

    Click on any listed database to see the list of tables with more details. Tabs changes as per the context. Now tabs will shows as per the database.

    Dashboard for Tables

    Tables

    Now in the schema browser, click on any table, right side section will load the table details as shown with updated tabbed interface to do various operations on that table as shown below −

    Dashboard for Table

    Double clicking on any cell, makes it editable, where you can edit and save data. Pressing esc key, will not save data. Once you move out of editing cell, it will show the update query and status of operation as shown below −

    Dashboard for Table

    You can verify the update statement as well as show below −

    UPDATE `employees` SET `AGE` = ''28'' WHERE `employees`.`ID` = 1;
    

    Now click on Structure tab, it will show the table structural details as shown below −

    Table Structure

    phpMyAdmin – SQL

    phpMyAdmin provides a SQL console under SQL Tab. Its context varies as per the selection. If no database is selected, then SQL console opens in localhost context otherwise in relevant database context. In given example, we”ve selected a database TutorialsPoint. Now switching to SQL shows the following screen.

    SQL Console

    Now let”s run a simple query to see SQL Tab in action. SQL interface will keep suggesting keywords while user types. You can press Ctrl+Space to open the relevant suggestion as well.

    SQL Suggestions

    Now click on Go Button and phpMyAdmin will run the query and show the result as shown below −

    SQL Result

    phpMyAdmin – Status

    phpMyAdmin provides a six types of statuses under Status Tab.

    • Server − Server Status tab describes the MySQL/MariaDB server status in terms of traffic and connections that server is handling. It also shares the replication status.

    Server Status
    • Processes − Processes like root, event scheduler are shared on this dashboard. We can kill them as well.

    Processes Status
    • Queries − Query Statistics tell about the types and count of queries that has been run using phpMyAdmin interface. It includes the queries run plus the queries run by phpMyAdmin in background.

    Queries Status
    • All Status Variables − All kind of status variables are listed here with their value and description. User can filter on these variables as well.

    • Monitor − Monitor dashboard helps in visual way to check and control traffic, cpu usages, connections, processes, questions, system memory and system swaps.

    • Advisor − Advisor helps in analyzing the problems and provides advices for performance bottlenecks. It also provides insights on generally faced problems.

    phpMyAdmin – User Accounts

    phpMyAdmin provides an intuitive user interface for user management. We can view users, edit their previleges etc.

    User Accounts

    Let”s create a user using phpMyAdmin say testuser. Click on the Add User Account link under New Section.

    Create user with a strong password.

    Add User

    Grant Privileges.

    Grant Privileges

    Now click on go button and phpMyAdmin will create the user and shows the SQL used to create the user.

    User added success

    Now click on User accounts and verify the user with required privileges.

    Verify User

    phpMyAdmin – Exports

    phpMyAdmin provides an intuitive user interface to export database(s).

    Export Dashboard

    Click on Go button and phpMyAdmin will generate SQL required to create databases/tables and other relevant entities.

    Instead of SQL, user can choose other popular options as well like csv, json, yaml etc.

    Export Options

    Now select the custom option and phpMyAdmin will show lots of options like

    • Databases − A list of databases to be selected. User can select multiple databases.

    • Output − Options to save output to a file with customization options like name, charset, compression. It also provides options to skip large tables, rename exported databases/tables/columns and so on.

    • Format Specific Options − Options to display/hide comments, enclose export in a transaction, export views as tables, export metadata and database selection for compatabilities and so.

    • Object Creation Options − Options to add drop database/tables etc if exists, auto increment id, add create view, add create trigger statements, using backquotes to enclose table and column names etc.

    • Data Creation Options − Options to truncate table before insert delayed statements and insert ignore statements. Options to choose format while preparing sql for insert data, set the maximum length of created query, dump timestamp columns in UTC etc.

    phpMyAdmin – Imports

    phpMyAdmin provides an intuitive user interface to import database(s).

    Import Dashboard

    Choose a file to import. phpMyAdmin allows to import zip file as well as uncompressed file. Max size limit is 2GB. Click on Go button and phpMyAdmin will import the databases and show the success/failure/error messages accordingly.

    Import Success

    Now select the custom option and phpMyAdmin will show lots of options like

    Import Options
    • Partial Import − This option is very handy while importing large databases. It allows to prevent PHP timeout and allows to skip queries as well.

    • Other Options − Options to check foreign integrity checks.

    • Format − phpMyAdmin allows six differents format to be used in import process.

    Import Format
    • Format Specific Options − Options to choose database specific formats. For zero values, auto increment can be disabled.

    phpMyAdmin – Settings

    phpMyAdmin provides an intuitive user interface to manage and set settings for its interface.

    Settings

    Following is the description of various sections of Settings tab.

    • Manage Your Settings − Main Dashboard shows the Import/Export and Reset Options. User can set up a setup script to do this process automatically as well. Script provide more fine grain control as well. Saved settings can be exported in JSON/PHP format or to browser storage and in similar fashion, it can be imported.

    • Two Factor Authentication − Two factor authentication is very important for security purpose. It enables to authenticate user with additional authentication mechanism like HOTP and TOTP applications such as FreeOTP, Google Authenticator or Authy or using hardware security tokens supporting FIDO U2F, along with password authentication.

    • Features − Features covers the configuration setting related to databases, text fields, page titles, warning messages, console and general settings like natural order, version checks etc.

    • SQL Queries − Options related to SQL queries like show SQL queries, confirmation on drop queries and configurations on sql query box like to show explain SQL, create PHP Code, refresh options and so.

    • Navigation Panel − Options covering navigation panel, navigation tree and to configure display settings for servers, databases and tables display.

    • Main Panel − Options to customize startup screen, database structure, table structure, browse mode, edit mode, tabs and relational schema display.

    • Export/Import − Options to customize export and import settings.

    phpMyAdmin – Binary Logs

    phpMyAdmin Binary Logs tabs helps in checking the log history. It shows a glimpse of whatever we”ve done using phpMyAdmin.

    Binary Logs

    Let”s select any binary logs file and click on Go button, It will display the logs history of that log file.

    Binary Logs Example

    Here, you can check which activities has been carried out by phpMyAdmin behind the scene.

    phpMyAdmin – Replication

    phpMyAdmin Replication tab handles the database replication. Marking one database as master database and other as slave databases is made easy using this feature.

    Replication
    • Master Replication − This section shows the master status and connected slaves status. We can add slave replication user as well using this section.

    Slave Replication User
    • Slave Replication − This section allows to add a slave using username, password, host and port details.

    Slave Configuration

    phpMyAdmin – Variables

    phpMyAdmin Variables tab handles nearly 600 variables of MySQL where we can edit set them on/off and update their values.

    Variables

    Click on edit button, and you can edit the variable value.

    Editing Variables

    After updating the value, click on save button or press esc key to cancel.

    An important point to note is that these variables can be edited only one user logged in as root user.

    phpMyAdmin – Charsets

    phpMyAdmin Charsets tab displays all the charsets and collations which are supported by MySQL server.

    Charsets

    You cannot edit anything here. It is a readonly information.

    phpMyAdmin – Storage Engines

    phpMyAdmin Storage Engines tab displays all the engines which are supported by MySQL server.

    Storage Engines

    You cannot edit anything here. It is a readonly information. When we click on any engine name, it displays the details further. For example, when user clicks on the default engine myISAM, it displays as following −

    MyISAM

    phpMyAdmin – Plugins

    phpMyAdmin Plugins tab displays all the plugins which are presently installed in MySQL server. It contains information like their version and description.

    Plugins

    Plugins are broadly categorized in six categories −

    • AUDIT

    • AUTHENTICATION

    • DAEMON

    • FTPPARSER

    • INFORMATION SCHEMA

    • STORAGE ENGINE

    If you click on any of the category, it will scroll to the related list of plugins.

    Authentication Plugins

    Khóa học lập trình tại Toidayhoc vừa học vừa làm dự án vừa nhận lương: Khóa học lập trình nhận lương tại trung tâm Toidayhoc

  • Khóa học miễn phí phpMyAdmin – Binary Logs nhận dự án làm có lương

    phpMyAdmin – Binary Logs


    phpMyAdmin Binary Logs tabs helps in checking the log history. It shows a glimpse of whatever we”ve done using phpMyAdmin.

    Binary Logs

    Let”s select any binary logs file and click on Go button, It will display the logs history of that log file.

    Binary Logs Example

    Here, you can check which activities has been carried out by phpMyAdmin behind the scene.


    Khóa học lập trình tại Toidayhoc vừa học vừa làm dự án vừa nhận lương: Khóa học lập trình nhận lương tại trung tâm Toidayhoc