SQLAlchemy – Introduction
SQLAlchemy is a popular SQL toolkit and Object Relational Mapper. It is written in Python and gives full power and flexibility of SQL to an application developer. It is an open source and cross-platform software released under MIT license.
SQLAlchemy is famous for its object-relational mapper (ORM), using which, classes can be mapped to the database, thereby allowing the object model and database schema to develop in a cleanly decoupled way from the beginning.
As size and performance of SQL databases start to matter, they behave less like object collections. On the other hand, as abstraction in object collections starts to matter, they behave less like tables and rows. SQLAlchemy aims to accommodate both of these principles.
For this reason, it has adopted the data mapper pattern (like Hibernate) rather than the active record pattern used by a number of other ORMs. Databases and SQL will be viewed in a different perspective using SQLAlchemy.
Michael Bayer is the original author of SQLAlchemy. Its initial version was released in February 2006. Latest version is numbered as 1.2.7, released as recently as in April 2018.
What is ORM?
ORM (Object Relational Mapping) is a programming technique for converting data between incompatible type systems in object-oriented programming languages. Usually, the type system used in an Object Oriented (OO) language like Python contains non-scalar types. These cannot be expressed as primitive types such as integers and strings. Hence, the OO programmer has to convert objects in scalar data to interact with backend database. However, data types in most of the database products such as Oracle, MySQL, etc., are primary.
In an ORM system, each class maps to a table in the underlying database. Instead of writing tedious database interfacing code yourself, an ORM takes care of these issues for you while you can focus on programming the logics of the system.
SQLAlchemy – Environment setup
Let us discuss the environmental setup required to use SQLAlchemy.
Any version of Python higher than 2.7 is necessary to install SQLAlchemy. The easiest way to install is by using Python Package Manager, pip. This utility is bundled with standard distribution of Python.
pip install sqlalchemy
Using the above command, we can download the latest released version of SQLAlchemy from and install it to your system.
In case of anaconda distribution of Python, SQLAlchemy can be installed from conda terminal using the below command −
conda install -c anaconda sqlalchemy
It is also possible to install SQLAlchemy from below source code −
python setup.py install
SQLAlchemy is designed to operate with a DBAPI implementation built for a particular database. It uses dialect system to communicate with various types of DBAPI implementations and databases. All dialects require that an appropriate DBAPI driver is installed.
The following are the dialects included −
- Firebird
- Microsoft SQL Server
- MySQL
- Oracle
- PostgreSQL
- SQLite
- Sybase
To check if SQLAlchemy is properly installed and to know its version, enter the following command in the Python prompt −
>>> import sqlalchemy
>>>sqlalchemy.__version__
''1.2.7''
SQLAlchemy Core – Expression Language
SQLAlchemy core includes SQL rendering engine, DBAPI integration, transaction integration, and schema description services. SQLAlchemy core uses SQL Expression Language that provides a schema-centric usage paradigm whereas SQLAlchemy ORM is a domain-centric mode of usage.
The SQL Expression Language presents a system of representing relational database structures and expressions using Python constructs. It presents a system of representing the primitive constructs of the relational database directly without opinion, which is in contrast to ORM that presents a high level and abstracted pattern of usage, which itself is an example of applied usage of the Expression Language.
Expression Language is one of the core components of SQLAlchemy. It allows the programmer to specify SQL statements in Python code and use it directly in more complex queries. Expression language is independent of backend and comprehensively covers every aspect of raw SQL. It is closer to raw SQL than any other component in SQLAlchemy.
Expression Language represents the primitive constructs of the relational database directly. Because the ORM is based on top of Expression language, a typical Python database application may have overlapped use of both. The application may use expression language alone, though it has to define its own system of translating application concepts into individual database queries.
Statements of Expression language will be translated into corresponding raw SQL queries by SQLAlchemy engine. We shall now learn how to create the engine and execute various SQL queries with its help.
SQLAlchemy Core – Connecting to Database
In the previous chapter, we have discussed about expression Language in SQLAlchemy. Now let us proceed towards the steps involved in connecting to a database.
Engine class connects a Pool and Dialect together to provide a source of database connectivity and behavior. An object of Engine class is instantiated using the create_engine() function.
The create_engine() function takes the database as one argument. The database is not needed to be defined anywhere. The standard calling form has to send the URL as the first positional argument, usually a string that indicates database dialect and connection arguments. Using the code given below, we can create a database.
>>> from sqlalchemy import create_engine
>>> engine = create_engine(''sqlite:///college.db'', echo = True)
For a MySQL database, use the below command −
engine = create_engine("mysql://user:pwd@localhost/college",echo = True)
To specifically mention DB-API to be used for connection, the URL string takes the form as follows −
dialect[+driver]://user:password@host/dbname
For example, if you are using PyMySQL driver with MySQL, use the following command −
mysql+pymysql://<username>:<password>@<host>/<dbname>
The echo flag is a shortcut to set up SQLAlchemy logging, which is accomplished via Python’s standard logging module. In the subsequent chapters, we will learn all the generated SQLs. To hide the verbose output, set echo attribute to None. Other arguments to create_engine() function may be dialect specific.
The create_engine() function returns an Engine object. Some important methods of Engine class are −
| Sr.No. |
Method & Description |
| 1 |
connect()
Returns connection object
|
| 2 |
execute()
Executes a SQL statement construct
|
| 3 |
begin()
Returns a context manager delivering a Connection with a Transaction established. Upon successful operation, the Transaction is committed, else it is rolled back
|
| 4 |
dispose()
Disposes of the connection pool used by the Engine
|
| 5 |
driver()
Driver name of the Dialect in use by the Engine
|
| 6 |
table_names()
Returns a list of all table names available in the database
|
| 7 |
transaction()
Executes the given function within a transaction boundary
|
SQLAlchemy Core – Creating Table
Let us now discuss how to use the create table function.
The SQL Expression Language constructs its expressions against table columns. SQLAlchemy Column object represents a column in a database table which is in turn represented by a Tableobject. Metadata contains definitions of tables and associated objects such as index, view, triggers, etc.
Hence an object of MetaData class from SQLAlchemy Metadata is a collection of Table objects and their associated schema constructs. It holds a collection of Table objects as well as an optional binding to an Engine or Connection.
from sqlalchemy import MetaData
meta = MetaData()
Constructor of MetaData class can have bind and schema parameters which are by default None.
Next, we define our tables all within above metadata catalog, using the Table construct, which resembles regular SQL CREATE TABLE statement.
An object of Table class represents corresponding table in a database. The constructor takes the following parameters −
| Name |
Name of the table |
| Metadata |
MetaData object that will hold this table |
| Column(s) |
One or more objects of column class |
Column object represents a column in a database table. Constructor takes name, type and other parameters such as primary_key, autoincrement and other constraints.
SQLAlchemy matches Python data to the best possible generic column data types defined in it. Some of the generic data types are −
- BigInteger
- Boolean
- Date
- DateTime
- Float
- Integer
- Numeric
- SmallInteger
- String
- Text
- Time
To create a students table in college database, use the following snippet −
from sqlalchemy import Table, Column, Integer, String, MetaData
meta = MetaData()
students = Table(
''students'', meta,
Column(''id'', Integer, primary_key = True),
Column(''name'', String),
Column(''lastname'', String),
)
The create_all() function uses the engine object to create all the defined table objects and stores the information in metadata.
meta.create_all(engine)
Complete code is given below which will create a SQLite database college.db with a students table in it.
from sqlalchemy import create_engine, MetaData, Table, Column, Integer, String
engine = create_engine(''sqlite:///college.db'', echo = True)
meta = MetaData()
students = Table(
''students'', meta,
Column(''id'', Integer, primary_key = True),
Column(''name'', String),
Column(''lastname'', String),
)
meta.create_all(engine)
Because echo attribute of create_engine() function is set to True, the console will display the actual SQL query for table creation as follows −
CREATE TABLE students (
id INTEGER NOT NULL,
name VARCHAR,
lastname VARCHAR,
PRIMARY KEY (id)
)
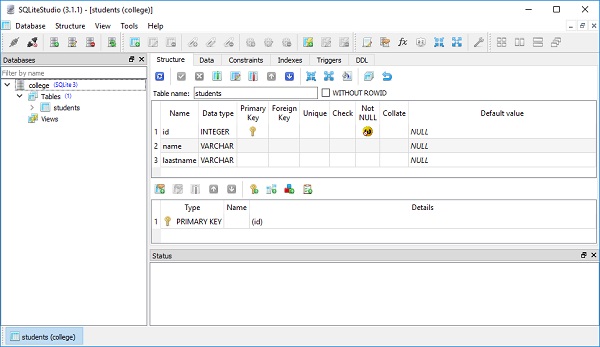
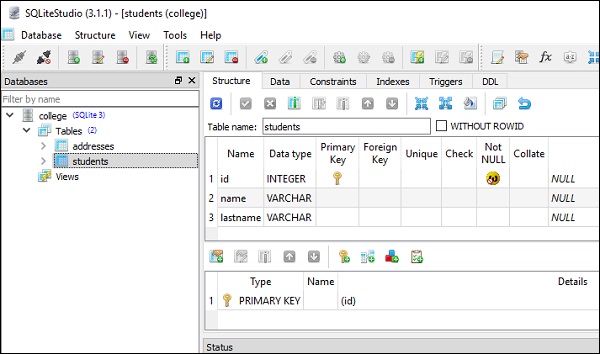
The college.db will be created in current working directory. To check if the students table is created, you can open the database using any SQLite GUI tool such as SQLiteStudio.
The below image shows the students table that is created in the database −
SQLAlchemy Core – SQL Expressions
In this chapter, we will briefly focus on the SQL Expressions and their functions.
SQL expressions are constructed using corresponding methods relative to target table object. For example, the INSERT statement is created by executing insert() method as follows −
ins = students.insert()
The result of above method is an insert object that can be verified by using str() function. The below code inserts details like student id, name, lastname.
''INSERT INTO students (id, name, lastname) VALUES (:id, :name, :lastname)''
It is possible to insert value in a specific field by values() method to insert object. The code for the same is given below −
>>> ins = users.insert().values(name = ''Karan'')
>>> str(ins)
''INSERT INTO users (name) VALUES (:name)''
The SQL echoed on Python console doesn’t show the actual value (‘Karan’ in this case). Instead, SQLALchemy generates a bind parameter which is visible in compiled form of the statement.
ins.compile().params
{''name'': ''Karan''}
Similarly, methods like update(), delete() and select() create UPDATE, DELETE and SELECT expressions respectively. We shall learn about them in later chapters.
SQLAlchemy Core – Executing Expression
In the previous chapter, we have learnt SQL Expressions. In this chapter, we shall look into the execution of these expressions.
In order to execute the resulting SQL expressions, we have to obtain a connection object representing an actively checked out DBAPI connection resource and then feed the expression object as shown in the code below.
conn = engine.connect()
The following insert() object can be used for execute() method −
ins = students.insert().values(name = ''Ravi'', lastname = ''Kapoor'')
result = conn.execute(ins)
The console shows the result of execution of SQL expression as below −
INSERT INTO students (name, lastname) VALUES (?, ?)
(''Ravi'', ''Kapoor'')
COMMIT
Following is the entire snippet that shows the execution of INSERT query using SQLAlchemy’s core technique −
from sqlalchemy import create_engine, MetaData, Table, Column, Integer, String
engine = create_engine(''sqlite:///college.db'', echo = True)
meta = MetaData()
students = Table(
''students'', meta,
Column(''id'', Integer, primary_key = True),
Column(''name'', String),
Column(''lastname'', String),
)
ins = students.insert()
ins = students.insert().values(name = ''Ravi'', lastname = ''Kapoor'')
conn = engine.connect()
result = conn.execute(ins)
The result can be verified by opening the database using SQLite Studio as shown in the below screenshot −
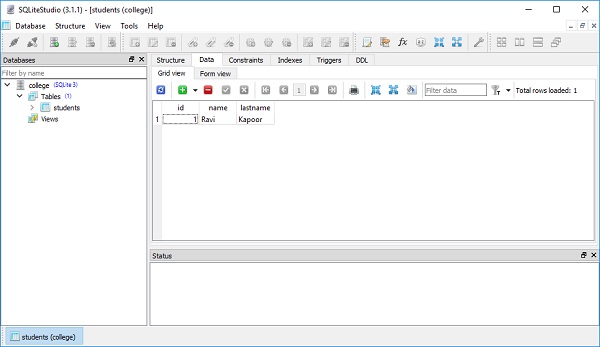
The result variable is known as a object. It is analogous to the DBAPI cursor object. We can acquire information about the primary key values which were generated from our statement using ResultProxy.inserted_primary_key as shown below −
result.inserted_primary_key
[1]
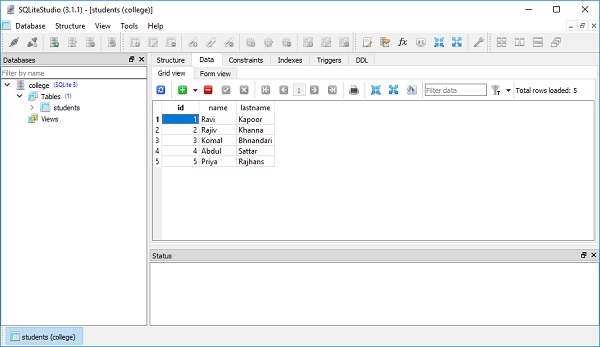
To issue many inserts using DBAPI’s execute many() method, we can send in a list of dictionaries each containing a distinct set of parameters to be inserted.
conn.execute(students.insert(), [
{''name'':''Rajiv'', ''lastname'' : ''Khanna''},
{''name'':''Komal'',''lastname'' : ''Bhandari''},
{''name'':''Abdul'',''lastname'' : ''Sattar''},
{''name'':''Priya'',''lastname'' : ''Rajhans''},
])
This is reflected in the data view of the table as shown in the following figure −
SQLAlchemy Core – Selecting Rows
In this chapter, we will discuss about the concept of selecting rows in the table object.
The select() method of table object enables us to construct SELECT expression.
s = students.select()
The select object translates to SELECT query by str(s) function as shown below −
''SELECT students.id, students.name, students.lastname FROM students''
We can use this select object as a parameter to execute() method of connection object as shown in the code below −
result = conn.execute(s)
When the above statement is executed, Python shell echoes following equivalent SQL expression −
SELECT students.id, students.name, students.lastname
FROM students
The resultant variable is an equivalent of cursor in DBAPI. We can now fetch records using fetchone() method.
row = result.fetchone()
All selected rows in the table can be printed by a for loop as given below −
for row in result:
print (row)
The complete code to print all rows from students table is shown below −
from sqlalchemy import create_engine, MetaData, Table, Column, Integer, String
engine = create_engine(''sqlite:///college.db'', echo = True)
meta = MetaData()
students = Table(
''students'', meta,
Column(''id'', Integer, primary_key = True),
Column(''name'', String),
Column(''lastname'', String),
)
s = students.select()
conn = engine.connect()
result = conn.execute(s)
for row in result:
print (row)
The output shown in Python shell is as follows −
(1, ''Ravi'', ''Kapoor'')
(2, ''Rajiv'', ''Khanna'')
(3, ''Komal'', ''Bhandari'')
(4, ''Abdul'', ''Sattar'')
(5, ''Priya'', ''Rajhans'')
The WHERE clause of SELECT query can be applied by using Select.where(). For example, if we want to display rows with id >2
s = students.select().where(students.c.id>2)
result = conn.execute(s)
for row in result:
print (row)
Here c attribute is an alias for column. Following output will be displayed on the shell −
(3, ''Komal'', ''Bhandari'')
(4, ''Abdul'', ''Sattar'')
(5, ''Priya'', ''Rajhans'')
Here, we have to note that select object can also be obtained by select() function in sqlalchemy.sql module. The select() function requires the table object as argument.
from sqlalchemy.sql import select
s = select([users])
result = conn.execute(s)
SQLAlchemy Core – Using Textual SQL
SQLAlchemy lets you just use strings, for those cases when the SQL is already known and there isn’t a strong need for the statement to support dynamic features. The text() construct is used to compose a textual statement that is passed to the database mostly unchanged.
It constructs a new TextClause, representing a textual SQL string directly as shown in the below code −
from sqlalchemy import text
t = text("SELECT * FROM students")
result = connection.execute(t)
The advantages text() provides over a plain string are −
- backend-neutral support for bind parameters
- per-statement execution options
- result-column typing behaviour
The text()function requires Bound parameters in the named colon format. They are consistent regardless of database backend. To send values in for the parameters, we pass them into the execute() method as additional arguments.
The following example uses bound parameters in textual SQL −
from sqlalchemy.sql import text
s = text("select students.name, students.lastname from students where students.name between :x and :y")
conn.execute(s, x = ''A'', y = ''L'').fetchall()
The text() function constructs SQL expression as follows −
select students.name, students.lastname from students where students.name between ? and ?
The values of x = ’A’ and y = ’L’ are passed as parameters. Result is a list of rows with names between ‘A’ and ‘L’ −
[(''Komal'', ''Bhandari''), (''Abdul'', ''Sattar'')]
The text() construct supports pre-established bound values using the TextClause.bindparams() method. The parameters can also be explicitly typed as follows −
stmt = text("SELECT * FROM students WHERE students.name BETWEEN :x AND :y")
stmt = stmt.bindparams(
bindparam("x", type_= String),
bindparam("y", type_= String)
)
result = conn.execute(stmt, {"x": "A", "y": "L"})
The text() function also be produces fragments of SQL within a select() object that
accepts text() objects as an arguments. The “geometry” of the statement is provided by
select() construct , and the textual content by text() construct. We can build a statement
without the need to refer to any pre-established Table metadata.
from sqlalchemy.sql import select
s = select([text("students.name, students.lastname from students")]).where(text("students.name between :x and :y"))
conn.execute(s, x = ''A'', y = ''L'').fetchall()
You can also use and_() function to combine multiple conditions in WHERE clause created with the help of text() function.
from sqlalchemy import and_
from sqlalchemy.sql import select
s = select([text("* from students")])
.where(
and_(
text("students.name between :x and :y"),
text("students.id>2")
)
)
conn.execute(s, x = ''A'', y = ''L'').fetchall()
Above code fetches rows with names between “A” and “L” with id greater than 2. The output of the code is given below −
[(3, ''Komal'', ''Bhandari''), (4, ''Abdul'', ''Sattar'')]
SQLAlchemy Core – Using Aliases
The alias in SQL corresponds to a “renamed” version of a table or SELECT statement, which occurs anytime you say “SELECT * FROM table1 AS a”. The AS creates a new name for the table. Aliases allow any table or subquery to be referenced by a unique name.
In case of a table, this allows the same table to be named in the FROM clause multiple times. It provides a parent name for the columns represented by the statement, allowing them to be referenced relative to this name.
In SQLAlchemy, any Table, select() construct, or other selectable object can be turned into an alias using the From Clause.alias() method, which produces an Alias construct. The alias() function in sqlalchemy.sql module represents an alias, as typically applied to any table or sub-select within a SQL statement using the AS keyword.
from sqlalchemy.sql import alias
st = students.alias("a")
This alias can now be used in select() construct to refer to students table −
s = select([st]).where(st.c.id>2)
This translates to SQL expression as follows −
SELECT a.id, a.name, a.lastname FROM students AS a WHERE a.id > 2
We can now execute this SQL query with the execute() method of connection object. The complete code is as follows −
from sqlalchemy.sql import alias, select
st = students.alias("a")
s = select([st]).where(st.c.id > 2)
conn.execute(s).fetchall()
When above line of code is executed, it generates the following output −
[(3, ''Komal'', ''Bhandari''), (4, ''Abdul'', ''Sattar''), (5, ''Priya'', ''Rajhans'')]
Using UPDATE Expression
The update() method on target table object constructs equivalent UPDATE SQL expression.
table.update().where(conditions).values(SET expressions)
The values() method on the resultant update object is used to specify the SET conditions of the UPDATE. If left as None, the SET conditions are determined from those parameters passed to the statement during the execution and/or compilation of the statement.
The where clause is an Optional expression describing the WHERE condition of the UPDATE statement.
Following code snippet changes value of ‘lastname’ column from ‘Khanna’ to ‘Kapoor’ in students table −
stmt = students.update().where(students.c.lastname == ''Khanna'').values(lastname = ''Kapoor'')
The stmt object is an update object that translates to −
''UPDATE students SET lastname = :lastname WHERE students.lastname = :lastname_1''
The bound parameter lastname_1 will be substituted when execute() method is invoked. The complete update code is given below −
from sqlalchemy import create_engine, MetaData, Table, Column, Integer, String
engine = create_engine(''sqlite:///college.db'', echo = True)
meta = MetaData()
students = Table(
''students'',
meta,
Column(''id'', Integer, primary_key = True),
Column(''name'', String),
Column(''lastname'', String),
)
conn = engine.connect()
stmt=students.update().where(students.c.lastname==''Khanna'').values(lastname=''Kapoor'')
conn.execute(stmt)
s = students.select()
conn.execute(s).fetchall()
The above code displays following output with second row showing effect of update operation as in the screenshot given −
[
(1, ''Ravi'', ''Kapoor''),
(2, ''Rajiv'', ''Kapoor''),
(3, ''Komal'', ''Bhandari''),
(4, ''Abdul'', ''Sattar''),
(5, ''Priya'', ''Rajhans'')
]

Note that similar functionality can also be achieved by using update() function in sqlalchemy.sql.expression module as shown below −
from sqlalchemy.sql.expression import update
stmt = update(students).where(students.c.lastname == ''Khanna'').values(lastname = ''Kapoor'')
Using DELETE Expression
In the previous chapter, we have understood what an Update expression does. The next expression that we are going to learn is Delete.
The delete operation can be achieved by running delete() method on target table object as given in the following statement −
stmt = students.delete()
In case of students table, the above line of code constructs a SQL expression as following −
''DELETE FROM students''
However, this will delete all rows in students table. Usually DELETE query is associated with a logical expression specified by WHERE clause. The following statement shows where parameter −
stmt = students.delete().where(students.c.id > 2)
The resultant SQL expression will have a bound parameter which will be substituted at runtime when the statement is executed.
''DELETE FROM students WHERE students.id > :id_1''
Following code example will delete those rows from students table having lastname as ‘Khanna’ −
from sqlalchemy.sql.expression import update
from sqlalchemy import create_engine, MetaData, Table, Column, Integer, String
engine = create_engine(''sqlite:///college.db'', echo = True)
meta = MetaData()
students = Table(
''students'', meta,
Column(''id'', Integer, primary_key = True),
Column(''name'', String),
Column(''lastname'', String),
)
conn = engine.connect()
stmt = students.delete().where(students.c.lastname == ''Khanna'')
conn.execute(stmt)
s = students.select()
conn.execute(s).fetchall()
To verify the result, refresh the data view of students table in SQLiteStudio.
SQLAlchemy Core – Using Multiple Tables
One of the important features of RDBMS is establishing relation between tables. SQL operations like SELECT, UPDATE and DELETE can be performed on related tables. This section describes these operations using SQLAlchemy.
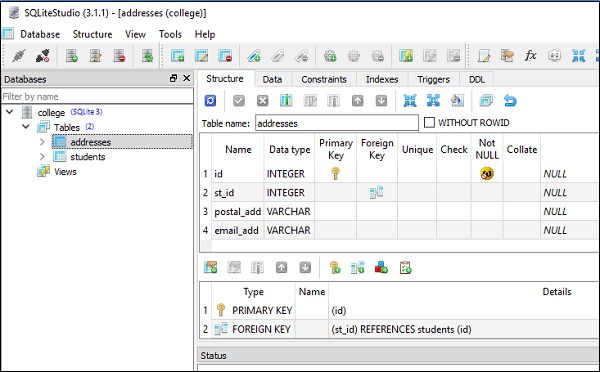
For this purpose, two tables are created in our SQLite database (college.db). The students table has the same structure as given in the previous section; whereas the addresses table has st_id column which is mapped to id column in students table using foreign key constraint.
The following code will create two tables in college.db −
from sqlalchemy import create_engine, MetaData, Table, Column, Integer, String, ForeignKey
engine = create_engine(''sqlite:///college.db'', echo=True)
meta = MetaData()
students = Table(
''students'', meta,
Column(''id'', Integer, primary_key = True),
Column(''name'', String),
Column(''lastname'', String),
)
addresses = Table(
''addresses'', meta,
Column(''id'', Integer, primary_key = True),
Column(''st_id'', Integer, ForeignKey(''students.id'')),
Column(''postal_add'', String),
Column(''email_add'', String))
meta.create_all(engine)
Above code will translate to CREATE TABLE queries for students and addresses table as below −
CREATE TABLE students (
id INTEGER NOT NULL,
name VARCHAR,
lastname VARCHAR,
PRIMARY KEY (id)
)
CREATE TABLE addresses (
id INTEGER NOT NULL,
st_id INTEGER,
postal_add VARCHAR,
email_add VARCHAR,
PRIMARY KEY (id),
FOREIGN KEY(st_id) REFERENCES students (id)
)
The following screenshots present the above code very clearly −
These tables are populated with data by executing insert() method of table objects. To insert 5 rows in students table, you can use the code given below −
from sqlalchemy import create_engine, MetaData, Table, Column, Integer, String
engine = create_engine(''sqlite:///college.db'', echo = True)
meta = MetaData()
conn = engine.connect()
students = Table(
''students'', meta,
Column(''id'', Integer, primary_key = True),
Column(''name'', String),
Column(''lastname'', String),
)
conn.execute(students.insert(), [
{''name'':''Ravi'', ''lastname'':''Kapoor''},
{''name'':''Rajiv'', ''lastname'' : ''Khanna''},
{''name'':''Komal'',''lastname'' : ''Bhandari''},
{''name'':''Abdul'',''lastname'' : ''Sattar''},
{''name'':''Priya'',''lastname'' : ''Rajhans''},
])
Rows are added in addresses table with the help of the following code −
from sqlalchemy import create_engine, MetaData, Table, Column, Integer, String
engine = create_engine(''sqlite:///college.db'', echo = True)
meta = MetaData()
conn = engine.connect()
addresses = Table(
''addresses'', meta,
Column(''id'', Integer, primary_key = True),
Column(''st_id'', Integer),
Column(''postal_add'', String),
Column(''email_add'', String)
)
conn.execute(addresses.insert(), [
{''st_id'':1, ''postal_add'':''Shivajinagar Pune'', ''email_add'':''ravi@gmail.com''},
{''st_id'':1, ''postal_add'':''ChurchGate Mumbai'', ''email_add'':''kapoor@gmail.com''},
{''st_id'':3, ''postal_add'':''Jubilee Hills Hyderabad'', ''email_add'':''komal@gmail.com''},
{''st_id'':5, ''postal_add'':''MG Road Bangaluru'', ''email_add'':''as@yahoo.com''},
{''st_id'':2, ''postal_add'':''Cannought Place new Delhi'', ''email_add'':''admin@khanna.com''},
])
Note that the st_id column in addresses table refers to id column in students table. We can now use this relation to fetch data from both the tables. We want to fetch name and lastname from students table corresponding to st_id in the addresses table.
from sqlalchemy.sql import select
s = select([students, addresses]).where(students.c.id == addresses.c.st_id)
result = conn.execute(s)
for row in result:
print (row)
The select objects will effectively translate into following SQL expression joining two tables on common relation −
SELECT students.id,
students.name,
students.lastname,
addresses.id,
addresses.st_id,
addresses.postal_add,
addresses.email_add
FROM students, addresses
WHERE students.id = addresses.st_id
This will produce output extracting corresponding data from both tables as follows −
(1, ''Ravi'', ''Kapoor'', 1, 1, ''Shivajinagar Pune'', ''ravi@gmail.com'')
(1, ''Ravi'', ''Kapoor'', 2, 1, ''ChurchGate Mumbai'', ''kapoor@gmail.com'')
(3, ''Komal'', ''Bhandari'', 3, 3, ''Jubilee Hills Hyderabad'', ''komal@gmail.com'')
(5, ''Priya'', ''Rajhans'', 4, 5, ''MG Road Bangaluru'', ''as@yahoo.com'')
(2, ''Rajiv'', ''Khanna'', 5, 2, ''Cannought Place new Delhi'', ''admin@khanna.com'')
Using Multiple Table Updates
In the previous chapter, we have discussed about how to use multiple tables. So we proceed a step further and learn multiple table updates in this chapter.
Using SQLAlchemy’s table object, more than one table can be specified in WHERE clause of update() method. The PostgreSQL and Microsoft SQL Server support UPDATE statements that refer to multiple tables. This implements “UPDATE FROM” syntax, which updates one table at a time. However, additional tables can be referenced in an additional “FROM” clause in the WHERE clause directly. The following lines of codes explain the concept of multiple table updates clearly.
stmt = students.update().
values({
students.c.name:''xyz'',
addresses.c.email_add:''abc@xyz.com''
}).
where(students.c.id == addresses.c.id)
The update object is equivalent to the following UPDATE query −
UPDATE students
SET email_add = :addresses_email_add, name = :name
FROM addresses
WHERE students.id = addresses.id
As far as MySQL dialect is concerned, multiple tables can be embedded into a single UPDATE statement separated by a comma as given below −
stmt = students.update().
values(name = ''xyz'').
where(students.c.id == addresses.c.id)
The following code depicts the resulting UPDATE query −
''UPDATE students SET name = :name
FROM addresses
WHERE students.id = addresses.id''
SQLite dialect however doesn’t support multiple-table criteria within UPDATE and shows following error −
NotImplementedError: This backend does not support multiple-table criteria within UPDATE
Parameter-Ordered Updates
The UPDATE query of raw SQL has SET clause. It is rendered by the update() construct using the column ordering given in the originating Table object. Therefore, a particular UPDATE statement with particular columns will be rendered the same each time. Since the parameters themselves are passed to the Update.values() method as Python dictionary keys, there is no other fixed ordering available.
In some cases, the order of parameters rendered in the SET clause are significant. In MySQL, providing updates to column values is based on that of other column values.
Following statement’s result −
UPDATE table1 SET x = y + 10, y = 20
will have a different result than −
UPDATE table1 SET y = 20, x = y + 10
SET clause in MySQL is evaluated on a per-value basis and not on per-row basis. For this purpose, the preserve_parameter_order is used. Python list of 2-tuples is given as argument to the Update.values() method −
stmt = table1.update(preserve_parameter_order = True).
values([(table1.c.y, 20), (table1.c.x, table1.c.y + 10)])
The List object is similar to dictionary except that it is ordered. This ensures that the “y” column’s SET clause will render first, then the “x” column’s SET clause.
SQLAlchemy Core – Multiple Table Deletes
In this chapter, we will look into the Multiple Table Deletes expression which is similar to using Multiple Table Updates function.
More than one table can be referred in WHERE clause of DELETE statement in many DBMS dialects. For PG and MySQL, “DELETE USING” syntax is used; and for SQL Server, using “DELETE FROM” expression refers to more than one table. The SQLAlchemy delete() construct supports both of these modes implicitly, by specifying multiple tables in the WHERE clause as follows −
stmt = users.delete().
where(users.c.id == addresses.c.id).
where(addresses.c.email_address.startswith(''xyz%''))
conn.execute(stmt)
On a PostgreSQL backend, the resulting SQL from the above statement would render as −
DELETE FROM users USING addresses
WHERE users.id = addresses.id
AND (addresses.email_address LIKE %(email_address_1)s || ''%%'')
If this method is used with a database that doesn’t support this behaviour, the compiler will raise NotImplementedError.
SQLAlchemy Core – Using Joins
In this chapter, we will learn how to use Joins in SQLAlchemy.
Effect of joining is achieved by just placing two tables in either the columns clause or the where clause of the select() construct. Now we use the join() and outerjoin() methods.
The join() method returns a join object from one table object to another.
join(right, onclause = None, isouter = False, full = False)
The functions of the parameters mentioned in the above code are as follows −
-
right − the right side of the join; this is any Table object
-
onclause − a SQL expression representing the ON clause of the join. If left at None, it attempts to join the two tables based on a foreign key relationship
-
isouter − if True, renders a LEFT OUTER JOIN, instead of JOIN
-
full − if True, renders a FULL OUTER JOIN, instead of LEFT OUTER JOIN
For example, following use of join() method will automatically result in join based on the foreign key.
>>> print(students.join(addresses))
This is equivalent to following SQL expression −
students JOIN addresses ON students.id = addresses.st_id
You can explicitly mention joining criteria as follows −
j = students.join(addresses, students.c.id == addresses.c.st_id)
If we now build the below select construct using this join as −
stmt = select([students]).select_from(j)
This will result in following SQL expression −
SELECT students.id, students.name, students.lastname
FROM students JOIN addresses ON students.id = addresses.st_id
If this statement is executed using the connection representing engine, data belonging to selected columns will be displayed. The complete code is as follows −
from sqlalchemy import create_engine, MetaData, Table, Column, Integer, String, ForeignKey
engine = create_engine(''sqlite:///college.db'', echo = True)
meta = MetaData()
conn = engine.connect()
students = Table(
''students'', meta,
Column(''id'', Integer, primary_key = True),
Column(''name'', String),
Column(''lastname'', String),
)
addresses = Table(
''addresses'', meta,
Column(''id'', Integer, primary_key = True),
Column(''st_id'', Integer,ForeignKey(''students.id'')),
Column(''postal_add'', String),
Column(''email_add'', String)
)
from sqlalchemy import join
from sqlalchemy.sql import select
j = students.join(addresses, students.c.id == addresses.c.st_id)
stmt = select([students]).select_from(j)
result = conn.execute(stmt)
result.fetchall()
The following is the output of the above code −
[
(1, ''Ravi'', ''Kapoor''),
(1, ''Ravi'', ''Kapoor''),
(3, ''Komal'', ''Bhandari''),
(5, ''Priya'', ''Rajhans''),
(2, ''Rajiv'', ''Khanna'')
]
SQLAlchemy Core – Using Conjunctions
Conjunctions are functions in SQLAlchemy module that implement relational operators used in WHERE clause of SQL expressions. The operators AND, OR, NOT, etc., are used to form a compound expression combining two individual logical expressions. A simple example of using AND in SELECT statement is as follows −
SELECT * from EMPLOYEE WHERE salary>10000 AND age>30
SQLAlchemy functions and_(), or_() and not_() respectively implement AND, OR and NOT operators.
and_() function
It produces a conjunction of expressions joined by AND. An example is given below for better understanding −
from sqlalchemy import and_
print(
and_(
students.c.name == ''Ravi'',
students.c.id <3
)
)
This translates to −
students.name = :name_1 AND students.id < :id_1
To use and_() in a select() construct on a students table, use the following line of code −
stmt = select([students]).where(and_(students.c.name == ''Ravi'', students.c.id <3))
SELECT statement of the following nature will be constructed −
SELECT students.id,
students.name,
students.lastname
FROM students
WHERE students.name = :name_1 AND students.id < :id_1
The complete code that displays output of the above SELECT query is as follows −
from sqlalchemy import create_engine, MetaData, Table, Column, Integer, String, ForeignKey, select
engine = create_engine(''sqlite:///college.db'', echo = True)
meta = MetaData()
conn = engine.connect()
students = Table(
''students'', meta,
Column(''id'', Integer, primary_key = True),
Column(''name'', String),
Column(''lastname'', String),
)
from sqlalchemy import and_, or_
stmt = select([students]).where(and_(students.c.name == ''Ravi'', students.c.id <3))
result = conn.execute(stmt)
print (result.fetchall())
Following row will be selected assuming that students table is populated with data used in previous example −
[(1, ''Ravi'', ''Kapoor'')]
or_() function
It produces conjunction of expressions joined by OR. We shall replace the stmt object in the above example with the following one using or_()
stmt = select([students]).where(or_(students.c.name == ''Ravi'', students.c.id <3))
Which will be effectively equivalent to following SELECT query −
SELECT students.id,
students.name,
students.lastname
FROM students
WHERE students.name = :name_1
OR students.id < :id_1
Once you make the substitution and run the above code, the result will be two rows falling in the OR condition −
[(1, ''Ravi'', ''Kapoor''),
(2, ''Rajiv'', ''Khanna'')]
asc() function
It produces an ascending ORDER BY clause. The function takes the column to apply the function as a parameter.
from sqlalchemy import asc
stmt = select([students]).order_by(asc(students.c.name))
The statement implements following SQL expression −
SELECT students.id,
students.name,
students.lastname
FROM students
ORDER BY students.name ASC
Following code lists out all records in students table in ascending order of name column −
from sqlalchemy import create_engine, MetaData, Table, Column, Integer, String, ForeignKey, select
engine = create_engine(''sqlite:///college.db'', echo = True)
meta = MetaData()
conn = engine.connect()
students = Table(
''students'', meta,
Column(''id'', Integer, primary_key = True),
Column(''name'', String),
Column(''lastname'', String),
)
from sqlalchemy import asc
stmt = select([students]).order_by(asc(students.c.name))
result = conn.execute(stmt)
for row in result:
print (row)
Above code produces following output −
(4, ''Abdul'', ''Sattar'')
(3, ''Komal'', ''Bhandari'')
(5, ''Priya'', ''Rajhans'')
(2, ''Rajiv'', ''Khanna'')
(1, ''Ravi'', ''Kapoor'')
desc() function
Similarly desc() function produces descending ORDER BY clause as follows −
from sqlalchemy import desc
stmt = select([students]).order_by(desc(students.c.lastname))
The equivalent SQL expression is −
SELECT students.id,
students.name,
students.lastname
FROM students
ORDER BY students.lastname DESC
And the output for the above lines of code is −
(4, ''Abdul'', ''Sattar'')
(5, ''Priya'', ''Rajhans'')
(2, ''Rajiv'', ''Khanna'')
(1, ''Ravi'', ''Kapoor'')
(3, ''Komal'', ''Bhandari'')
between() function
It produces a BETWEEN predicate clause. This is generally used to validate if value of a certain column falls between a range. For example, following code selects rows for which id column is between 2 and 4 −
from sqlalchemy import between
stmt = select([students]).where(between(students.c.id,2,4))
print (stmt)
The resulting SQL expression resembles −
SELECT students.id,
students.name,
students.lastname
FROM students
WHERE students.id
BETWEEN :id_1 AND :id_2
and the result is as follows −
(2, ''Rajiv'', ''Khanna'')
(3, ''Komal'', ''Bhandari'')
(4, ''Abdul'', ''Sattar'')
SQLAlchemy Core – Using Functions
Some of the important functions used in SQLAlchemy are discussed in this chapter.
Standard SQL has recommended many functions which are implemented by most dialects. They return a single value based on the arguments passed to it. Some SQL functions take columns as arguments whereas some are generic. Thefunc keyword in SQLAlchemy API is used to generate these functions.
In SQL, now() is a generic function. Following statements renders the now() function using func −
from sqlalchemy.sql import func
result = conn.execute(select([func.now()]))
print (result.fetchone())
Sample result of above code may be as shown below −
(datetime.datetime(2018, 6, 16, 6, 4, 40),)
On the other hand, count() function which returns number of rows selected from a table, is rendered by following usage of func −
from sqlalchemy.sql import func
result = conn.execute(select([func.count(students.c.id)]))
print (result.fetchone())
From the above code, count of number of rows in students table will be fetched.
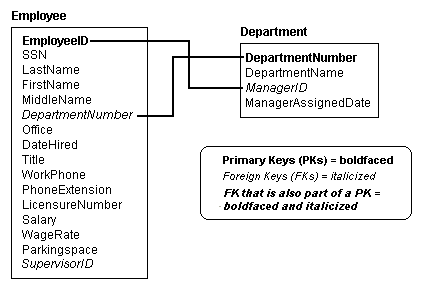
Some built-in SQL functions are demonstrated using Employee table with following data −
| ID |
Name |
Marks |
| 1 |
Kamal |
56 |
| 2 |
Fernandez |
85 |
| 3 |
Sunil |
62 |
| 4 |
Bhaskar |
76 |
The max() function is implemented by following usage of func from SQLAlchemy which will result in 85, the total maximum marks obtained −
from sqlalchemy.sql import func
result = conn.execute(select([func.max(employee.c.marks)]))
print (result.fetchone())
Similarly, min() function that will return 56, minimum marks, will be rendered by following code −
from sqlalchemy.sql import func
result = conn.execute(select([func.min(employee.c.marks)]))
print (result.fetchone())
So, the AVG() function can also be implemented by using the below code −
from sqlalchemy.sql import func
result = conn.execute(select([func.avg(employee.c.marks)]))
print (result.fetchone())
Functions are normally used in the columns clause of a select statement.
They can also be given label as well as a type. A label to function allows the result
to be targeted in a result row based on a string name, and a type is required when
you need result-set processing to occur.from sqlalchemy.sql import func
result = conn.execute(select([func.max(students.c.lastname).label(''Name'')]))
print (result.fetchone())
SQLAlchemy Core – Using Set Operations
In the last chapter, we have learnt about various functions such as max(), min(), count(), etc., here, we will learn about set operations and their uses.
Set operations such as UNION and INTERSECT are supported by standard SQL and most of its dialect. SQLAlchemy implements them with the help of following functions −
union()
While combining results of two or more SELECT statements, UNION eliminates duplicates from the resultset. The number of columns and datatype must be same in both the tables.
The union() function returns a CompoundSelect object from multiple tables. Following example demonstrates its use −
from sqlalchemy import create_engine, MetaData, Table, Column, Integer, String, union
engine = create_engine(''sqlite:///college.db'', echo = True)
meta = MetaData()
conn = engine.connect()
addresses = Table(
''addresses'', meta,
Column(''id'', Integer, primary_key = True),
Column(''st_id'', Integer),
Column(''postal_add'', String),
Column(''email_add'', String)
)
u = union(addresses.select().where(addresses.c.email_add.like(''%@gmail.com addresses.select().where(addresses.c.email_add.like(''%@yahoo.com''))))
result = conn.execute(u)
result.fetchall()
The union construct translates to following SQL expression −
SELECT addresses.id,
addresses.st_id,
addresses.postal_add,
addresses.email_add
FROM addresses
WHERE addresses.email_add LIKE ? UNION SELECT addresses.id,
addresses.st_id,
addresses.postal_add,
addresses.email_add
FROM addresses
WHERE addresses.email_add LIKE ?
From our addresses table, following rows represent the union operation −
[
(1, 1, ''Shivajinagar Pune'', ''ravi@gmail.com''),
(2, 1, ''ChurchGate Mumbai'', ''kapoor@gmail.com''),
(3, 3, ''Jubilee Hills Hyderabad'', ''komal@gmail.com''),
(4, 5, ''MG Road Bangaluru'', ''as@yahoo.com'')
]
union_all()
UNION ALL operation cannot remove the duplicates and cannot sort the data in the resultset. For example, in above query, UNION is replaced by UNION ALL to see the effect.
u = union_all(addresses.select().where(addresses.c.email_add.like(''%@gmail.com'')), addresses.select().where(addresses.c.email_add.like(''%@yahoo.com'')))
The corresponding SQL expression is as follows −
SELECT addresses.id,
addresses.st_id,
addresses.postal_add,
addresses.email_add
FROM addresses
WHERE addresses.email_add LIKE ? UNION ALL SELECT addresses.id,
addresses.st_id,
addresses.postal_add,
addresses.email_add
FROM addresses
WHERE addresses.email_add LIKE ?
except_()
The SQL EXCEPT clause/operator is used to combine two SELECT statements and return rows from the first SELECT statement that are not returned by the second SELECT statement. The except_() function generates a SELECT expression with EXCEPT clause.
In the following example, the except_() function returns only those records from addresses table that have ‘gmail.com’ in email_add field but excludes those which have ‘Pune’ as part of postal_add field.
u = except_(addresses.select().where(addresses.c.email_add.like(''%@gmail.com'')), addresses.select().where(addresses.c.postal_add.like(''%Pune'')))
Result of the above code is the following SQL expression −
SELECT addresses.id,
addresses.st_id,
addresses.postal_add,
addresses.email_add
FROM addresses
WHERE addresses.email_add LIKE ? EXCEPT SELECT addresses.id,
addresses.st_id,
addresses.postal_add,
addresses.email_add
FROM addresses
WHERE addresses.postal_add LIKE ?
Assuming that addresses table contains data used in earlier examples, it will display following output −
[(2, 1, ''ChurchGate Mumbai'', ''kapoor@gmail.com''),
(3, 3, ''Jubilee Hills Hyderabad'', ''komal@gmail.com'')]
intersect()
Using INTERSECT operator, SQL displays common rows from both the SELECT statements. The intersect() function implements this behaviour.
In following examples, two SELECT constructs are parameters to intersect() function. One returns rows containing ‘gmail.com’ as part of email_add column, and other returns rows having ‘Pune’ as part of postal_add column. The result will be common rows from both resultsets.
u = intersect(addresses.select().where(addresses.c.email_add.like(''%@gmail.com'')), addresses.select().where(addresses.c.postal_add.like(''%Pune'')))
In effect, this is equivalent to following SQL statement −
SELECT addresses.id,
addresses.st_id,
addresses.postal_add,
addresses.email_add
FROM addresses
WHERE addresses.email_add LIKE ? INTERSECT SELECT addresses.id,
addresses.st_id,
addresses.postal_add,
addresses.email_add
FROM addresses
WHERE addresses.postal_add LIKE ?
The two bound parameters ‘%gmail.com’ and ‘%Pune’ generate a single row from original data in addresses table as shown below −
[(1, 1, ''Shivajinagar Pune'', ''ravi@gmail.com'')]
SQLAlchemy ORM – Declaring Mapping
The main objective of the Object Relational Mapper API of SQLAlchemy is to facilitate associating user-defined Python classes with database tables, and objects of those classes with rows in their corresponding tables. Changes in states of objects and rows are synchronously matched with each other. SQLAlchemy enables expressing database queries in terms of user defined classes and their defined relationships.
The ORM is constructed on top of the SQL Expression Language. It is a high level and abstracted pattern of usage. In fact, ORM is an applied usage of the Expression Language.
Although a successful application may be constructed using the Object Relational Mapper exclusively, sometimes an application constructed with the ORM may use the Expression Language directly where specific database interactions are required.
Declare Mapping
First of all, create_engine() function is called to set up an engine object which is subsequently used to perform SQL operations. The function has two arguments, one is the name of database and other is an echo parameter when set to True will generate the activity log. If it doesn’t exist, the database will be created. In the following example, a SQLite database is created.
from sqlalchemy import create_engine
engine = create_engine(''sqlite:///sales.db'', echo = True)
The Engine establishes a real DBAPI connection to the database when a method like Engine.execute() or Engine.connect() is called. It is then used to emit the SQLORM which does not use the Engine directly; instead, it is used behind the scenes by the ORM.
In case of ORM, the configurational process starts by describing the database tables and then by defining classes which will be mapped to those tables. In SQLAlchemy, these two tasks are performed together. This is done by using Declarative system; the classes created include directives to describe the actual database table they are mapped to.
A base class stores a catlog of classes and mapped tables in the Declarative system. This is called as the declarative base class. There will be usually just one instance of this base in a commonly imported module. The declarative_base() function is used to create base class. This function is defined in sqlalchemy.ext.declarative module.
from sqlalchemy.ext.declarative import declarative_base
Base = declarative_base()
Once base classis declared, any number of mapped classes can be defined in terms of it. Following code defines a Customer’s class. It contains the table to be mapped to, and names and datatypes of columns in it.
class Customers(Base):
__tablename__ = ''customers''
id = Column(Integer, primary_key = True)
name = Column(String)
address = Column(String)
email = Column(String)
A class in Declarative must have a __tablename__ attribute, and at least one Column which is part of a primary key. Declarative replaces all the Column objects with special Python accessors known as descriptors. This process is known as instrumentation which provides the means to refer to the table in a SQL context and enables persisting and loading the values of columns from the database.
This mapped class like a normal Python class has attributes and methods as per the requirement.
The information about class in Declarative system, is called as table metadata. SQLAlchemy uses Table object to represent this information for a specific table created by Declarative. The Table object is created according to the specifications, and is associated with the class by constructing a Mapper object. This mapper object is not directly used but is used internally as interface between mapped class and table.
Each Table object is a member of larger collection known as MetaData and this object is available using the .metadata attribute of declarative base class. The MetaData.create_all() method is, passing in our Engine as a source of database connectivity. For all tables that haven’t been created yet, it issues CREATE TABLE statements to the database.
Base.metadata.create_all(engine)
The complete script to create a database and a table, and to map Python class is given below −
from sqlalchemy import Column, Integer, String
from sqlalchemy import create_engine
engine = create_engine(''sqlite:///sales.db'', echo = True)
from sqlalchemy.ext.declarative import declarative_base
Base = declarative_base()
class Customers(Base):
__tablename__ = ''customers''
id = Column(Integer, primary_key=True)
name = Column(String)
address = Column(String)
email = Column(String)
Base.metadata.create_all(engine)
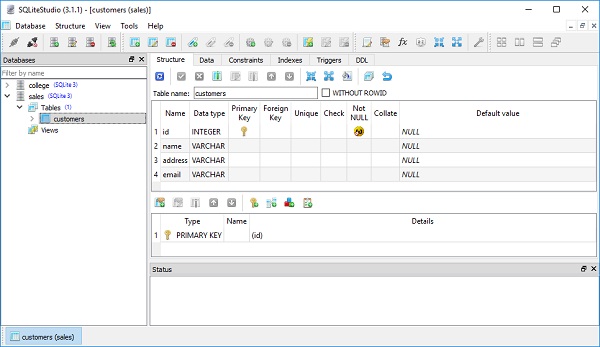
When executed, Python console will echo following SQL expression being executed −
CREATE TABLE customers (
id INTEGER NOT NULL,
name VARCHAR,
address VARCHAR,
email VARCHAR,
PRIMARY KEY (id)
)
If we open the Sales.db using SQLiteStudio graphic tool, it shows customers table inside it with above mentioned structure.
SQLAlchemy ORM – Creating Session
In order to interact with the database, we need to obtain its handle. A session object is the handle to database. Session class is defined using sessionmaker() – a configurable session factory method which is bound to the engine object created earlier.
from sqlalchemy.orm import sessionmaker
Session = sessionmaker(bind = engine)
The session object is then set up using its default constructor as follows −
session = Session()
Some of the frequently required methods of session class are listed below −
| Sr.No. |
Method & Description |
| 1 |
begin()
begins a transaction on this session
|
| 2 |
add()
places an object in the session. Its state is persisted in the database on next flush operation
|
| 3 |
add_all()
adds a collection of objects to the session
|
| 4 |
commit()
flushes all items and any transaction in progress
|
| 5 |
delete()
marks a transaction as deleted
|
| 6 |
execute()
executes a SQL expression
|
| 7 |
expire()
marks attributes of an instance as out of date
|
| 8 |
flush()
flushes all object changes to the database
|
| 9 |
invalidate()
closes the session using connection invalidation
|
| 10 |
rollback()
rolls back the current transaction in progress
|
| 11 |
close()
Closes current session by clearing all items and ending any transaction in progress
|
SQLAlchemy ORM – Adding Objects
In the previous chapters of SQLAlchemy ORM, we have learnt how to declare mapping and create sessions. In this chapter, we will learn how to add objects to the table.
We have declared Customer class that has been mapped to customers table. We have to declare an object of this class and persistently add it to the table by add() method of session object.
c1 = Sales(name = ''Ravi Kumar'', address = ''Station Road Nanded'', email = ''ravi@gmail.com'')
session.add(c1)
Note that this transaction is pending until the same is flushed using commit() method.
session.commit()
Following is the complete script to add a record in customers table −
from sqlalchemy import Column, Integer, String
from sqlalchemy import create_engine
engine = create_engine(''sqlite:///sales.db'', echo = True)
from sqlalchemy.ext.declarative import declarative_base
Base = declarative_base()
class Customers(Base):
__tablename__ = ''customers''
id = Column(Integer, primary_key=True)
name = Column(String)
address = Column(String)
email = Column(String)
from sqlalchemy.orm import sessionmaker
Session = sessionmaker(bind = engine)
session = Session()
c1 = Customers(name = ''Ravi Kumar'', address = ''Station Road Nanded'', email = ''ravi@gmail.com'')
session.add(c1)
session.commit()
To add multiple records, we can use add_all() method of the session class.
session.add_all([
Customers(name = ''Komal Pande'', address = ''Koti, Hyderabad'', email = ''komal@gmail.com''),
Customers(name = ''Rajender Nath'', address = ''Sector 40, Gurgaon'', email = ''nath@gmail.com''),
Customers(name = ''S.M.Krishna'', address = ''Budhwar Peth, Pune'', email = ''smk@gmail.com'')]
)
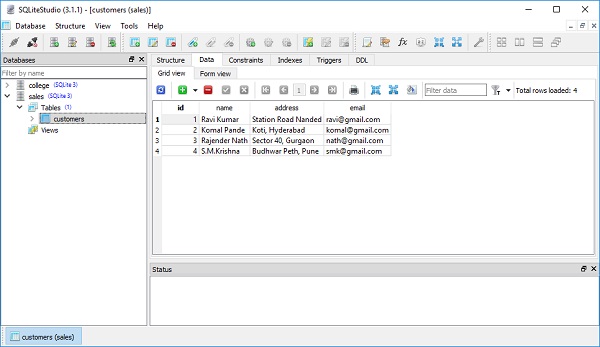
session.commit()
Table view of SQLiteStudio shows that the records are persistently added in customers table. The following image shows the result −
SQLAlchemy ORM – Using Query
All SELECT statements generated by SQLAlchemy ORM are constructed by Query object. It provides a generative interface, hence successive calls return a new Query object, a copy of the former with additional criteria and options associated with it.
Query objects are initially generated using the query() method of the Session as follows −
q = session.query(mapped class)
Following statement is also equivalent to the above given statement −
q = Query(mappedClass, session)
The query object has all() method which returns a resultset in the form of list of objects. If we execute it on our customers table −
result = session.query(Customers).all()
This statement is effectively equivalent to following SQL expression −
SELECT customers.id
AS customers_id, customers.name
AS customers_name, customers.address
AS customers_address, customers.email
AS customers_email
FROM customers
The result object can be traversed using For loop as below to obtain all records in underlying customers table. Here is the complete code to display all records in Customers table −
from sqlalchemy import Column, Integer, String
from sqlalchemy import create_engine
engine = create_engine(''sqlite:///sales.db'', echo = True)
from sqlalchemy.ext.declarative import declarative_base
Base = declarative_base()
class Customers(Base):
__tablename__ = ''customers''
id = Column(Integer, primary_key = True)
name = Column(String)
address = Column(String)
email = Column(String)
from sqlalchemy.orm import sessionmaker
Session = sessionmaker(bind = engine)
session = Session()
result = session.query(Customers).all()
for row in result:
print ("Name: ",row.name, "Address:",row.address, "Email:",row.email)
Python console shows list of records as below −
Name: Ravi Kumar Address: Station Road Nanded Email: ravi@gmail.com
Name: Komal Pande Address: Koti, Hyderabad Email: komal@gmail.com
Name: Rajender Nath Address: Sector 40, Gurgaon Email: nath@gmail.com
Name: S.M.Krishna Address: Budhwar Peth, Pune Email: smk@gmail.com
The Query object also has following useful methods −
| Sr.No. |
Method & Description |
| 1 |
add_columns()
It adds one or more column expressions to the list of result columns to be returned.
|
| 2 |
add_entity()
It adds a mapped entity to the list of result columns to be returned.
|
| 3 |
count()
It returns a count of rows this Query would return.
|
| 4 |
delete()
It performs a bulk delete query. Deletes rows matched by this query from the database.
|
| 5 |
distinct()
It applies a DISTINCT clause to the query and return the newly resulting Query.
|
| 6 |
filter()
It applies the given filtering criterion to a copy of this Query, using SQL expressions.
|
| 7 |
first()
It returns the first result of this Query or None if the result doesn’t contain any row.
|
| 8 |
get()
It returns an instance based on the given primary key identifier providing direct access to the identity map of the owning Session.
|
| 9 |
group_by()
It applies one or more GROUP BY criterion to the query and return the newly resulting Query
|
| 10 |
join()
It creates a SQL JOIN against this Query object’s criterion and apply generatively, returning the newly resulting Query.
|
| 11 |
one()
It returns exactly one result or raise an exception.
|
| 12 |
order_by()
It applies one or more ORDER BY criterion to the query and returns the newly resulting Query.
|
| 13 |
update()
It performs a bulk update query and updates rows matched by this query in the database.
|
SQLAlchemy ORM – Updating Objects
In this chapter, we will see how to modify or update the table with desired values.
To modify data of a certain attribute of any object, we have to assign new value to it and commit the changes to make the change persistent.
Let us fetch an object from the table whose primary key identifier, in our Customers table with ID=2. We can use get() method of session as follows −
x = session.query(Customers).get(2)
We can display contents of the selected object with the below given code −
print ("Name: ", x.name, "Address:", x.address, "Email:", x.email)
From our customers table, following output should be displayed −
Name: Komal Pande Address: Koti, Hyderabad Email: komal@gmail.com
Now we need to update the Address field by assigning new value as given below −
x.address = ''Banjara Hills Secunderabad''
session.commit()
The change will be persistently reflected in the database. Now we fetch object corresponding to first row in the table by using first() method as follows −
x = session.query(Customers).first()
This will execute following SQL expression −
SELECT customers.id
AS customers_id, customers.name
AS customers_name, customers.address
AS customers_address, customers.email
AS customers_email
FROM customers
LIMIT ? OFFSET ?
The bound parameters will be LIMIT = 1 and OFFSET = 0 respectively which means first row will be selected.
print ("Name: ", x.name, "Address:", x.address, "Email:", x.email)
Now, the output for the above code displaying the first row is as follows −
Name: Ravi Kumar Address: Station Road Nanded Email: ravi@gmail.com
Now change name attribute and display the contents using the below code −
x.name = ''Ravi Shrivastava''
print ("Name: ", x.name, "Address:", x.address, "Email:", x.email)
The output of the above code is −
Name: Ravi Shrivastava Address: Station Road Nanded Email: ravi@gmail.com
Even though the change is displayed, it is not committed. You can retain the earlier persistent position by using rollback() method with the code below.
session.rollback()
print ("Name: ", x.name, "Address:", x.address, "Email:", x.email)
Original contents of first record will be displayed.
For bulk updates, we shall use update() method of the Query object. Let us try and give a prefix, ‘Mr.’ to name in each row (except ID = 2). The corresponding update() statement is as follows −
session.query(Customers).filter(Customers.id! = 2).
update({Customers.name:"Mr."+Customers.name}, synchronize_session = False)
The update() method requires two parameters as follows −
-
A dictionary of key-values with key being the attribute to be updated, and value being the new contents of attribute.
-
synchronize_session attribute mentioning the strategy to update attributes in the session. Valid values are false: for not synchronizing the session, fetch: performs a select query before the update to find objects that are matched by the update query; and evaluate: evaluate criteria on objects in the session.
Three out of 4 rows in the table will have name prefixed with ‘Mr.’ However, the changes are not committed and hence will not be reflected in the table view of SQLiteStudio. It will be refreshed only when we commit the session.
SQLAlchemy ORM – Applying Filter
In this chapter, we will discuss how to apply filter and also certain filter operations along with their codes.
Resultset represented by Query object can be subjected to certain criteria by using filter() method. The general usage of filter method is as follows −
session.query(class).filter(criteria)
In the following example, resultset obtained by SELECT query on Customers table is filtered by a condition, (ID>2) −
result = session.query(Customers).filter(Customers.id>2)
This statement will translate into following SQL expression −
SELECT customers.id
AS customers_id, customers.name
AS customers_name, customers.address
AS customers_address, customers.email
AS customers_email
FROM customers
WHERE customers.id > ?
Since the bound parameter (?) is given as 2, only those rows with ID column>2 will be displayed. The complete code is given below −
from sqlalchemy import Column, Integer, String
from sqlalchemy import create_engine
engine = create_engine(''sqlite:///sales.db'', echo = True)
from sqlalchemy.ext.declarative import declarative_base
Base = declarative_base()
class Customers(Base):
__tablename__ = ''customers''
id = Column(Integer, primary_key = True)
name = Column(String)
address = Column(String)
email = Column(String)
from sqlalchemy.orm import sessionmaker
Session = sessionmaker(bind = engine)
session = Session()
result = session.query(Customers).filter(Customers.id>2)
for row in result:
print ("ID:", row.id, "Name: ",row.name, "Address:",row.address, "Email:",row.email)
The output displayed in the Python console is as follows −
ID: 3 Name: Rajender Nath Address: Sector 40, Gurgaon Email: nath@gmail.com
ID: 4 Name: S.M.Krishna Address: Budhwar Peth, Pune Email: smk@gmail.com
SQLAlchemy ORM – Filter Operators
Now, we will learn the filter operations with their respective codes and output.
Equals
The usual operator used is == and it applies the criteria to check equality.
result = session.query(Customers).filter(Customers.id == 2)
for row in result:
print ("ID:", row.id, "Name: ",row.name, "Address:",row.address, "Email:",row.email)
SQLAlchemy will send following SQL expression −
SELECT customers.id
AS customers_id, customers.name
AS customers_name, customers.address
AS customers_address, customers.email
AS customers_email
FROM customers
WHERE customers.id = ?
The output for the above code is as follows −
ID: 2 Name: Komal Pande Address: Banjara Hills Secunderabad Email: komal@gmail.com
Not Equals
The operator used for not equals is != and it provides not equals criteria.
result = session.query(Customers).filter(Customers.id! = 2)
for row in result:
print ("ID:", row.id, "Name: ",row.name, "Address:",row.address, "Email:",row.email)
The resulting SQL expression is −
SELECT customers.id
AS customers_id, customers.name
AS customers_name, customers.address
AS customers_address, customers.email
AS customers_email
FROM customers
WHERE customers.id != ?
The output for the above lines of code is as follows −
ID: 1 Name: Ravi Kumar Address: Station Road Nanded Email: ravi@gmail.com
ID: 3 Name: Rajender Nath Address: Sector 40, Gurgaon Email: nath@gmail.com
ID: 4 Name: S.M.Krishna Address: Budhwar Peth, Pune Email: smk@gmail.com
Like
like() method itself produces the LIKE criteria for WHERE clause in the SELECT expression.
result = session.query(Customers).filter(Customers.name.like(''Ra%''))
for row in result:
print ("ID:", row.id, "Name: ",row.name, "Address:",row.address, "Email:",row.email)
Above SQLAlchemy code is equivalent to following SQL expression −
SELECT customers.id
AS customers_id, customers.name
AS customers_name, customers.address
AS customers_address, customers.email
AS customers_email
FROM customers
WHERE customers.name LIKE ?
And the output for the above code is −
ID: 1 Name: Ravi Kumar Address: Station Road Nanded Email: ravi@gmail.com
ID: 3 Name: Rajender Nath Address: Sector 40, Gurgaon Email: nath@gmail.com
IN
This operator checks whether the column value belongs to a collection of items in a list. It is provided by in_() method.
result = session.query(Customers).filter(Customers.id.in_([1,3]))
for row in result:
print ("ID:", row.id, "Name: ",row.name, "Address:",row.address, "Email:",row.email)
Here, the SQL expression evaluated by SQLite engine will be as follows −
SELECT customers.id
AS customers_id, customers.name
AS customers_name, customers.address
AS customers_address, customers.email
AS customers_email
FROM customers
WHERE customers.id IN (?, ?)
The output for the above code is as follows −
ID: 1 Name: Ravi Kumar Address: Station Road Nanded Email: ravi@gmail.com
ID: 3 Name: Rajender Nath Address: Sector 40, Gurgaon Email: nath@gmail.com
AND
This conjunction is generated by either putting multiple commas separated criteria in the filter or using and_() method as given below −
result = session.query(Customers).filter(Customers.id>2, Customers.name.like(''Ra%''))
for row in result:
print ("ID:", row.id, "Name: ",row.name, "Address:",row.address, "Email:",row.email)
from sqlalchemy import and_
result = session.query(Customers).filter(and_(Customers.id>2, Customers.name.like(''Ra%'')))
for row in result:
print ("ID:", row.id, "Name: ",row.name, "Address:",row.address, "Email:",row.email)
Both the above approaches result in similar SQL expression −
SELECT customers.id
AS customers_id, customers.name
AS customers_name, customers.address
AS customers_address, customers.email
AS customers_email
FROM customers
WHERE customers.id > ? AND customers.name LIKE ?
The output for the above lines of code is −
ID: 3 Name: Rajender Nath Address: Sector 40, Gurgaon Email: nath@gmail.com
OR
This conjunction is implemented by or_() method.
from sqlalchemy import or_
result = session.query(Customers).filter(or_(Customers.id>2, Customers.name.like(''Ra%'')))
for row in result:
print ("ID:", row.id, "Name: ",row.name, "Address:",row.address, "Email:",row.email)
As a result, SQLite engine gets following equivalent SQL expression −
SELECT customers.id
AS customers_id, customers.name
AS customers_name, customers.address
AS customers_address, customers.email
AS customers_email
FROM customers
WHERE customers.id > ? OR customers.name LIKE ?
The output for the above code is as follows −
ID: 1 Name: Ravi Kumar Address: Station Road Nanded Email: ravi@gmail.com
ID: 3 Name: Rajender Nath Address: Sector 40, Gurgaon Email: nath@gmail.com
ID: 4 Name: S.M.Krishna Address: Budhwar Peth, Pune Email: smk@gmail.com
Returning List and Scalars
There are a number of methods of Query object that immediately issue SQL and return a value containing loaded database results.
Here’s a brief rundown of returning list and scalars −
all()
It returns a list. Given below is the line of code for all() function.
session.query(Customers).all()
Python console displays following SQL expression emitted −
SELECT customers.id
AS customers_id, customers.name
AS customers_name, customers.address
AS customers_address, customers.email
AS customers_email
FROM customers
first()
It applies a limit of one and returns the first result as a scalar.
SELECT customers.id
AS customers_id, customers.name
AS customers_name, customers.address
AS customers_address, customers.email
AS customers_email
FROM customers
LIMIT ? OFFSET ?
The bound parameters for LIMIT is 1 and for OFFSET is 0.
one()
This command fully fetches all rows, and if there is not exactly one object identity or composite row present in the result, it raises an error.
session.query(Customers).one()
With multiple rows found −
MultipleResultsFound: Multiple rows were found for one()
With no rows found −
NoResultFound: No row was found for one()
The one() method is useful for systems that expect to handle “no items found” versus “multiple items found” differently.
scalar()
It invokes the one() method, and upon success returns the first column of the row as follows −
session.query(Customers).filter(Customers.id == 3).scalar()
This generates following SQL statement −
SELECT customers.id
AS customers_id, customers.name
AS customers_name, customers.address
AS customers_address, customers.email
AS customers_email
FROM customers
WHERE customers.id = ?
SQLAlchemy ORM – Textual SQL
Earlier, textual SQL using text() function has been explained from the perspective of core expression language of SQLAlchemy. Now we shall discuss it from ORM point of view.
Literal strings can be used flexibly with Query object by specifying their use with the text() construct. Most applicable methods accept it. For example, filter() and order_by().
In the example given below, the filter() method translates the string “id<3” to the WHERE id<3
from sqlalchemy import text
for cust in session.query(Customers).filter(text("id<3")):
print(cust.name)
The raw SQL expression generated shows conversion of filter to WHERE clause with the code illustrated below −
SELECT customers.id
AS customers_id, customers.name
AS customers_name, customers.address
AS customers_address, customers.email
AS customers_email
FROM customers
WHERE id<3
From our sample data in Customers table, two rows will be selected and name column will be printed as follows −
Ravi Kumar
Komal Pande
To specify bind parameters with string-based SQL, use a colon,and to specify the values, use the params() method.
cust = session.query(Customers).filter(text("id = :value")).params(value = 1).one()
The effective SQL displayed on Python console will be as given below −
SELECT customers.id
AS customers_id, customers.name
AS customers_name, customers.address
AS customers_address, customers.email
AS customers_email
FROM customers
WHERE id = ?
To use an entirely string-based statement, a text() construct representing a complete statement can be passed to from_statement().
session.query(Customers).from_statement(text("SELECT * FROM customers")).all()
The result of above code will be a basic SELECT statement as given below −
SELECT * FROM customers
Obviously, all records in customers table will be selected.
The text() construct allows us to link its textual SQL to Core or ORM-mapped column expressions positionally. We can achieve this by passing column expressions as positional arguments to the TextClause.columns() method.
stmt = text("SELECT name, id, name, address, email FROM customers")
stmt = stmt.columns(Customers.id, Customers.name)
session.query(Customers.id, Customers.name).from_statement(stmt).all()
The id and name columns of all rows will be selected even though the SQLite engine executes following expression generated by above code shows all columns in text() method −
SELECT name, id, name, address, email FROM customers
SQLAlchemy ORM – Building Relationship
This session describes creation of another table which is related to already existing one in our database. The customers table contains master data of customers. We now need to create invoices table which may have any number of invoices belonging to a customer. This is a case of one to many relationships.
Using declarative, we define this table along with its mapped class, Invoices as given below −
from sqlalchemy import create_engine, ForeignKey, Column, Integer, String
engine = create_engine(''sqlite:///sales.db'', echo = True)
from sqlalchemy.ext.declarative import declarative_base
Base = declarative_base()
from sqlalchemy.orm import relationship
class Customer(Base):
   __tablename__ = ''customers''

   id = Column(Integer, primary_key = True)
   name = Column(String)
   address = Column(String)
   email = Column(String)

class Invoice(Base):
   __tablename__ = ''invoices''

   id = Column(Integer, primary_key = True)
   custid = Column(Integer, ForeignKey(''customers.id''))
   invno = Column(Integer)
   amount = Column(Integer)
   customer = relationship("Customer", back_populates = "invoices")

Customer.invoices = relationship("Invoice", order_by = Invoice.id, back_populates = "customer")
Base.metadata.create_all(engine)
This will send a CREATE TABLE query to SQLite engine as below −
CREATE TABLE invoices (
id INTEGER NOT NULL,
custid INTEGER,
invno INTEGER,
amount INTEGER,
PRIMARY KEY (id),
FOREIGN KEY(custid) REFERENCES customers (id)
)
We can check that new table is created in sales.db with the help of SQLiteStudio tool.
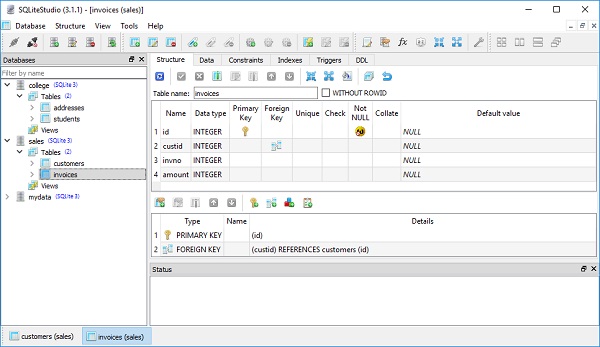
Invoices class applies ForeignKey construct on custid attribute. This directive indicates that values in this column should be constrained to be values present in id column in customers table. This is a core feature of relational databases, and is the “glue” that transforms unconnected collection of tables to have rich overlapping relationships.
A second directive, known as relationship(), tells the ORM that the Invoice class should be linked to the Customer class using the attribute Invoice.customer. The relationship() uses the foreign key relationships between the two tables to determine the nature of this linkage, determining that it is many to one.
An additional relationship() directive is placed on the Customer mapped class under the attribute Customer.invoices. The parameter relationship.back_populates is assigned to refer to the complementary attribute names, so that each relationship() can make intelligent decision about the same relationship as expressed in reverse. On one side, Invoices.customer refers to Invoices instance, and on the other side, Customer.invoices refers to a list of Customers instances.
The relationship function is a part of Relationship API of SQLAlchemy ORM package. It provides a relationship between two mapped classes. This corresponds to a parent-child or associative table relationship.
Following are the basic Relationship Patterns found −
One To Many
A One to Many relationship refers to parent with the help of a foreign key on the child table. relationship() is then specified on the parent, as referencing a collection of items represented by the child. The relationship.back_populates parameter is used to establish a bidirectional relationship in one-to-many, where the “reverse” side is a many to one.
Many To One
On the other hand, Many to One relationship places a foreign key in the parent table to refer to the child. relationship() is declared on the parent, where a new scalar-holding attribute will be created. Here again the relationship.back_populates parameter is used for Bidirectionalbehaviour.
One To One
One To One relationship is essentially a bidirectional relationship in nature. The uselist flag indicates the placement of a scalar attribute instead of a collection on the “many” side of the relationship. To convert one-to-many into one-to-one type of relation, set uselist parameter to false.
Many To Many
Many to Many relationship is established by adding an association table related to two classes by defining attributes with their foreign keys. It is indicated by the secondary argument to relationship(). Usually, the Table uses the MetaData object associated with the declarative base class, so that the ForeignKey directives can locate the remote tables with which to link. The relationship.back_populates parameter for each relationship() establishes a bidirectional relationship. Both sides of the relationship contain a collection.
Working with Related Objects
In this chapter, we will focus on the related objects in SQLAlchemy ORM.
Now when we create a Customer object, a blank invoice collection will be present in the form of Python List.
c1 = Customer(name = "Gopal Krishna", address = "Bank Street Hydarebad", email = "gk@gmail.com")
The invoices attribute of c1.invoices will be an empty list. We can assign items in the list as −
c1.invoices = [Invoice(invno = 10, amount = 15000), Invoice(invno = 14, amount = 3850)]
Let us commit this object to the database using Session object as follows −
from sqlalchemy.orm import sessionmaker
Session = sessionmaker(bind = engine)
session = Session()
session.add(c1)
session.commit()
This will automatically generate INSERT queries for customers and invoices tables −
INSERT INTO customers (name, address, email) VALUES (?, ?, ?)
(''Gopal Krishna'', ''Bank Street Hydarebad'', ''gk@gmail.com'')
INSERT INTO invoices (custid, invno, amount) VALUES (?, ?, ?)
(2, 10, 15000)
INSERT INTO invoices (custid, invno, amount) VALUES (?, ?, ?)
(2, 14, 3850)
Let us now look at contents of customers table and invoices table in the table view of SQLiteStudio −


You can construct Customer object by providing mapped attribute of invoices in the constructor itself by using the below command −
c2 = [
Customer(
name = "Govind Pant",
address = "Gulmandi Aurangabad",
email = "gpant@gmail.com",
invoices = [Invoice(invno = 3, amount = 10000),
Invoice(invno = 4, amount = 5000)]
)
]
Or a list of objects to be added using add_all() function of session object as shown below −
rows = [
Customer(
name = "Govind Kala",
address = "Gulmandi Aurangabad",
email = "kala@gmail.com",
invoices = [Invoice(invno = 7, amount = 12000), Invoice(invno = 8, amount = 18500)]),
Customer(
name = "Abdul Rahman",
address = "Rohtak",
email = "abdulr@gmail.com",
invoices = [Invoice(invno = 9, amount = 15000),
Invoice(invno = 11, amount = 6000)
])
]
session.add_all(rows)
session.commit()
SQLAlchemy ORM – Working with Joins
Now that we have two tables, we will see how to create queries on both tables at the same time. To construct a simple implicit join between Customer and Invoice, we can use Query.filter() to equate their related columns together. Below, we load the Customer and Invoice entities at once using this method −
from sqlalchemy.orm import sessionmaker
Session = sessionmaker(bind = engine)
session = Session()
for c, i in session.query(Customer, Invoice).filter(Customer.id == Invoice.custid).all():
print ("ID: {} Name: {} Invoice No: {} Amount: {}".format(c.id,c.name, i.invno, i.amount))
The SQL expression emitted by SQLAlchemy is as follows −
SELECT customers.id
AS customers_id, customers.name
AS customers_name, customers.address
AS customers_address, customers.email
AS customers_email, invoices.id
AS invoices_id, invoices.custid
AS invoices_custid, invoices.invno
AS invoices_invno, invoices.amount
AS invoices_amount
FROM customers, invoices
WHERE customers.id = invoices.custid
And the result of the above lines of code is as follows −
ID: 2 Name: Gopal Krishna Invoice No: 10 Amount: 15000
ID: 2 Name: Gopal Krishna Invoice No: 14 Amount: 3850
ID: 3 Name: Govind Pant Invoice No: 3 Amount: 10000
ID: 3 Name: Govind Pant Invoice No: 4 Amount: 5000
ID: 4 Name: Govind Kala Invoice No: 7 Amount: 12000
ID: 4 Name: Govind Kala Invoice No: 8 Amount: 8500
ID: 5 Name: Abdul Rahman Invoice No: 9 Amount: 15000
ID: 5 Name: Abdul Rahman Invoice No: 11 Amount: 6000
The actual SQL JOIN syntax is easily achieved using the Query.join() method as follows −
session.query(Customer).join(Invoice).filter(Invoice.amount == 8500).all()
The SQL expression for join will be displayed on the console −
SELECT customers.id
AS customers_id, customers.name
AS customers_name, customers.address
AS customers_address, customers.email
AS customers_email
FROM customers JOIN invoices ON customers.id = invoices.custid
WHERE invoices.amount = ?
We can iterate through the result using for loop −
result = session.query(Customer).join(Invoice).filter(Invoice.amount == 8500)
for row in result:
for inv in row.invoices:
print (row.id, row.name, inv.invno, inv.amount)
With 8500 as the bind parameter, following output is displayed −
4 Govind Kala 8 8500
Query.join() knows how to join between these tables because there’s only one foreign key between them. If there were no foreign keys, or more foreign keys, Query.join() works better when one of the following forms are used −
| query.join(Invoice, id == Address.custid) |
explicit condition |
| query.join(Customer.invoices) |
specify relationship from left to right |
| query.join(Invoice, Customer.invoices) |
same, with explicit target |
| query.join(”invoices”) |
same, using a string |
Similarly outerjoin() function is available to achieve left outer join.
query.outerjoin(Customer.invoices)
The subquery() method produces a SQL expression representing SELECT statement embedded within an alias.
from sqlalchemy.sql import func
stmt = session.query(
Invoice.custid, func.count(''*'').label(''invoice_count'')
).group_by(Invoice.custid).subquery()
The stmt object will contain a SQL statement as below −
SELECT invoices.custid, count(:count_1) AS invoice_count FROM invoices GROUP BY invoices.custid
Once we have our statement, it behaves like a Table construct. The columns on the statement are accessible through an attribute called c as shown in the below code −
for u, count in session.query(Customer, stmt.c.invoice_count).outerjoin(stmt, Customer.id == stmt.c.custid).order_by(Customer.id):
print(u.name, count)
The above for loop displays name-wise count of invoices as follows −
Arjun Pandit None
Gopal Krishna 2
Govind Pant 2
Govind Kala 2
Abdul Rahman 2
Common Relationship Operators
In this chapter, we will discuss about the operators which build on relationships.
__eq__()
The above operator is a many-to-one “equals” comparison. The line of code for this operator is as shown below −
s = session.query(Customer).filter(Invoice.invno.__eq__(12))
The equivalent SQL query for the above line of code is −
SELECT customers.id
AS customers_id, customers.name
AS customers_name, customers.address
AS customers_address, customers.email
AS customers_email
FROM customers, invoices
WHERE invoices.invno = ?
__ne__()
This operator is a many-to-one “not equals” comparison. The line of code for this operator is as shown below −
s = session.query(Customer).filter(Invoice.custid.__ne__(2))
The equivalent SQL query for the above line of code is given below −
SELECT customers.id
AS customers_id, customers.name
AS customers_name, customers.address
AS customers_address, customers.email
AS customers_email
FROM customers, invoices
WHERE invoices.custid != ?
contains()
This operator is used for one-to-many collections and given below is the code for contains() −
s = session.query(Invoice).filter(Invoice.invno.contains([3,4,5]))
The equivalent SQL query for the above line of code is −
SELECT invoices.id
AS invoices_id, invoices.custid
AS invoices_custid, invoices.invno
AS invoices_invno, invoices.amount
AS invoices_amount
FROM invoices
WHERE (invoices.invno LIKE ''%'' + ? || ''%'')
any()
any() operator is used for collections as shown below −
s = session.query(Customer).filter(Customer.invoices.any(Invoice.invno==11))
The equivalent SQL query for the above line of code is shown below −
SELECT customers.id
AS customers_id, customers.name
AS customers_name, customers.address
AS customers_address, customers.email
AS customers_email
FROM customers
WHERE EXISTS (
SELECT 1
FROM invoices
WHERE customers.id = invoices.custid
AND invoices.invno = ?)
has()
This operator is used for scalar references as follows −
s = session.query(Invoice).filter(Invoice.customer.has(name = ''Arjun Pandit''))
The equivalent SQL query for the above line of code is −
SELECT invoices.id
AS invoices_id, invoices.custid
AS invoices_custid, invoices.invno
AS invoices_invno, invoices.amount
AS invoices_amount
FROM invoices
WHERE EXISTS (
SELECT 1
FROM customers
WHERE customers.id = invoices.custid
AND customers.name = ?)
SQLAlchemy ORM – Eager Loading
Eager load reduces the number of queries. SQLAlchemy offers eager loading functions invoked via query options which give additional instructions to the Query. These options determine how to load various attributes via the Query.options() method.
Subquery Load
We want that Customer.invoices should load eagerly. The orm.subqueryload() option gives a second SELECT statement that fully loads the collections associated with the results just loaded. The name “subquery” causes the SELECT statement to be constructed directly via the Query re-used and embedded as a subquery into a SELECT against the related table.
from sqlalchemy.orm import subqueryload
c1 = session.query(Customer).options(subqueryload(Customer.invoices)).filter_by(name = ''Govind Pant'').one()
This results in the following two SQL expressions −
SELECT customers.id
AS customers_id, customers.name
AS customers_name, customers.address
AS customers_address, customers.email
AS customers_email
FROM customers
WHERE customers.name = ?
(''Govind Pant'',)
SELECT invoices.id
AS invoices_id, invoices.custid
AS invoices_custid, invoices.invno
AS invoices_invno, invoices.amount
AS invoices_amount, anon_1.customers_id
AS anon_1_customers_id
FROM (
SELECT customers.id
AS customers_id
FROM customers
WHERE customers.name = ?)
AS anon_1
JOIN invoices
ON anon_1.customers_id = invoices.custid
ORDER BY anon_1.customers_id, invoices.id 2018-06-25 18:24:47,479
INFO sqlalchemy.engine.base.Engine (''Govind Pant'',)
To access the data from two tables, we can use the below program −
print (c1.name, c1.address, c1.email)
for x in c1.invoices:
print ("Invoice no : {}, Amount : {}".format(x.invno, x.amount))
The output of the above program is as follows −
Govind Pant Gulmandi Aurangabad gpant@gmail.com
Invoice no : 3, Amount : 10000
Invoice no : 4, Amount : 5000
Joined Load
The other function is called orm.joinedload(). This emits a LEFT OUTER JOIN. Lead object as well as the related object or collection is loaded in one step.
from sqlalchemy.orm import joinedload
c1 = session.query(Customer).options(joinedload(Customer.invoices)).filter_by(name=''Govind Pant'').one()
This emits following expression giving same output as above −
SELECT customers.id
AS customers_id, customers.name
AS customers_name, customers.address
AS customers_address, customers.email
AS customers_email, invoices_1.id
AS invoices_1_id, invoices_1.custid
AS invoices_1_custid, invoices_1.invno
AS invoices_1_invno, invoices_1.amount
AS invoices_1_amount
FROM customers
LEFT OUTER JOIN invoices
AS invoices_1
ON customers.id = invoices_1.custid
WHERE customers.name = ? ORDER BY invoices_1.id
(''Govind Pant'',)
The OUTER JOIN resulted in two rows, but it gives one instance of Customer back. This is because Query applies a “uniquing” strategy, based on object identity, to the returned entities. Joined eager loading can be applied without affecting the query results.
The subqueryload() is more appropriate for loading related collections while joinedload() is better suited for many-to-one relationship.
SQLAlchemy ORM – Deleting Related Objects
It is easy to perform delete operation on a single table. All you have to do is to delete an object of the mapped class from a session and commit the action. However, delete operation on multiple related tables is little tricky.
In our sales.db database, Customer and Invoice classes are mapped to customer and invoice table with one to many type of relationship. We will try to delete Customer object and see the result.
As a quick reference, below are the definitions of Customer and Invoice classes −
from sqlalchemy import create_engine, ForeignKey, Column, Integer, String
engine = create_engine(''sqlite:///sales.db'', echo = True)
from sqlalchemy.ext.declarative import declarative_base
Base = declarative_base()
from sqlalchemy.orm import relationship
class Customer(Base):
__tablename__ = ''customers''
id = Column(Integer, primary_key = True)
name = Column(String)
address = Column(String)
email = Column(String)
class Invoice(Base):
__tablename__ = ''invoices''
id = Column(Integer, primary_key = True)
custid = Column(Integer, ForeignKey(''customers.id''))
invno = Column(Integer)
amount = Column(Integer)
customer = relationship("Customer", back_populates = "invoices")
Customer.invoices = relationship("Invoice", order_by = Invoice.id, back_populates = "customer")
We setup a session and obtain a Customer object by querying it with primary ID using the below program −
from sqlalchemy.orm import sessionmaker
Session = sessionmaker(bind=engine)
session = Session()
x = session.query(Customer).get(2)
In our sample table, x.name happens to be ”Gopal Krishna”. Let us delete this x from the session and count the occurrence of this name.
session.delete(x)
session.query(Customer).filter_by(name = ''Gopal Krishna'').count()
The resulting SQL expression will return 0.
SELECT count(*)
AS count_1
FROM (
   SELECT customers.id
   AS customers_id, customers.name
   AS customers_name, customers.address
   AS customers_address, customers.email
   AS customers_email
   FROM customers
   WHERE customers.name = ?)
AS anon_1(''Gopal Krishna'',) 0
However, the related Invoice objects of x are still there. It can be verified by the following code −
session.query(Invoice).filter(Invoice.invno.in_([10,14])).count()
Here, 10 and 14 are invoice numbers belonging to customer Gopal Krishna. Result of the above query is 2, which means the related objects have not been deleted.
SELECT count(*)
AS count_1
FROM (
   SELECT invoices.id
   AS invoices_id, invoices.custid
   AS invoices_custid, invoices.invno
   AS invoices_invno, invoices.amount
   AS invoices_amount
   FROM invoices
   WHERE invoices.invno IN (?, ?))
AS anon_1(10, 14) 2
This is because SQLAlchemy doesn’t assume the deletion of cascade; we have to give a command to delete it.
To change the behavior, we configure cascade options on the User.addresses relationship. Let us close the ongoing session, use new declarative_base() and redeclare the User class, adding in the addresses relationship including the cascade configuration.
The cascade attribute in relationship function is a comma-separated list of cascade rules which determines how Session operations should be “cascaded” from parent to child. By default, it is False, which means that it is “save-update, merge”.
The available cascades are as follows −
- save-update
- merge
- expunge
- delete
- delete-orphan
- refresh-expire
Often used option is “all, delete-orphan” to indicate that related objects should follow along with the parent object in all cases, and be deleted when de-associated.
Hence redeclared Customer class is shown below −
class Customer(Base):
   __tablename__ = ''customers''

   id = Column(Integer, primary_key = True)
   name = Column(String)
   address = Column(String)
   email = Column(String)
   invoices = relationship(
      "Invoice",
      order_by = Invoice.id,
      back_populates = "customer",
      cascade = "all,
      delete, delete-orphan"
   )
Let us delete the Customer with Gopal Krishna name using the below program and see the count of its related Invoice objects −
from sqlalchemy.orm import sessionmaker
Session = sessionmaker(bind = engine)
session = Session()
x = session.query(Customer).get(2)
session.delete(x)
session.query(Customer).filter_by(name = ''Gopal Krishna'').count()
session.query(Invoice).filter(Invoice.invno.in_([10,14])).count()
The count is now 0 with following SQL emitted by above script −
SELECT customers.id
AS customers_id, customers.name
AS customers_name, customers.address
AS customers_address, customers.email
AS customers_email
FROM customers
WHERE customers.id = ?
(2,)
SELECT invoices.id
AS invoices_id, invoices.custid
AS invoices_custid, invoices.invno
AS invoices_invno, invoices.amount
AS invoices_amount
FROM invoices
WHERE ? = invoices.custid
ORDER BY invoices.id (2,)
DELETE FROM invoices
WHERE invoices.id = ? ((1,), (2,))
DELETE FROM customers
WHERE customers.id = ? (2,)
SELECT count(*)
AS count_1
FROM (
   SELECT customers.id
   AS customers_id, customers.name
   AS customers_name, customers.address
   AS customers_address, customers.email
   AS customers_email
   FROM customers
   WHERE customers.name = ?)
AS anon_1(''Gopal Krishna'',)
SELECT count(*)
AS count_1
FROM (
   SELECT invoices.id
   AS invoices_id, invoices.custid
   AS invoices_custid, invoices.invno
   AS invoices_invno, invoices.amount
   AS invoices_amount
   FROM invoices
   WHERE invoices.invno IN (?, ?))
AS anon_1(10, 14)
0
Many to Many Relationships
Many to Many relationship between two tables is achieved by adding an association table such that it has two foreign keys – one from each table’s primary key. Moreover, classes mapping to the two tables have an attribute with a collection of objects of other association tables assigned as secondary attribute of relationship() function.
For this purpose, we shall create a SQLite database (mycollege.db) with two tables – department and employee. Here, we assume that an employee is a part of more than one department, and a department has more than one employee. This constitutes many-to-many relationship.
Definition of Employee and Department classes mapped to department and employee table is as follows −
from sqlalchemy import create_engine, ForeignKey, Column, Integer, String
engine = create_engine(''sqlite:///mycollege.db'', echo = True)
from sqlalchemy.ext.declarative import declarative_base
Base = declarative_base()
from sqlalchemy.orm import relationship
class Department(Base):
__tablename__ = ''department''
id = Column(Integer, primary_key = True)
name = Column(String)
employees = relationship(''Employee'', secondary = ''link'')
class Employee(Base):
__tablename__ = ''employee''
id = Column(Integer, primary_key = True)
name = Column(String)
departments = relationship(Department,secondary=''link'')
We now define a Link class. It is linked to link table and contains department_id and employee_id attributes respectively referencing to primary keys of department and employee table.
class Link(Base):
__tablename__ = ''link''
department_id = Column(
Integer,
ForeignKey(''department.id''),
primary_key = True)
employee_id = Column(
Integer,
ForeignKey(''employee.id''),
primary_key = True)
Here, we have to make a note that Department class has employees attribute related to Employee class. The relationship function’s secondary attribute is assigned a link as its value.
Similarly, Employee class has departments attribute related to Department class. The relationship function’s secondary attribute is assigned a link as its value.
All these three tables are created when the following statement is executed −
Base.metadata.create_all(engine)
The Python console emits following CREATE TABLE queries −
CREATE TABLE department (
id INTEGER NOT NULL,
name VARCHAR,
PRIMARY KEY (id)
)
CREATE TABLE employee (
id INTEGER NOT NULL,
name VARCHAR,
PRIMARY KEY (id)
)
CREATE TABLE link (
department_id INTEGER NOT NULL,
employee_id INTEGER NOT NULL,
PRIMARY KEY (department_id, employee_id),
FOREIGN KEY(department_id) REFERENCES department (id),
FOREIGN KEY(employee_id) REFERENCES employee (id)
)
We can check this by opening mycollege.db using SQLiteStudio as shown in the screenshots given below −
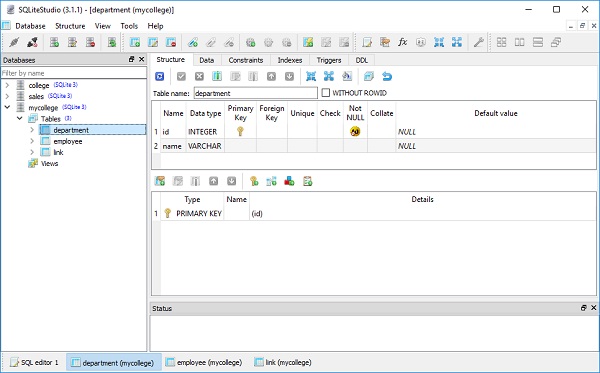
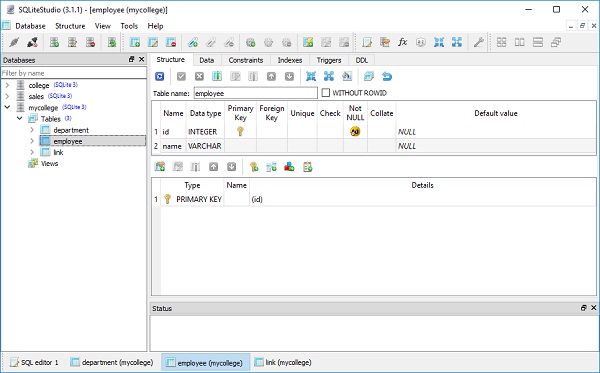
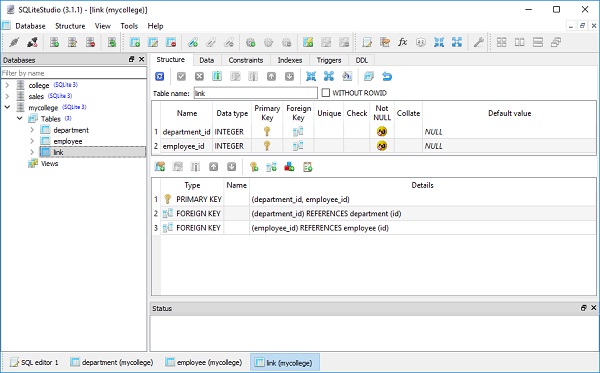
Next we create three objects of Department class and three objects of Employee class as shown below −
d1 = Department(name = "Accounts")
d2 = Department(name = "Sales")
d3 = Department(name = "Marketing")
e1 = Employee(name = "John")
e2 = Employee(name = "Tony")
e3 = Employee(name = "Graham")
Each table has a collection attribute having append() method. We can add Employee objects to Employees collection of Department object. Similarly, we can add Department objects to departments collection attribute of Employee objects.
e1.departments.append(d1)
e2.departments.append(d3)
d1.employees.append(e3)
d2.employees.append(e2)
d3.employees.append(e1)
e3.departments.append(d2)
All we have to do now is to set up a session object, add all objects to it and commit the changes as shown below −
from sqlalchemy.orm import sessionmaker
Session = sessionmaker(bind = engine)
session = Session()
session.add(e1)
session.add(e2)
session.add(d1)
session.add(d2)
session.add(d3)
session.add(e3)
session.commit()
Following SQL statements will be emitted on Python console −
INSERT INTO department (name) VALUES (?) (''Accounts'',)
INSERT INTO department (name) VALUES (?) (''Sales'',)
INSERT INTO department (name) VALUES (?) (''Marketing'',)
INSERT INTO employee (name) VALUES (?) (''John'',)
INSERT INTO employee (name) VALUES (?) (''Graham'',)
INSERT INTO employee (name) VALUES (?) (''Tony'',)
INSERT INTO link (department_id, employee_id) VALUES (?, ?) ((1, 2), (3, 1), (2, 3))
INSERT INTO link (department_id, employee_id) VALUES (?, ?) ((1, 1), (2, 2), (3, 3))
To check the effect of above operations, use SQLiteStudio and view data in department, employee and link tables −


To display the data, run the following query statement −
from sqlalchemy.orm import sessionmaker
Session = sessionmaker(bind = engine)
session = Session()

for x in session.query( Department, Employee).filter(Link.department_id == Department.id,
   Link.employee_id == Employee.id).order_by(Link.department_id).all():
   print ("Department: {} Name: {}".format(x.Department.name, x.Employee.name))
As per the data populated in our example, output will be displayed as below −
Department: Accounts Name: John
Department: Accounts Name: Graham
Department: Sales Name: Graham
Department: Sales Name: Tony
Department: Marketing Name: John
Department: Marketing Name: Tony
SQLAlchemy – Dialects
SQLAlchemy uses system of dialects to communicate with various types of databases. Each database has a corresponding DBAPI wrapper. All dialects require that an appropriate DBAPI driver is installed.
Following dialects are included in SQLAlchemy API −
- Firebird
- Microsoft SQL Server
- MySQL
- Oracle
- PostgreSQL
- SQL
- Sybase
An Engine object based on a URL is produced by create_engine() function. These URLs can include username, password, hostname, and database name. There may be optional keyword arguments for additional configuration. In some cases, a file path is accepted, and in others, a “data source name” replaces the “host” and “database” portions. The typical form of a database URL is as follows −
dialect+driver://username:password@host:port/database
PostgreSQL
The PostgreSQL dialect uses psycopg2 as the default DBAPI. pg8000 is also available as a pure-Python substitute as shown below:
# default
engine = create_engine(''postgresql://scott:tiger@localhost/mydatabase'')
# psycopg2
engine = create_engine(''postgresql+psycopg2://scott:tiger@localhost/mydatabase'')
# pg8000
engine = create_engine(''postgresql+pg8000://scott:tiger@localhost/mydatabase'')
MySQL
The MySQL dialect uses mysql-python as the default DBAPI. There are many MySQL DBAPIs available, such as MySQL-connector-python as follows −
# default
engine = create_engine(''mysql://scott:tiger@localhost/foo'')
# mysql-python
engine = create_engine(''mysql+mysqldb://scott:tiger@localhost/foo'')
# MySQL-connector-python
engine = create_engine(''mysql+mysqlconnector://scott:tiger@localhost/foo'')
Oracle
The Oracle dialect uses cx_oracle as the default DBAPI as follows −
engine = create_engine(''oracle://scott:tiger@127.0.0.1:1521/sidname'')
engine = create_engine(''oracle+cx_oracle://scott:tiger@tnsname'')
Microsoft SQL Server
The SQL Server dialect uses pyodbc as the default DBAPI. pymssql is also available.
# pyodbc
engine = create_engine(''mssql+pyodbc://scott:tiger@mydsn'')
# pymssql
engine = create_engine(''mssql+pymssql://scott:tiger@hostname:port/dbname'')
SQLite
SQLite connects to file-based databases, using the Python built-in module sqlite3 by default. As SQLite connects to local files, the URL format is slightly different. The “file” portion of the URL is the filename of the database. For a relative file path, this requires three slashes as shown below −
engine = create_engine(''sqlite:///foo.db'')
And for an absolute file path, the three slashes are followed by the absolute path as given below −
engine = create_engine(''sqlite:///C:\path\to\foo.db'')
To use a SQLite:memory:database, specify an empty URL as given below −
engine = create_engine(''sqlite://'')
Conclusion
In the first part of this tutorial, we have learnt how to use the Expression Language to execute SQL statements. Expression language embeds SQL constructs in Python code. In the second part, we have discussed object relation mapping capability of SQLAlchemy. The ORM API maps the SQL tables with Python classes.