Your cart is currently empty!
Author: alien
-
Khóa học miễn phí SQL – Update Join nhận dự án làm có lương
SQL – UPDATE JOIN

Table of content
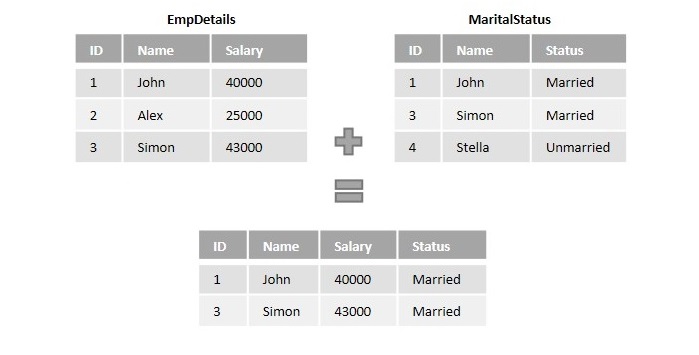
To update the data entered in a single database table using SQL, you can use the UPDATE statement. However, to update the data in multiple database tables, we need to use the UPDATE… JOIN clause.
For instance, if a student changes their primary phone number and wishes to update it in their organizational database, the information needs to be modified in multiple tables like student records, laboratory records, canteen passes etc. Using the JOIN clause, you can combine all these tables into one, and then using UPDATE statement, you can update the student data in them simultaneously.
The SQL UPDATE… JOIN Clause
The UPDATE statement only modifies the data in a single table and JOINS in SQL are used to fetch the combination of rows from multiple tables, with respect to a matching field.
If we want to update data in multiple tables, we can combine multiple tables into one using JOINS and then update them using UPDATE statement. This is also known as cross-table modification.
Syntax
Following is the basic syntax of the SQL UPDATE… JOIN statement −
UPDATE table(s)
JOIN table2 ON table1.join_column = table2.join_column
SET table1.column1 = table2.new_value1,
    table1.column2 = table2.new_value2;
Where, JOIN can be: Regular Join, Natural Join, Inner Join, Outer Join, Left Join, Right Join, Full Join etc.
Example
Assume we have created a table named CUSTOMERS, which contains the personal details of customers including their name, age, address and salary etc., using the following query −
CREATE TABLE CUSTOMERS (
   ID INT NOT NULL,
   NAME VARCHAR (20) NOT NULL,
   AGE INT NOT NULL,
   ADDRESS CHAR (25),
   SALARY DECIMAL (18, 2),
   PRIMARY KEY (ID)
);
Now, insert values into this table using the INSERT statement as follows −
INSERT INTO CUSTOMERS VALUES
(1, ''Ramesh'', 32, ''Ahmedabad'', 2000.00 ),
(2, ''Khilan'', 25, ''Delhi'', 1500.00 ),
(3, ''Kaushik'', 23, ''Kota'', 2000.00 ),
(4, ''Chaitali'', 25, ''Mumbai'', 6500.00 ),
(5, ''Hardik'', 27, ''Bhopal'', 8500.00 ),
(6, ''Komal'', 22, ''Hyderabad'', 4500.00 ),
(7, ''Muffy'', 24, ''Indore'', 10000.00 );
The table will be created as −
ID NAME AGE ADDRESS SALARY 1 Ramesh 32 Ahmedabad 2000.00 2 Khilan 25 Delhi 1500.00 3 Kaushik 23 Kota 2000.00 4 Chaitali 25 Mumbai 6500.00 5 Hardik 27 Bhopal 8500.00 6 Komal 22 Hyderabad 4500.00 7 Muffy 24 Indore 10000.00 Let us create another table ORDERS, containing the details of orders made and the date they are made on.
CREATE TABLE ORDERS (
   OID INT NOT NULL,
   DATE VARCHAR (20) NOT NULL,
   CUSTOMER_ID INT NOT NULL,
   AMOUNT DECIMAL (18, 2)
);
Using the INSERT statement, insert values into this table as follows −
INSERT INTO ORDERS VALUES
(102, ''2009-10-08 00:00:00'', 3, 3000.00),
(100, ''2009-10-08 00:00:00'', 3, 1500.00),
(101, ''2009-11-20 00:00:00'', 2, 1560.00),
(103, ''2008-05-20 00:00:00'', 4, 2060.00);
The table is displayed as follows −
OID DATE CUSTOMER_ID AMOUNT 102 2009-10-08 00:00:00 3 3000.00 100 2009-10-08 00:00:00 3 1500.00 101 2009-11-20 00:00:00 2 1560.00 103 2008-05-20 00:00:00 4 2060.00 Following UPDATE… JOIN query increments the salary of customers by 1000 with respect to the inflation of their order amount by 500 −
UPDATE CUSTOMERS
JOIN ORDERS
ON CUSTOMERS.ID = ORDERS.CUSTOMER_ID
SET CUSTOMERS.SALARY = CUSTOMERS.SALARY + 1000,
ORDERS.AMOUNT = ORDERS.AMOUNT + 500;
Verification
We can verify whether the changes are reflected in a table by retrieving its contents using the SELECT statement as follows −
SELECT * FROM CUSTOMERS;
The updated CUSTOMERS table is displayed as follows −
ID NAME AGE ADDRESS SALARY 1 Ramesh 32 Ahmedabad 2000.00 2 Khilan 25 Delhi 2500.00 3 Kaushik 23 Kota 3000.00 4 Chaitali 25 Mumbai 7500.00 5 Hardik 27 Bhopal 8500.00 6 Komal 22 Hyderabad 4500.00 7 Muffy 24 Indore 10000.00 Now, check whether the ORDERS table is updated using the following SELECT statement −
SELECT * FROM ORDERS;
The updated ORDERS table is displayed as follows −
OID DATE CUSTOMER_ID AMOUNT 102 2009-10-08 00:00:00 3 3500.00 100 2009-10-08 00:00:00 3 2000.00 101 2009-11-20 00:00:00 2 2060.00 103 2008-05-20 00:00:00 4 2560.00 UPDATE… JOIN with WHERE Clause
While updating records from multiple tables, if we use the WHERE clause along with the UPDATE… JOIN statement we can filter the records to be updated (from the combined result set).
Syntax
The syntax of SQL UPDATE… JOIN with WHERE clause in MySQL database is as follows −
UPDATE table(s)
JOIN table2 ON column3 = column4
SET table1.column1 = value1, table1.column2 = value2, ...
WHERE condition;
Example
Now, let us execute the following query to increase the salary of customer whose id is 3 −
UPDATE CUSTOMERS
LEFT JOIN ORDERS
ON CUSTOMERS.ID = ORDERS.CUSTOMER_ID
SET CUSTOMERS.SALARY = CUSTOMERS.SALARY + 1000
WHERE ORDERS.CUSTOMER_ID = 3;
Verification
We can verify whether the changes are reflected in a table by retrieving its contents using the SELECT statement as follows.
SELECT * FROM CUSTOMERS;
As we can see in the table below, SALARY value of “Kaushik” is increased by 1000 −
ID NAME AGE ADDRESS SALARY 1 Ramesh 32 Ahmedabad 2000.00 2 Khilan 25 Delhi 1500.00 3 Kaushik 23 Kota 3000.00 4 Chaitali 25 Mumbai 6500.00 5 Hardik 27 Bhopal 8500.00 6 Komal 22 Hyderabad 4500.00 7 Muffy 24 Indore 10000.00 The UPDATE… JOIN Clause in SQL Server
The SQL UPDATE… JOIN Clause also works in SQL Server database. But, the syntax of the query is slightly different from that of MySQL. However, the working of it is exactly the same as MySQL query.
In MySQL, the UPDATE statement is followed by the JOIN clause and SET statements respectively. Whereas, in MS SQL Server the SET statement is followed by the JOIN clause.
Syntax
Following is the syntax of the UPDATE… JOIN in SQL Server −
UPDATE tables(s)
SET column1 = value1, column2 = value2, ...
FROM table1
JOIN table2 ON table1.join_column = table2.join_column;
Example
In this example, we will update values of the CUSTOMERS and ORDERS table that we created above; using the following UPDATE… JOIN query −
UPDATE CUSTOMERS
SET SALARY = SALARY + 1000
FROM CUSTOMERS
JOIN ORDERS ON CUSTOMERS.ID = ORDERS.CUSTOMER_ID;
Verification
We can verify whether the changes are reflected in a table by retrieving its contents using the SELECT statement as follows.
SELECT * FROM CUSTOMERS;
The updated CUSTOMERS table is displayed as follows −
ID NAME AGE ADDRESS SALARY 1 Ramesh 32 Ahmedabad 2000.00 2 Khilan 25 Delhi 2500.00 3 Kaushik 23 Kota 3000.00 4 Chaitali 25 Mumbai 7500.00 5 Hardik 27 Bhopal 8500.00 6 Komal 22 Hyderabad 4500.00 7 Muffy 24 Indore 10000.00
Khóa học lập trình tại Toidayhoc vừa học vừa làm dự án vừa nhận lương: Khóa học lập trình nhận lương tại trung tâm Toidayhoc
Khóa học miễn phí SQL – Self Join nhận dự án làm có lương
SQL – Self Join
Self Join, as its name suggests, is a type of join that combines the records of a table with itself.
Suppose an organization, while organizing a Christmas party, is choosing a Secret Santa among its employees based on some colors. It is designed to be done by assigning one color to each of its employees and having them pick a color from the pool of various colors. In the end, they will become the Secret Santa of an employee this color is assigned to.
As we can see in the figure below, the information regarding the colors assigned and a color each employee picked is entered into a table. The table is joined to itself using self join over the color columns to match employees with their Secret Santa.

The SQL Self Join
The SQL Self Join is used to join a table to itself as if the table were two tables. To carry this out, alias of the tables should be used at least once.
Self Join is a type of inner join, which is performed in cases where the comparison between two columns of a same table is required; probably to establish a relationship between them. In other words, a table is joined with itself when it contains both Foreign Key and Primary Key in it.
Unlike queries of other joins, we use WHERE clause to specify the condition for the table to combine with itself; instead of the ON clause.
Syntax
Following is the basic syntax of SQL Self Join −
SELECT column_name(s)
FROM table1 a, table1 b
WHERE a.common_field = b.common_field;
Here, the WHERE clause could be any given expression based on your requirement.
Example
Self Join only requires one table, so, let us create a CUSTOMERS table containing the customer details like their names, age, address and the salary they earn.
CREATE TABLE CUSTOMERS (
   ID INT NOT NULL,
   NAME VARCHAR (20) NOT NULL,
   AGE INT NOT NULL,
   ADDRESS CHAR (25),
   SALARY DECIMAL (18, 2),
   PRIMARY KEY (ID)
);
Now, insert values into this table using the INSERT statement as follows −
INSERT INTO CUSTOMERS VALUES
(1, ''Ramesh'', 32, ''Ahmedabad'', 2000.00 ),
(2, ''Khilan'', 25, ''Delhi'', 1500.00 ),
(3, ''Kaushik'', 23, ''Kota'', 2000.00 ),
(4, ''Chaitali'', 25, ''Mumbai'', 6500.00 ),
(5, ''Hardik'', 27, ''Bhopal'', 8500.00 ),
(6, ''Komal'', 22, ''Hyderabad'', 4500.00 ),
(7, ''Muffy'', 24, ''Indore'', 10000.00 );
The table will be created as −
| ID | NAME | AGE | ADDRESS | SALARY |
|---|---|---|---|---|
| 1 | Ramesh | 32 | Ahmedabad | 2000.00 |
| 2 | Khilan | 25 | Delhi | 1500.00 |
| 3 | Kaushik | 23 | Kota | 2000.00 |
| 4 | Chaitali | 25 | Mumbai | 6500.00 |
| 5 | Hardik | 27 | Bhopal | 8500.00 |
| 6 | Komal | 22 | Hyderabad | 4500.00 |
| 7 | Muffy | 24 | Indore | 10000.00 |
Now, let us join this table using the following Self Join query. Our aim is to establish a relationship among the said Customers on the basis of their earnings. We are doing this with the help of the WHERE clause.
SELECT a.ID, b.NAME as EARNS_HIGHER, a.NAME
as EARNS_LESS, a.SALARY as LOWER_SALARY
FROM CUSTOMERS a, CUSTOMERS b
WHERE a.SALARY < b.SALARY;
Output
The resultant table displayed will list out all the customers that earn lesser than other customers −
| ID | EARNS_HIGHER | EARNS_LESS | LOWER_SALARY |
|---|---|---|---|
| 2 | Ramesh | Khilan | 1500.00 |
| 2 | Kaushik | Khilan | 1500.00 |
| 6 | Chaitali | Komal | 4500.00 |
| 3 | Chaitali | Kaushik | 2000.00 |
| 2 | Chaitali | Khilan | 1500.00 |
| 1 | Chaitali | Ramesh | 2000.00 |
| 6 | Hardik | Komal | 4500.00 |
| 4 | Hardik | Chaitali | 6500.00 |
| 3 | Hardik | Kaushik | 2000.00 |
| 2 | Hardik | Khilan | 1500.00 |
| 1 | Hardik | Ramesh | 2000.00 |
| 3 | Komal | Kaushik | 2000.00 |
| 2 | Komal | Khilan | 1500.00 |
| 1 | Komal | Ramesh | 2000.00 |
| 6 | Muffy | Komal | 4500.00 |
| 5 | Muffy | Hardik | 8500.00 |
| 4 | Muffy | Chaitali | 6500.00 |
| 3 | Muffy | Kaushik | 2000.00 |
| 2 | Muffy | Khilan | 1500.00 | 1 | Muffy | Ramesh | 2000.00 |
Self Join with ORDER BY Clause
After joining a table with itself using self join, the records in the combined table can also be sorted in an order, using the ORDER BY clause.
Syntax
Following is the syntax for it −
SELECT column_name(s)
FROM table1 a, table1 b
WHERE a.common_field = b.common_field
ORDER BY column_name;
Example
Let us join the CUSTOMERS table with itself using self join on a WHERE clause; then, arrange the records in an ascending order using the ORDER BY clause with respect to a specified column, as shown in the following query.
SELECT  a.ID, b.NAME as EARNS_HIGHER, a.NAME
as EARNS_LESS, a.SALARY as LOWER_SALARY
FROM CUSTOMERS a, CUSTOMERS b
WHERE a.SALARY < b.SALARY
ORDER BY a.SALARY;
Output
The resultant table is displayed as follows −
| ID | EARNS_HIGHER | EARNS_LESS | LOWER_SALARY |
|---|---|---|---|
| 2 | Ramesh | Khilan | 1500.00 |
| 2 | Kaushik | Khilan | 1500.00 |
| 2 | Chaitali | Khilan | 1500.00 |
| 2 | Hardik | Khilan | 1500.00 |
| 2 | Komal | Khilan | 1500.00 |
| 2 | Muffy | Khilan | 1500.00 |
| 3 | Chaitali | Kaushik | 2000.00 |
| 1 | Chaitali | Ramesh | 2000.00 |
| 3 | Hardik | Kaushik | 2000.00 |
| 1 | Hardik | Ramesh | 2000.00 |
| 3 | Komal | Kaushik | 2000.00 |
| 1 | Komal | Ramesh | 2000.00 |
| 3 | Muffy | Kaushik | 2000.00 |
| 1 | Muffy | Ramesh | 2000.00 |
| 6 | Chaitali | Komal | 4500.00 |
| 6 | Hardik | Komal | 4500.00 |
| 6 | Muffy | Komal | 4500.00 |
| 4 | Hardik | Chaitali | 6500.00 |
| 4 | Muffy | Chaitali | 6500.00 |
| 5 | Muffy | Hardik | 8500.00 |
Not just the salary column, the records can be sorted based on the alphabetical order of names, numerical order of Customer IDs etc.
Khóa học lập trình tại Toidayhoc vừa học vừa làm dự án vừa nhận lương: Khóa học lập trình nhận lương tại trung tâm Toidayhoc