Author: alien

  • Khóa học miễn phí Amazon RDS – Oracle DB Data Import nhận dự án làm có lương

    Amazon RDS – Oracle DB Data Import


    To import data into the RDS oracle database or export data from it, we need to consider the size of the data involved and use a appropriate technique. The Sql Developer tool which we use to connect to AWS RDS oracle instance, can be used for both export and import small volume of data like 20MB or so. But to import data of size in terabytes, we need to use oracle data pump.

    Exporting Data Using SQL Developer
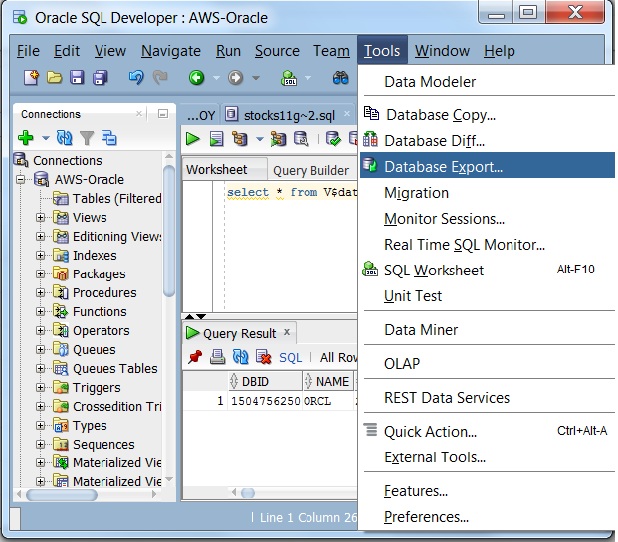
    Step-1

    After connecting to the AWS RDS Oracle DB, choose tools and Database Export.
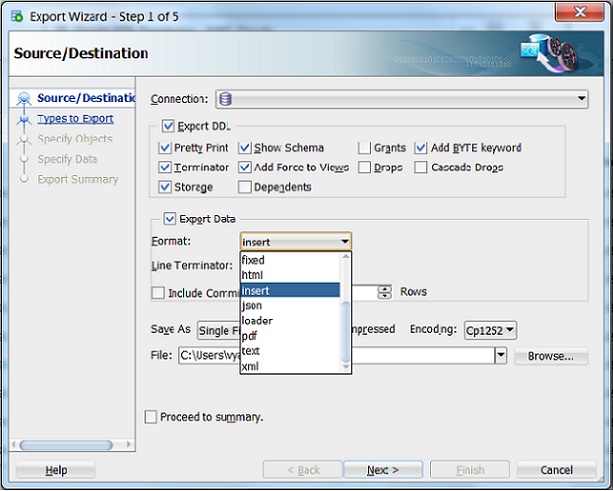
    oracle_export_1.jpg

    Step-2

    The next step asks for the type of export where we decide the export format.
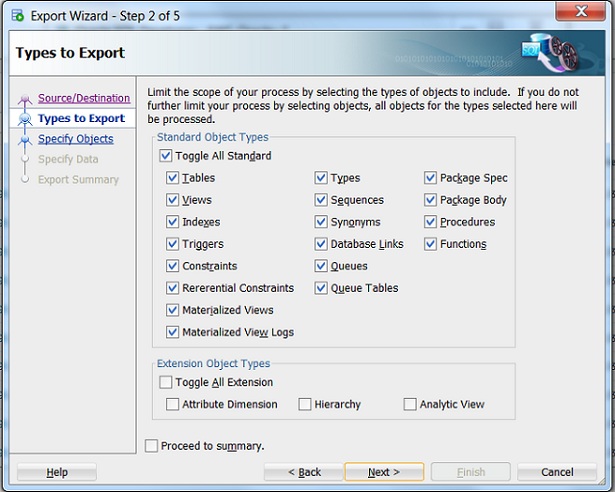
    oracle_export_2.jpg

    Step-3

    Next we decide on the DB objects to be exported.
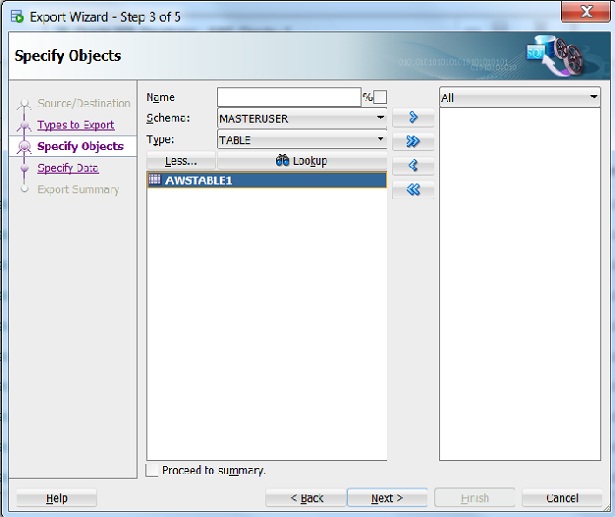
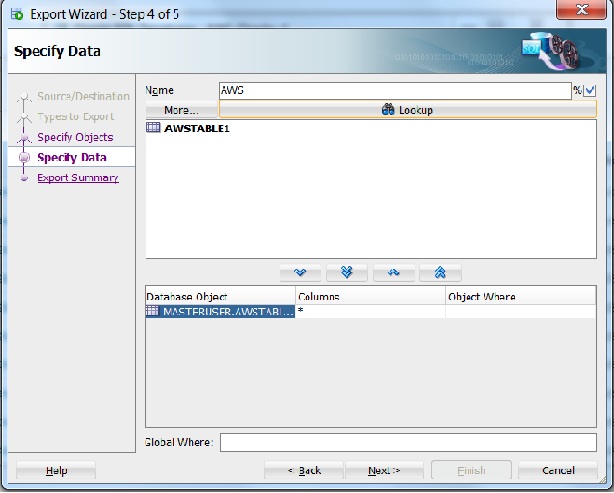
    oracle_export_3.jpg

    Step-4

    We can further decide on the name of the objects to be exported.

    oracle_export_4.jpg

    Step-5

    We can further decide on the objects attributes to be exported.

    oracle_export_5.jpg

    Step-6

    Finally we get the summary screen where we can revisit the objects we have choosen.

    oracle_export_6.jpg

    Clicking finish on the above step will export the DB into a file in choosen format.

    Importing Data Using SQL Developer

    Similar to the export steps above we can choose to import the db by using Database Copy command from the Tools menu option.


    Khóa học lập trình tại Toidayhoc vừa học vừa làm dự án vừa nhận lương: Khóa học lập trình nhận lương tại trung tâm Toidayhoc

  • Khóa học miễn phí Amazon RDS – Oracle Connecting to DB nhận dự án làm có lương

    Amazon RDS – Oracle Connecting to DB


    To connect to Amazon RDS Oracle DB we need a client software. In this case we use Sql Developer. Install it using the link .

    After it is successfully installed we follow the steps below to connect it to the Amazon RDS.

    Step-1

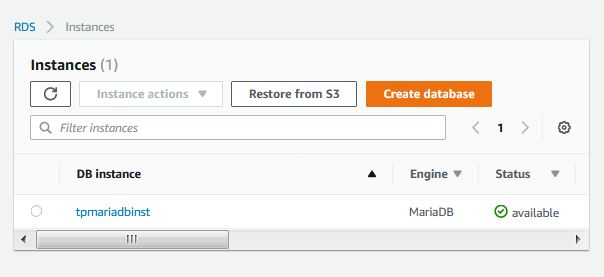
    From the DB instance details get the end point.
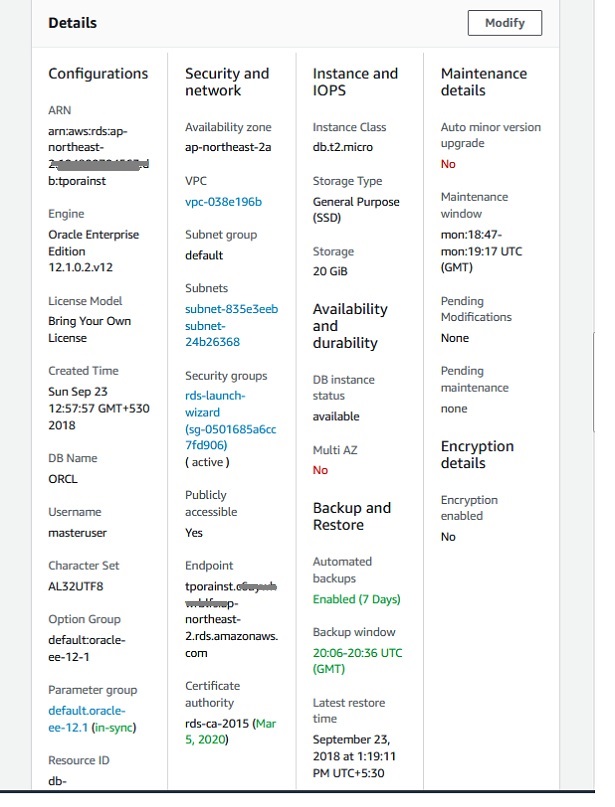
     oracle_db_conn_1.jpg

    Step-2

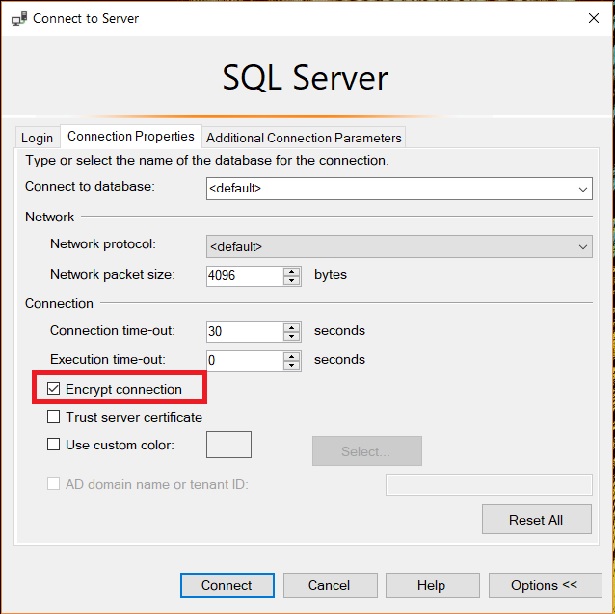
    Use the end point and the master user credentials as the connection details.
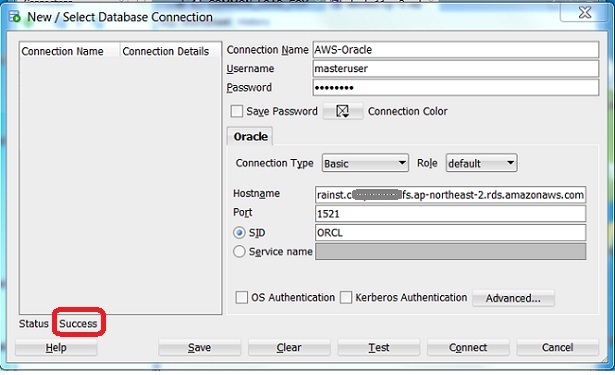
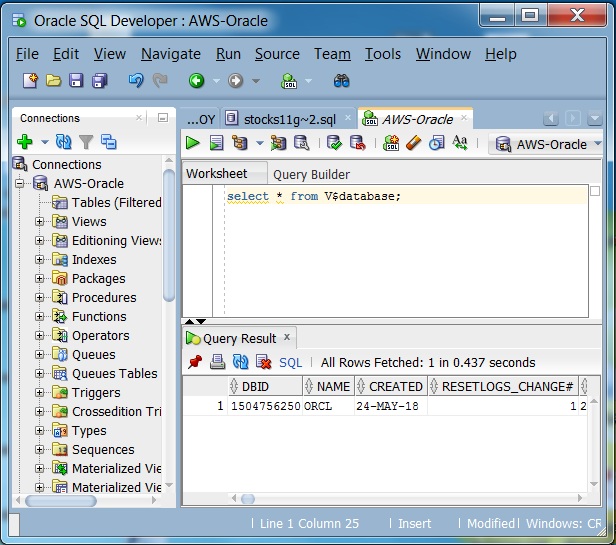
    oracle_db_conn_2.jpg

    Step-3

    Once connected, we get the following window.

    oracle_db_conn_3.jpg

    Khóa học lập trình tại Toidayhoc vừa học vừa làm dự án vừa nhận lương: Khóa học lập trình nhận lương tại trung tâm Toidayhoc

  • Khóa học miễn phí Amazon RDS – Oracle Creating DB nhận dự án làm có lương

    Amazon RDS – Oracle Creating DB


    As a cloud platform AWS gives you very minimal number of steps to setup a DB in RDS. Creating a Oracle DB can be done in three ways. Using AWS management console, AWS CLI or AWS API. We will look at each of these approaches one by one.

    Using AWS management Console

    AWS management console is the most convenient way to get started with RDS. You login to the AWS console using your AWS account details, locate the RDS service and then follow the steps shown below to create a Oracle SQL DB instance.

    Step-1

    Select the Oracle db Engine form the console.

     oracle_create_db_1.jpg

    Step-2

    Specify the required DB details.

    oracle_create_db_2.jpg

    Step-3

    In this step you decide on the db instance class, amount of storage allocated also set the master password along with few other details.

    oracle_create_db_3.jpg

    Stpe—4

    This is the final step when you mention the vpc and security settings, encryption, backup options and log export etc. For brevity the screen shot has been shortened showing only the important options.

    oracle_create_db_4.jpg

    Using CLI

    To create a Oracle DB instance by using the AWS CLI, call the create-db-instance command with the parameters below.

    aws rds create-db-instance
        --engine oracle-se1
        --db-instance-identifier mydbinstance
        --allocated-storage 20
        --db-instance-class db.m1.small
        --db-security-groups mydbsecuritygroup
        --db-subnet-group mydbsubnetgroup
        --master-username masterawsuser
        --master-user-password masteruserpassword
        --backup-retention-period 3
    

    Using API

    To create a Oracle DB instance by using the Amazon RDS API, we call the CreateDBInstance action with the parameters as shown below.

    https://rds.amazonaws.com/
        ?Action=CreateDBInstance
        &AllocatedStorage=250
        &BackupRetentionPeriod=3
        &DBInstanceClass=db.m1.large
        &DBInstanceIdentifier=mydbinstance
        &DBSecurityGroups.member.1=mysecuritygroup
        &DBSubnetGroup=mydbsubnetgroup
        &Engine=oracle-se1
        &MasterUserPassword=masteruserpassword
        &MasterUsername=masterawsuser
        &SignatureMethod=HmacSHA256
        &SignatureVersion=4
        &Version=2014-10-31
        &X-Amz-Algorithm=AWS4-HMAC-SHA256
        &X-Amz-Credential=AKIADQKE4SARGYLE/20140305/us-west-1/rds/aws4_request
        &X-Amz-Date=20140305T185838Z
        &X-Amz-SignedHeaders=content-type;host;user-agent;x-amz-content-sha256;x-amz-date
        &X-Amz-Signature=b441901545441d3c7a48f63b5b1522c5b2b37c137500c93c45e209d4b3a064a3
    

    Khóa học lập trình tại Toidayhoc vừa học vừa làm dự án vừa nhận lương: Khóa học lập trình nhận lương tại trung tâm Toidayhoc

  • Khóa học miễn phí Amazon RDS – Oracle DBA Tasks nhận dự án làm có lương

    Amazon RDS – Oracle DBA Tasks


    As an industry leading database technology, oracle has many in-built features which makes it easy to manage the DBA activities, even in the cloud. The Amazon RDS oracle DB provides access to many stored procedures and functions which can be accessed using the SQL developer client tool. This procedure can be executed using the user ID and password created during the Amazon RDS instance creation. Below are the examples of some of the most frequently used DBA activities.

    Killing a Session

    Sometimes a long running query or any other DB activity needs to be killed by killing the session. We use the Amazon RDS procedure rdsadmin.rdsadmin_util.kill to kill a session. The following code does that.

    # First get the session identifier and the session serial number,
    select SID, SERIAL#, STATUS from V$SESSION where USERNAME = ''AWSUSER
    
    # Next use the procedure
    begin
        rdsadmin.rdsadmin_util.kill(
            sid    => sid,
            serial => serial_number);
    end;
    /


    Setting the Default Tablespace

    The Amazon RDS procedure rdsadmin.rdsadmin_util.alter_default_tablespace can be used to set to the default tablespace for a DB using the following command.

    exec rdsadmin.rdsadmin_util.alter_default_tablespace(tablespace_name => ''AWSuser'');


    Setting the Database Time Zone

    We can use the Amazon RDS procedure rdsadmin.rdsadmin_util.alter_db_time_zone to changes the time zone for the DB.

    # Change the time zone of the DB to UTC + 5.30
    exec rdsadmin.rdsadmin_util.alter_db_time_zone(p_new_tz => ''+5:30'');
    # Change the time zone to a specific region
    exec rdsadmin.rdsadmin_util.alter_db_time_zone(p_new_tz => ''Asia/Kolkata'');
    

    Adding Online Redo Logs

    We can use the Amazon RDS procedure rdsadmin.rdsadmin_util.add_logfile to add additional redo logs. The following command adds a log file of size 128MB.

    exec rdsadmin.rdsadmin_util.add_logfile(p_size => ''128M'');
    

    Khóa học lập trình tại Toidayhoc vừa học vừa làm dự án vừa nhận lương: Khóa học lập trình nhận lương tại trung tâm Toidayhoc

  • Khóa học miễn phí Amazon RDS – MS SQL DBA Tasks nhận dự án làm có lương

    Amazon RDS – MS SQL DBA Tasks


    As a RDS service the MSSQL DB has many DBA tasks available as managed service. You do not have the shell access to the DB, but through the console or through the commands in the client software you can execute various DBA activities. Below are the most common and frequently used DBA tasks performed in Amazon RDS Ms SQL server.

    Change Data Capture

    CDC captures changes that are made to the data in the tables. The changes that were made to user tables are captured in corresponding change tables. These change tables provide an historical view of the changes over time. The change data capture functions that SQL Server provides enable the change data to be consumed easily and systematically.

    Use the below commands in SSMS connected to RDS MSSQL server to enable and disable CDC.

    #Enable CDC for RDS DB Instance
    exec msdb.dbo.rds_cdc_enable_db ''''
    
    #Disable CDC for RDS DB Instance
    exec msdb.dbo.rds_cdc_disable_db ''''
    

    Next to track the changes in a specific table we use the stored procedure sp_cdc_enable_table with the below command.

    #Begin tracking a table
    exec sys.sp_cdc_enable_table
       @source_schema           = N''''
    ,  @source_name             = N''
    '' , @role_name = N'''' , @captured_column_list = '''' ;

    Modifying tempdb Database Options

    The tempdb system database is a global resource which is available to all users connected to the instance of SQL Server and is used to hold the following

    • Temporary user objects that are explicitly created, such as: global or local temporary tables, temporary stored procedures, table variables, or cursors.

    • Internal objects that are created by the SQL Server Database Engine, for example, work tables to store intermediate results for spools or sorting.

    • Row versions that are generated by data modification transactions in a database that uses read-committed using row versioning isolation or snapshot isolation transactions.

    Following are examples of How you modify the RDS MSSQL tempdb for various DBA activities.

    # setting the size to 100 GB and file growth to 10 percent.
    alter database[tempdb] modify file (NAME = N''templog'', SIZE=100GB, FILEGROWTH = 10%)
    
    # set the MAXSIZE property to prevent tempdb database from using all available disk space.
    alter database [tempdb] modify file (NAME = N''templog'', MAXSIZE = 2048MB)
    
    # Shrinking the tempdb Database file size and requests a new size
    exec msdb.dbo.rds_shrink_tempdbfile @temp_filename = N''test_file'', @target_size = 10;


    OFFLINE to ONLINE Transition

    You can transition your Microsoft SQL Server database on an Amazon RDS DB instance from OFFLINE to ONLINE using the following command.

    EXEC rdsadmin.dbo.rds_set_database_online name
    

    Non-English Character Set

    During the creation of RDS MSSQL instance, the default collation marked for the DB is English. But it can be changed to another non-English language by applying the COLLATE clause along with the name of the collation. The below example illustrates that.

    CREATE TABLE [dbo].[Account]
    (
        [AccountID] [nvarchar](10) NOT NULL,
        [AccountName] [nvarchar](100) COLLATE Japanese_CI_AS NOT NULL
    ) ON [PRIMARY];
    

    Khóa học lập trình tại Toidayhoc vừa học vừa làm dự án vừa nhận lương: Khóa học lập trình nhận lương tại trung tâm Toidayhoc

  • Khóa học miễn phí Amazon RDS – MariaDB Features nhận dự án làm có lương

    Amazon RDS – MariaDB Features


    MariaDB is a popular open Source Relational DB which is available in the amazon RDS services with its community edition features. Almost every feature of MariaDB can be leveraged in the RDS platform. Below is a brief description on MariaDB”s major features in the RDS platform.

    Supported Versions

    The versions 10.0, 10.1,10.2 are the major versions supported in the RDS platform. If no version is mentioned during the DB creation, it defaults to the most recent version at that point in time. Below is an example of how to get all supported DB Engine versions using AWS API in a python SDK program.

    import boto3
    
    client = boto3.client(''rds'')
    
    response = client.describe_db_engine_versions(
        DBParameterGroupFamily='''',
        DefaultOnly=True,
        Engine=''mariadb'',
        EngineVersion='''',
        ListSupportedCharacterSets=False, #True,
    )
    
    print(response)


    When we run the above program, we get the following output −

    {
       "ResponseMetadata": {
          "RetryAttempts": 0,
          "HTTPStatusCode": 200,
          "RequestId": "16179fbd-9d07-425b-9b86-cc61359ce7b4",
          "HTTPHeaders": {
             "x-amzn-requestid": "16179fbd-9d07-425b-9b86-cc61359ce7b4",
             "date": "Fri, 14 Sep 2018 06:45:52 GMT",
             "content-length": "1658",
             "content-type": "text/xml"
          }
       },
       "u''DBEngineVersions''": [
          {
             "u''Engine''": "mariadb",
             "u''DBParameterGroupFamily''": "mariadb10.2",
             "u''SupportsLogExportsToCloudwatchLogs''": true,
             "u''SupportsReadReplica''": true,
             "u''DBEngineDescription''": "MariaDb Community Edition",
             "u''EngineVersion''": "10.2.12",
             "u''DBEngineVersionDescription''": "mariadb 10.2.12",
             "u''ExportableLogTypes''": [
                "audit",
                "error",
                "general",
                "slowquery"
             ],
             "u''ValidUpgradeTarget''": [
                {
                   "u''Engine''": "mariadb",
                   "u''IsMajorVersionUpgrade''": false,
                   "u''AutoUpgrade''": false,
                   "u''Description''": "MariaDB 10.2.15",
                   "u''EngineVersion''": "10.2.15"
                }
             ]
          }
       ]
    }
    

    Database Security

    The security for RDS MariaDB is managed at three layers.

    Using IAM

    In this approach the IAM user should have appropriate policies and permissions. Granting of such permissions is decided by the account holder or the super user who grants these permissions.

    Using VPC

    You either use a VPC security group or DB security group to decide which EC2 instances can open connections to the endpoint and port of a DB instance. These connections can also be made using SSL.

    Using IAM Database Authentication

    In this approach you use a IAM role and an authentication token. The authentication token generates a unique value which is relevant to the IAM role that is used in the access process. Here the same set of credentials are used for database as well as other aws resources, like EC2 and S3 etc.

    Cache Warming

    Cache warming can provide performance gains for your MariaDB DB instance by saving the current state of the buffer pool when the DB instance is shut down, and then reloading the buffer pool from the saved information when the DB instance starts up. This approach bypasses the need for the buffer pool to “warm up” from normal database use and instead preloads the buffer pool with the pages for known common queries.

    Cache warming primarily provides a performance benefit for DB instances that use standard storage.

    You can create an event to dump the buffer pool automatically and at a regular interval. For example, the following statement creates an event named periodic_buffer_pool_dump that dumps the buffer pool every hour.

    CREATE EVENT periodic_buffer_pool_dump
       ON SCHEDULE EVERY 1 HOUR
       DO CALL mysql.rds_innodb_buffer_pool_dump_now();
    

    Khóa học lập trình tại Toidayhoc vừa học vừa làm dự án vừa nhận lương: Khóa học lập trình nhận lương tại trung tâm Toidayhoc

  • Khóa học miễn phí Amazon RDS – MS SQL DB with SSL nhận dự án làm có lương

    Amazon RDS – MS SQL DB with SSL


    To protect data from being viewed by unintended parties, we can use connection encryption between the client application and the RDS DB instance. Encryption is available in all AWS regions and for all the DB types supported by AWS RDS. In this chapter we will see how encryption is enabled for MSSQL Server.

    There are two ways to enable encryption.

    • Force SSL for all connections — this happens transparently to the client, and the client doesn”t have to do any work to use SSL.

    • Encrypt specific connections — this sets up an SSL connection from a specific client computer, and you must do work on the client to encrypt connections.

    Force SSL

    In this approach we force all the connections form the DB client to use SSL. This is done by using the rds.force_ssl parameter. Set the rds.force_ssl parameter to true to force connections to use SSL. As it is a static parameter, we must reboot your DB instance for the change to take effect. The below diagram shows how to reset the value by visiting the DB parameters settings page to set the value for rds.force_ssl parameter.

     SSL_force_conn.JPG

    Encrypting Specific Connections

    We can encrypt connections from specific client computers only to the RDS DB Instance. In order to do this, we need to install certificate on the client computer. Below are the steps to install the certificate.

    Step-1

    Download the certificate to the client computer from .

    Step-2

    Follow the path Windows -> Run -> type MMC and enter. It opens the following window.

     ssl_mmc_1.JPG

    Step-3

    In the Add or Remove Snap-ins dialog box, for Available snap-ins, select Certificates, and then choose Add.

     ssl_mmc_2.JPG

    Step-4

    Follow the Path Computer Account -> Local Computer -> Finish.

    Step-5

    In the MMC console, expand Certificates, open the context (right-click) menu for Trusted Root Certification Authorities, choose All Tasks, and then choose Import.

     ssl_mmc_3 .JPG

    Step-6

    Select the .pem file downloaded in the previous step and finish the import wizard by choosing the default values and clicking next.

    Step-7

    We can see the certificate installed as below.

     ssl_mmc_4 .JPG

    Step-8

    When connecting to AWS RDS MSSQL Db instance using SSMS, expand the options tab and choose Encrypt connection.

     ssl_mmc_5 .JPG

    Now the client connection to RDS from this computer will be encrypted.


    Khóa học lập trình tại Toidayhoc vừa học vừa làm dự án vừa nhận lương: Khóa học lập trình nhận lương tại trung tâm Toidayhoc

  • Khóa học miễn phí Amazon RDS – MariaDB Creating DB nhận dự án làm có lương

    Amazon RDS – MariaDB Creating DB


    As a cloud platform AWS gives you very minimal number of steps to setup a DB in RDS. Creating a MariaDB can be done in three ways. Using AWS management console, AWS CLI or AWS API. We will look at each of these approaches one by one.

    Using AWS management Console

    AWS management console is the most convenient way to get started with RDS. You login to the AWS console using your AWS account details, locate the RDS service and then follow the steps shown below to create a MariaDB instance.

    Step-1

    Select the MariaDB Engine form the console.

     mariadb_creation_step_1.JPG

    Step-2

    Specify the required DB details.

    mariadb_step_2.JPG

    Step-3

    In this step you decide on the db instance class, amount of storage allocated also set the master password along with few other details.

    mariadb_step_3.JPG

    Stpe—4

    This is the final step when you mention the vpc and security settings, encryption, backup options and log export etc. For brevity the screen shot has been shortened showing only the final options.

    maria_db_step_4.JPG

    Stpe—5

    In the final step we choose the create Data base option.

    maria_db_step_5.JPG

    Using CLI

    To create a MariaDB instance by using the AWS CLI, call the create-db-instance command with the parameters below.

    aws rds create-db-instance
        --db-instance-identifier mydbinstance
        --db-instance-class db.m4.xlarge
        --engine mariadb
        --allocated-storage 20
        --master-username masteruser
        --master-user-password masteruserpassword
        --backup-retention-period 3
    

    Using API

    To create a MariaDB instance by using the Amazon RDS API, we call the CreateDBInstance action with the parameters as shown below.

    https://rds.us-west-2.amazonaws.com/
        ?Action=CreateDBInstance
        &AllocatedStorage=20
        &BackupRetentionPeriod=3
        &DBInstanceClass=db.m4.xlarge
        &DBInstanceIdentifier=mydbinstance
        &DBName=mydatabase
        &DBSecurityGroups.member.1=mysecuritygroup
        &DBSubnetGroup=mydbsubnetgroup
        &Engine=mariadb
        &MasterUserPassword=masteruserpassword
        &MasterUsername=masterawsuser
        &Version=2014-10-31
        &X-Amz-Algorithm=AWS4-HMAC-SHA256
        &X-Amz-Credential=AKIADQKE4SARGYLE/20140213/us-west-2/rds/aws4_request
        &X-Amz-Date=20140213T162136Z
        &X-Amz-SignedHeaders=content-type;host;user-agent;x-amz-content-sha256;x-amz-date
        &X-Amz-Signature=8052a76dfb18469393c5f0182cdab0ebc224a9c7c5c949155376c1c250fc7ec3
    

    Khóa học lập trình tại Toidayhoc vừa học vừa làm dự án vừa nhận lương: Khóa học lập trình nhận lương tại trung tâm Toidayhoc

  • Khóa học miễn phí Amazon RDS – MS SQL DB Export Import nhận dự án làm có lương

    Amazon RDS – MS SQL DB Export Import


    Amazon RDS MSSQL provides native backup and restore as a mechanism to export and import the DB. A full backup file can be created from the on-premise database and stored in Amazon S3. Next this backup file is restored to an existing Amazon RDS DB instance running SQL server. We can follow just the similar steps to export the data from Amazon RDS MSSQL instance and restore it to an on-premise SQL Server database.

    The below diagram describes the approach.

     mssql_export_import.png

    We upload the backup file created above to a pre-decided Amazon S3 bucket in the same region where the target RDS MSSQL database is present. You can follow to learn about how to upload.

    This native backup and restore mechanism has the following advantages.

    • Migrate databases to Amazon RDS.

    • Move databases between Amazon RDS SQL Server DB instances.

    • Import and export data.

    • Migrate schemas, stored procedures, triggers and other database code.

    • Backup and restore single databases, instead of entire DB instances.

    • Create copies of databases for testing, training, and demonstrations.

    • Store and transfer backup files into and out of Amazon RDS through Amazon S3, giving you an added layer of protection for disaster recovery.

    Backing Up a Database

    To back up your database, you call the rds_backup_database stored procedure after connecting to the Amazon RDS MSSQL instance from the SSMS client software. The stored procedure is executed using following parameters.

    exec msdb.dbo.rds_backup_database
            @source_db_name=''database_name'',
            @s3_arn_to_backup_to=''arn:aws:s3:::bucket_name/file_name_and_extension'',
            @kms_master_key_arn=''arn:aws:kms:region:account-id:key/key-id'',
            @overwrite_S3_backup_file=1,
            @type=''FULL


    The successful completion of the above stored procedure creates a backup file and stores it in the mentioned bucket of S3.

    Restoring a Database

    To restore your database, you call the rds_restore_database stored procedure after connecting to the Amazon RDS MSSQL instance from the SSMS client software. The stored procedure is executed using following parameters.

    exec msdb.dbo.rds_restore_database
            @restore_db_name=''database_name'',
            @s3_arn_to_restore_from=''arn:aws:s3:::bucket_name/file_name_and_extension'',
            @kms_master_key_arn=''arn:aws:kms:region:account-id:key/key-id
    

    Khóa học lập trình tại Toidayhoc vừa học vừa làm dự án vừa nhận lương: Khóa học lập trình nhận lương tại trung tâm Toidayhoc

  • Khóa học miễn phí Amazon RDS – Environment nhận dự án làm có lương

    Amazon RDS – Environment


    For using any Aws service you ned to set up an AWS account. We assume you have set up the AWS account by following the guide lines mentioned in the aws home page. Below are the preliminary steps to access the RDS services from the console.

    Step-1

    After logging in to the amazon console, to access the RDS services we need to navigate to the Amazon RDS home page by searching for RDS in the search box of under the services tag as shown in the diagram below.

    rds_environment_1.JPG

    Step-2

    On clicking the link above we get the Amazon RDS home page. If it is the first time ever you are accessing RDS services, then it will show you a screen prompting for creating a database as shown below.

    rds_environment_2.JPG

    In case you have already created some RDS resources a summary of that will be available by scrolling down in the above page. A screen shot is shown below.

    rds_environment_3.JPG

    Step-3

    The next screen gives us an option to select the DB engine we need and that is the start of our configuration steps for the database we need.

    rds_environment_4.JPG

    In the next chapter we will see the details on each of the industry’s popular database configuration and usage one by one.


    Khóa học lập trình tại Toidayhoc vừa học vừa làm dự án vừa nhận lương: Khóa học lập trình nhận lương tại trung tâm Toidayhoc