Author: alien

  • Khóa học miễn phí DB2 – Bufferpools nhận dự án làm có lương

    DB2 – Bufferpools


    This chapter introduces you to Bufferpools in the database.

    bufferpool

    Introduction

    The bufferpool is portion of a main memory space which is allocated by the database manager. The purpose of bufferpools is to cache table and index data from disk. All databases have their own bufferpools. A default bufferpool is created at the time of creation of new database. It called as “IBMDEFAULTBP”. Depending on the user requirements, it is possible to create a number of bufferpools. In the bufferpool, the database manager places the table row data as a page. This page stays in the bufferpool until the database is shutdown or until the space is written with new data. The pages in the bufferpool, which are updated with data but are not written onto the disk, are called “Dirty” pages. After the updated data pages in the bufferpool are written on the disk, the bufferpool is ready to take another data.

    Relationship between tablespaces and bufferpools

    Each table space is associated with a specific buffer pool in a database. One tablespace is associated with one bufferpool. The size of bufferpool and tablespace must be same. Multiple bufferpools allow you to configure the memory used by the database to increase its overall performance.

    Bufferpool sizes

    The size of the bufferpool page is set when you use the “CREATE DATABASE” command. If you do not specify the page size, it will take default page size, which is 4KB. Once the bufferpool is created, it is not possible to modify the page size later

    Listing the available bufferpools in the current database directory

    Syntax: [The syntax below shows all available bufferpools in database]

    db2 select * from syscat.bufferpools
    

    Example: [To see available bufferpools in current database]

    db2 select * from syscat.bufferpools
    

    Output:

    BPNAME      BUFFERPOOLID DBPGNAME   NPAGES      PAGESIZE    ESTORE
    NUMBLOCKPAGES BLOCKSIZE   NGNAME
    ------------------------------------------------------------
    IBMDEFAULTBP
     1 -
     -2        4096 N                  0           0 -
    
     1 record(s) selected.
    

    Creating the bufferpool

    To create a new bufferpool for database server, you need two parameters namely, “bufferpool name” and “size of page”. The following query is executed to create a new bufferpool.

    Syntax: [In the syntax below,‘bp_name’ indicates bufferpool name and ‘size’ indicates size for page you need to declare for bufferpools (4K,8K,16K,32K)]

    db2 create bufferpool <bp_name> pagesize <size>
    

    Example: [To create a new bufferpool with name “bpnew” and size “8192”(8Kb).]

    db2 create bufferpool bpnew pagesize 8192
    

    Output

    DB20000I The SQL command completed successfully.
    

    Dropping the bufferpool

    Before dropping the bufferpool, it is required to check if any tablespace is assigned to it.

    Syntax: [To drop the bufferpool]

    drop bufferpool <bp_name>
    

    Example: [To drop ‘bpnew’ named bufferpool]

    db2 drop bufferpool bpnew
    

    Output

    DB20000I The SQL command completed successfully.
    

    Khóa học lập trình tại Toidayhoc vừa học vừa làm dự án vừa nhận lương: Khóa học lập trình nhận lương tại trung tâm Toidayhoc

  • Khóa học miễn phí DB2 – Storagegroups nhận dự án làm có lương

    DB2 – Storagegroups


    This chapter describes the Database Storagegroups.

    Storage

    Introduction

    A set of Storage paths to store database table or objects, is a storage group. You can assign the tablespaces to the storage group. When you create a database, all the tablespaces take default storagegorup. The default storage group for a database is ‘IBMSTOGROUP’. When you create a new database, the default storage group is active, if you pass the “AUTOMATIC STOGROUP NO” parameter at the end of “CREATE DATABASE” command. The database does not have any default storage groups.

    Listing storagegroups

    You can list all the storagegroups in the database.

    Syntax: [To see the list of available storagegroups in current database]

    db2 select * from syscat.stogroups
    

    Example: [To see the list of available storagegorups in current database]

    db2 select * from syscat.stogroups
    

    Creating a storagegroup

    Here is a syntax to create a storagegroup in the database:

    Syntax: [To create a new stogroup. The ‘stogropu_name’ indicates name of new storage group and ‘path’ indicates the location where data (tables) are stored]

    db2 create stogroup  on ‘path’
    

    Example: [To create a new stogroup ‘stg1’ on the path ‘data1’ folder]

    db2 create stogroup stg1 on ‘/data1’
    

    Output:

    DB20000I The SQL command completed succesfully
    

    Creating tablespace with stogroup

    Here is how you can create a tablespace with storegroup:

    Syntax: [To create a new tablespace using existed storage group]

    db2 create tablespace <tablespace_name>  using stogroup <stogroup_name>
    

    Example: [To create a new tablespace named ‘ts1’ using existed storage group ‘stg1’]

    db2 create tablespace ts1 using stogroup stg1
    

    Output:

    DB20000I The SQL command completed succesfully
    

    Altering a storagegroup

    You can alter the location of a storegroup by using following syntax:

    Syntax: [To shift a storage group from old location to new location]

    db2 alter stogroup  add ‘location’, ‘location’
    

    Example: [To modify location path from old location to new location for storage group named ‘sg1’]

    db2 alter stogroup sg1 add ‘/path/data3’, ‘/path/data4’
    

    Dropping folder path of storagegroup

    Before dropping folder path of storagegroup, you can add new location for the storagegroup by using alter command.

    Syntax: [To drop old path from storage group location]

    db2 alter stogroup  drop ‘/path’
    

    Example: [To drop storage group location from ‘stg1’]

    db2 alter stogroup stg1 drop ‘/path/data1’
    

    Rebalancing a tablespace

    Rebalancing the tablespace is required when we create a new folder for storagegroup or tablespaces while the transactions are conducted on the database and the tablespace becomes full. Rebalancing updates database configuration files with new storagegroup.

    Syntax: [To rebalance the tablespace from old storage group path to new storage group]

    db2 alter tablspace <ts_name> rebalance
    

    Example: [To rebalance]

    db2 alter tablespace ts1 rebalance
    

    Renaming a storagegroup

    Syntax: [To modify the name of existing storage name]

    db2 rename stogroup <old_stg_name> to <new_stg_name>
    

    Example: [To modify the name of storage group from ‘sg1’ to new name ‘sgroup1’]

    db2 rename stogroup sg1 to sgroup1
    

    Dropping a storage group

    Step 1: Before dropping any storagegroup, you can assign some different storagegroup for tablespaces.

    Syntax: [To assign another storagegroup for table space.]

    db2 alter tablspace <ts_name> using stogroup <another sto_group_name>
    

    Example: [To change from one old stogroup to new stogroup named ‘sg2’ for tablespace ‘ts1’]

    db2 alter tablespace ts1 using stogroup sg2
    

    Step 2:

    Syntax: [To drop the existing stogroup]

    db2 drop stogorup <stogroup_name>
    

    Example: [To drop stogroup ‘stg1’ from database]

    db2 drop stogroup stg1
    

    Khóa học lập trình tại Toidayhoc vừa học vừa làm dự án vừa nhận lương: Khóa học lập trình nhận lương tại trung tâm Toidayhoc

  • Khóa học miễn phí DB2 – Server Installation nhận dự án làm có lương

    DB2 – Server Installation


    This chapter describes installation steps of DB2 server.

    Introduction

    You can download the DB2 Server trial version or purchase the product license from . There are two separate DB2 servers available for downloading, depending upon the size of operating system, on which it is intended to execute. For example, if you want to download a DB2 server for 32bit Linux or UNIX operating system, then you need to download a 32 bit DB2 server. The same applies for 64bit DB2 server.

    Hardware requirements

    Processor : Minimum Core 2Duo

    Ram : 1GB minimum

    Hard disk : 30GB minimum

    Software requirements

    Before installing the DB2 server, your system needs to get ready with the required software on it. For Linux, you need to install “libstdc++6.0”.

    Checking system compatibility

    Before installing DB2 Server, you need to verify if your system is compatible with the DB2 server. For confirming the compatibility, you need to call ”db2prereqcheck” command on command console.

    Installing DB2 on Linux operating system

    Open the Terminal and set the db2 installation image folder path on console using “CD <DB2 installation folder>” command. Then type “./db2prereqcheck” command, which confirms the compatibility of your system with DB2 server.

    ./db2prereqcheck
    

    Figure-1 shows the compatibility requirements of Linux operating system and hardware system.

    Follow the given steps for installing DB2 on your Linux system:

    • Open the terminal.
    • Login as root user.
    • Open DB2 Installation folder.
    • Type “./db2setup” and press Enter.

    This process will start execution of DB2 server setup.

    DB2 Server Setup

    Type “./db2setup” and press Enter on root terminal to start setup process of DB2 Server.

    On doing so, the “Set up Launch Pad” screen appears. [Figure-2]

    Set up Launch Pad

    On Setup Launch pad page, select “Install a Product” option from left side menu. Select option “DB2 Advanced Enterprise Server Edition”. Select “Install New” Button.

    A new frame appears with name “DB2 setup wizard”. Click “Next”. [Figure-3]

    DB2 setup wizard

    The next screen appears with DB2 license agreement. Select “I accept the terms…” Click “Next”. [Figure-4]

    DB2 license agreement

    Next screen comes up with offer of Installation type, which is set to “Typical” by default.

    Keep the same selection. Click “Next”. [Figure-5]

    Installation Action

    The next screen appears with installation action.

    Select “Install DB2 Advanced Enterprise Server Edition…”

    Click “Next”. [Figure-6]

    Installation Directory

    On the next screen, the setup program asks for selection of installation directory.

    Keep the default and click “Next”.

    Server Info

    The next screen comes up with the user authentication. Enter your password for “dasusr1” user.

    (Your password can be identical to username so that it is convenient to remember.)

    DB2 Instance

    On the following screen, the setup asks you for creation of DB2 Server Instance.

    Here, it is creating a DB2 instance with name “db2inst1”.

    DB2 Instance Name

    The next screen asks you the number of partitions you require for your default instance.

    You have a choice of “single or Multiple” partitions.

    Select “single partition instance”. Click “next”.

    DB2 Partition

    On the next screen, the setup asks you for authentication for DB2 instance being created.

    Here, by default username is created as “db2inst1”. You can enter password same as username.

    Click “Next”.

    Authentication

    On the next screen, the setup asks to enter authentication information for “db2fenc” user.

    Here, you can enter password same as username.

    Click “Next”.

    Authentication Information

    On the next screen, you can select “Do not setup your db2 server to send notifications at this time” option.

    Click ”Next”.

    Notification

    The next screen shows you the information about db2 setup.

    Click “Finish”.

    The DB2 Installation procedure is complete at this stage.

    Verifying DB2 installation

    You need to verify the installation of DB2 server for its usefulness. On completing the DB2 Server installation, logout from current user mode and login to “db2inst1” user. In “db2inst1” user environment, you can open terminal and execute the following commands to verify if your db2 product is installed properly or not.

    db2level

    This command shows the current version and service level of the installed DB2 product for current instance.

    Syntax:

    db2level
    

    Example:

    db2level
    

    Output:

    DB21085I Instance "db2inst2" uses "64" bits
    And DB2 code release "SQL10010" with level
    identifier "0201010E". Informational tokens
    are "DB2 v10.1.0.0", "s120403",
    "LINUXAMD64101", and Fix Pack "0".
    Product is installed at "/home/db2inst2/sqllib".
    

    db2licm

    This command shows all the license related information of our DB2 Product.

    Syntax:

    db2licm <parameter>
    

    Example:

    db2licm -l
    

    Output:

    Product name:                     "DB2 Advanced Enterprise Server Edition"
    License type:                     "Trial"
    Expiry date:                      "10/02/2014"
    Product identifier:               "db2aese"
    Version information:              "10.1"
    Product name:                     "DB2 Connect Server"
    License type:                     "Trial"
    Expiry date:                      "10/02/2014"
    Product identifier:               "db2consv"
    Version information:              "10.1"
    

    Command Line Processor (CLP)

    The CLP can be started in one of the three modes:

    • Command mode: In this mode, each command and SQL statement must be prefixed by “db2”. For example, query “db2 activate database sample”.

    • Interactive input mode: you can launch this mode by using the “db2” command. Here, you can pass SQL statements without prefix. For example, “activate database sample”.

    • Batch mode: Here, you need to create a script file, which contains all SQL queries of requirements and save the file with “.db2” extension. You can call this in command line using syntax “db2 –tf <filename.db2>”.

    Accessing DB22

    Khóa học lập trình tại Toidayhoc vừa học vừa làm dự án vừa nhận lương: Khóa học lập trình nhận lương tại trung tâm Toidayhoc

  • Khóa học miễn phí DB2 – Tablespaces nhận dự án làm có lương

    DB2 – Tablespaces


    This chapter describes the tablespaces in detail

    Tablespaces

    Introduction

    A table space is a storage structure, it contains tables, indexes, large objects, and long data. It can be used to organize data in a database into logical storage group which is related with where data stored on a system. This tablespaces are stored in database partition groups

    Benefits of tablespaces in database

    The table spaces are beneficial in database in various ways given as follows:

    Recoverability: Tablespaces make backup and restore operations more convenient. Using a single command, you can make backup or restore all the database objects in tablespaces.

    Automatic storage Management: Database manager creates and extends containers depending on the needs.

    Memory utilization: A single bufferpool can manage multiple tablespaces. You can assign temporary tablespaces to their own bufferpool to increase the performance of activities such as sorts or joins.

    Container

    Tablespaces contains one or more containers. A container can be a directory name, a device name, or a filename. In a database, a single tablespace can have several containers on the same physical storage device. If the tablespace is created with automatic storage tablespace option, the creation and management of containers is handled automatically by the database manager. If it is not created with automatic storage tablespace option, you need to define and manage the containers yourself.

    Default tablespaces

    When you create a new database, the database manager creates some default tablespaces for database. These tablespace is used as a storage for user and temporary data. Each database must contain at least three tablespaces as given here:

    1. Catalog tablespace
    2. User tablespace
    3. Temporary tablespace

    Catalog tablespace: It contains system catalog tables for the database. It is named as SYSCATSPACE and it cannot be dropped.

    User tablespace: This tablespace contains user-defined tables. In a database, we have one default user tablespace, named as USERSPACE1. If you do not specify user-defined tablespace for a table at the time you create it, then the database manager chooses default user tablespace for you.

    Temporary tablespace: A temporary tablespace contains temporary table data. This tablespace contains system temporary tablespaces or user temporary tablespace.

    System temporary tablespace holds temporary data required by the database manager while performing operation such as sorts or joins. A database must have at least one system temporary tablespace and it is named as TEMPSPACE1. It is created at the time of creating the database. User temporary tablespace holds temporary data from tables. It is created with DECLARE GLOBAL TEMPORARY TABLE or CREATE GLOBAL TEMPORARY TABLE statement. This temporary tablespace is not created by default at the time of database creation.

    Tablespaces and storage management:

    Tablespaces can be setup in different ways, depending on how you want to use them. You can setup the operating system to manage tablespace allocation, you can let the database manager allocate space or you can choose automatic allocation of tablespace for your data.

    The following three types of managed spaces are available:

    System Managed Space (SMS): The operating system’s file system manager allocates and manages the space where the table is stored. Storage space is allocated on demand. This model consists of files representing database objects. This tablespace type has been deprecated in Version 10.1 for user-defined tablespaces, and it is not deprecated for catalog and temporary tablespaces.

    Database Managed Space (DMS): The Database Server controls the storage space. Storage space is pre- allocated on the file system based on container definition that you specify when you create the DMS table space. It is deprecated from version 10.1 fix pack 1 for user-defined tablespaces, but it is not deprecated for system tablespace and temporary tablespace.

    Automatic Storage Tablespace: Database server can be managed automatically. Database server creates and extends containers depend on data on database. With automatic storage management, it is not required to provide container definitions. The database server looks after creating and extending containers to make use of the storage allocated to the database. If you add storage space to a storage group, new containers are automatically created when the existing container reach their maximum capacity. If you want to use the newly-added storage immediately, you can rebalance the tablespace.

    Page, table and tablespace size:

    Temporary DMS and automatic storage tablespaces, the page size you choose for your database determines the maximum limit for the tablespace size. For table SMS and temporary automatic storage tablespaces, the page size constrains the size of table itself. The page sizes can be 4kb, 8kb, 16kb or 32kb.

    Tablespace type 4K page size limit 8K page size limit 16K page size limit 32K page size limit
    DMS, non-temporary automatic storage tablespace regular 64G 128G 256G 512G
    DMS, temporary DMS and non- temporary automatic storage table space large 1892G 16384G 32768G 65536G

    Khóa học lập trình tại Toidayhoc vừa học vừa làm dự án vừa nhận lương: Khóa học lập trình nhận lương tại trung tâm Toidayhoc

  • Khóa học miễn phí DB2 – Schemas nhận dự án làm có lương

    DB2 – Schemas


    This chapter introduces and describes the concept of Schema.

    Introduction

    A schema is a collection of named objects classified logically in the database.

    In a database, you cannot create multiple database objects with same name. To do so, the schema provides a group environment. You can create multiple schemas in a database and you can create multiple database objects with same name, with different schema groups.

    schemas

    A schema can contain tables, functions, indices, tablespaces, procedures, triggers etc. For example, you create two different schemas named as “Professional” and “Personal” for an “employee” database. It is possible to make two different tables with the same name “Employee”. In this environment, one table has professional information and the other has personal information of employee. In spite of having two tables with the same name, they have two different schemas “Personal” and “Professional”. Hence, the user can work with both without encountering any problem. This feature is useful when there are constraints on the naming of tables.

    Let us see few commands related to Schema:

    Getting currently active schema

    Syntax:

    db2 get schema
    

    Example: [To get current database schema]

    db2 get schema
    

    Setting another schema to current environment

    Syntax:

    db2 set schema=<schema_name>
    

    Example: [To arrange ‘schema1’ to current instance environment]

    db2 set schema=schema1
    

    Creating a new Schema

    Syntax: [To create a new schema with authorized user id]

    db2 create schema <schema_name> authroization <inst_user>
    

    Example: [To create “schema1” schema authorized with ‘db2inst2”]

    db2 create schema schema1 authorization db2inst2
    

    Exercise

    Let us create two different tables with same name but two different schemas. Here, you create employee table with two different schemas, one for personal and the other for professional information.

    Step 1: Create two schemas.

    Schema 1: [To create schema named professional]

    db2 create schema professional authorization db2inst2
    

    Schema 2: [To create schema named personal]

    db2 create schema personal authorization db2inst2
    

    Step 2: Create two tables with the same name for Employee details

    Table1: professional.employee

    [To create a new table ‘employee’ in the database using schema name ‘professional’]

    db2 create table professional.employee(id number, name
    varchar(20), profession varchar(20), join_date date,
    salary number);
    

    Table2: personal.employee

    [To create a new table ‘employee’ in the same database, with schema name ‘personal’]

    db2 create table personal.employee(id number, name
    varchar(20), d_birth date, phone bigint, address
    varchar(200));
    

    After executing these steps, you get two tables with same name ’employee’, with two different schemas.


    Khóa học lập trình tại Toidayhoc vừa học vừa làm dự án vừa nhận lương: Khóa học lập trình nhận lương tại trung tâm Toidayhoc

  • Khóa học miễn phí DB2 – Instance nhận dự án làm có lương

    DB2 – Instance


    Introduction

    An Instance is a logical environment for DB2 Database Manager. Using instance, you can manage databases. Depending on our requirements, you can create multiple instances on one physical machine. The contents of Instance directory are:

    • Database Manager Configuration file
    • System Database Directory
    • Node Directory
    • Node Configuration File [db2nodes.cfg]
    • Debugging files, dump files

    For DB2 Database Server, the default instance is “DB2”. It is not possible to change the location of Instance directory after its creation. An instance can manage multiple databases. In an instance, each database has a unique name, its own set of catalog tables, configurations files, authorities and privileges.

    Architecture of instance in DB2 product

    db2_product

    Multiple instances

    You can create multiple instances in one DB2Server on Linux, UNIX and Windows. It is possible to install multiple DB2Servers on a physical machine.

    Creating instance on Linux

    You can create multiple instances on Linux and UNIX if DB2 Server is installed as root user. An instance can run simultaneously on Linux and UNIX independently. You can work within a single instance of the database manager at a time.

    An Instance folder contains database configuration files and folders. The Instance directory is stored at different locations on Windows depending on the operating system versions.

    Listing instances

    The following command is used to list instances:

    db2ilist

    This command lists all the instances that are available on a system.

    Syntax:

    db2ilist
    

    Example:[To see how many instances are created in DB2 copy]

    db2ilist
    

    Output:

    db2inst1
    db2inst2
    db2inst3
    

    Instance environment commands

    These commands are useful to work with arrangement of instance in the DB2 CLI.

    Get instance

    This command shows details of the currently running instance.

    Syntax:

    db2 get instance
    

    Example:[To see the current instance which activated the current user]

    db2 get instance
    

    Output:

    The current database manager instance is : db2inst1
    

    Set instance

    To start or stop the database manager of an instance on DB2 UDB, the following command is executed for the current instance.

    Syntax:

    set db2instance=<instance_name>
    

    Example:[ To arrange the “db2inst1” environment to current user]

    set db2instance=db2inst1
    

    db2start

    Using this command, you can start an instance. Before this, you need to run “set instance”.

    Syntax:

    db2start
    

    Example:[To start an instance]

    db2start
    

    Output:

    SQL1063N DB2START processing was successful
    

    db2stop

    Using this command you can stop a running instance.

    Syntax:

    db2stop
    

    Output:

    SQL1064N DB2STOP processing was successful.
    

    Creating an instance

    Let us see how to create a new instance.

    db2icrt

    If you want to create a new instance, you need to log in with root. Instance id is not a root id or a root name.

    Here are the steps to create a new instance:

    Step1: Create an operating system user for instance.

    Syntax:

    useradd -u <ID> -g <group name> -m -d <user location> <user name>
    -p <password>
    

    Example: [To create a user for instance with name ‘db2inst2’ in group ‘db2iadm1’ and password ‘db2inst2’]

    useradd -u 1000 -g db2iadm1 -m -d /home/db2inst2 db2inst2 -p db2inst2
    

    Step2: Go to the DB2 instance directory in root user for create new instance.

    Location:

    cd /opt/ibm/db2/v10.1/instance
    

    Step3: Create instance using the syntax below:

    Syntax:

    ./db2icrt -s ese -u <inst id> <instance name>
    

    Example: [To create a new instance ‘db2inst2’ in user ‘db2inst2’ with the features of ‘ESE’ (Enterprise Server Edition)]

    ./db2icrt -s ese -u db2inst2 db2inst2
    

    Output:

    DBI1446I The db2icrt command is running, please wait.
     ….
     …..
    DBI1070I Program db2icrt completed successfully.
    

    Arranging communication port and host for an instance

    Edit the /etc/services file and add the port number. In the syntax given below, ‘inst_name’ indicates the Instance name and ‘inst_port’ indicates port number of instance.

    Syntax:

    db2c_<inst name> <inst_port>/tcp
    

    Example: [Adding ‘50001/tcp’ port number for instance ‘db2inst2’ with variable ‘db2c_db2inst2’ in ‘services’ file]

    db2c_db2inst2 50001/tcp
    

    Syntax 1: [Update Database Manager Configuration with service name. The following syntax ‘svcename’ indicates the instance service name and ‘inst_name’ indicates the instance name]

    db2 update database manager configuration using svcename db2c_&<inst_name>
    

    Example 1: [Updating DBM Configuration with variable svcename with value ‘db2c_db2inst2’ for instance ‘db2inst2’

    db2 update database manager configuration using svcename db2c_db2inst2
    

    Output

    DB20000I The UPDATE DATABASE MANAGER CONFIGURATION command completed successfully.
    

    Syntax 2: set the “tcpip” communication protocol for the current instance

    db2set DB2COMM=tcpip
    

    Syntax 3: [Stopping and starting current instance to get updated values from database manager configuration]

    db2stop
    db2start
    

    Updating an instance

    You can update an instance using following command:

    db2iupdt

    This command is used to update the instance within the same version release. Before executing this command, you need to stop the instance database manager using “db2stop” command. The syntax below “inst_name” indicates the previous released or installed db2 server instance name, which you want to update to newer release or installed db2 server version.

    Syntax 1: To update an instance in normal mode

    db2iupdt <inst_name>
    

    Example1:

    ./db2iupdt db2inst2
    

    Syntax 2: To update an instance in debugging mode

    db2iupdt -D <inst_name>
    

    Example

    db2iupdt -D db2inst2
    

    Upgrading an instance

    You can upgrade an instance from previous version of DB2 copy to current newly installed version of DB2 copy.

    db2iupgrade

    On Linux or UNIX system, this command is located in DB2DIR/instance directory. In the following syntaxes, “inst_name” indicates the previous version DB2 instance and “inst_username” indicates the current installed version DB2 copy instance user.

    Syntax 2:

    db2iupgrade -d -k -u <inst_username> <inst_name>
    

    Example:

    db2iupgrade -d -k -u db2inst2 db2inst2
    

    Command Parameters:

    -d : Turns debugging mode on.

    -k : Keeps the pre-upgrade instance type if it is supported in the DB2 copy, from where you are running this command.

    If you are using the Super User (su) on Linux for db2iupgrade command, you must issue the “su” command with the “-” option.

    Dropping an instance

    You can drop or delete the instance, which was created by “db2icrt” command.

    db2idrop

    On Linux and UNIX operating system, this command is located in the DB2_installation_folder/instance directory.

    Syntax: [in the following syntax, ‘inst_username’ indicates username of instance and ‘inst_name’ indicates instance name]

    db2idrop -u <inst_username> <inst_name>
    

    Example: [To drop db2inst2]

    ./db2idrop -u db2inst2 db2inst2
    

    Using other commands with instance

    Command to find out which DB2 instance we are working on now.

    Syntax 1: [to check the current instance activated by database manager]

    db2 get instance
    

    Output:

    The current database manager instance is:  db2inst1
    

    Syntax 2: [To see the current instance with operating bits and release version]

    db2pd -inst | head -2
    

    Example:

    db2pd -inst | head -2
    

    Output:

    Instance db2inst1 uses 64 bits and DB2 code release SQL10010
    

    Syntax 3: [To check the name of currently working instance]

    db2 select inst_name from sysibmadm.env_inst_info
    

    Example:

    db2 select inst_name from sysibmadm.env_inst_info
    

    Output:

    INST_NAME  --------------------------------------
    db2inst1
    1 record(s) selected.
    

    Syntax: [To set a new instance as default]

    db2set db2instdef=<inst_name> -g
    

    Example: [To array newly created instance as a default instance]

    db2set db2instdef=db2inst2 -g
    

    Khóa học lập trình tại Toidayhoc vừa học vừa làm dự án vừa nhận lương: Khóa học lập trình nhận lương tại trung tâm Toidayhoc

  • Khóa học miễn phí DB2 – Introduction nhận dự án làm có lương

    DB2 – Introduction


    This chapter describes history of DB2, its versions, editions and their respective features.

    Overview

    DB2 is a database product from IBM. It is a Relational Database Management System (RDBMS). DB2 is designed to store, analyze and retrieve the data efficiently. DB2 product is extended with the support of Object-Oriented features and non-relational structures with XML.

    History

    Initially, IBM had developed DB2 product for their specific platform. Since year 1990, it decided to develop a Universal Database (UDB) DB2 Server, which can run on any authoritative operating systems such as Linux, UNIX, and Windows.

    Versions

    For IBM DB2, the UDB current version is 10.5 with the features of BLU Acceleration and its code name as ”Kepler”. All the versions of DB2 till today are listed below:

    Version Code Name
    3.4 Cobweb
    8.1, 8.2 Stinger
    9.1 Viper
    9.5 Viper 2
    9.7 Cobra
    9.8 It added features with Only PureScale
    10.1 Galileo
    10.5 Kepler

    Data server editions and features

    Depending upon the requirement of needful features of DB2, the organizations select appropriate DB2 version. The following table shows DB2 server editions and their features:

    Editions Features
    Advanced Enterprise Server Edition and Enterprise Server Edition (AESE / ESE) It is designed for mid-size to large-size business organizations. Platform – Linux, UNIX, and Windows. Table partitioning High Availability Disaster Recovery (HARD) Materialized Query Table (MQTs) Multidimensional Clustering (MDC) Connection concentrator Pure XML Backup compression Homogeneous Federations
    Workgroup Server Edition (WSE) It is designed for Workgroup or mid-size business organizations. Using this WSE you can work with – High Availability Disaster Recovery (HARD) Online Reorganization Pure XML Web Service Federation support DB2 Homogeneous Federations Homogeneous SQL replication Backup compression
    Express -C It provides all the capabilities of DB2 at zero charge. It can run on any physical or virtual systems with any size of configuration.
    Express Edition It is designed for entry level and mid-size business organizations. It is full featured DB2 data server. It offers only limited services. This Edition comes with – Web Service Federations DB2 homogeneous federations Homogeneous SQL Replications Backup compression
    Enterprise Developer Edition It offers only single application developer. It is useful to design, build and prototype the applications for deployment on any of the IBM server. The software cannot be used for developing applications.

    Khóa học lập trình tại Toidayhoc vừa học vừa làm dự án vừa nhận lương: Khóa học lập trình nhận lương tại trung tâm Toidayhoc

  • Khóa học miễn phí nhận dự án làm có lương

    Khóa học lập trình tại Toidayhoc vừa học vừa làm dự án vừa nhận lương: Khóa học lập trình nhận lương tại trung tâm Toidayhoc

  • Khóa học miễn phí DB2 – Databases nhận dự án làm có lương

    DB2 – Databases


    This chapter describes creating, activating and deactivating the databases with the associated syntax.

    Database architecture

    Database Architecture

    A database is a collection of Tables, Schemas, Bufferpools, Logs, Storage groups and Tablespaces working together to handle database operations efficiently.

    Database directory

    Database directory is an organized repository of databases. When you create a database, all the details about database are stored in a database directory, such as details of default storage devices, configuration files, and temporary tables list etc.

    Partition global directory is created in the instance folder. This directory contains all global information related to the database. This partition global directory is named as NODExxxx/SQLyyy, where xxxx is the data partition number and yyy is the database token.

    In the partition-global directory, a member-specific directory is created. This directory contains local database information. The member-specific directory is named as MEMBERxxxx where xxxx is a member number. DB2 Enterprise Server Edition environment runs on a single member and has only one member specific directory. This member specific directory is uniquely named as MEMBER0000.

    Partitioned global directory

    Directory Location : <instance>/NODExxx/SQLxxx

    The partition-global directory contains database related files as listed below.

    • Global deadlock write-to-file event monitoring files
    • Table space information files [SQLSPCS.1, SQLSPCS.2]
    • Storage group control files [SQLSGF.1, SQLSGF.2]
    • Temporary table space container files. [/storage path//T0000011/C000000.TMP/SQL00002.MEMBER0001.TDA]
    • Global Configuration file [SQLDBCONF]
    • History files [DB2RHIST.ASC, DB2RHIST.BAK, DB2TSCHG.HIS, DB2TSCHG.HIS]
    • Logging-related files [SQLOGCTL.GLFH.1, SQLOGCTL.GLFH.2]
    • Locking files [SQLINSLK, SQLTMPLK]
    • Automatic Storage containers

    Member specific directory

    Directory location : /NODExxxx/SQLxxxx/MEMBER0000

    This directory contains:

    • Objects associated with databases
    • Buffer pool information files [SQLBP.1, SQLBP.2]
    • Local event monitoring files
    • Logging-related files [SQLOGCTL.LFH.1, SQLOGCTL.LFH.2, SQLOGMIR.LFH].
    • Local configuration files
    • Deadlocks event monitor file. The detailed deadlock events monitor files are stored in the database directory of the catalog node in case of ESE and partitioned database environment.

    Creating database

    You can create a database in instance using the “CREATE DATABASE” command. All databases are created with the default storage group “IBMSTOGROUP”, which is created at the time of creating an instance. In DB2, all the database tables are stored in “tablespace”, which use their respective storage groups.

    The privileges for database are automatically set as PUBLIC [CREATETAB, BINDADD, CONNECT, IMPLICIT_SCHEMA, and SELECT], however, if the RESTRICTIVE option is present, the privileges are not granted as PUBLIC.

    Creating non-restrictive database

    This command is used to create a non-restrictive database.

    Syntax: [To create a new Database. ‘database_name’ indicates a new database name, which you want to create.]

    db2 create database <database name>
    

    Example: [To create a new non-restrictive database with name ‘one’]

    db2 create database one
    

    Output:

    DB20000I The CREATE DATABASE command completed successfully.
    

    Creating restrictive database

    Restrictive database is created on invoking this command.

    Syntax: [In the syntax below, “db_name” indicates the database name.]

    db2 create database <db_name> restrictive
    

    Example: [To create a new restrictive database with the name ‘two’]

    db2 create database two restrictive
    

    Creating database with different user defined location

    Create a database with default storage group “IBMSTOGROUP” on different path. Earlier, you invoked the command “create database” without any user-defined location to store or create database at a particular location. To create the database using user- defined database location, the following procedure is followed:

    Syntax: [In the syntax below, ‘db_name’ indicates the ‘database name’ and ‘data_location’ indicates where have to store data in folders and ‘db_path_location’ indicates driver location of ‘data_location’.]

    db2 create database ''<db_name>'' on ''<data location>'' dbpath on ''<db_path_location>''
    

    Example: [To create database named ‘four’, where data is stored in ‘data1’ and this folder is stored in ‘dbpath1’]

    db2 create database four on ''/data1'' dbpath on ''/dbpath1''
    

    Viewing local or system database directory files

    You execute this command to see the list of directories available in the current instance.

    Syntax:

    db2 list database directory
    

    Example:

    db2 list database directory
    

    Output:

     System Database Directory
     Number of entries in the directory = 6
     Database 1 entry:
     Database alias                       = FOUR
     Database name                        = FOUR
     Local database directory             =
     /home/db2inst4/Desktop/dbpath
     Database release level               = f.00
     Comment                              =
     Directory entry type                 = Indirect
     Catalog database partition number    = 0
     Alternate server hostname            =
     Alternate server port number         =
    Database 2 entry:
    Database alias                       = SIX
    Database name                        = SIX
    Local database directory             = /home/db2inst4
    Database release level               = f.00
    Comment                              =
    Directory entry type                 = Indirect
    Catalog database partition number    = 0
    Alternate server hostname            =
    Alternate server port number         =
    

    Activating database

    This command starts up all necessary services for a particular database so that the database is available for application.

    Syntax:[‘db_name’ indicates database name]

    db2 activate db <db_name>
    

    Example: [Activating the database ‘one’]

    db2 activate db one
    

    Deactivating database

    Using this command, you can stop the database services.

    Syntax:

    db2 deactivate db <db_name>
    

    Example: [To Deactivate database ‘one’]

    db2 deactivate db one
    

    Connecting to database

    After creating a database, to put it into use, you need to connect or start database.

    Syntax:

    db2 connect to <database name>
    

    Example: [To Connect Database one to current CLI]

    db2 connect to one
    

    Output:

     Database Connection Information
     Database server        = DB2/LINUXX8664 10.1.0
     SQL authorization ID   = DB2INST4
     Local database alias   = ONE
    

    Verifying if database is restrictive

    To check if this database is restrictive or not, here is the syntax:

    Syntax: [In the following syntax, ‘db’ indicates Database, ‘cfg’ indicates configuration, ‘db_name’ indicates database name]

    db2 get db cfg for <db_name> | grep -i restrict
    

    Example: [To check if ‘one’ database is restricted or not]

    db2 get db cfg for one | grep -i restrict
    

    Output:

    Restrict access                       = NO
    

    Configuring the database manager and the database

    Instance configuration (Database manager configuration) is stored in a file named ”db2system” and the database related configuration is stored in a file named ”SQLDBCON”. These files cannot be edited directly. You can edit these files using tools which call API. Using the command line processor, you can use these commands.

    Database Manager Configuration Parameters

    Syntax: [To get the information of Instance Database manager]

    db2 get database manager configuration
    
    OR
    db2 get dbm cfg
    

    Syntax: [To update instance database manager]

    db2 update database manager configuration
    
    OR
    db2 update dbm cfg
    

    Syntax: [To reset previous configurations]

    db2 reset database manager configuration
    
    OR
    db2 reset dbm cfg
    

    Database Configuration Parameters

    Syntax: [To get the information of Database]

    db2 get database configuration
    
    OR
    db2 get db cfg
    

    Syntax: [To update the database configuration]

    db2 update database configuration
    
    OR
    db2 update db cfg
    

    Syntax: [To reset the previously configured values in database configuration

    db2 reset database configuration
    
    OR
    db2 reset db cfg
    

    Syntax: [To check the size of Current Active Database]

    db2 "call get_dbsize_info(?,?,?,-1)"
    

    Example: [To verify the size of Currently Activate Database]

    db2 "call get_dbsize_info(?,?,?,-1)"
    

    Output:

    Value of output parameters
    --------------------------
    Parameter Name  : SNAPSHOTTIMESTAMP
    Parameter Value : 2014-07-02-10.27.15.556775
    Parameter Name  : DATABASESIZE
    Parameter Value : 105795584
    Parameter Name  : DATABASECAPACITY
    Parameter Value : 396784705536
    Return Status = 0
    

    Estimating space required for database

    To estimate the size of a database, the contribution of the following factors must be considered:

    • System Catalog Tables
    • User Table Data
    • Long Field Data
    • Large Object (LOB) Data
    • Index Space
    • Temporary Work Space
    • XML data
    • Log file space
    • Local database directory
    • System files

    Checking database authorities

    You can use the following syntax to check which database authorities are granted to PUBLIC on the non-restrictive database.

    Step 1: connect to database with authentication user-id and password of instance.

    Syntax: [To connect to database with username and password]

    db2 connect to <db_name> user <userid> using <password>
    

    Example: [To Connect “one” Database with the user id ‘db2inst4’ and password ‘db2inst4’]

    db2 connect to one user db2inst4 using db2inst4
    

    Output:

     Database Connection Information
     Database server        = DB2/LINUXX8664 10.1.0
     SQL authorization ID   = DB2INST4
     Local database alias   = ONE
    

    Step2: To verify the authorities of database.

    Syntax: [The syntax below shows the result of authority services for current database]

    db2 "select substr(authority,1,25) as authority, d_user, d_group,
    d_public, role_user, role_group, role_public,d_role from table(
    sysproc.auth_list_authorities_for_authid (''public'',''g''))as t
    order by authority"
    

    Example:

    db2 "select substr(authority,1,25) as authority, d_user, d_group,
    d_public, role_user, role_group, role_public,d_role from table(
    sysproc.auth_list_authorities_for_authid (''PUBLIC'',''G''))as t
    order by authority"
    

    Output:

    AUTHORITY                 D_USER D_GROUP D_PUBLIC ROLE_USER ROLE_GROUP ROLE_PUBLIC D_ROLE
    ------------------------- ------ ------- -------- --------- ---------- ----------- ------
    ACCESSCTRL                *      *       N        *         *          N           *
    BINDADD                   *      *       Y        *         *          N           *
    CONNECT                   *      *       Y        *         *          N           *
    CREATETAB                 *      *       Y        *         *          N           *
    CREATE_EXTERNAL_ROUTINE   *      *       N        *         *          N           *
    CREATE_NOT_FENCED_ROUTINE *      *       N        *         *          N           *
    CREATE_SECURE_OBJECT      *      *       N        *         *          N           *
    DATAACCESS                *      *       N        *         *          N           *
    DBADM                     *      *       N        *         *          N           *
    EXPLAIN                   *      *       N        *         *          N           *
    IMPLICIT_SCHEMA           *      *       Y        *         *          N           *
    LOAD                      *      *       N        *         *          N           *
    QUIESCE_CONNECT           *      *       N        *         *          N           *
    SECADM                    *      *       N        *         *          N           *
    SQLADM                    *      *       N        *         *          N           *
    SYSADM                    *      *       *        *         *          *           *
    SYSCTRL                   *      *       *        *         *          *           *
    SYSMAINT                  *      *       *        *         *          *           *
    SYSMON                    *      *       *        *         *          *           *
    WLMADM                    *      *       N        *         *          N           *
    20 record(s) selected.
    

    Dropping Database

    Using the Drop command, you can remove our database from instance database directory. This command can delete all its objects, table, spaces, containers and associated files.

    Syntax: [To drop any database from an instance]

    db2 drop database <db_name>
    

    Example: [To drop ‘six’ database from instance]

    db2  drop database six
    

    Output:

    DB20000I The DROP DATABASE command completed successfully
    

    Khóa học lập trình tại Toidayhoc vừa học vừa làm dự án vừa nhận lương: Khóa học lập trình nhận lương tại trung tâm Toidayhoc

  • Khóa học miễn phí CouchDB – Quick Guide nhận dự án làm có lương

    CouchDB – Quick Guide


    CouchDB – Introduction

    Database management system provides mechanism for storage and retrieval of data. There are three main types of database management systems namely RDBMS (Relational Database management Systems), OLAP (Online Analytical Processing Systems) and NoSQL.

    RDBMS

    RDBMS stands for Relational Database Management System. RDBMS is the basis for SQL, and for all modern database systems like MS SQL Server, IBM DB2, Oracle, MySQL, and Microsoft Access.

    A Relational database management system (RDBMS) is a database management system (DBMS) that is based on the relational model as introduced by E. F. Codd.

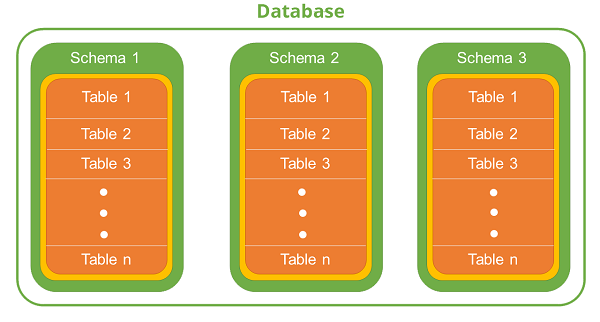
    The data in RDBMS is stored in database objects called tables. The table is a collection of related data entries and it consists of columns and rows. It stores only structured data.

    OLAP

    Online Analytical Processing Server (OLAP) is based on the multidimensional data model. It allows managers and analysts to get an insight of the information through fast, consistent, and interactive access to information.

    NoSQL Databases

    A NoSQL database (sometimes called as Not Only SQL) is a database that provides a mechanism to store and retrieve data other than the tabular relations used in relational databases. These databases are schema-free, support easy replication, have simple API, eventually consistent, and can handle huge amounts of data (big data).

    The primary objective of a NoSQL database is to have the following −

    • Simplicity of design,
    • Horizontal scaling, and
    • Finer control over availability.

    NoSQL databases use different data structures compared to relational databases. It makes some operations faster in NoSQL. The suitability of a given NoSQL database depends on the problem it must solve. These databases store both structured data and unstructured data like audio files, video files, documents, etc. These NoSQL databases are classified into three types and they are explained below.

    Key-value Store − These databases are designed for storing data in key-value pairs and these databases will not have any schema. In these databases, each data value consists of an indexed key and a value for that key.

    Examples − BerkeleyDB, Cassandra, DynamoDB, Riak.

    Column Store − In these databases, data is stored in cells grouped in columns of data, and these columns are further grouped into Column families. These column families can contain any number of columns.

    Examples − BigTable, HBase, and HyperTable.

    Document Store − These are the databases developed on the basic idea of key-value stores where “documents” contain more complex data. Here, each document is assigned a unique key, which is used to retrieve the document. These are designed for storing, retrieving, and managing document-oriented information, also known as semi-structured data.

    Examples − CouchDB and MongoDB.

    What is CouchDB?

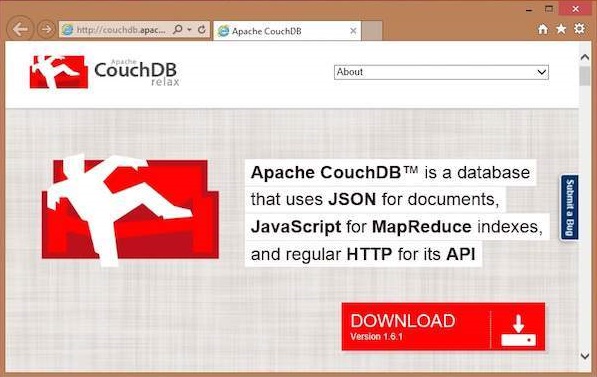
    CouchDB is an open source database developed by Apache software foundation. The focus is on the ease of use, embracing the web. It is a NoSQL document store database.

    It uses JSON, to store data (documents), java script as its query language to transform the documents, http protocol for api to access the documents, query the indices with the web browser. It is a multi master application released in 2005 and it became an apache project in 2008.

    Why CouchDB?

    • CouchDB have an HTTP-based REST API, which helps to communicate with the database easily. And the simple structure of HTTP resources and methods (GET, PUT, DELETE) are easy to understand and use.

    • As we store data in the flexible document-based structure, there is no need to worry about the structure of the data.

    • Users are provided with powerful data mapping, which allows querying, combining, and filtering the information.

    • CouchDB provides easy-to-use replication, using which you can copy, share, and synchronize the data between databases and machines.

    Data Model

    • Database is the outermost data structure/container in CouchDB.

    • Each database is a collection of independent documents.

    • Each document maintains its own data and self-contained schema.

    • Document metadata contains revision information, which makes it possible to merge the differences occurred while the databases were disconnected.

    • CouchDB implements multi version concurrency control, to avoid the need to lock the database field during writes.

    Features of CouchDB:Reduce the Content

    Document Storage

    CouchDB is a document storage NoSQL database. It provides the facility of storing documents with unique names, and it also provides an API called RESTful HTTP API for reading and updating (add, edit, delete) database documents.

    In CouchDB, documents are the primary unit of data and they also include metadata. Document fields are uniquely named and contain values of varying types (text, number, Boolean, lists, etc.), and there is no set limit to text size or element count.

    Document updates (add, edit, delete) follow Atomicity, i.e., they will be saved completely or not saved at all. The database will not have any partially saved or edited documents.

    Json Document Structure

    {
       "field" : "value",
       "field" : "value",
       "field" : "value",
    }
    

    ACID Properties

    CouchDB contains ACID properties as one of its features.

    Consistency − When the data in CouchDB was once committed, then this data will not be modified or overwritten. Thus, CouchDB ensures that the database file will always be in a consistent state.

    A multi-Version Concurrency Control (MVCC) model is used by CouchDB reads, because of which the client will see a consistent snapshot of the database from the beginning to the end of the read operation.

    Whenever a documents is updated, CouchDB flushes the data into the disk, and the updated database header is written in two consecutive and identical chunks to make up the first 4k of the file, and then synchronously flushed to disk. Partial updates during the flush will be discarded.

    If the failure occurred while committing the header, a surviving copy of the previous identical headers will remain, ensuring coherency of all previously committed data. Except the header area, consistency checks or fix-ups after a crash or a power failure are never necessary.

    Compaction

    Whenever the space in the database file got wasted above certain extent, all the active data will be copied (cloned) to a new file. When the copying process is entirely done, then the old file will be discarded. All this is done by compaction process. The database remains online during the compaction and all updates and reads are allowed to complete successfully.

    Views

    Data in CouchDB is stored in semi-structured documents that are flexible with individual implicit structures, but it is a simple document model for data storage and sharing. If we want see our data in many different ways, we need a way to filter, organize and report on data that hasn’t been decomposed into tables.

    To solve this problem, CouchDB provides a view model. Views are the method of aggregating and reporting on the documents in a database, and are built on-demand to aggregate, join and report on database documents. Because views are built dynamically and don’t affect the underlying document, you can have as many different view representations of the same data as you like.

    History

    • CouchDB was written in Erlang programming language.
    • It was started by Damien Katz in 2005.
    • CouchDB became an Apache project in 2008.

    The current version of CouchDB is 1.61.

    CouchDB – Installation

    This chapter teaches you how to install CouchDB in windows as well as Linux systems.

    Installing CouchDB in Windows

    Download CouchDB

    The official website for CouchDB is . If you click the given link, you can get the home page of the CouchDB official website as shown below.

    Download CouchDB

    If you click on the download button that will lead to a page where download links of CouchDB in various formats are provided. The following snapshot illustrates the same.

    CouchDB Formats

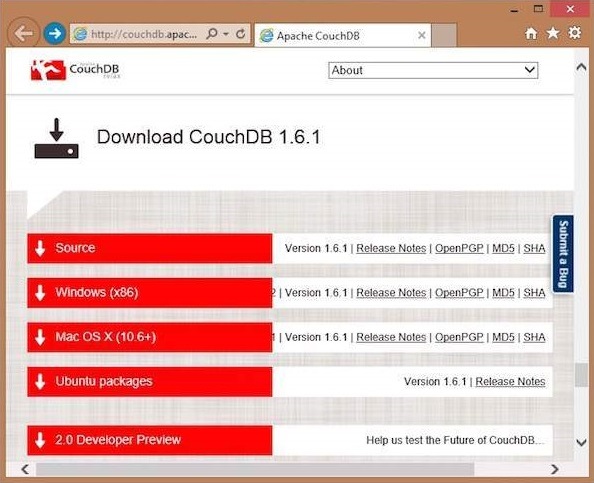
    Choose the download link for windows systems and select one of the provided mirrors to start your download.
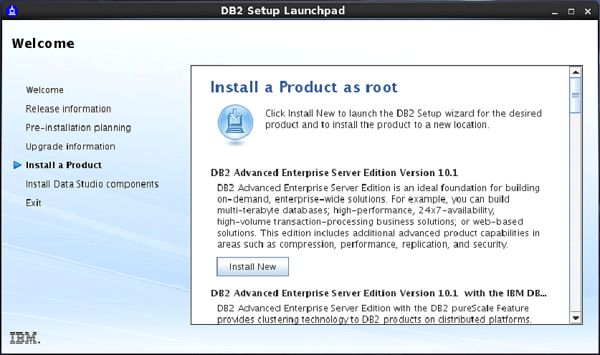
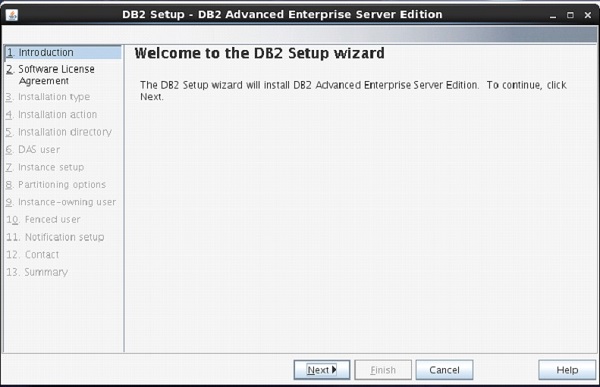
    Installing CouchDB

    CouchDB will be downloaded to your system in the form of setup file named setup-couchdb-1.6.1_R16B02.exe. Run the setup file and proceed with the installation.

    After installation, open built-in web interface of CouchDB by visiting the following link: http://127.0.0.1:5984/. If everything goes fine, this will give you a web page, which have the following output.

    {
       "couchdb":"Welcome","uuid":"c8d48ac61bb497f4692b346e0f400d60",
       "version":"1.6.1",
       "vendor":{
          "version":"1.6.1","name":"The Apache Software Foundation"
       }
    }
    

    You can interact with the CouchDB web interface by using the following url −

    http://127.0.0.1:5984/_utils/
    

    This shows you the index page of Futon, which is the web interface of CouchDB.

    Web Interface

    Installing CouchDB in Linux Systems

    For many of the Linux flavored systems, they provide CouchDB internally. To install this CouchDB follow the instructions.

    On Ubuntu and Debian you can use −

    sudo aptitude install couchdb
    

    On Gentoo Linux there is a CouchDB ebuild available −

    sudo emerge couchdb
    

    If your Linux system does not have CouchDB, follow the next section to install CouchDB and its dependencies.

    Installing CouchDB Dependencies

    Following is the list of dependencies that are to be installed to get CouchDB in your system−

    • Erlang OTP
    • ICU
    • OpenSSL
    • Mozilla SpiderMonkey
    • GNU Make
    • GNU Compiler Collection
    • libcurl
    • help2man
    • Python for docs
    • Python Sphinx

    To install these dependencies, type the following commands in the terminal. Here we are using Centos 6.5 and the following commands will install the required softwares compatible to Centos 6.5.

    $sudo yum install autoconf
    $sudo yum install autoconf-archive
    $sudo yum install automake
    $sudo yum install curl-devel
    $sudo yum install erlang-asn1
    $sudo yum install erlang-erts
    $sudo yum install erlang-eunit
    $sudo yum install erlang-os_mon
    $sudo yum install erlang-xmerl
    $sudo yum install help2man
    $sudo yum install js-devel
    $sudo yum install libicu-devel
    $sudo yum install libtool
    $sudo yum install perl-Test-Harness
    

    Note − For all these commands you need to use sudo. The following procedure converts a normal user to a sudoer.

    • Login as root in admin user

    • Open sudo file using the following command −

    visudo
    
    • Then edit as shown below to give your existing user the sudoer privileges −
    Hadoop All=(All) All , and press esc : x to write the changes to the file.
    

    After downloading all the dependencies in your system, download CouchDB following the given instructions.

    Downloading CouchDB

    Apache software foundation will not provide the complete .tar file for CouchDB, so you have to install it from the source.

    Create a new directory to install CouchDB, browse to such created directory and download CouchDB source by executing the following commands −

    $ cd
    $ mkdir CouchDB
    $ cd CouchDB/
    $ wget
    http://www.google.com/url?q=http%3A%2F%2Fwww.apache.org%2Fdist%2Fcouchdb%2Fsource%2F1.6.1%2Fapache-couchdb-1.6.1.tar.gz
    

    This will download CouchDB source file into your system. Now unzip the apache-couchdb-1.6.1.tar.gz as shown below.

    $ tar zxvf apache-couchdb-1.6.1.tar.gz
    

    Configuring CouchDB

    To configure CouchDB, do the following −

    • Browse to the home folder of CouchDB.
    • Login as superuser.
    • Configure using ./configure prompt as shown below −
    $ cd apache-couchdb-1.6.1
    $ su
    Password:
    # ./configure --with-erlang=/usr/lib64/erlang/usr/include/
    

    It gives you the following output similar to that shown below with a concluding line saying − You have configured Apache CouchDB, time to relax.

    # ./configure --with-erlang=/usr/lib64/erlang/usr/include/
    
    checking for a BSD-compatible install... /usr/bin/install -c
    checking whether build environment is sane... yes
    checking for a thread-safe mkdir -p... /bin/mkdir -p
    checking for gawk... gawk
    checking whether make sets $(MAKE)... yes
    checking how to create a ustar tar archive... gnutar
    ………………………………………………………..
    ……………………….
    config.status: creating var/Makefile
    config.status: creating config.h
    config.status: config.h is unchanged
    config.status: creating src/snappy/google-snappy/config.h
    config.status: src/snappy/google-snappy/config.h is unchanged
    config.status: executing depfiles commands
    config.status: executing libtool commands
    
    You have configured Apache CouchDB, time to relax.
    
    Run `make && sudo make install'' to install.
    

    Installing CouchDB

    Now type the following command to install CouchDB in your system.

    # make && sudo make install
    

    It installs CouchDB in your system with a concluding line saying − You have installed Apache CouchDB, time to relax.

    Starting CouchDB

    To start CouchDB, browse to the CouchDB home folder and use the following command −

    $ cd apache-couchdb-1.6.1
    $ cd etc
    $ couchdb start
    

    It starts CouchDB giving the following output: −

    Apache CouchDB 1.6.1 (LogLevel=info) is starting.
    Apache CouchDB has started. Time to relax.
    [info] [lt;0.31.0gt;] Apache CouchDB has started on http://127.0.0.1:5984/
    [info] [lt;0.112.0gt;] 127.0.0.1 - - GET / 200
    [info] [lt;0.112.0gt;] 127.0.0.1 - - GET /favicon.ico 200
    

    Verification

    Since CouchDB is a web interface, try to type the following homepage url in the browser.

    http://127.0.0.1:5984/
    

    It produces the following output −

    {
       "couchdb":"Welcome",
       "uuid":"8f0d59acd0e179f5e9f0075fa1f5e804",
       "version":"1.6.1",
       "vendor":{
          "name":"The Apache Software Foundation",
          "version":"1.6.1"
       }
    }
    

    CouchDB – Curl & Futon

    cURL Utility

    cURL utility is a way to communicate with CouchDB.

    It is a tool to transfer data from or to a server, using one of the supported protocols (HTTP, HTTPS, FTP, FTPS, TFTP, DICT, TELNET, LDAP or FILE). The command is designed to work without user interaction. cURL offers a busload of useful tricks like proxy support, user authentication, ftp upload, HTTP post, SSL (https:) connections, cookies, file transfer resume and more.

    The cURL utility is available in operating systems such as UNIX, Linux, Mac OS X and Windows. It is a command line utility using which user can access HTTP protocol straight away from the command line. This chapter teaches you how to use cURL utility.

    Using cURL Utility

    You can access any website using cURL utility by simply typing cURL followed by the website address as shown below −

    curl www.tutorialspoint.com/
    

    By default, the cURL utility returns the source code of the requested page. It displays this code on the terminal window.

    cURL Utility Options

    cURL utility provides various options to work with, and you can see them in cURL utility help.

    The following code shows some portion of cURL help.

    $ curl --help
    Usage: curl [options...] <url>
    Options: (H) means HTTP/HTTPS only, (F) means FTP only
          --anyauth Pick "any" authentication method (H)
       -a/--append Append to target file when uploading (F/SFTP)
          --basic Use HTTP Basic Authentication (H)
          --cacert <file> CA certificate to verify peer against (SSL)
    -d/--data <data> HTTP POST data (H)
          --data-ascii <data> HTTP POST ASCII data (H)
          --data-binary <data> HTTP POST binary data (H)
          --data-urlencode <name=data/name@filename> HTTP POST data
    urlencoded (H)
          --delegation STRING GSS-API delegation permission
          --digest Use HTTP Digest Authentication (H)
          --disable-eprt Inhibit using EPRT or LPRT (F)
          --disable-epsv Inhibit using EPSV (F)
    
       -F/--form <name=content> Specify HTTP multipart POST data (H)
          --form-string <name=string> Specify HTTP multipart POST data (H)
          --ftp-account <data> Account data to send when requested by server
    (F)
          --ftp-alternative-to-user <cmd> String to replace "USER [name]" (F)
          --ftp-create-dirs Create the remote dirs if not present (F)
          --ftp-method [multi cwd/no cwd/single cwd] Control CWD usage (F)
          --ftp-pasv Use PASV/EPSV instead of PORT (F)
    
       -G/--get Send the -d data with a HTTP GET (H)
    
       -H/--header <line> Custom header to pass to server (H)
       -I/--head Show document info only
       -h/--help This help text
          --hostpubmd5 <md5> Hex encoded MD5 string of the host public key.
    (SSH)
       -0/--http1.0 Use HTTP 1.0 (H)
          --ignore-content-length Ignore the HTTP Content-Length header
       -i/--include Include protocol headers in the output (H/F)
    
       -M/--manual Display the full manual
    
       -o/--output <file> Write output to <file> instead of stdout
          --pass <pass> Pass phrase for the private key (SSL/SSH)
          --post301 Do not switch to GET after following a 301
    redirect (H)
          --post302 Do not switch to GET after following a 302
    redirect (H)
       -O/--remote-name Write output to a file named as the remote file
          --remote-name-all Use the remote file name for all URLs
       -R/--remote-time Set the remote file''s time on the local output
       -X/--request <command> Specify request command to use
          --retry <num> Retry request <num> times if transient problems
    occur
          --retry-delay <seconds> When retrying, wait this many seconds
    between each
          --retry-max-time <seconds> Retry only within this period
       -T/--upload-file <file> Transfer <file> to remote site
          --url <URL> Set URL to work with
       -B/--use-ascii Use ASCII/text transfer
    

    While communicating with CouchDB, certain options of cURL utility were extensively used. Following are the brief descriptions of some important options of cURL utility including those used by CouchDB.

    -X flag

    (HTTP) Specifies a custom request method used when communicating with the HTTP server. The specified request is used instead of the method otherwise used (which defaults to GET). Read the HTTP 1.1 specification for details and explanations.

    (FTP) Specifies a custom FTP command to use instead of LIST when doing file lists with ftp.

    -H

    (HTTP) Extra header is used when getting a web page. Note that if you add a custom header that has the same name as one of the internal ones cURL would use, your externally set header will be used instead of the internal one. This allows you to make even trickier work than cURL would normally do. You should not replace internally set headers without perfectly knowing what you’re doing. Replacing an internal header with the one without content on the right side of the colon, will prevent that header from appearing.

    cURL assures that each header you add/replace get sent with the proper end of line marker. Neither you should add that as a part of the header content nor add newlines or carriage returns to disorder things.

    See also the -A/–user-agent and -e/–referer options.

    This option can be used multiple times to add/replace/remove multiple headers.

    -d flag

    Using this flag of cURL, you can send data along with the HTTP POST request to the server, as if it was filled by the user in the form and submitted.

    Example

    Suppose there is a website and you want to login into it or send some data to the website using –d flag of cURL utility as shown below.

    curl -X PUT http://mywebsite.com/login.html -d userid=001 -d password=tutorialspoint
    

    It sends a post chunk that looks like “userid=001&password=tutorialspoint”. Likewise you can also send documents (JSON ) using -d flag.

    -o flag

    Using this flag, cURL writes the output of the request to a file.

    Example

    The following example shows the use of -o flag of cURL utility.

    $ curl -o example.html www.tutorialspoint.com/index.htm
    % Total % Received % Xferd Average Speed Time Time Time Current
          Dload Upload Total Spent Left Speed
    100 81193 0 81193 0 0 48168 0 --:--:-- 0:00:01 --:--:--
    58077
    

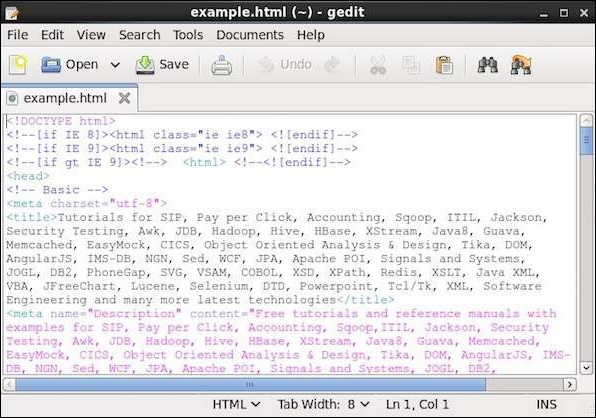
    This gets the source code of the homepage of tutorialspoint.com, creates a file named example.com and saves the output in the file named example.html.

    Following is the snapshot of the example.html.

    Example Html

    -O

    This flag is similar to –o, the only difference is with this flag, a new file with the same name as the requested url was created, and the source code of the requested url will be copied to it.

    Example

    The following example shows the use of -O flag of cURL utility.

    $ curl -O www.tutorialspoint.com/index.htm
    % Total % Received % Xferd Average Speed Time Time Time Current
          Dload Upload Total Spent Left
    Speed
    100 81285 0 81285 0 0 49794 0 --:--:-- 0:00:01 --:--:--
    60077
    

    It creates a new file with the name index.htm and saves the source code of the index page of tutorialspoint.com in it.

    Hello CouchDB

    You can access the homepage of the CouchDB by sending a GET request to the CouchDB instance installed. First of all make sure you have installed CouchDB in your Linux environment and it is running successfully, and then use the following syntax to send a get request to the CouchDB instance.

    curl http://127.0.0.1:5984/
    

    This gives you a JSON document as shown below where CouchDB specifies the details such as version number, name of the vendor, and version of the software.

    $ curl http://127.0.0.1:5984/
    {
       "couchdb" : "Welcome",
       "uuid" : "8f0d59acd0e179f5e9f0075fa1f5e804",
       "version" : "1.6.1",
       "vendor" : {
          "name":"The Apache Software Foundation",
          "version":"1.6.1"
       }
    }
    

    List of All Databases

    You can get the list of all the databases created, by sending a get request along with the string “_all_dbs string “. Following is the syntax to get the list of all databases in CouchDB.

    curl -X GET http://127.0.0.1:5984/_all_dbs
    

    It gives you the list of all databases in CouchDB as shown below.

    $ curl -X GET http://127.0.0.1:5984/_all_dbs
    [ "_replicator" , "_users" ]
    

    Creating a Database

    You can create a database in CouchDB using cURL with PUT header using the following syntax −

    $ curl -X PUT http://127.0.0.1:5984/database_name
    

    Example

    As an example, using the above given syntax create a database with name my_database as shown below.

    $ curl -X PUT http://127.0.0.1:5984/my_database
    {"ok":true}
    

    Verification

    Verify whether the database is created, by listing out all the databases as shown below. Here you can observe the name of newly created database, “my_database” in the list

    $ curl -X GET http://127.0.0.1:5984/_all_dbs
    
    [ "_replicator " , "_users" , "my_database" ]
    

    Getting Database Info

    You can get the information about database using the get request along with the database name. Following is the syntax to get the database information.

    Example

    As an example let us get the information of the database named my_database as shown below. Here you can get the information about your database as a response.

    $ curl -X GET http://127.0.0.1:5984/my_database
    
    {
       "db_name" : "my_database",
       "doc_count" : 0,
       "doc_del_count" : 0,
       "update_seq" : 0,
       "purge_seq" : 0,
       "compact_running" : false,
       "disk_size" : 79,
       "data_size" : 0,
       "instance_start_time" : "1423628520835029",
       "disk_format_version" : 6,
       "committed_update_seq" : 0
     }
    

    Futon

    Futon is the built-in, web based, administration interface of CouchDB. It provides a simple graphical interface using which you can interact with CouchDB. It is a naive interface and it provides full access to all CouchDB features. Following is the list of those features −

    Databases −
    • Creates databases.
    • Destroys databases.
    Documents −
    • Creates documents.
    • Updates documents.
    • Edits documents.
    • Deletes documents.

    Starting Futon

    Make sure CouchDB is running and then open the following url in browser −

    http://127.0.0.1:5984/_utils/
    

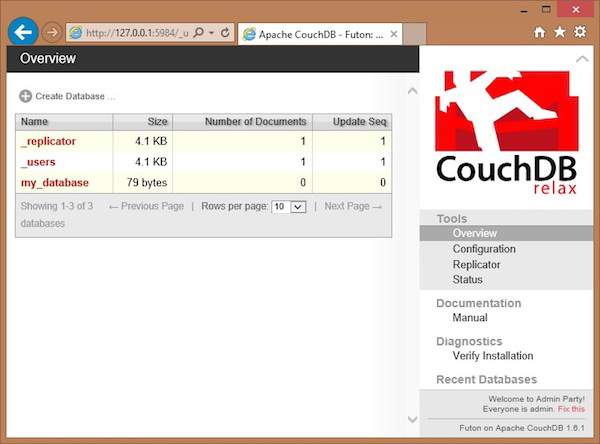
    If you open this url, it displays the Futon home page as shown below −

    Futon Homepage
    • On the left hand side of this page you can observe the list of all the current databases of CouchDB. In this illustration, we have a database named my_database, along with system defined databases _replicator and _user.

    • On the right hand side you can see the following −

      • Tools − In this section you can find Configuration to configure CouchDB, Replicator to perform replications, and Status to verify status of CouchDB and recent modifications done on CouchDB.

      • Documentation − This section contains the complete documentation for the recent version of CouchDB.

      • Diagnostics − Under this you can verify the installation of CouchDB.

      • Recent Databases − Under this you can find the names of recently added databases.

    CouchDB – HTTP API

    Using HTTP request headers, you can communicate with CouchDB. Through these requests we can retrieve data from the database, store data in to the database in the form of documents, and we can view as well as format the documents stored in a database.

    HTTP Request Formats

    While communicating with the database we will use different request formats like get, head, post, put, delete, and copy. For all operations in CouchDB, the input data and the output data structures will be in the form of JavaScript Object Notation (JSON) object.

    Following are the different request formats of HTTP Protocol used to communicate with CouchDB.

    • GET − This format is used to get a specific item. To get different items, you have to send specific url patterns. In CouchDB using this GET request, we can get static items, database documents and configuration, and statistical information in the form of JSON documents (in most cases).

    • HEAD − The HEAD method is used to get the HTTP header of a GET request without the body of the response.

    • POST − Post request is used to upload data. In CouchDB using POST request, you can set values, upload documents, set document values, and can also start certain administration commands.

    • PUT − Using PUT request, you can create new objects, databases, documents, views and design documents.

    • DELETE − Using DELETE request, you can delete documents, views, and design documents.

    • COPY − Using COPY method, you can copy documents and objects.

    HTTP Request Headers

    HTTP headers should be supplied to get the right format and encoding. While sending the request to the CouchDB server, you can send Http request headers along with the request. Following are the different Http request headers.

    • Content-type − This Header is used to specify the content type of the data that we supply to the server along with the request. Mostly the type of the content we send along with the request will be MIME type or JSON (application/json). Using Content-type on a request is highly recommended.

    • Accept − This header is used to specify the server, the list of data types that client can understand, so that the server will send its response using those data types. Generally here, you can send the list of MIME data types the client accepts, separated by colons.

      Though, using Accept in queries of CouchDB is not required, it is highly recommended to ensure that the data returned can be processed by the client.

    Response Headers

    These are the headers of the response sent by the server. These headers give information about the content send by the server as response.

    • Content-type − This header specifies the MIME type of the data returned by the server. For most request, the returned MIME type is text/plain.

    • Cache-control − This header suggests the client about treating the information sent by the server. CouchDB mostly returns the must-revalidate, which indicates that the information should be revalidated if possible.

    • Content-length − This header returns the length of the content sent by the server, in bytes.

    • Etag − This header is used to show the revision for a document, or a view.

    Status Codes

    Following is the tabular form of the status code sent by the http header and the description of it.

    Sr.No. Status Code & Description
    1

    200 − OK

    This status will be issued when a request completed successfully.

    2

    201 − Created

    This status will be issued when a document is created.

    3

    202 − Accepted

    This status will be issued when a request is accepted.

    4

    404 − Not Found

    This status will be issued when the server is unable to find the requested content.

    5

    405 − Resource Not Allowed

    This status is issued when the HTTP request type used is invalid.

    6

    409 − Conflict

    This status is issued whenever there is any update conflict.

    7

    415 − Bad Content Type

    This status indicated that the requested content type is not supported by the server.

    8

    500 − Internal Server Error

    This status is issued whenever the data sent in the request is invalid.

    HTTP URL Paths

    There are certain url paths using which, you can interact with the database directly. Following is the tabular format of such url paths.

    Sr.No. URL & Operation
    1

    PUT /db

    This url is used to create a new database.

    2

    GET /db

    This url is used to get the information about the existing database.

    3

    PUT /db/document

    This url is used to create a document/update an existing document.

    4

    GET /db/document

    This url is used to get the document.

    5

    DELETE /db/document

    This url is used to delete the specified document from the specified database.

    6

    GET /db/_design/design-doc

    This url is used to get the definition of a design document.

    7

    GET /db/_design/designdoc/_view/view-name

    This url is used to access the view, view-name from the design document from the specified database.

    CouchDB – Creating a Database

    Database is the outermost data structure in CouchDB where your documents are stored. You can create these databases using cURL utility provided by CouchDB, as well as Futon the web interface of CouchDB.

    Creating a Database using cURL Utility

    You can create a database in CouchDB by sending an HTTP request to the server using PUT method through cURL utility. Following is the syntax to create a database −

    $ curl -X PUT http://127.0.0.1:5984/database name
    

    Using −X we can specify HTTP custom request method to be used. In this case, we are using PUT method. When we use the PUT operation/method, the content of the url specifies the object name we are creating using HTTP request. Here we have to send the name of the database using put request in the url to create a database.

    Example

    Using the above given syntax if you want to create a database with name my_database, you can create it as follows

    curl -X PUT http://127.0.0.1:5984/my_database
    {
       "ok":true
    }
    

    As a response the server will return you a JSON document with content “ok”true indicating the operation was successful.

    Verification

    Verify whether the database is created, by listing out all the databases as shown below. Here you can observe the name of a newly created database, ” my_database “ in the list.

    $ curl -X GET http://127.0.0.1:5984/_all_dbs
    
    [ "_replicator " , " _users " , " my_database " ]
    

    Creating a Database using Futon

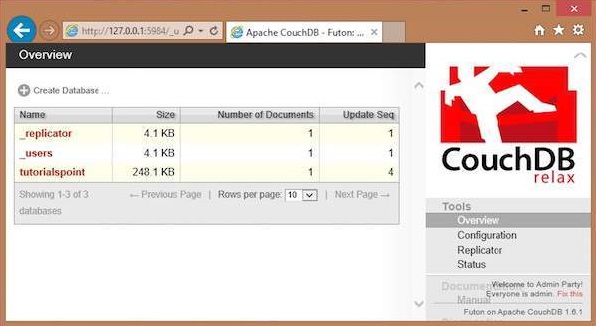
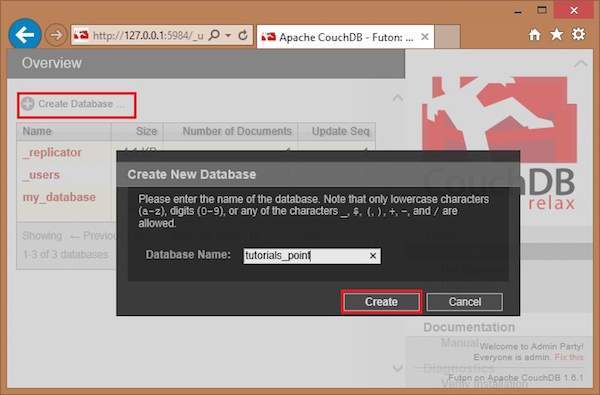
    To create a database open the http://127.0.0.1:5984/_utils/. You will get an Overview/index page of CouchDB as shown below.

    Futon Homepage

    In this page, you can see the list of databases in CouchDB, an option button Create Database on the left hand side.

    Now click on the create database link. You can see a popup window Create New Databases asking for the database name for the new database. Choose any name following the mentioned criteria. Here we are creating another database with name tutorials_point. Click on the create button as shown in the following screenshot.

    Create Database

    CouchDB – Deleting a Database

    Deleting a Database using cURL Utility

    You can delete a database in CouchDB by sending a request to the server using DELETE method through cURL utility. Following is the syntax to create a database −

    $ curl -X DELETE http://127.0.0.1:5984/database name
    

    Using −X we can specify a custom request method of HTTP we are using, while communicating with the HTTP server. In this case, we are using the DELETE method. Send the url to the server by specifying the database to be deleted in it.

    Example

    Assume there is a database named my_database2 in CouchDB. Using the above given syntax if you want to delete it, you can do it as follows −

    $ curl -X DELETE http://127.0.0.1:5984/my_database2
    {
       "ok" : true
    }
    

    As a response, the server will return you a JSON document with content “ok”true indicating the operation was successful.

    Verification

    Verify whether the database is deleted by listing out all the databases as shown below. Here you can observe the name of the deleted database, “my_database” is not there in the list.

    $ curl -X GET http://127.0.0.1:5984/_all_dbs
    
    [ "_replicator " , " _users " ]
    

    Deleting a Database using Futon

    To delete a database, open the http://127.0.0.1:5984/_utils/ url where you will get an Overview/index page of CouchDB as shown below.

    Delete Database1

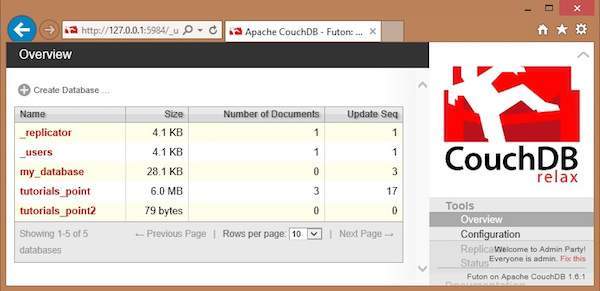
    Here you can see three user created databases. Let us delete the database named tutorials_point2. To delete a database, select one from the list of databases, and click on it, which will lead to the overview page of the selected database where you can see the various operations on databases. The following screenshot shows the same −

    Delete Database2

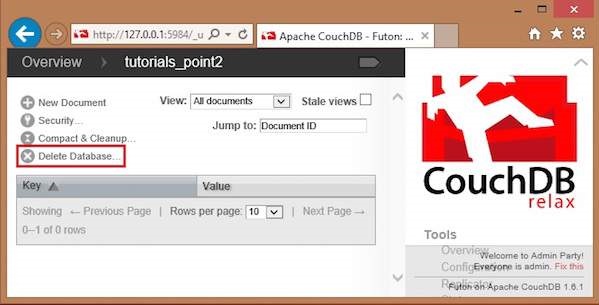
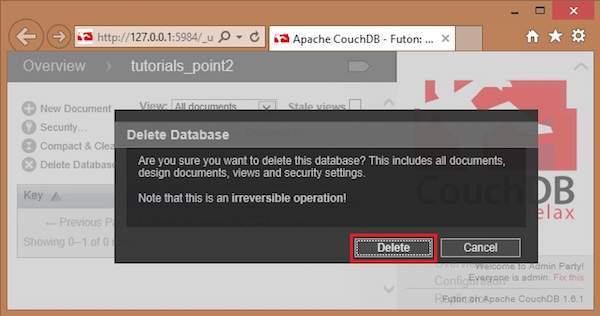
    Among them you can find Delete Database option. By clicking on it you will get a popup window, asking whether you are sure! Click on delete, to delete the selected database.

    Delete Database3

    CouchDB – Creating a Document

    Documents are CouchDB’s central data structure. Contents of the database will be stored in the form of Documents instead of tables. You can create these documents using cURL utility provided by CouchDB, as well as Futon. This chapter covers the ways to create a document in a database.

    Each document in CouchDB has a unique ID. You can choose your own ID that should be in the form of a string. Generally, UUID (Universally Unique IDentifier) is used, which are random numbers that have least chance of creating a duplicate. These are preferred to avoid collisions.

    Creating a Document using cURL Utility

    You can create a document in CouchDB by sending an HTTP request to the server using PUT method through cURL utility. Following is the syntax to create a document.

    $ curl -X PUT http://127.0.0.1:5984/database name/"id" -d '' { document} ''
    

    Using −X, we can specify a custom request method of HTTP we are using, while communicating with the HTTP server. In this case, we are using PUT method. When we use the PUT method, the content of the url specifies the object name we are creating using the HTTP request. Here we have to send the following −

    • The name of the database name in which we are creating the document.

    • The document id.

    • The data of the document. −d option is used to send the data/document through HTTP request. While writing a document simply enter your Field-Value pairs separated by colon, within flower brackets as shown below −

    {
       Name : Raju
       age : 23
       Designation : Designer
    }
    

    Example

    Using the above given syntax if you want to create a document with id 001 in a database with name my_database, you can create it as shown below.

    $ curl -X PUT http://127.0.0.1:5984/my_database/"001" -d
    ''{ " Name " : " Raju " , " age " :" 23 " , " Designation " : " Designer " }''
    
    {"ok":true,"id":"001","rev":"1-1c2fae390fa5475d9b809301bbf3f25e"}
    

    The response of CouchDB to this request contains three fields −

    • “ok”, indicating the operation was successful.

    • “id”, which stores the id of the document and

    • “rev”, this indicates the revision id. Every time you revise (update or modify) a document a _rev value will be generated by CouchDB. If you want to update or delete a document, CouchDB expects you to include the _rev field of the revision you wish to change. When CouchDB accepts the change, it will generate a new revision number. This mechanism ensures concurrency control.

    Verification

    If you want to view the created document you can get it using the document as shown below.

    $ curl -X GET http://127.0.0.1:5984/my_database/001
    {
       "_id": "001",
       "_rev": "1-3fcc78daac7a90803f0a5e383f4f1e1e",
       "Name": "Raju",
       "age": 23,
       "Designation": "Designer"
    }
    

    Creating a Document using Futon

    To Create a document open the http://127.0.0.1:5984/_utils/ url to get an Overview/index page of CouchDB as shown below.

    Create Document

    Select the database in which you want to create the document. Open the Overview page of the database and select New Document option as shown below.

    New Document

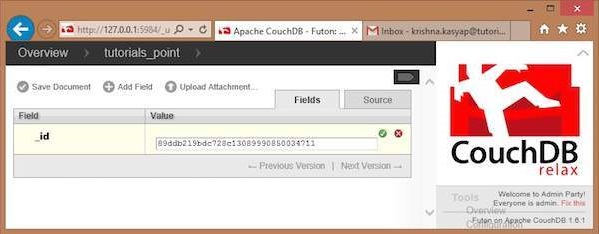
    When you select the New Document option, CouchDB creates a new database document, assigning it a new id. You can edit the value of the id and can assign your own value in the form of a string. In the following illustration, we have created a new document with an id 001.

    New Document ID

    In this page, you can observe three options − save Document, Add Field and Upload Attachment.

    Add Field to the Document

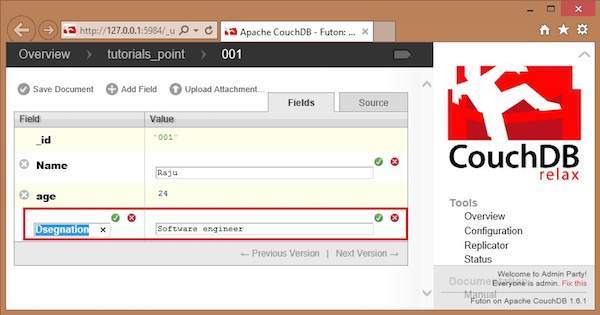
    To add field to the document click on Add Field option. After creating a database, you can add a field to it using this option. Clicking on it will get you a pair of text boxes, namely, Field, value. You can edit these values by clicking on them. Edit those values and type your desired Field-Value pair. Click on the green button to save these values.

    In the following illustration, we have created three fields Name, age and, Designation of the employee.

    Create Field

    Save Document

    You can save the changes made to the document by clicking on this option. After saving, a new id _rev will be generated as shown below.

    Save Document

    CouchDB – Updating a Document

    Updating Documents using cURL

    You can update a document in CouchDB by sending an HTTP request to the server using PUT method through cURL utility. Following is the syntax to update a document.

    curl -X PUT http://127.0.0.1:5984/database_name/document_id/ -d ''{ "field" : "value", "_rev" : "revision id" }''
    

    Example

    Suppose there is a document with id 001 in the database named my_database. You can delete this as shown below.

    First of all, get the revision id of the document that is to be updated. You can find the _rev of the document in the document itself, therefore get the document as shown below.

    $ curl -X GET http://127.0.0.1:5984/my_database/001
    {
       "_id" : "001",
       "_rev" : "2-04d8eac1680d237ca25b68b36b8899d3 " ,
       "age" : "23"
    }
    

    Use revision id _rev from the document to update the document. Here we are updating the age from 23 to 24.

    $ curl -X PUT http://127.0.0.1:5984/my_database/001/ -d
    '' { " age " : " 24 " , " _rev " : " 1-1c2fae390fa5475d9b809301bbf3f25e " } ''
    
    { " ok " : true , " id " : " 001 " , " rev " : " 2-04d8eac1680d237ca25b68b36b8899d3 " }
    

    Verification

    To verify the document, get the document again using GET request as shown below.

    $ curl -X GET http://127.0.0.1:5984/my_database/001
    {
       " _id " : " 001 ",
       " _rev " : " 2-04d8eac1680d237ca25b68b36b8899d3 " ,
       " age " : " 23 "
     }
    
    Note

    Following are some important points to be noted while updating a document.

    • The URL we send in the request containing the database name and the document id.

    • Updating an existing document is same as updating the entire document. You cannot add a field to an existing document. You can only write an entirely new version of the document into the database with the same document ID.

    • We have to supply the revision number as a part of the JSON request.

    • In return JSON contains the success message, the ID of the document being updated, and the new revision information. If you want to update the new version of the document, you have to quote this latest revision number.

    Updating Documents using Futon

    To delete a document open the http://127.0.0.1:5984/_utils/ url to get an Overview/index page of CouchDB as shown below.

    Create Document

    Select the database in which the document to be updated exists and click it. Here we are updating a document in the database named tutorials_point. You will get the list of documents in the database as shown below.

    Update Document

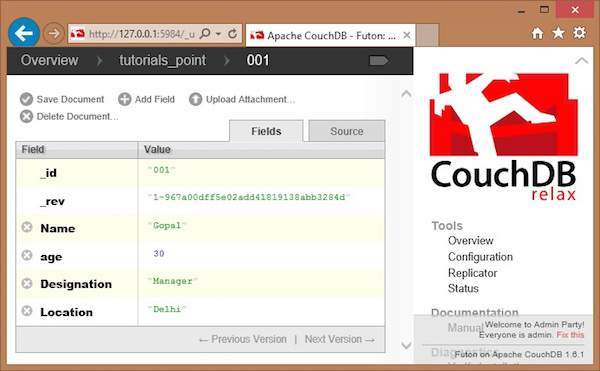
    Select a document that you want to update and click on it. You will get the contents of the documents as shown below.

    Document Contents

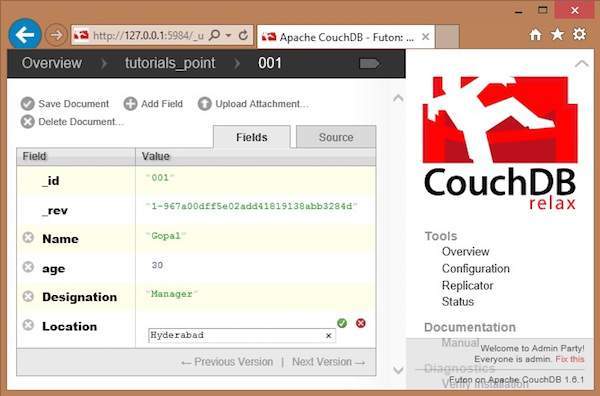
    Here, to update the location from Delhi to Hyderabad, click on the text box, edit the field, and click the green button to save the changes as shown below.

    Save Changes

    CouchDB – Deleting a Document

    Deleting a Document using cURL Utility

    You can delete a document in CouchDB by sending an HTTP request to the server using DELETE method through cURL utility. Following is the syntax to delete a document.

    curl -X DELETE http : // 127.0.0.1:5984 / database name/database id?_rev id
    

    Using −X, we can specify a custom request method of HTTP we are using, while communicating with the HTTP server. In this case, we are using Delete method. To delete a database /database_name/database_id/ is not enough. You have to pass the recent revision id through the url. To mention attributes of any data structure “?” is used.

    Example

    Suppose there is a document in database named my_database with document id 001. To delete this document, you have to get the rev id of the document. Get the document data as shown below.

    $ curl -X GET http://127.0.0.1:5984/my_database/001
    {
       " _id " : " 001 ",
       " _rev " : " 2-04d8eac1680d237ca25b68b36b8899d3 " ,
       " age " : " 23 "
    }
    

    Now specify the revision id of the document to be deleted, id of the document, and database name the document belongs to, as shown below −

    $ curl -X DELETE http://127.0.0.1:5984/my_database/001?rev=1-
    3fcc78daac7a90803f0a5e383f4f1e1e
    
    {"ok":true,"id":"001","rev":"2-3a561d56de1ce3305d693bd15630bf96"}
    

    Verification

    To verify whether the document is deleted, try to fetch the document by using the GET method. Since you are fetching a deleted document, this will give you an error message as shown below −

    $ curl -X GET http://127.0.0.1:5984/my_database/001
    {"error":"not_found","reason":"deleted"}
    

    Deleting a Document using Futon

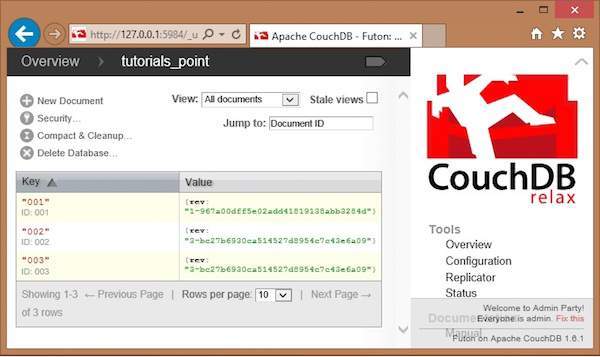
    First of all, verify the documents in the database. Following is the snapshot of the database named tutorials_point.

    Deleting Document

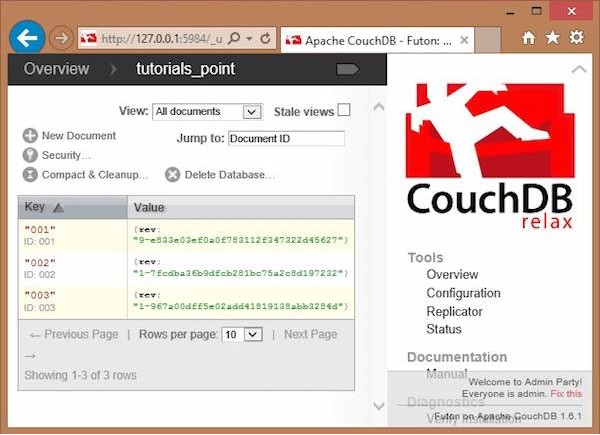
    Here you can observe, the database consists of three documents. To delete any of the documents say 003, do the following −

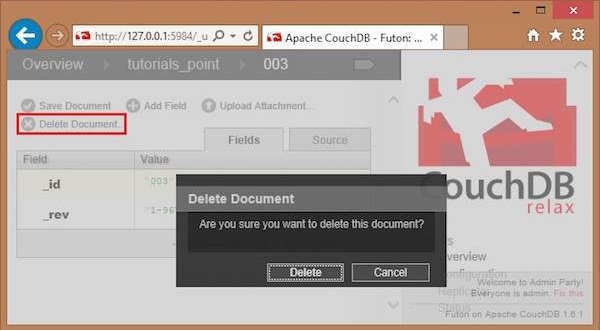
    • Click on the document, you will get a page showing the contents of selected document in the form of field-value pairs.

    • This page also contains four options namely Save Document, Add Field, Upload Attachment, Delete Document.

    • Click on Delete Document option.

    • You will get a dialog box saying “Are you sure you want to delete this document?” Click on delete, to delete the document.

    Delete Document2

    CouchDB – Attaching Files

    Attaching Files using cURL

    You can attach files to CouchDB just like email. The file contains metadata like name and includes its MIME type, and the number of bytes the attachment contains. To attach files to a document you have to send PUT request to the server. Following is the syntax to attach files to the document −

    $ curl -vX PUT http://127.0.0.1:5984/database_name/database_id
    /filename?rev=document rev_id --data-binary @filename -H "Content-Type:
    type of the content"
    

    The request has various options that are explained below.

    • –data-binary@ − This option tells cURL to read a file’s contents into the HTTP request body.

    • -H − This option is used to mention the content type of the file we are going to upload.

    Example

    Let us attach a file named boy.jpg, to the document with id 001, in the database named my_database by sending PUT request to CouchDB. Before that, you have to fetch the data of the document with id 001 to get its current rev id as shown below.

    $ curl -X GET http://127.0.0.1:5984/my_database/001
    {
       "_id": "001",
       "_rev": "1-967a00dff5e02add41819138abb3284d"
    }
    

    Now using the _rev value, send the PUT request to the CouchDB server as shown below.

    $ curl -vX PUT http://127.0.0.1:5984/my_database/001/boy.jpg?rev=1-
    967a00dff5e02add41819138abb3284d --data-binary @boy.jpg -H "ContentType:
    image/jpg"
    

    Verification

    To verify whether the attachment is uploaded, fetch the document content as shown below−

    $ curl -X GET http://127.0.0.1:5984/my_database/001
    {
       "_id": "001",
       "_rev": "2-4705a219cdcca7c72aac4f623f5c46a8",
       "_attachments": {
          "boy.jpg": {
             "content_type": "image/jpg",
             "revpos": 2,
             "digest": "md5-9Swz8jvmga5mfBIsmCxCtQ==",
             "length": 91408,
             "stub": true
          }
       }
    }
    

    Attaching Files using Futon

    Upload Attachment

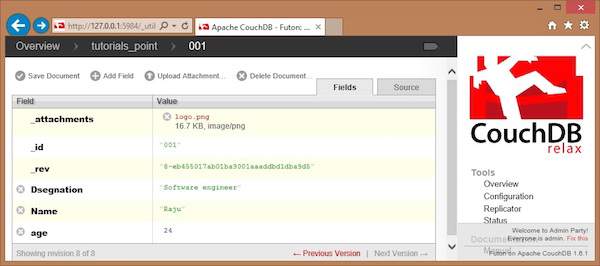
    Using this option, you can upload a new attachment such as a file, image, or document, to the database. To do so, click on the Upload Attachment button. A dialog box will appear where you can choose the file to be uploaded. Select the file and click on the Upload button.

    Upload Attachment

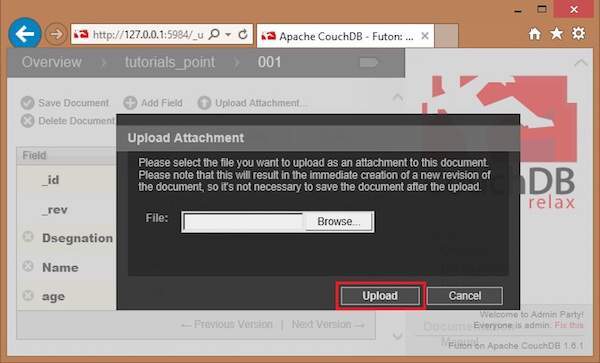
    The file uploaded will be displayed under _attachments field. Later you can see the file by clicking on it.


    Khóa học lập trình tại Toidayhoc vừa học vừa làm dự án vừa nhận lương: Khóa học lập trình nhận lương tại trung tâm Toidayhoc