Hazelcast – Introduction
Distributed In-memory Data Grid
A data grid is a superset to distributed cache. Distributed cache is typically used only for storing and retrieving key-value pairs which are spread across caching servers. However, a data grid, apart from supporting storage of key-value pairs, also supports other features, for example,
-
It supports other data structures like locks, semaphores, sets, list, and queues.
-
It provides a way to query the stored data by rich querying languages, for example, SQL.
-
It provides a distributed execution engine which helps to operate on the data in parallel.
Benefits of Hazelcast
-
Support multiple data structures − Hazelcast supports the usage of multiple data structures along with Map. Some of the examples are Lock, Semaphore, Queue, List, etc.
-
Fast R/W access − Given that all the data is in-memory, Hazelcast offers very high-speed data read/write access.
-
High availability − Hazelcast supports the distribution of data across machines along with additional support for backup. This means that the data is not stored on a single machine. So, even if a machine goes down, which occurs frequently in a distributed environment, the data is not lost.
-
High Performance − Hazelcast provides constructs which can be used to distribute the workload/computation/query among multiple worker machines. This means a computation/query uses resources from multiple machines which reduces the execution time drastically.
-
Easy to use − Hazelcast implements and extends a lot of java.util.concurrent constructs which make it very easy to use and integrate with the code. Configuration to start using Hazelcast on a machine just involves adding the Hazelcast jar to our classpath.
Hazelcast vs Other Caches & Key-Value stores
Comparing Hazelcast with other caches like Ehcache, Guava, and Caffeine may not be very useful. It is because, unlike other caches, Hazelcast is a distributed cache, that is, it spreads the data across machines/JVM. Although Hazelcast can work very well on single JVM as well, however, it is more useful is a distributed environment.
Similarly comparing it with Databases like MongoDB is also of not much use. This is because, Hazelcast mostly stores data in memory (although it also supports writing to disk). So, it offers high R/W speed with the limitation that data needs to be stored in memory.
Hazelcast also supports caching/storing complex data types and provides an interface to query them, unlike other data stores.
A comparison, however, can be made with Redis which also offers similar features.
Hazelcast vs Redis
In terms of features, both Redis and Hazelcast are very similar. However, following are the points where Hazelcast scores over Redis −
-
Built for Distributed Environment from ground-up − Unlike Redis, which started as single machine cache, Hazelcast, from the very beginning, has been built for distributed environment.
-
Simple cluster scale in/out − Maintaining a cluster where nodes are added or removed is very simple in case of Hazelcast, for example, adding a node is a matter of launching the node with the required configuration. Removing a node requires simple shutting down of the node. Hazelcast automatically handles partitioning of data, etc. Having the same setup for Redis and performing the above operation requires more precaution and manual efforts.
-
Less resources needs to support failover − Redis follows master-slave approach. For failover, Redis requires additional resources to setup Redis Sentinel. These Sentinel nodes are responsible to elevate a slave to master if the original master node goes down. In Hazelcast, all nodes are treated equal, failure of a node is detected by other nodes. So, the case of a node going down is handled pretty transparently and that too without any additional set of monitoring servers.
-
Simple Distributed Compute − Hazelcast, with its EntryProcessor, provides a simple interface to send the code to the data for parallel processing. This reduces data transfer over the wire. Redis also supports this, however, achieving this requires one to be aware of Lua scripting which adds additional learning curve.
Hazelcast – Setup
Hazelcast requires Java 1.6 or above. Hazelcast can also be used with .NET, C++, or other JVM based languages like Scala and Clojure. However, for this tutorial, we are going to use Java 8.
Before we move on, following is the project setup that we will use for this tutorial.
hazelcast/
├── com.example.demo/
│ ├── SingleInstanceHazelcastExample.java
│ ├── MultiInstanceHazelcastExample.java
│ ├── Server.java
│ └── ....
├── pom.xml
├── target/
├── hazelcast.xml
├── hazelcast-multicast.xml
├── ...
For now, we can just create the package, i.e., com.example.demo inside the hazelcast directory. Then, just cd to that directory. We will look at other files in the upcoming sections.
Installing Hazelcast
Installing Hazelcast simply involves adding a JAR file to your build file. POM file or build.gradle based on whether you are using Maven or Gradle respectively.
If you are using Gradle, adding the following to build.gradle file would be enough −
dependencies {
compile "com.hazelcast:hazelcast:3.12.12”
}
POM for the tutorial
We will use the following POM for our tutorial −
<?xml version="1.0" encoding="UTF-8"?>
<project xmlns="http://maven.apache.org/POM/4.0.0"
xmlns:xsi="http://www.w3.org/2001/XMLSchema-instance"
xsi:schemaLocation="http://maven.apache.org/POM/4.0.0 http://maven.apache.org/xsd/maven-4.0.0.xsd">
<modelVersion>1.0.0</modelVersion>
<groupId>com.example</groupId>
<artifactId>demo</artifactId>
<version>0.0.1-SNAPSHOT</version>
<name>demo</name>
<description>Demo project for Hazelcast</description>
<properties>
<maven.compiler.source>1.8</maven.compiler.source>
<maven.compiler.target>1.8</maven.compiler.target>
</properties>
<dependencies>
<dependency>
<groupId>com.hazelcast</groupId>
<artifactId>hazelcast</artifactId>
<version>3.12.12</version>
</dependency>
</dependencies>
<!-- Below build plugin is not needed for Hazelcast, it is being used only to created a shaded JAR so that -->
<!-- using the output i.e. the JAR becomes simple for testing snippets in the tutorial-->
<build>
<plugins>
<plugin>
<!-- Create a shaded JAR and specify the entry point class-->
<groupId>org.apache.maven.plugins</groupId>
<artifactId>maven-shade-plugin</artifactId>
<version>3.2.4</version>
<executions>
<execution>
<phase>package</phase>
<goals>
<goal>shade</goal>
</goals>
</execution>
</executions>
</plugin>
</plugins>
</build>
</project>
Hazelcast – First Application
Hazelcast can be run in isolation (single node) or multiple nodes can be run to form a cluster. Let us first try starting a single instance.
Single Instance
Example
Now, let us try creating and using a single instance of Hazelcast cluster. For that, we will create SingleInstanceHazelcastExample.java file.
package com.example.demo;
import java.util.Map;
import com.hazelcast.core.Hazelcast;
import com.hazelcast.core.HazelcastInstance;
public class SingleInstanceHazelcastExample {
public static void main(String... args){
//initialize hazelcast server/instance
HazelcastInstance hazelcast = Hazelcast.newHazelcastInstance();
System.out.println(“Hello world”);
// perform a graceful shutdown
hazelcast.shutdown();
}
}
Now let’s compile the code and execute it −
mvn clean install
java -cp target/demo-0.0.1-SNAPSHOT.jar
com.example.demo.SingleInstanceHazelcastExample
Output
If you execute above code, the output would be −
Hello World
However, more importantly, you will also notice log lines from Hazelcast which signifies that Hazelcast has started. Since we are running this code only once, i.e., a single JVM, we would only have one member in our cluster.
Jan 30, 2021 10:26:51 AM com.hazelcast.config.XmlConfigLocator
INFO: Loading ''hazelcast-default.xml'' from classpath.
Jan 30, 2021 10:26:51 AM com.hazelcast.instance.AddressPicker
INFO: [LOCAL] [dev] [3.12.12] Prefer IPv4 stack is true.
Jan 30, 2021 10:26:52 AM com.hazelcast.instance.AddressPicker
INFO: [LOCAL] [dev] [3.12.12] Picked [localhost]:5701, using socket
ServerSocket[addr=/0:0:0:0:0:0:0:0,localport=5701], bind any local is true
Jan 30, 2021 10:26:52 AM com.hazelcast.system
...
Members {size:1, ver:1} [
Member [localhost]:5701 - 9b764311-9f74-40e5-8a0a-85193bce227b this
]
Jan 30, 2021 10:26:56 AM com.hazelcast.core.LifecycleService
INFO: [localhost]:5701 [dev] [3.12.12] [localhost]:5701 is STARTED
...
You will also notice log lines from Hazelcast at the end which signifies
Hazelcast was shutdown:
INFO: [localhost]:5701 [dev] [3.12.12] Hazelcast Shutdown is completed in 784 ms.
Jan 30, 2021 10:26:57 AM com.hazelcast.core.LifecycleService
INFO: [localhost]:5701 [dev] [3.12.12] [localhost]:5701 is SHUTDOWN
Cluster: Multi Instance
Now, let”s create MultiInstanceHazelcastExample.java file (as below) which would be used for multi-instance cluster.
package com.example.demo;
import com.hazelcast.core.Hazelcast;
import com.hazelcast.core.HazelcastInstance;
public class MultiInstanceHazelcastExample {
public static void main(String... args) throws InterruptedException{
//initialize hazelcast server/instance
HazelcastInstance hazelcast = Hazelcast.newHazelcastInstance();
//print the socket address of this member and also the size of the cluster
System.out.println(String.format("[%s]: No. of hazelcast members: %s",
hazelcast.getCluster().getLocalMember().getSocketAddress(),
hazelcast.getCluster().getMembers().size()));
// wait for the member to join
Thread.sleep(30000);
//perform a graceful shutdown
hazelcast.shutdown();
}
}
Let’s execute the following command on two different shells −
java -cp .targetdemo-0.0.1-SNAPSHOT.jar
com.example.demo.MultiInstanceHazelcastExample
You would notice on the 1st shell that a Hazelcast instance has been started and a member has been assigned. Note the last line of output which says that there is a single member using port 5701.
Jan 30, 2021 12:20:21 PM com.hazelcast.internal.cluster.ClusterService
INFO: [localhost]:5701 [dev] [3.12.12]
Members {size:1, ver:1} [
Member [localhost]:5701 - b0d5607b-47ab-47a2-b0eb-6c17c031fc2f this
]
Jan 30, 2021 12:20:21 PM com.hazelcast.core.LifecycleService
INFO: [localhost]:5701 [dev] [3.12.12] [localhost]:5701 is STARTED
[/localhost:5701]: No. of hazelcast members: 1
You would notice on the 2nd shell that a Hazelcast instance has joined the 1st instance. Note the last line of the output which says that there are now two members using port 5702.
INFO: [localhost]:5702 [dev] [3.12.12]
Members {size:2, ver:2} [
Member [localhost]:5701 - b0d5607b-47ab-47a2-b0eb-6c17c031fc2f
Member [localhost]:5702 - 037b5fd9-1a1e-46f2-ae59-14c7b9724ec6 this
]
Jan 30, 2021 12:20:46 PM com.hazelcast.core.LifecycleService
INFO: [localhost]:5702 [dev] [3.12.12] [localhost]:5702 is STARTED
[/localhost:5702]: No. of hazelcast members: 2
Hazelcast – Configuration
Hazelcast supports programmatic as well as XML-based configuration. However, it is the XML configuration which is heavily used in production, given its ease of use. But XML configuration internally uses the Programmatic configuration.
XML Configuration
The hazelcast.xml is where these configurations need to be placed. The file is searched for in the following location (in same order) and is chosen from the first available location −
-
Passing the location of the XML to the JVM via the system property – Dhazelcast.config=/path/to/hazelcast.xml
-
hazelcast.xml in the current working directory
-
hazelcast.xml in the classpath
-
default hazelcast.xml provided by Hazelcast
Once the XML is found, Hazelcast would load the required configuration from the XML file.
Let”s try that out with an example. Create an XML in your current directory with the name hazelcast.xml.
<hazelcast
xsi:schemaLocation="http://www.hazelcast.com/schema/config
http://www.hazelcast.com/schema/config/hazelcast-config-3.12.12.xsd"
xmlns="http://www.hazelcast.com/schema/config"
xmlns:xsi="http://www.w3.org/2001/XMLSchema-instance">
<!-- name of the instance -->
<instance-name>XML_Hazelcast_Instance</instance-name>
</hazelcast>
The XML as of now only contains the schema location of the Hazelcast XML which is used for validation. But more importantly, it contains the instance name.
Example
Now create an XMLConfigLoadExample.java file with the following content.
package com.example.demo;
import com.hazelcast.core.Hazelcast;
import com.hazelcast.core.HazelcastInstance;
public class XMLConfigLoadExample {
public static void main(String... args) throws InterruptedException{
//initialize hazelcast server/instance
HazelcastInstance hazelcast = Hazelcast.newHazelcastInstance();
//specified the name written in the XML file
System.out.println(String.format("Name of the instance: %s",hazelcast.getName()));
//perform a graceful shutdown
hazelcast.shutdown();
}
}
Execute the above Java file with the following command −
java -Dhazelcast.config=hazelcast.xml -cp .targetdemo-0.0.1-SNAPSHOT.jar
com.example.demo.XMLConfigLoadExample
Output
The output for above command would be −
Jan 30, 2021 1:21:41 PM com.hazelcast.config.XmlConfigLocator
INFO: Loading configuration hazelcast.xml from System property
''hazelcast.config''
Jan 30, 2021 1:21:41 PM com.hazelcast.config.XmlConfigLocator
INFO: Using configuration file at C:Usersdemoeclipseworkspace
hazelcasthazelcast.xml
...
Members {size:1, ver:1} [
Member [localhost]:5701 - 3d400aed-ddb9-4e59-9429-3ab7773e7e09 this
]
Name of cluster: XML_Hazelcast_Instance
As you see, Hazelcast loaded the configuration and printed the name which was specified in the configuration (last line).
There are a whole lot of configuration options which can be specified in the XML. The complete list can be found at −
We will see a few of these configurations as we move along the tutorial.
Programmatic Configuration
As stated earlier, XML configuration is ultimately done via programmatic configuration. So, let’s try programmatic configuration for the same example which we saw in XML configuration. For that, let’s create the ProgramaticConfigLoadExample.java file with the following content.
Example
package com.example.demo;
import com.hazelcast.config.Config;
import com.hazelcast.core.Hazelcast;
import com.hazelcast.core.HazelcastInstance;
public class ProgramaticConfigLoadExample {
public static void main(String... args) throws InterruptedException {
Config config = new Config();
config.setInstanceName("Programtic_Hazelcast_Instance");
// initialize hazelcast server/instance
HazelcastInstance hazelcast = Hazelcast.newHazelcastInstance(config);
// specified the name written in the XML file
System.out.println(String.format("Name of the instance: %s", hazelcast.getName()));
// perform a graceful shutdown
hazelcast.shutdown();
}
}
Let’s execute the code without passing any hazelcast.xml file by −
java -cp .targetdemo-0.0.1-SNAPSHOT.jar
com.example.demo.ProgramaticConfigLoadExample
Output
The output of the above code is −
Name of the instance: Programtic_Hazelcast_Instance
Logging
To avoid dependencies, Hazelcast by default uses JDK based logging. But it also supports logging via slf4j, log4j. For example, if we want to setup logging via for sl4j with logback, we can update the POM to contain the following dependencies −
<!-- contains both sl4j bindings and the logback core -->
<dependency>
<groupId>ch.qos.logback</groupId>
<artifactId>logback-classic</artifactId>
<version>1.2.3</version>
</dependency>
Example
Define a configuration logback.xml file and add it to your classpath, for example, src/main/resources.
<configuration>
<appender name="STDOUT" class="ch.qos.logback.core.ConsoleAppender">
<encoder>
<pattern>%d{HH:mm:ss.SSS} [%thread] %-5level %logger{36} - %msg%n</pattern>
</encoder>
</appender>
<root level="info">
<appender-ref ref="STDOUT" />
</root>
<logger name="com.hazelcast" level="error">
<appender-ref ref="STDOUT" />
</logger>
</configuration>
Now, when we execute the following command, we notice that all the meta information about the Hazelcast member creation etc. is not printed. And this is because we have set the logging level for Hazelcast to error and asked Hazelcast to use sl4j logger.
java -Dhazelcast.logging.type=slf4j -cp .targetdemo-0.0.1-SNAPSHOT.jar com.example.demo.SingleInstanceHazelcastExample
Output
John
Variables
Value written to XML configuration files can vary based on the environment. For example, in production, you may use a different username/password for connecting to the Hazelcast cluster compared to the dev environment. Instead of maintaining separate XML files, one can also write variables in the XML files and then pass those variables via command line or programmatically to Hazelcast. Here is an example for choosing the name of the instance from the command line.
So, here is our XML file with the variable ${varname}
<hazelcast
xsi:schemaLocation="http://www.hazelcast.com/schema/config
http://www.hazelcast.com/schema/config/hazelcast-config-3.12.12.xsd"
xmlns="http://www.hazelcast.com/schema/config"
xmlns:xsi="http://www.w3.org/2001/XMLSchema-instance">
<instance-name>${instance_name}</instance-name>
</hazelcast>
Example
And here is the sample Java code we would use to print the variable value −
package com.example.demo;
import java.util.Map;
import com.hazelcast.core.Hazelcast;
import com.hazelcast.core.HazelcastInstance;
public class XMLConfigLoadWithVariable {
public static void main(String... args) throws InterruptedException {
// initialize hazelcast server/instance
HazelcastInstance hazelcast = Hazelcast.newHazelcastInstance();
// specified the name written in the XML file
System.out.println(String.format("Name of the instance: %s", hazelcast.getName()));
// perform a graceful shutdown
hazelcast.shutdown();
}
}
And, following is the command −
java -Dhazelcast.config=othershazelcast.xml -Dinstance_name=dev_cluster -cp
.targetdemo-0.0.1-SNAPSHOT.jar com.example.demo.XMLConfigLoadWithVariable
Output
And the output shows that the variable was replaced by Hazelcast correctly.
Name of the instance: dev_cluster
Hazelcast – Setting up multi node instances
Given that Hazelcast is a distributed IMDG and typically is set up on multiple machines, it requires access to the internal/external network. The most important use-case being discovery of Hazelcast nodes within a cluster.
Hazelcast requires the following ports −
This node discovery happens in few ways −
Of this, we will look at Multicast and TCP/IP
Multicast
Multicast joining mechanism is enabled by default. is a way of communication form in which message is transmitted to all the nodes in a group. And this is what Hazelcast uses to discover other members of the cluster. All the examples that we have looked at earlier use multicast to discover members.
Example
Let’s now explicitly turn it on. Save the following in hazelcast-multicast.xml
<hazelcast
xsi:schemaLocation="http://www.hazelcast.com/schema/config
http://www.hazelcast.com/schema/config/hazelcast-config-3.12.12.xsd"
xmlns="http://www.hazelcast.com/schema/config"
xmlns:xsi="http://www.w3.org/2001/XMLSchema-instance">
<network>
<join>
<multicast enabled="true" />
</join>
</network>
</hazelcast>
And then, let us execute the following −
java -Dhazelcast.config=hazelcast-multicast.xml -cp .targetdemo-0.0.1-
SNAPSHOT.jar com.example.demo.XMLConfigLoadExample
Output
In the output, we notice the following lines from Hazelcast which effectively means that multicast joiner is used to discover the members.
Jan 30, 2021 5:26:15 PM com.hazelcast.instance.Node
INFO: [localhost]:5701 [dev] [3.12.12] Creating MulticastJoiner
Multicast, by default, accepts communication from all the machines in the multicast group. This may be a security concern and that is why typically, on-premise, multicast communication is firewalled. So, while multicast is good for development work, in production, it is best to use TCP/IP based discovery.
TCP/IP
Due to the drawbacks stated for Multicast, TCP/IP is the preferred way for communication. In case of TCP/IP, a member can connect to only known/listed members.
Example
Let’s use TCP/IP for discovery mechanisms. Save the following in hazelcast-tcp.xml
<hazelcast
xsi:schemaLocation="http://www.hazelcast.com/schema/config
http://www.hazelcast.com/schema/config/hazelcast-config-3.12.12.xsd"
xmlns="http://www.hazelcast.com/schema/config"
xmlns:xsi="http://www.w3.org/2001/XMLSchema-instance">
<network>
<join>
<multicast enabled="false" />
<tcp-ip enabled="true">
<members>localhost</members>
</tcp-ip>
</join>
</network>
</hazelcast>
And then, let’s execute the following command −
java -Dhazelcast.config=hazelcast-tcp.xml -cp .targetdemo-0.0.1-SNAPSHOT.jar
com.example.demo.XMLConfigLoadExample
Output
The output is following −
INFO: [localhost]:5701 [dev] [3.12.12] Creating TcpIpJoiner
Jan 30, 2021 8:09:29 PM
com.hazelcast.spi.impl.operationexecutor.impl.OperationExecutorImpl
The above output shows that TCP/IP joiner was use to join two members.
And if you execute following command on two different shells −
java ''-Dhazelcast.config=hazelcast-tcp.xml'' -cp .targetdemo-0.0.1-SNAPSHOT.jar
com.example.demo.MultiInstanceHazelcastExample
We see the following output −
Members {size:2, ver:2} [
Member [localhost]:5701 - 62eedeae-2701-4df0-843c-7c3655e16b0f
Member [localhost]:5702 - 859c1b46-06e6-495a-8565-7320f7738dd1 this
]
The above output means that the nodes were able to join using TCP/IP and both are using localhost as the IP address.
Note that we can specify more IPs or the machine names (which would be resolved by DNS) in the XML configuration file.
<hazelcast
xsi:schemaLocation="http://www.hazelcast.com/schema/config
http://www.hazelcast.com/schema/config/hazelcast-config-3.12.12.xsd"
xmlns="http://www.hazelcast.com/schema/config"
xmlns:xsi="http://www.w3.org/2001/XMLSchema-instance">
<network>
<join>
<multicast enabled="false" />
<tcp-ip enabled="true">
<members>machine1, machine2....</members>
</tcp-ip>
</join>
</network>
</hazelcast>
Hazelcast – Data Structures
java.util.concurrent package provides data structures such as AtomicLong, CountDownLatch, ConcurrentHashMap, etc. which are useful when you have more than one thread reading/writing data to the data structure. But to provide thread safety, all of these threads are expected to be on a single JVM/machine.
There are two major benefits of distributing data structure −
-
Better Performance − If more than one machine has access to the data, all of them can work in parallel and complete the work in a lesser timespan.
-
Data Backup − If a JVM/machine goes down, we have another JVMs/machines holding the data
Hazelcast provides a way to distribute your data structure across JVMs/machines.
Hazelcast – Client
Hazelcast clients are the lightweight clients to Hazelcast members. Hazelcast members are responsible to store data and the partitions. They act like the server in the traditional client-server model.
Hazelcast clients are created only for accessing data stored with Hazelcast members of the cluster. They are not responsible to store data and do not take any ownership to store data.
The clients have their own life cycle and do not affect the Hazelcast member instances.
Let”s first create Server.java and run it.
import java.util.Map;
import com.hazelcast.core.Hazelcast;
import com.hazelcast.core.HazelcastInstance;
public class Server {
public static void main(String... args){
//initialize hazelcast server/instance
HazelcastInstance hazelcast = Hazelcast.newHazelcastInstance();
//create a simple map
Map<String, String> vehicleOwners = hazelcast.getMap("vehicleOwnerMap");
// add key-value to map
vehicleOwners.put("John", "Honda-9235");
// do not shutdown, let the server run
//hazelcast.shutdown();
}
}
Now, run the above class.
java -cp .targetdemo-0.0.1-SNAPSHOT.jar com.example.demo.Server
For setting up a client, we also need to add client jar.
<dependency>
<groupId>com.hazelcast</groupId>
<artifactId>hazelcast-client</artifactId>
<version>3.12.12</version>
</dependency>
Let”s now create Client.java. Note that similar to Hazelcast members, clients can also be configured programmatically or via XML configuration (i.e., via -Dhazelcast.client.config or hazelcast-client.xml).
Example
Let’s use the default configuration which means our client would be able to connect to local instances.
import java.util.Map;
import com.hazelcast.client.HazelcastClient;
import com.hazelcast.core.HazelcastInstance;
public class Client {
public static void main(String... args){
//initialize hazelcast client
HazelcastInstance hzClient = HazelcastClient.newHazelcastClient();
//read from map
Map<String, String> vehicleOwners = hzClient.getMap("vehicleOwnerMap");
System.out.println(vehicleOwners.get("John"));
System.out.println("Member of cluster: " +
hzClient.getCluster().getMembers());
// perform shutdown
hzClient.getLifecycleService().shutdown();
}
}
Now, run the above class.
java -cp .targetdemo-0.0.1-SNAPSHOT.jar com.example.demo.Client
Output
It will produce the following output −
Honda-9235
Member of cluster: [Member [localhost]:5701 - a47ec375-3105-42cd-96c7-fc5eb382e1b0]
As seen from the output −
Load Balancing
Hazelcast Client supports load balancing using various algorithms. Load balancing ensures that the load is shared across members and no single member of the cluster is overloaded. The default load balancing mechanism is set to round-robin. The same can be changed by using the loadBalancer tag in the config.
We can specify the type of load balancer using the load-balancer tag in the configuration. Here is a sample for choosing a strategy that randomly picks up a node.
<hazelcast-client xmlns="http://www.hazelcast.com/schema/client-config"
xmlns:xsi="http://www.w3.org/2001/XMLSchema-instance"
xsi:schemaLocation="http://www.hazelcast.com/schema/client-config
http://www.hazelcast.com/schema/client-config/hazelcastclient-config-4.2.xsd">
<load-balancer type="random"/>
</hazelcast-client>
Failover
In a distributed environment, members can fail arbitrarily. For supporting failover, it is recommended that address to multiple members is provided. If the client gets access to any one member, that is sufficient for it to get addressed to other members. The parameters addressList can be specified in the client configuration.
For example, if we use the following configuration −
<hazelcast-client xmlns="http://www.hazelcast.com/schema/client-config"
xmlns:xsi="http://www.w3.org/2001/XMLSchema-instance"
xsi:schemaLocation="http://www.hazelcast.com/schema/client-config
http://www.hazelcast.com/schema/client-config/hazelcastclient-config-4.2.xsd">
<address-list>machine1, machine2</address-list>
</hazelcast-client>
Even if, say, machine1 goes down, clients can use machine2 to get access to other members of the cluster.
Hazelcast – Serialization
Hazelcast is ideally used in an environment where data/query are distributed across machines. This requires data to be serialized from our Java objects to a byte array which can be transferred over the network.
Hazelcast supports various types of Serialization. However, let’s look at some commonly used ones, i.e., Java Serialization and Java Externalizable.
Java Serialization
Example
First let”s look at Java Serialization. Let”s say, we define an Employee class with Serializable interface implemented.
public class Employee implements Serializable{
private static final long serialVersionUID = 1L;
private String name;
private String department;
public Employee(String name, String department) {
super();
this.name = name;
this.department = department;
}
public String getName() {
return name;
}
public void setName(String name) {
this.name = name;
}
public String getDepartment() {
return department;
}
public void setDepartment(String department) {
this.department = department;
}
@Override
public String toString() {
return "Employee [name=" + name + ", department=" + department + "]";
}
}
Let’s now write code to add Employee object to the Hazelcast map.
public class EmployeeExample {
public static void main(String... args){
//initialize hazelcast server/instance
HazelcastInstance hazelcast = Hazelcast.newHazelcastInstance();
//create a set to track employees
Map<Employee, String> employeeOwners=hazelcast.getMap("employeeVehicleMap");
Employee emp1 = new Employee("John Smith", "Computer Science");
// add employee to set
System.out.println("Serializing key-value and add to map");
employeeOwners.put(emp1, "Honda");
// check if emp1 is present in the set
System.out.println("Serializing key for searching and Deserializing
value got out of map");
System.out.println(employeeOwners.get(emp1));
// perform a graceful shutdown
hazelcast.shutdown();
}
}
Output
It will produce the following output −
Serializing key-value and add to map
Serializing key for searching and Deserializing value got out of map
Honda
A very important aspect here is that simply by implementing a Serializable interface, we can make Hazelcast use Java Serialization. Also note that Hazelcast stores serialized data for key and value instead of storing it in-memory like HashMap. So, Hazelcast does the heavy-lifting of Serialization and Deserialization.
Example
However, there is a pitfall here. In the above case, what if the department of the employee changes? The person is still the same.
public class EmployeeExampleFailing {
public static void main(String... args){
//initialize hazelcast server/instance
HazelcastInstance hazelcast = Hazelcast.newHazelcastInstance();
//create a set to track employees
Map<Employee, String> employeeOwners=hazelcast.getMap("employeeVehicleMap");
Employee emp1 = new Employee("John Smith", "Computer Science");
// add employee to map
System.out.println("Serializing key-value and add to map");
employeeOwners.put(emp1, "Honda");
Employee empDeptChange = new Employee("John Smith", "Electronics");
// check if emp1 is present in the set
System.out.println("Checking if employee with John Smith is present");
System.out.println(employeeOwners.containsKey(empDeptChange));
Employee empSameDept = new Employee("John Smith", "Computer Science");
System.out.println("Checking if employee with John Smith is present");
System.out.println(employeeOwners.containsKey(empSameDept));
// perform a graceful shutdown
hazelcast.shutdown();
}
}
Output
It will produce the following output −
Serializing key-value and add to map
Checking if employee with name John Smith is present
false
Checking if employee with name John Smith is present
true
It is because Hazelcast does not deserialize the key, i.e., Employee while comparison. It directly compares the bytecode of the serialized key. So, an object with the same value to all the attributes would be treated the same. But if the value to those attributes changes, for example, department in the above scenario, those two keys are treated as unique.
Java Externalizable
What if, in the above example, we don”t care about the value of the department while performing serialization/deserialization of keys. Hazelcast also supports Java Externalizable which gives us control over what tags are used for serialization and deserialization.
Example
Let’s modify our Employee class accordingly −
public class EmplyoeeExternalizable implements Externalizable {
private static final long serialVersionUID = 1L;
private String name;
private String department;
public EmplyoeeExternalizable(String name, String department) {
super();
this.name = name;
this.department = department;
}
@Override
public void readExternal(ObjectInput in) throws IOException,
ClassNotFoundException {
System.out.println("Deserializaing....");
this.name = in.readUTF();
}
@Override
public void writeExternal(ObjectOutput out) throws IOException {
System.out.println("Serializing....");
out.writeUTF(name);
}
public String getName() {
return name;
}
public void setName(String name) {
this.name = name;
}
public String getDepartment() {
return department;
}
public void setDepartment(String department) {
this.department = department;
}
@Override
public String toString() {
return "Employee [name=" + name + ", department=" + department + "]";
}
}
So, as you can see from the code, we have added readExternal/writeExternal methods which are responsible for serialization/deserialization. Given that we are not interested in the department while serialization/deserialization, we exclude those in readExternal/writeExternal methods.
Example
Now, if we execute the following code −
public class EmployeeExamplePassing {
public static void main(String... args){
//initialize hazelcast server/instance
HazelcastInstance hazelcast = Hazelcast.newHazelcastInstance();
//create a set to track employees
Map<EmplyoeeExternalizable, String> employeeOwners=hazelcast.getMap("employeeVehicleMap");
EmplyoeeExternalizable emp1 = new EmplyoeeExternalizable("John Smith", "Computer Science");
// add employee to map
employeeOwners.put(emp1, "Honda");
EmplyoeeExternalizable empDeptChange = new EmplyoeeExternalizable("John Smith", "Electronics");
// check if emp1 is present in the set
System.out.println("Checking if employee with John Smith is present");
System.out.println(employeeOwners.containsKey(empDeptChange));
EmplyoeeExternalizable empSameDept = new EmplyoeeExternalizable("John Smith", "Computer Science");
System.out.println("Checking if employee with John Smith is present");
System.out.println(employeeOwners.containsKey(empSameDept));
// perform a graceful shutdown
hazelcast.shutdown();
}
}
Output
The output we get is −
Serializing....
Checking if employee with John Smith is present
Serializing....
true
Checking if employee with John Smith is present
Serializing....
true
As the output shows, using Externalizable interface, we can provide Hazelcast with serialized data for only the name of the employee.
Also note that Hazelcast serializes our key twice −
-
Once while storing the key,
-
And, second for searching the given key in the map. As stated earlier, this is because Hazelcast uses serialized byte arrays for key comparison.
Overall, using Externalizable has more benefits as compared to Serializable if we want to have more control over what attributes are to be serialized and how we want to handle them.
Hazelcast – Spring Integration
Hazelcast supports an easy way to integrate with Spring Boot application. Let”s try to understand that via an example.
We will create a simple API application which provides an API to get employee information for a company. For this purpose, we will use Spring Boot driven RESTController along with Hazelcast for caching data.
Note that to integrate Hazelcast in Spring Boot, we will need two things −
Let’s first define the POM. Note that we have to specify Hazelcast JAR to use it in the Spring Boot project.
<?xml version="1.0" encoding="UTF-8"?>
<project xmlns="http://maven.apache.org/POM/4.0.0"
xmlns:xsi="http://www.w3.org/2001/XMLSchema-instance"
xsi:schemaLocation="http://maven.apache.org/POM/4.0.0 http://maven.apache.org/xsd/maven-4.0.0.xsd">
<modelVersion>4.0.0</modelVersion>
<groupId>com.example</groupId>
<artifactId>hazelcast</artifactId>
<version>0.0.1-SNAPSHOT</version>
<name>demo</name>
<description>Demo project to explain Hazelcast integration with Spring Boot</description>
<properties>
<maven.compiler.target>1.8</maven.compiler.target>
<maven.compiler.source>1.8</maven.compiler.source>
</properties>
<parent>
<groupId>org.springframework.boot</groupId>
<artifactId>spring-boot-starter-parent</artifactId>
<version>2.4.0</version>
</parent>
<dependencies>
<dependency>
<groupId>org.springframework.boot</groupId>
<artifactId>spring-boot-starter-web</artifactId>
</dependency>
<dependency>
<groupId>org.springframework.boot</groupId>
<artifactId>spring-boot-starter-cache</artifactId>
</dependency>
<dependency>
<groupId>com.hazelcast</groupId>
<artifactId>hazelcast-all</artifactId>
<version>4.0.2</version>
</dependency>
</dependencies>
<build>
<plugins>
<plugin>
<groupId>org.springframework.boot</groupId>
<artifactId>spring-boot-maven-plugin</artifactId>
</plugin>
</plugins>
</build>
</project>
Also add hazelcast.xml to src/main/resources −
<hazelcast
xsi:schemaLocation="http://www.hazelcast.com/schema/config
http://www.hazelcast.com/schema/config/hazelcast-config-3.12.12.xsd"
xmlns="http://www.hazelcast.com/schema/config"
xmlns:xsi="http://www.w3.org/2001/XMLSchema-instance">
<instance-name>XML_Hazelcast_Instance</instance-name>
</hazelcast>
Define an entry point file for Spring Boot to use. Ensure that we have @EnableCaching specified −
package com.example.demo;
import org.springframework.boot.SpringApplication;
import org.springframework.boot.autoconfigure.SpringBootApplication;
import org.springframework.cache.annotation.EnableCaching;
@EnableCaching
@SpringBootApplication
public class CompanyApplication {
public static void main(String[] args) {
SpringApplication.run(CompanyApplication.class, args);
}
}
Let us define our employee POJO −
package com.example.demo;
import java.io.Serializable;
public class Employee implements Serializable{
private static final long serialVersionUID = 1L;
private int empId;
private String name;
private String department;
public Employee(Integer id, String name, String department) {
super();
this.empId = id;
this.name = name;
this.department = department;
}
public int getEmpId() {
return empId;
}
public void setEmpId(int empId) {
this.empId = empId;
}
public String getName() {
return name;
}
public void setName(String name) {
this.name = name;
}
public String getDepartment() {
return department;
}
public void setDepartment(String department) {
this.department = department;
}
@Override
public String toString() {
return "Employee [empId=" + empId + ", name=" + name + ", department=" + department + "]";
}
}
And ultimately, let us define a basic REST controller to access employee −
package com.example.demo;
import org.springframework.cache.annotation.Cacheable;
import org.springframework.web.bind.annotation.GetMapping;
import org.springframework.web.bind.annotation.PathVariable;
import org.springframework.web.bind.annotation.RequestMapping;
import org.springframework.web.bind.annotation.RestController;
@RestController
@RequestMapping("/v1/")
class CompanyApplicationController{
@Cacheable(value = "employee")
@GetMapping("employee/{id}")
public Employee getSubscriber(@PathVariable("id") int id) throws
InterruptedException {
System.out.println("Finding employee information with id " + id + " ...");
Thread.sleep(5000);
return new Employee(id, "John Smith", "CS");
}
}
Now let us execute the above application, by running the command −
mvn clean install
mvn spring-boot:run
You will notice that the output of the command would contain Hazelcast member information which mean Hazelcast Instance is automatically configured for us using hazelcast.xml configuration.
Members {size:1, ver:1} [
Member [localhost]:5701 - 91b3df1d-a226-428a-bb74-6eec0a6abb14 this
]
Now let us execute via curl or use browser to access API −
curl -X GET http://localhost:8080/v1/employee/5
The output of the API would be our sample employee.
{
"empId": 5,
"name": "John Smith",
"department": "CS"
}
In the server logs (i.e. where Spring Boot application running), we see the following line −
Finding employee information with id 5 ...
However, note that it takes almost 5 secs (because of sleep we added) to access the information. But If we call the API again, the output of the API is immediate. This is because we have specified @Cacheable notation. The data of our first API call has been cached using Hazelcast as a backend.
Hazelcast – Monitoring
Hazelcast provides multiple ways to monitor the cluster. We will look into how to monitor via REST API and via JMX. Let”s first look into REST API.
Monitoring Hazelcast via REST API
To monitor health of the cluster or member state via REST API, one has to enable REST API based communication to the members. This can be done by configuration and also programmatically.
Let us enable REST based monitoring via XML configuration in hazelcast-monitoring.xml −
<hazelcast
xsi:schemaLocation="http://www.hazelcast.com/schema/config
http://www.hazelcast.com/schema/config/hazelcast-config-3.12.12.xsd"
xmlns="http://www.hazelcast.com/schema/config"
xmlns:xsi="http://www.w3.org/2001/XMLSchema-instance">
<instance-name>XML_Hazelcast_Instance</instance-name>
<network>
<rest-api enabled="true">
<endpoint-group name="CLUSTER_READ" enabled="true" />
<endpoint-group name="HEALTH_CHECK" enabled="true" />
</rest-api>
</network>
</hazelcast>
Let us create a Hazelcast instance which runs indefinitely in Server.java file −
public class Server {
public static void main(String... args){
//initialize hazelcast server/instance
HazelcastInstance hazelcast = Hazelcast.newHazelcastInstance();
// do not shutdown, let the server run
//hazelcast.shutdown();
}
}
And now let us execute start the cluster −
java ''-Dhazelcast.config=hazelcast-monitoring.xml'' -cp .targetdemo-0.0.1-
SNAPSHOT.jar com.example.demo.Server
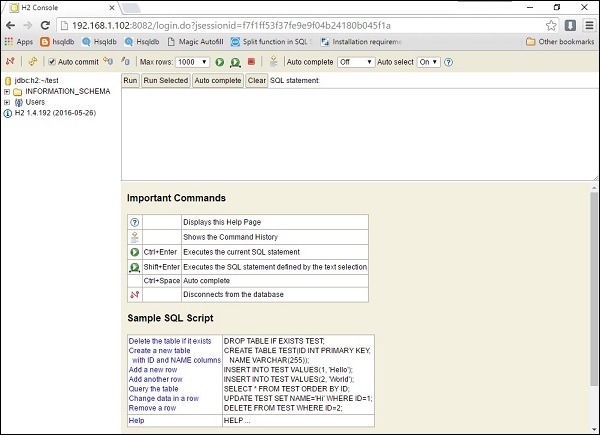
Once started, the health of the cluster can be found out by calling the API like −
http://localhost:5701/hazelcast/health
The output of the above API call −
Hazelcast::NodeState=ACTIVE
Hazelcast::ClusterState=ACTIVE
Hazelcast::ClusterSafe=TRUE
Hazelcast::MigrationQueueSize=0
Hazelcast::ClusterSize=1
This displays that there is 1 member in our cluster and it is Active.
More detailed information about the nodes, for example, IP, port, name can be found using −
http://localhost:5701/hazelcast/rest/cluster
The output of the above API −
Members {size:1, ver:1} [
Member [localhost]:5701 - e6afefcb-6b7c-48b3-9ccb-63b4f147d79d this
]
ConnectionCount: 1
AllConnectionCount: 2
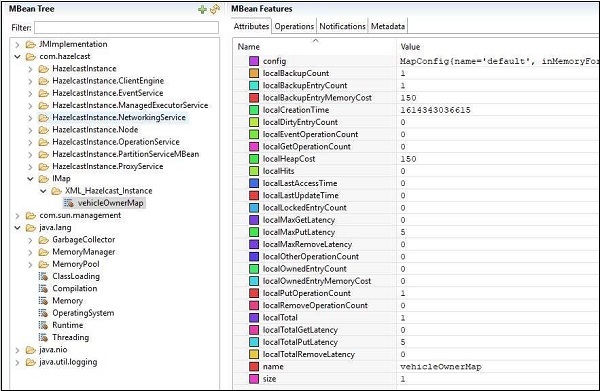
JMX monitoring
Hazelcast also supports JMX monitoring of the data structures embedded inside it, for example, IMap, Iqueue, and so on.
To enable JMX monitoring, we first need to enable JVM based JMX agents. This can be done by passing “-Dcom.sun.management.jmxremote” to the JVM. For using different ports or use authentication, we can use -Dcom.sun.management.jmxremote.port, – Dcom.sun.management.jmxremote.authenticate, respectively.
Apart from this, we have to enable JMX for Hazelcast MBeans. Let us enable JMX based monitoring via XML configuration in hazelcast-monitoring.xml −
<hazelcast
xsi:schemaLocation="http://www.hazelcast.com/schema/config
http://www.hazelcast.com/schema/config/hazelcast-config-3.12.12.xsd"
xmlns="http://www.hazelcast.com/schema/config"
xmlns:xsi="http://www.w3.org/2001/XMLSchema-instance">
<instance-name>XML_Hazelcast_Instance</instance-name>
<properties>
<property name="hazelcast.jmx">true</property>
</properties>
</hazelcast>
Let us create a Hazelcast instance which runs indefinitely in Server.java file and add a map −
class Server {
public static void main(String... args){
//initialize hazelcast server/instance
HazelcastInstance hazelcast = Hazelcast.newHazelcastInstance();
//create a simple map
Map<String, String> vehicleOwners = hazelcast.getMap("vehicleOwnerMap");
// add key-value to map
vehicleOwners.put("John", "Honda-9235");
// do not shutdown, let the server run
//hazelcast.shutdown();
}
}
Now we can execute the following command to enable JMX −
java ''-Dcom.sun.management.jmxremote'' ''-Dhazelcast.config=othershazelcastmonitoring.
xml'' -cp .targetdemo-0.0.1-SNAPSHOT.jar com.example.demo.Server
The JMX ports can now be connected by JMX clients like jConsole, VisualVM, etc.
Here is a snapshot of what we will get if we connect using jConsole and see the attributes for VehicleMap. As we can see, the name of the map as vehicleOwnerMap and the size of map being 1.
Hazelcast – Map Reduce & Aggregations
MapReduce is a computation model which is useful for data processing when you have lots of data and you need multiple machines, i.e., a distributed environment to calculate data. It involves ”map”ing of data into key-value pairs and then ”reducing”, i.e., grouping these keys and performing operation on the value.
Given the fact that Hazelcast is designed keeping a distributed environment in mind, implementing Map-Reduce Frameworks comes naturally to it.
Let’s see how to do it with an example.
For example, let”s suppose we have data about a car (brand & car number) and the owner of that car.
Honda-9235, John
Hyundai-235, Alice
Honda-935, Bob
Mercedes-235, Janice
Honda-925, Catnis
Hyundai-1925, Jane
And now, we have to figure out the number of cars for each brand, i.e., Hyundai, Honda, etc.
Example
Let”s try to find that out using MapReduce −
package com.example.demo;
import java.lang.reflect.Array;
import java.util.ArrayList;
import java.util.Map;
import java.util.concurrent.ExecutionException;
import java.util.concurrent.atomic.AtomicInteger;
import com.hazelcast.core.Hazelcast;
import com.hazelcast.core.HazelcastInstance;
import com.hazelcast.core.ICompletableFuture;
import com.hazelcast.core.IMap;
import com.hazelcast.mapreduce.Context;
import com.hazelcast.mapreduce.Job;
import com.hazelcast.mapreduce.JobTracker;
import com.hazelcast.mapreduce.KeyValueSource;
import com.hazelcast.mapreduce.Mapper;
import com.hazelcast.mapreduce.Reducer;
import com.hazelcast.mapreduce.ReducerFactory;
public class MapReduce {
public static void main(String[] args) throws ExecutionException,
InterruptedException {
try {
// create two Hazelcast instances
HazelcastInstance hzMember = Hazelcast.newHazelcastInstance();
Hazelcast.newHazelcastInstance();
IMap<String, String> vehicleOwnerMap=hzMember.getMap("vehicleOwnerMap");
vehicleOwnerMap.put("Honda-9235", "John");
vehicleOwnerMap.putc"Hyundai-235", "Alice");
vehicleOwnerMap.put("Honda-935", "Bob");
vehicleOwnerMap.put("Mercedes-235", "Janice");
vehicleOwnerMap.put("Honda-925", "Catnis");
vehicleOwnerMap.put("Hyundai-1925", "Jane");
KeyValueSource<String, String> kvs=KeyValueSource.fromMap(vehicleOwnerMap);
JobTracker tracker = hzMember.getJobTracker("vehicleBrandJob");
Job<String, String> job = tracker.newJob(kvs);
ICompletableFuture<Map<String, Integer>> myMapReduceFuture =
job.mapper(new BrandMapper())
.reducer(new BrandReducerFactory()).submit();
Map<String, Integer&g; result = myMapReduceFuture.get();
System.out.println("Final output: " + result);
} finally {
Hazelcast.shutdownAll();
}
}
private static class BrandMapper implements Mapper<String, String, String, Integer> {
@Override
public void map(String key, String value, Context<String, Integer>
context) {
context.emit(key.split("-", 0)[0], 1);
}
}
private static class BrandReducerFactory implements ReducerFactory<String, Integer, Integer> {
@Override
public Reducer<Integer, Integer> newReducer(String key) {
return new BrandReducer();
}
}
private static class BrandReducer extends Reducer<Integer, Integer> {
private AtomicInteger count = new AtomicInteger(0);
@Override
public void reduce(Integer value) {
count.addAndGet(value);
}
@Override
public Integer finalizeReduce() {
return count.get();
}
}
}
Let’s try to understand this code −
- We create Hazelcast members. In the example, we have a single member, but there can well be multiple members.
-
We create a map using dummy data and create a Key-Value store out of it.
-
We create a Map-Reduce job and ask it to use the Key-Value store as the data.
-
We then submit the job to cluster and wait for completion.
-
The mapper creates a key, i.e., extracts brand information from the original key and sets the value to 1 and then emits that information as K-V to the reducer.
-
The reducer simply sums the value, grouping the data, based on key, i.e., brand name.
Output
The output of the code −
Final output: {Mercedes=1, Hyundai=2, Honda=3}
Hazelcast – Collection Listener
Hazelcast supports addition of listeners when a given collection, for example, queue, set, list, etc. is updated. Typical events include entry added and entry removed.
Let”s see how to implement a set listener via an example. So, let”s say we want to implement a listener which tracks the number of elements in a set.
Example
So, let’s first implement the Producer −
public class SetTimedProducer{
public static void main(String... args) throws IOException,
InterruptedException {
//initialize hazelcast instance
HazelcastInstance hazelcast = Hazelcast.newHazelcastInstance();
Thread.sleep(5000);
// create a set
ISet<String> hzFruits = hazelcast.getSet("fruits");
hzFruits.add("Mango");
Thread.sleep(2000);
hzFruits.add("Apple");
Thread.sleep(2000);
hzFruits.add("Banana");
System.exit(0);
}
}
Now let”s implement the listener −
package com.example.demo;
import java.io.IOException;
import com.hazelcast.core.ISet;
import com.hazelcast.core.ItemEvent;
import com.hazelcast.core.ItemListener;
import com.hazelcast.core.Hazelcast;
import com.hazelcast.core.HazelcastInstance;
public class SetListener{
public static void main(String... args) throws IOException, InterruptedException {
//initialize hazelcast instance
HazelcastInstance hazelcast = Hazelcast.newHazelcastInstance();
// create a set
ISet<String> hzFruits = hazelcast.getSet("fruits");
ItemListener<String> listener = new FruitListener<String>();
hzFruits.addItemListener(listener, true);
System.exit(0);
}
private static class FruitListener<String> implements ItemListener<String> {
private int count = 0;
@Override
public void itemAdded(ItemEvent<String> item) {
System.out.println("item added" + item);
count ++;
System.out.println("Total elements" + count);
}
@Override
public void itemRemoved(ItemEvent<String> item) {
count --;
}
}
}
We will first run the producer −
java -cp .targetdemo-0.0.1-SNAPSHOT.jar com.example.demo.SetTimedProducer
And then, we run the listeners and let it run indefinitely −
java -cp .targetdemo-0.0.1-SNAPSHOT.jar com.example.demo.SetListener
Output
The output from the Listener is as follows −
item added: ItemEvent{
event=ADDED, item=Mango, member=Member [localhost]:5701-c28a60b7-3259-44bf-8793-54063d244394 this}
Total elements: 1
item added: ItemEvent{
event=ADDED, item=Apple, member=Member [localhost]:5701-c28a60b7-3259-44bf-8793-54063d244394 this}
Total elements: 2
item added: ItemEvent{
event=ADDED, item=Banana, member=Member [localhost]:5701-c28a60b7-3259-44bf-8793-54063d244394 this}
Total elements: 3
The call with hzFruits.addItemListener(listener, true) tells Hazelcast to provide member information. If set to false, we will just be notified that an entry was added/removed. This helps in avoiding the need to serialize and deserialize the entry to make it accessible to the listener.
Hazelcast – Common Pitfalls & Performance Tips
Hazelcast Queue on single machine
Hazelcast queues are stored on a single member (along with a backup on different machines). This effectively means the queue can hold as many items which can be accommodated on a single machine. So, the queue capacity does not scale by adding more members. Loading more data than what a machine can handle in a queue can cause the machine to crash.
Using Map”s set method instead of put
If we use IMap”s put(key, newValue), Hazelcast returns the oldValue. This means, extra computation and time is spent in deserialization. This also includes more data sent from the network. Instead, if we are not interested in the oldValue, we can use set(key, value) which returns void.
Let’s see how to store and inject references to Hazelcast structures. The following code creates a map of the name “stock” and adds Mango at one place and Apple at another.
//initialize hazelcast instance
HazelcastInstance hazelcast = Hazelcast.newHazelcastInstance();

// create a map
IMap<String, String> hzStockTemp = hazelcast.getMap("stock");
hzStock.put("Mango", "4");

IMap<String, String> hzStockTemp2 = hazelcast.getMap("stock");
hzStock.put("Apple", "3");
However, the problem here is that we are using getMap(“stock”) twice. Although this call seems harmless in a single node environment, it creates slowness in a clustered environment. The function call getMap() involves network round trips to other members of the cluster.
So, it is recommended that we store the reference to the map locally and use the referencing while operating on the map. For example −
// create a map
IMap<String, String> hzStock = hazelcast.getMap("stock");
hzStock.put("Mango", "4");
hzStock.put("Apple", "3");
Hazelcast uses serialized data for object comparison
As we have seen in the earlier examples, it is very critical to note that Hazelcast does not use deserialize objects while comparing keys. So, it does not have access to the code written in our equals/hashCode method. According to Hazelcast, keys are equal if the value to all the attributes of two Java objects is the same.
Use monitoring
In a large-scale distributed system, monitoring plays a very important role. Using REST API and JMX for monitoring is very important for taking proactive measures instead of being reactive.
Homogeneous cluster
Hazelcast assumes all the machines are equal, i.e., all the machines have same resources. But if our cluster contains a less powerful machine, for example, less memory, lesser CPU power, etc., then it can create slowness if the computation happens on that machine. Worst, the weaker machine can run out of resources causing cascading failures. So, it is necessary that Hazelcast members have equal resource power.