couchdb
Khóa học miễn phí CouchDB – Installation nhận dự án làm có lương
CouchDB – Installation
This chapter teaches you how to install CouchDB in windows as well as Linux systems.
Installing CouchDB in Windows
Download CouchDB
The official website for CouchDB is . If you click the given link, you can get the home page of the CouchDB official website as shown below.

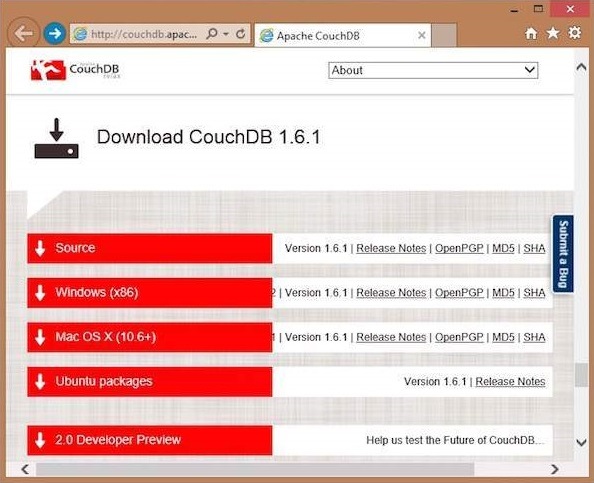
If you click on the download button that will lead to a page where download links of CouchDB in various formats are provided. The following snapshot illustrates the same.

Choose the download link for windows systems and select one of the provided mirrors to start your download.
Installing CouchDB
CouchDB will be downloaded to your system in the form of setup file named setup-couchdb-1.6.1_R16B02.exe. Run the setup file and proceed with the
installation.
After installation, open built-in web interface of CouchDB by visiting the following
link: http://127.0.0.1:5984/. If everything goes fine, this will give you a web page, which have the following output.
{
   "couchdb":"Welcome","uuid":"c8d48ac61bb497f4692b346e0f400d60",
   "version":"1.6.1",
   "vendor":{
      "version":"1.6.1","name":"The Apache Software Foundation"
   }
}
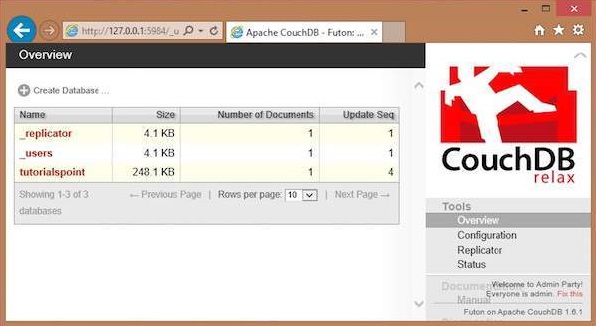
You can interact with the CouchDB web interface by using the following url −
http://127.0.0.1:5984/_utils/
This shows you the index page of Futon, which is the web interface of CouchDB.

Installing CouchDB in Linux Systems
For many of the Linux flavored systems, they provide CouchDB internally. To install this CouchDB follow the instructions.
On Ubuntu and Debian you can use −
sudo aptitude install couchdb
On Gentoo Linux there is a CouchDB ebuild available −
sudo emerge couchdb
If your Linux system does not have CouchDB, follow the next section to install CouchDB and its dependencies.
Installing CouchDB Dependencies
Following is the list of dependencies that are to be installed to get CouchDB in your system−
- Erlang OTP
- ICU
- OpenSSL
- Mozilla SpiderMonkey
- GNU Make
- GNU Compiler Collection
- libcurl
- help2man
- Python for docs
- Python Sphinx
To install these dependencies, type the following commands in the terminal. Here we are using Centos 6.5 and the following commands will install the required softwares compatible to Centos 6.5.
$sudo yum install autoconf
$sudo yum install autoconf-archive
$sudo yum install automake
$sudo yum install curl-devel
$sudo yum install erlang-asn1
$sudo yum install erlang-erts
$sudo yum install erlang-eunit
$sudo yum install erlang-os_mon
$sudo yum install erlang-xmerl
$sudo yum install help2man
$sudo yum install js-devel
$sudo yum install libicu-devel
$sudo yum install libtool
$sudo yum install perl-Test-Harness
Note − For all these commands you need to use sudo. The following procedure converts a normal user to a sudoer.
-
Login as root in admin user
-
Open sudo file using the following command −
visudo
- Then edit as shown below to give your existing user the sudoer privileges −
Hadoop All=(All) All , and press esc : x to write the changes to the file.
After downloading all the dependencies in your system, download CouchDB following the given instructions.
Downloading CouchDB
Apache software foundation will not provide the complete .tar file for CouchDB,
so you have to install it from the source.
Create a new directory to install CouchDB, browse to such created directory and download CouchDB source by executing the following commands −
$ cd
$ mkdir CouchDB
$ cd CouchDB/
$ wget
http://www.google.com/url?q=http%3A%2F%2Fwww.apache.org%2Fdist%2Fcouchdb%2Fsource%2F1.6.1%2Fapache-couchdb-1.6.1.tar.gz
This will download CouchDB source file into your system. Now unzip the apache-couchdb-1.6.1.tar.gz as shown below.
$ tar zxvf apache-couchdb-1.6.1.tar.gz
Configuring CouchDB
To configure CouchDB, do the following −
- Browse to the home folder of CouchDB.
- Login as superuser.
- Configure using ./configure prompt as shown below −
$ cd apache-couchdb-1.6.1
$ su
Password:
# ./configure --with-erlang=/usr/lib64/erlang/usr/include/
It gives you the following output similar to that shown below with a concluding
line saying − You have configured Apache CouchDB, time to relax.
# ./configure --with-erlang=/usr/lib64/erlang/usr/include/

checking for a BSD-compatible install... /usr/bin/install -c
checking whether build environment is sane... yes
checking for a thread-safe mkdir -p... /bin/mkdir -p
checking for gawk... gawk
checking whether make sets $(MAKE)... yes
checking how to create a ustar tar archive... gnutar
………………………………………………………..
……………………….
config.status: creating var/Makefile
config.status: creating config.h
config.status: config.h is unchanged
config.status: creating src/snappy/google-snappy/config.h
config.status: src/snappy/google-snappy/config.h is unchanged
config.status: executing depfiles commands
config.status: executing libtool commands

You have configured Apache CouchDB, time to relax.

Run `make && sudo make install'' to install.
Installing CouchDB
Now type the following command to install CouchDB in your system.
# make && sudo make install
It installs CouchDB in your system with a concluding line saying − You have installed Apache CouchDB, time to relax.
Starting CouchDB
To start CouchDB, browse to the CouchDB home folder and use the following command −
$ cd apache-couchdb-1.6.1
$ cd etc
$ couchdb start
It starts CouchDB giving the following output: −
Apache CouchDB 1.6.1 (LogLevel=info) is starting.
Apache CouchDB has started. Time to relax.
[info] [lt;0.31.0gt;] Apache CouchDB has started on http://127.0.0.1:5984/
[info] [lt;0.112.0gt;] 127.0.0.1 - - GET / 200
[info] [lt;0.112.0gt;] 127.0.0.1 - - GET /favicon.ico 200
Verification
Since CouchDB is a web interface, try to type the following homepage url in the browser.
http://127.0.0.1:5984/
It produces the following output −
{
   "couchdb":"Welcome",
   "uuid":"8f0d59acd0e179f5e9f0075fa1f5e804",
   "version":"1.6.1",
   "vendor":{
      "name":"The Apache Software Foundation",
      "version":"1.6.1"
   }
}
Khóa học lập trình tại Toidayhoc vừa học vừa làm dự án vừa nhận lương: Khóa học lập trình nhận lương tại trung tâm Toidayhoc
Notice: Trying to access array offset on value of type bool in /home/edua/htdocs/edu.toidayhoc.com/wp-content/themes/flatsome/flatsome/inc/shortcodes/share_follow.php on line 41
